If you’re a frequent user of WordPress, you’re probably familiar with child themes. If you’re new to WordPress, or if you haven’t used child themes before, this post is for you!
In this article, we’ll explain the purpose of child themes and how to quickly create your own.
What Are Child Themes?
A child theme lets you make changes to your WordPress theme and keep them separate from your regular (“parent”) theme. They’re useful for a number of reasons, but above all, because they let you keep your theme up-to-date without erasing your modifications in the process.
Simply put:
- A parent theme is your regular WordPress theme. For example, Astra.
- A child theme is a copy of that parent theme that helps keep modifications and updates separate from it.
Why Should You Use a Child Theme?
There are a number of good reasons to use a child theme:
- It protects your main theme against mistakes. If you make a modification to your theme and break your site in the process, it’s easy to fix. Simply delete the child theme file and copy a new one from the parent theme. If you modified the parent theme directly, it will take much more time and effort to fix it.
- It keeps your customizations separate. It is always a good practice to keep any additions or modifications separate from the original file, as it makes it easier to see and adjust changes. Most WordPress themes have a designated “custom CSS” section for precisely this reason.
- Your changes won’t be wiped out if the theme is updated. Keeping your theme up-to-date is essential for security purposes. But if you make changes to your parent theme, they could be wiped out after any updates. The solution? Use a child theme. Child themes will remain the same, even if you update the parent theme.
Step-by-Step Guide to Creating a Child Theme
For this walkthrough, we’ll be using our theme, Astra. No matter which theme you’re using, the process should be mostly the same.
There are three ways to create a child theme:
- By using our Astra Child Theme Generator
- By installing a child theme plugin
- By manually creating files and folders in your WordPress directory
Method 1: Use the Astra Child Theme Generator
Here at Astra, we have a powerful tool that lets you create a child theme for our Astra theme. The Astra Child Theme Generator lets you create a child theme with a simple click of a button.
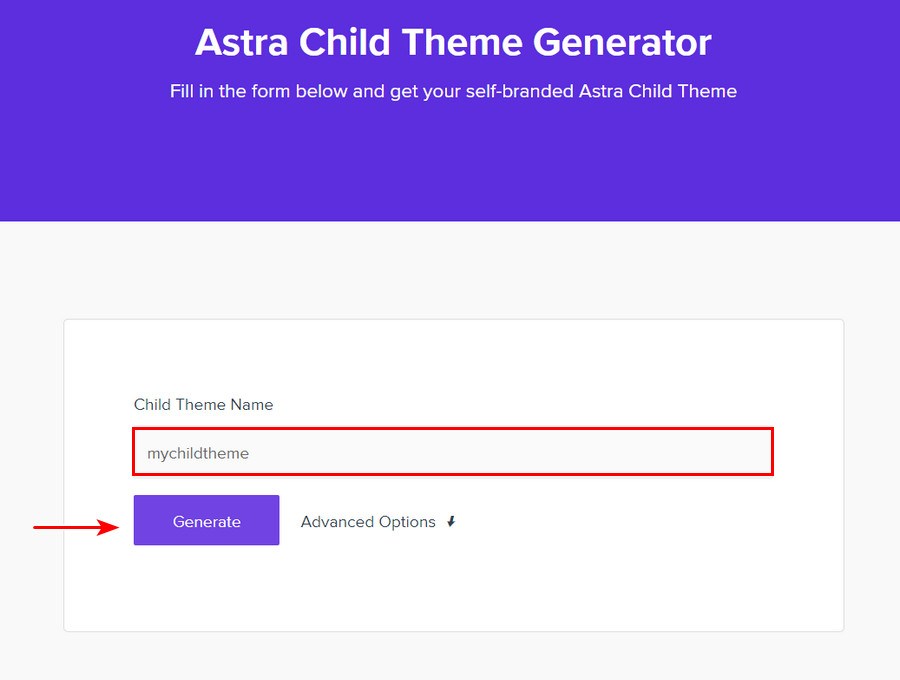
To use the generator, go to this link and fill out the form. If you click “Advanced Options,”, you can add extra details like Author, Description, and Folder Name. You can also add a screenshot if you like.
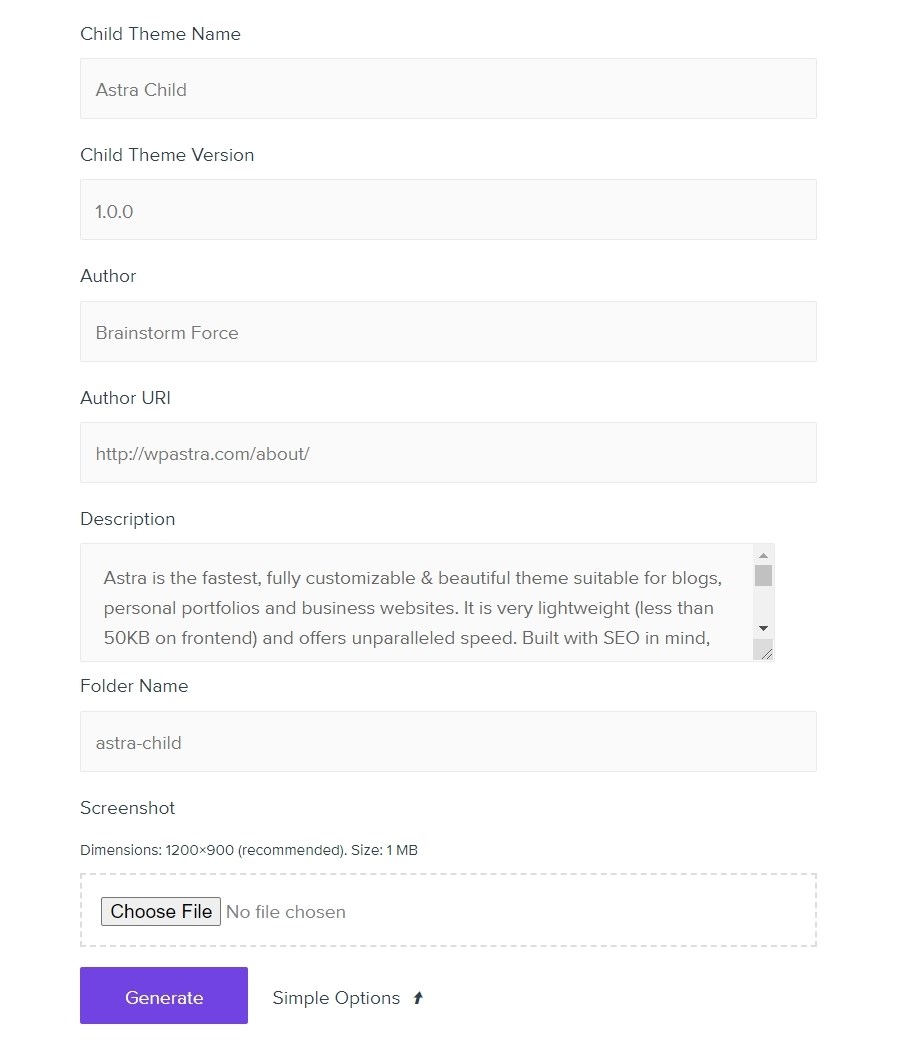
Then, click Generate. The child theme will be downloaded to your computer.
You can add it to your site just like any other theme: go to Appearance > Themes then click Add New.
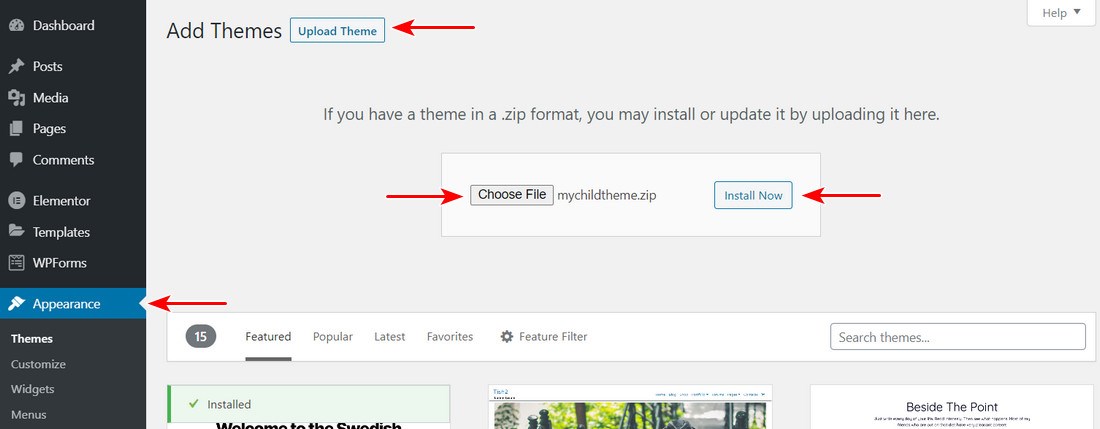
That’s it! You’ve now got a new child theme, which you can edit directly in the Theme Editor.
Method 2: Use a Plugin
There are a number of free plugins available that let you create a child theme. They all function in more-or-less the same manner, although a few have unique features.
Child Theme Configurator

With over 300,000 installations, this plugin is the single most popular child theme plugin available. It has over a dozen options that let you customize your child theme.
Let’s walk through using this plugin to create a child theme.
1. Download the plugin from this link and upload it to your WordPress website.
2. After activating the plugin, go to Tools > Child Themes to use the plugin.
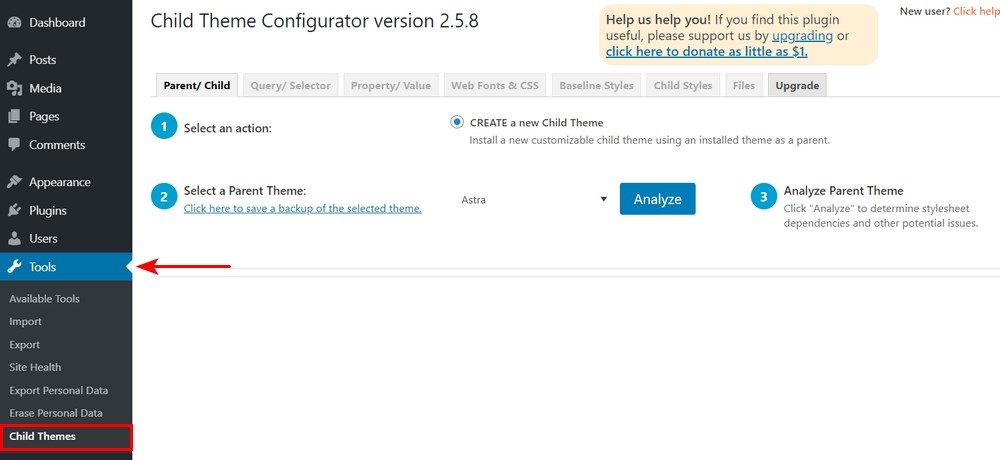
3. On the first tab, you’ll see a wizard for creating a Child Theme. Select your Parent theme, then click the Analyze button to have the plugin evaluate it.

If your theme is suitable (as the Astra theme is), you’ll receive a confirmation message.
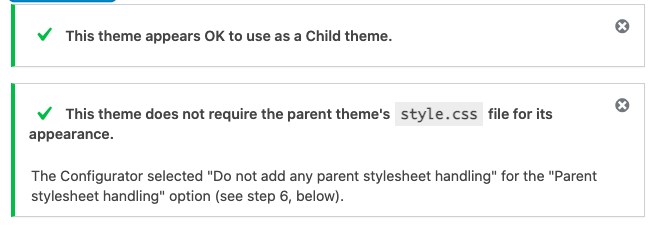
Below the confirmation message are a number of settings. First, name the theme directory. Note that this is the name of the folder, not the name of the theme itself.

Then, choose where to save the styles. You can use the default style.css file or save it in a separate stylesheet.

On the next step, choose how the Parent Theme stylesheet will be accessed. Read the Enqueue the Stylesheet section below for more information on this process.

Open the theme attributes panel by clicking on the button. Here, you can add the child theme’s name, website, author, and author website.
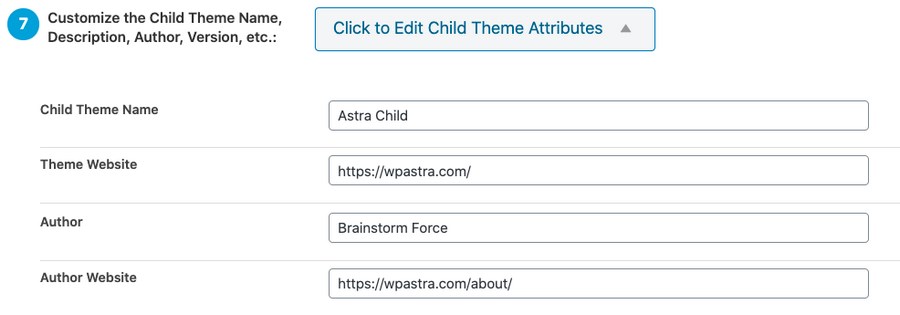
On the last step, you can copy menus, widgets, and other settings from your parent theme to the child theme.

Finally, click the button to create your new Child Theme. Voila!

Other Plugins
These other plugins operate in a similar fashion.
Child Theme Wizard: This plugin has a “wizard” that walks you through the process, step-by-step.
Generate Child Theme: This is a standard plugin for creating a child theme. It is simpler and has less features than other options, which allows you to create the child theme more quickly.
Childify Me: Another solid plugin with a few different customization options.
Child Theme Creator by Orbisius: Another popular plugin, with over 30,000 installs.
Child Theme Generator: A simple but highly-rated plugin.
Method 3: Create a Child Theme Manually
If you’d rather create a child theme yourself, you can do that too!
Step 1: Access Your Site Via FTP/SFTP, SSH, or the File Browser in cPanel
First, you’ll need to connect to your site so you can upload a few files. The easiest way to do this is via FileZilla (FTP/SFTP), Putty (SSH) or the file browser in your host’s control panel (cPanel or Plesk)
Not sure of how to do that? Read one of the guides below.
- To access your site via FTP/SFTP, read this guide.
- To access your site via SSH, read this guide.
- To access your site via the File Manager in your control panel with cPanel, read this guide.
- To access your site via the File Manager in your control panel with Plesk, read this guide.
Once you’ve logged into the site, go to the /wp-content folder. Then, go to /themes.
There, create a folder for the child theme and call it astra-child. The first part of the name should be the parent theme name, followed by a dash and the word child.
Step 2: Create the Style.css File
Now we need to create a style.css file to contain your CSS code. CSS, which stands for Cascading Style Sheets, is the style sheet language used to design elements on websites.
If you are totally unfamiliar with CSS, check out some of these beginner guides:
Already comfortable using CSS? Open your favorite text editor, create a new file, and save it as style.css.
Then, copy and paste the text below. Be sure to change the content to match your own website or company name.
/*
 Theme Name:   Astra Child
 Theme URI:	http://example.com/astra-child
 Description:  Astra Child Theme is an awesome theme.
 Author:   	Brainstorm Force
 Author URI:   https://www.wpastra.com
 Template: 	astra
 Version:  	1.0.0
 License:  	GNU General Public License v2 or later
 License URI:  http://www.gnu.org/licenses/gpl-2.0.html
 Tags:     	astra
 Text Domain:  astrachild
*/
Then, add the file to the astra-child folder of your site via FTP/SFTP, SSH, or the cPanel/Plesk file manager.
Step 3: Enqueue the Stylesheet
Now we need to add a short line of code that connects the parent theme to the child theme.
There are two ways to do this; the first is easy but inefficient, while the second takes longer but is recommended by WordPress.
Method 1
This first method is considered outdated as it increases the amount of time that it takes to load the stylesheet. However, it is much simpler to do and if your site is not particularly large, there is very little practical downside.
This is especially true if you are only making a small number of edits in the child theme.
Simply add the following code to the bottom of your style.css file:
@import url(“../astra/style.css");Method 2
The second method is recommended by WordPress.org, but requires a little more technical knowledge. It is the preferred method, especially if you have a larger site and are trying to optimize for page load time.
In your WordPress admin sidebar, go to Appearance > Theme Editor.
Select your child theme and find the functions.php file. If you do not have one, create it.
The first line of this file should be an opening PHP tag (<?php), followed by the code below:
add_action( 'wp_enqueue_scripts', 'my_theme_enqueue_styles' );
function my_theme_enqueue_styles() {
    wp_enqueue_style( ' astra-child', get_stylesheet_uri(),
        array( astra ),
        wp_get_theme()->get('Version') // this only works if you have Version in the style header
    );
}
Be sure to replace astra-child with your own child theme name and array(astra) with the parent theme slug.
Note that unlike the style.css file (or any other file), the child theme version of functions.php doesn’t overwrite the parent theme’s file. Rather, it simply adds the child file’s code to the parent file. As such, you don’t need to copy the entire file from the parent theme.
Step 4: Activate the Theme
Once you’ve uploaded the theme, open your WordPress admin panel and go to Appearance > Themes. Your theme should now be listed. Activate it.
Since we haven’t added any new code yet, the child theme will be exactly the same as its parent theme.
Step 5: Add Customizations
Now, let’s add some customizations. To do this, you will need to be familiar with HTML and CSS. If you aren’t, check out our links above.
The easiest way to make a specific change to your website’s theme is with the inspector tool in your browser. In most browsers, including Google Chrome, Mozilla Firefox, and Apple Safari, you can do this by right clicking on an element. When you do this, a developer panel will appear on the side of your browser window.
For example, right click on the top heading, then select Inspect. This will bring up the developer sidebar.
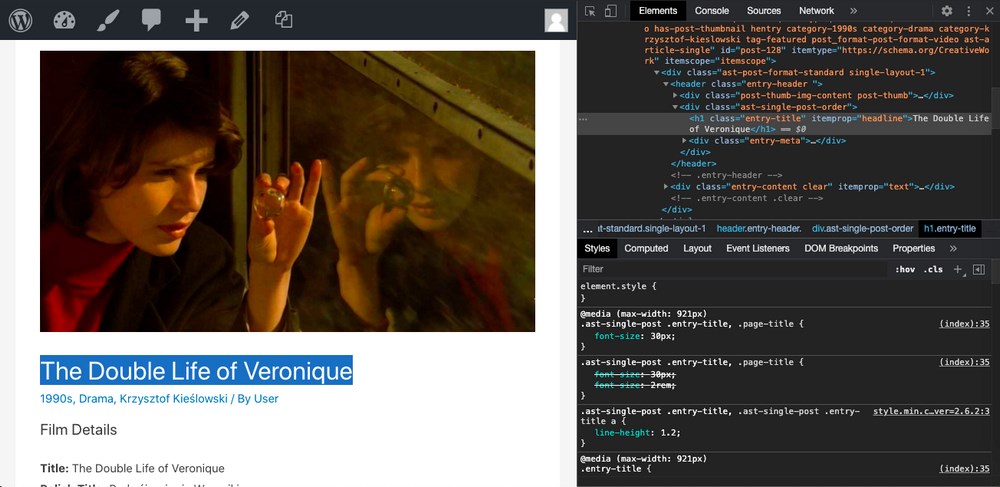
Since we specifically inspected the heading, you can see the <h1> HTML tag displayed. Since we want to modify this header (and all headers), we want to target the H1 element.
To do this, go to Appearance > Edit Themes. On the right hand side, select your child theme. Then, add the following code to the style.css file.
h1 { color: blue; }Save the file and go back to the page on your site. The heading title should now be blue.

Nice job! You’ve created a child theme. Any time you want to make modifications to your theme, add them to this style.css file — and not the style.css file of your parent theme.
You can also upload the modified file directly via FTP/SFTP, SSH, or the File Manager.
Other WordPress Theming Tips
How to Change Other Files in Your Theme
Every WordPress theme (including our Astra theme) is composed of several .php files. These include comments.php, header.php, body.php, footer.php, and so on.
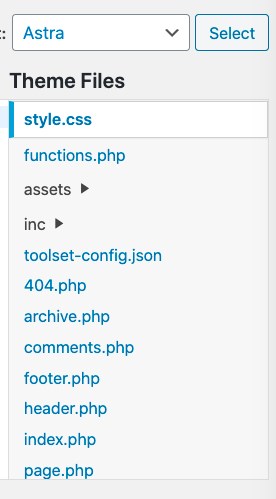
These files are called “template” files and shouldn’t be modified directly, for the same reason you shouldn’t modify style.css. If you want to change any of them, you can follow a similar process that we did above.
For this example, we will use the header.php file.
Open the file and copy the entire contents. Then, paste those contents into a new text file on your computer. Make any modifications to it, being sure to not change anything else.
When you’re done, save it as header.php and upload it to the child theme folder via FTP/SFTP, SSH, or File Manager.
To make modifications in the future, either edit it directly in the WordPress editor (by going to Theme Editor) or re-upload the updated file.
Functions.php
We can also do something similar for functions.php, the file that controls many of the processes on your site. Unlike the style.css file (or any other file), the child theme version of functions.php doesn’t overwrite the parent theme’s file.
Rather, it simply adds the child file’s code to the parent file.
- First, open the functions.php file in your theme.
- Copy all of the text, then paste it into a new text document.
- Make any changes, then save it as functions.php.
- Finally, upload the file to the same child theme folder.
Conclusion
That about sums it up! As a reminder, you should always try to use a child theme when making modifications to a WordPress theme. While it may seem easier to just quickly modify the parent theme, in the long run, you’ll have more issues.
If you’re a subscriber to one of our Astra paid plans, our support team can help you set up a child theme on your WordPress website. Just get in touch with us!
Are you using a child theme? Which method do you use to make changes? Let us know in the comments!
Disclosure: This blog may contain affiliate links. If you make a purchase through one of these links, we may receive a small commission. Read disclosure. Rest assured that we only recommend products that we have personally used and believe will add value to our readers. Thanks for your support!



Plugin method.
Thanks🌹
My website header uses the Child Astra theme. I want to add a title to the header (the name of the website). However when I go on the “Header Builder” I get three fields but none allows me to type the title in. How do I do this? Thanks