Are you a real estate agent? Do you run a real estate agency? Wondering how to create a full-fledged real estate website on your own? Well you’re in the right place!
For many, buying a home is a lifetime dream. They invest all their savings into buying their dream home. There’s a lot of emotions attached to it.
In such cases, they would like to associate themselves with someone they can trust. Someone who can help them in the process of finding their dream home. Are you their trusted realtor?
Your real estate website has to be designed to build that trust!
The key ingredients in building a successful real estate website are,
- Allowing prospects to view your property listings, photos and walkthroughs
- Showing prospects the exact location of the property using maps
- Educating prospects on the neighbourhood around the property
- And most importantly, getting yourself out there and establishing a connection with your prospect even before your first rendezvous
In this article, we’ll walk you through, step-by-step on how to build a real estate website using Astra and Toolset. A website that will help you convert prospects into sales and one that you will be proud of!
And the best bit, you don’t need to have any technical knowledge whatsoever!
- Do It Yourself or Hire a Professional?
- Why build a real estate website with WordPress?
- Benefits of Creating a Real Estate Website
- What you need to create a WordPress real estate website
- Best tools for optimizing and enhancing a real estate website
- How to build a real estate website with WordPress
- Conclusion
Do It Yourself or Hire a Professional?
What are your initial thoughts when you think about creating your own real estate website?
It could be…
- Do we hire a professional website developer?
- How much is it going to cost?
- How long is it going to take?
Do you ever consider you might be able to do it yourself? It isn’t as difficult as you might think!
With WordPress, the Astra theme and Toolset, you could have a working website up and running in hours. Yes, really!
You don’t have to depend on a website developer to create a website. You needn’t be technically skilled to create and manage it either. With basic computer skills and a little time and effort, you can create amazing websites!
Why build a real estate website with WordPress?
Creating real estate websites can also be pretty expensive. Market estimates indicate the cost of having a developer create a real estate website could start anywhere from $4,000 for basic listing sites, all the way to $30,000 for more complex sites.
If you did it yourself, it could cost as little as buying a domain name and hosting. You could spend more on a premium WordPress theme like Astra and powerful WordPress plugins, but even then, that’s a significant saving over having a developer do it.
With WordPress, you can have a fully functioning website up and running in under ten minutes. To see how, check out our beginners guide on how to create a WordPress website.
Once you’ve created a basic website using WordPress, you can enhance it with a full-fledged real estate listing website using a plugin called Toolset.
Toolset is an all-in-one WordPress plugin that provides all the tools you could need to build advanced websites. for managing custom content in WordPress. It allows you to create custom content, custom taxonomy, custom post types and custom fields.
Using Toolset, you can build advanced WordPress websites without writing a single line of code.
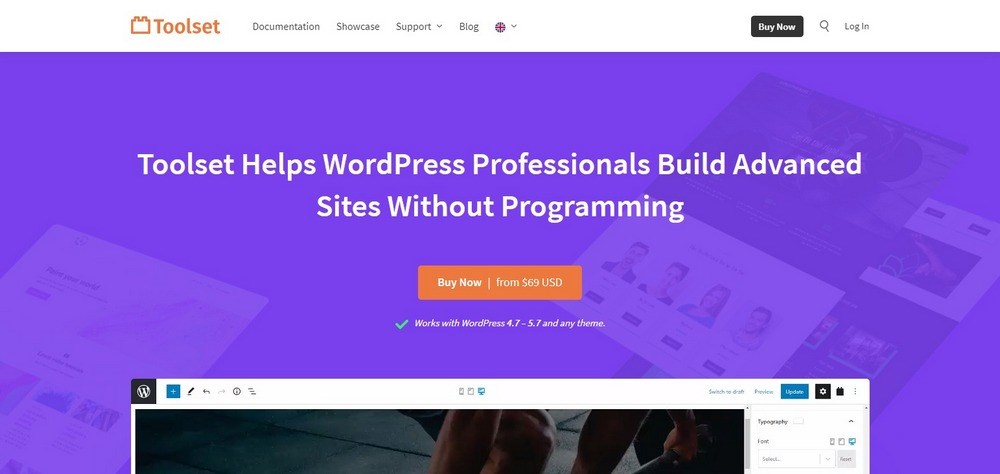
Toolset includes the elements you’d typically see in a real estate website, such as property search, property submission forms, Google maps integration, agent assigned properties and a whole lot more.
Using our Astra Pro theme and Toolset single site license, you could create a full-fledged real estate website for around $100. Now that’s cheap for a fully operational website!
Whether you are a real estate agent, an agency, or a developer creating a real estate website for your clients, this is a considerable saving.
Towards the end of this article, we’ve included a detailed tutorial on creating custom real estate sites with Toolset to help you set one up.
Benefits of Creating a Real Estate Website
Before diving into the actual process of creating a real estate website, let’s step back a bit and ask an all-important question.
- As an agent (or an agency), do we need a real estate website?
- And what are the benefits of having one?
Ok, that’s two questions!
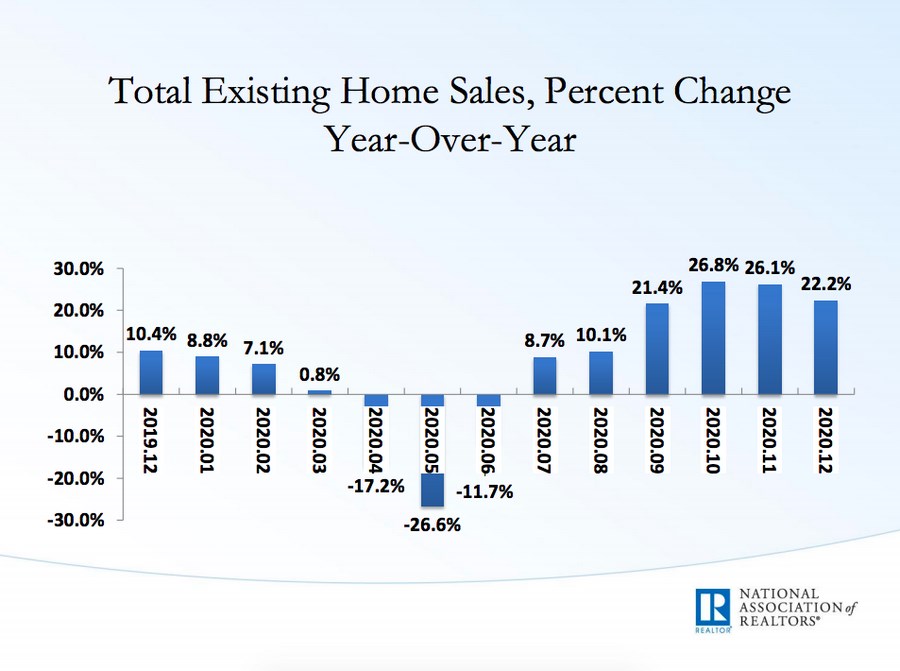
According to NAR (National Association of Realtors), there’s been an understandable decrease in the number of houses sold since the beginning of the pandemic.
(Source: NAR)
The good news is that real estate is now being sold faster. With more and more property owners willing to offer discounts and buyers wanting to cash in on the best prices, the real estate market sees an upward trend.
Going by the NAR report that 52% of home buyers start looking for the best deals on the web, it’s imperative to maximize your marketing strategies and include a professional real estate website as one of your top selling tools.
You’ll probably agree that today’s home buyers are well educated even before contacting an agent. From the actual home buying process to the prerequisites and checklists before purchasing a home, documentation, and more, your home buyer is well informed.
So why not be the Wikipedia of your local market?
In addition to showcasing the best listings in town that include great visuals and walkthroughs, have local information such as the best schools, hospitals, restaurants, malls, and so on.
Also create a lead magnet, for e.g., an ebook on the best properties in your location under $$$$$ or offer a free evaluation of their property. We’re sure you can come up with lots of other ideas.
Not only are you educating home buyers, but you are also building authority for yourself. And in the process, you are converting a casual visitor on your website into a prospect.
Creating a real estate website is easier than you thought. Whether you’re a rookie or a sales mogul, this article will help you elevate your real estate business to the next level without ever needing to write a single line of code.
And as far as the second question is concerned, we’ve listed some of the key benefits of having a real estate website,
- Build on your brand
Your website is your online presence. Use it not only to share your property listings but also to provide valuable information and show off your expertise.
Create blogs, educational articles, information related to real estate, market trends, and so on. Become the go-to person for anything that has to do with real estate. Become an authority (influencer) in your industry.
- Open 24/7, 365 Days
Ok, we are not hinting you work round the clock, all year long. But the fact is, when you are online, there are no time zones. Clients can contact you whenever they want.
And the key to ensuring your clients stick to you is by responding at the earliest possible. With the help of automation and chatbots, you can respond to your clients even when you’re asleep.
- Generate more leads
Your real estate website is your online office and should be the first touchpoint where potential clients find you.
Just like in the offline world, when a potential client visits your office, and you collect their details, your real estate website must be set up to capture leads.
Looking for a great plugin to capture leads? Check out our popular Convert Pro plugin.
- Global Audience
There are no restrictions on geographical boundaries when it comes to viewing your website. Thus, you are potentially promoting your property listings and real estate services to a global audience.
- Digital Marketing
Last but not least, use the power of digital marketing to promote your real estate website. From email marketing, search engine optimization (SEO), social media marketing (SMM), paid ads on Google, blogging and other methods, you are opening a whole new dimension to your real estate business.
With the help of cutting-edge technologies, 3D walkthroughs and videos, you can showcase your listings to a prospect from the comfort of their home.
Now, let’s start creating our real estate website.
What you need to create a WordPress real estate website
To create your first real estate website in WordPress you just need a few things, making this a really affordable procedure!
- Hosting (~$50/yr): You’ll need a digital space to host your website. Choose a managed WordPress hosting so the host takes care of basic maintenance.
- Domain (~$12/yr): As long as it’s available you’re free to choose your web address. No more realestate.othercompany.com!
- SSL certificate (free/$): Real estate is a serious business. Even if you don’t handle financial transactions, you’ll need to operate in a secure environment.
- WordPress (free): You can connect your domain to the hosting and install WordPress by following a few simple steps that we have already explained in a previous guide.
- A real estate WordPress theme (free/$): A template focused on your business niche will make things much easier. We have a template for real estate agencies that you can modify to your liking.
A real estate plugin (free/$): If you want to easily integrate property listings into your website, a plugin of this kind is almost mandatory.
Best tools for optimizing and enhancing a real estate website
If you want to upgrade your real estate website there are more things you might want to add to improve the browsing experience of your users.
- Smart contact forms: A smart form that includes the reference of the property users are viewing at that very moment will make it easier to take action.
- Powerful CRM: Helps organize customer details. You may not always remember the Blacksmith family is looking for a 4 bedroom house and has a budget of $200,000.
- Email marketing software: Alert potential buyers of new homes, and price changes, or nurture them step by step to their ideal home.
- Video hosting: Video will increase conversions much more than pictures. It’s better if you use a specific hosting to store this media.
- Video editing software: To create visual content easily, you can use online editors such as Animoto or Invideo.
- Image optimization tools: Real estate websites are image intensive. It will be great for your site and users if you optimize them to speed up the site.
- Virtual tours plugin: Let users take control and visit properties virtually.
- Appointment software: Make it as easy as possible to arrange a physical meeting to visit the properties.
- SEO plugins: Increase the speed and discoverability of your site to attract more customers through search engines.
- Advertisement and social media management tools: A tool like Metricool can support your strategy of attracting customers via social networks or paid advertising.
- Real estate mapping software: For managing and analyzing land and properties there is nothing better than a bird’s eye view of the location.
- Additional real estate plugins: Add much more value to users with a plugin that adds a loan or mortgage calculator or 3D floor plans for example.
Each of these tools can add value to you and your clients and portray you in the best light.
How to build a real estate website with WordPress
Toolset adds the features a real estate website needs and Astra is one of the most popular WordPress themes in the world. Websites built with Astra have a faster load time, better conversion rate, and improved SEO.
Together, Toolset and Astra work seamlessly to help you build amazing real estate websites.
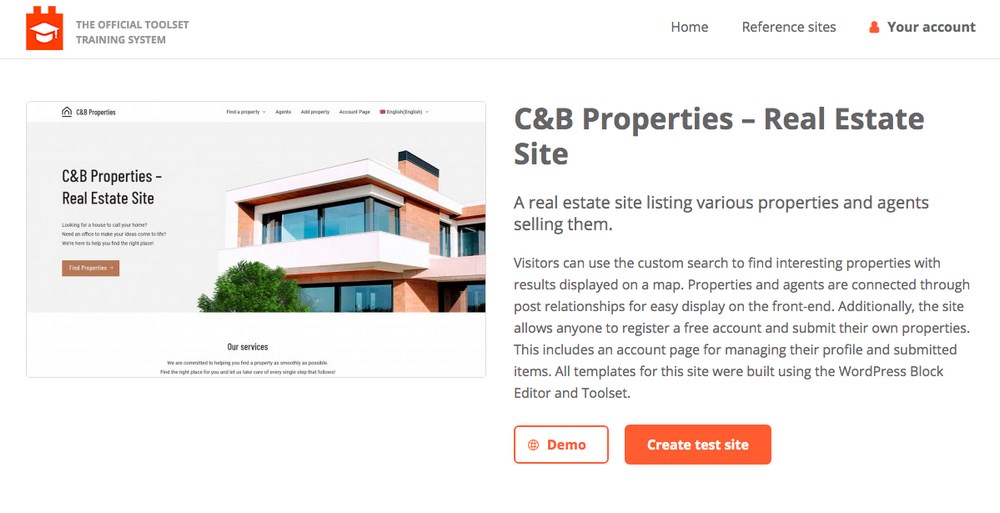
Don’t forget, Toolset’s Discover WP offers an entirely free testing ground where you can create an account and a test site with all Toolset plugins and Astra.
Without further ado, let’s get started with our real estate website. We’ll start by purchasing a domain and hosting. Once that’s done, we’ll install WordPress, Astra, and Toolset.
Step 1: Purchase a Domain and Hosting
Chances are you’ve already decided on a name for your real estate business or will want to use the name you’re using now. If you haven’t purchased a domain name yet, go ahead and purchase one.
While you can decide on a domain extension of your choice, we recommend choosing a .com domain extension. It’s a commonly used and widely recognized domain extension.
The cost of a domain name ranges anywhere from $9 per year. There are several options to choose from.
A few popular domain name registrars are GoDaddy, NameCheap, NameSilo, Google Domains, among many more.
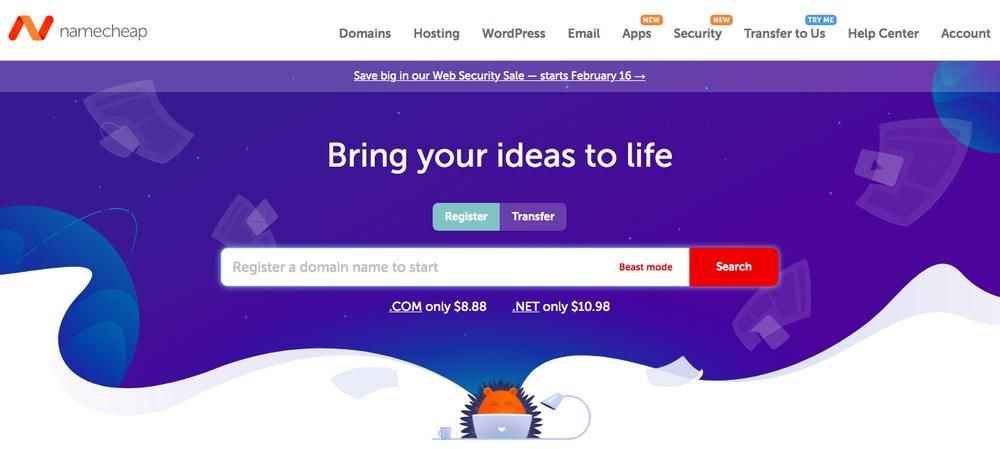
The next step in creating your website is choosing a hosting provider. In some cases, the domain registrars sell their own hosting services too.
You can purchase the domain and hosting from the same service provider. This makes managing both your domain and the hosting a lot easier and setup will be handled for you. In some cases, the hosting service provider offers a free domain for the first year.
There are several options to choose from depending on your needs. Some of them include SiteGround, InMotion, BlueHost, HostGator, Hostinger and GoDaddy.
The hosting provider you select depends on your needs, your location, privacy requirements, scalability, speed, and so on.
We recommend SiteGround. They have fantastic customer support that can help you through every step.
Step 2: Install WordPress
SiteGround makes it really simple to install WordPress in the client dashboard.
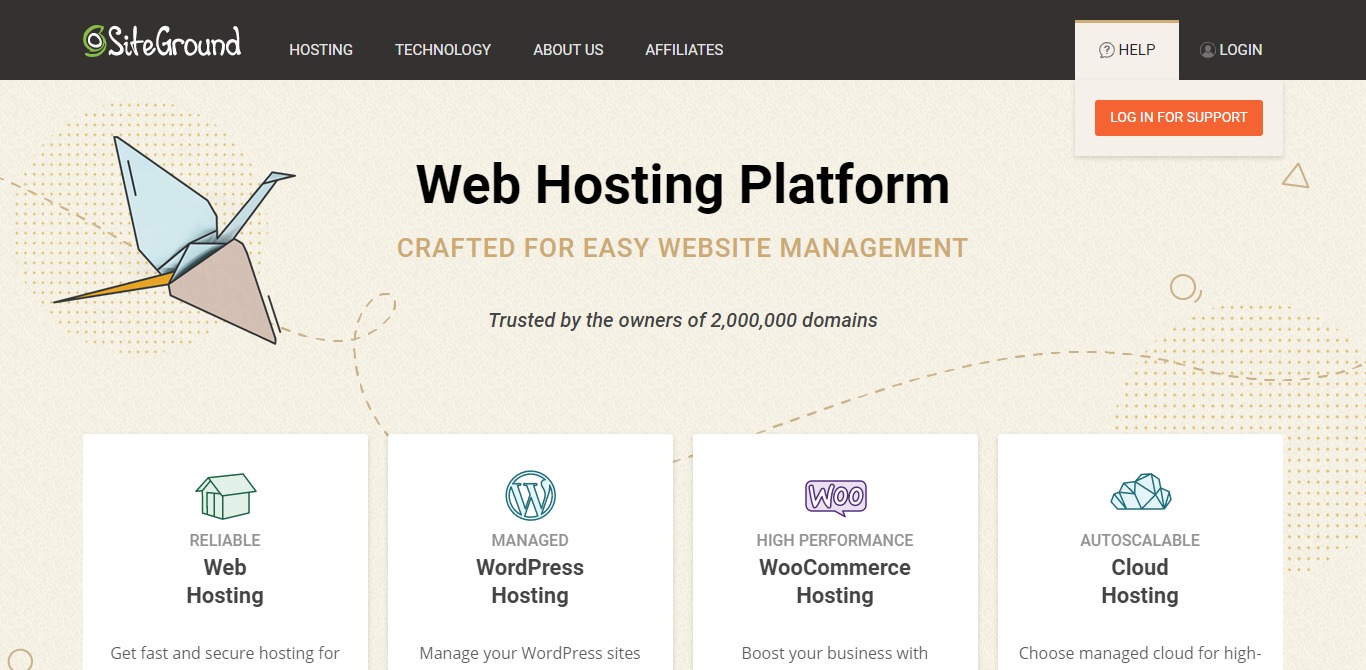
Using the WordPress auto-installer or the WordPress setup wizard, you’ll have your WordPress website installed in just a few clicks.
For a step-by-step tutorial on installing WordPress, check out our beginners’ guide on creating a WordPress website.
Step 3: Install Astra
Now that you’ve installed WordPress, it’s time to install your theme.
The theme controls how the website will look. The fonts, the colors and the layout are all defined within your WordPress theme.
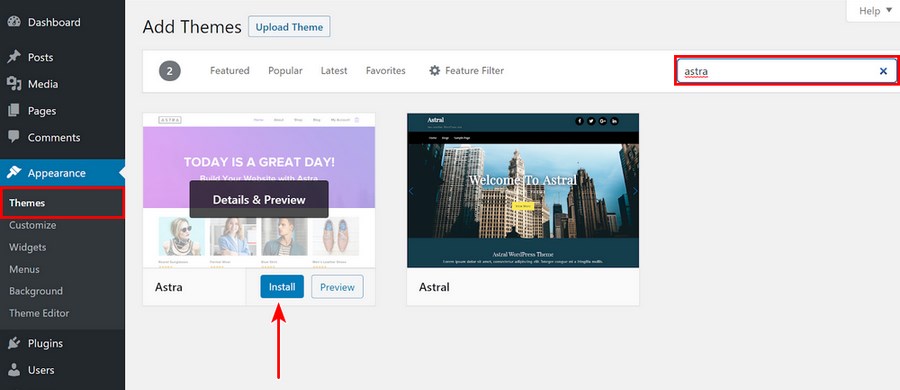
Head over to Appearance > Themes in your WordPress dashboard and install the Astra theme.
Step 4: Install Toolset
To install Toolset, you’ll need to have an account first.
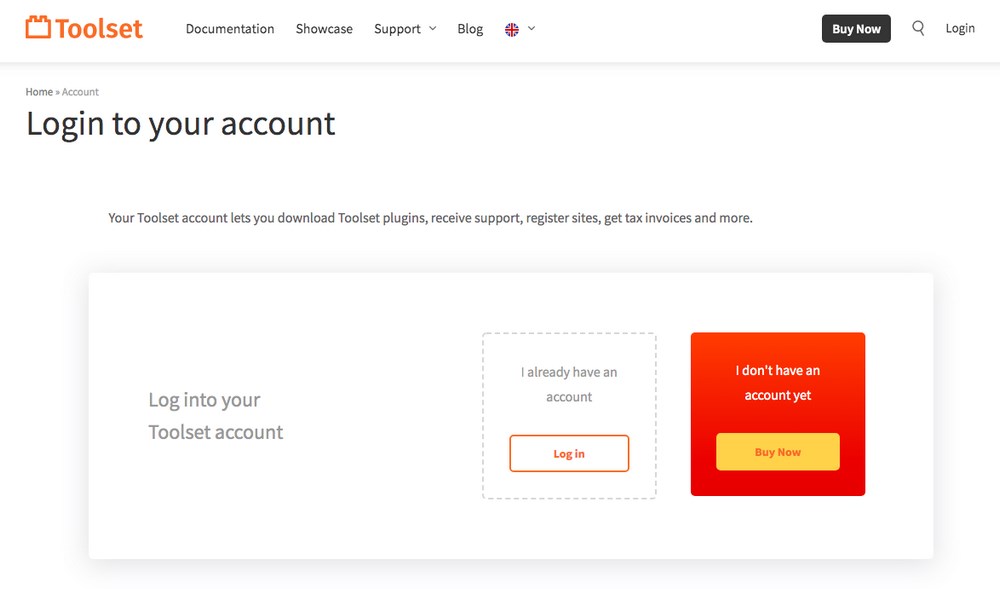
Toolset plugins have their own installation and update mechanism.
To use it, the first step is to install the Toolset Types plugin manually. Once that’s completed, you can automatically add the rest of the Toolset plugins and update them from the WordPress dashboard.
Manually Installing Toolset Types Plugin
1. Head over to the Toolset downloads page in your Toolset account and download the latest Types version.
2. Now, in your WordPress dashboard, go to Plugins > Add New and click on Upload Plugin.

3. Select the Types plugin .zip file you just downloaded.
4. Install and activate the plugin.
Once completed, let’s proceed with the automatic installation of the other Toolset plugins.
Automatic Installation
1. Head over to Plugins > Add new and click on the Commercial tab.
2. Since we’ve already created an account in Toolset, click on Register Toolset.

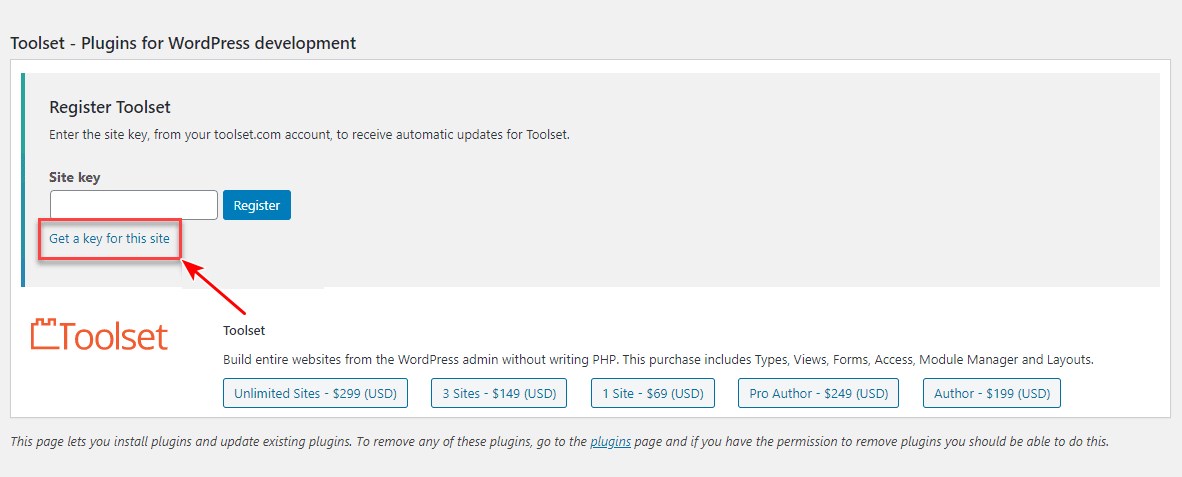
3. Click Get a key for this site to register and receive automatic updates.
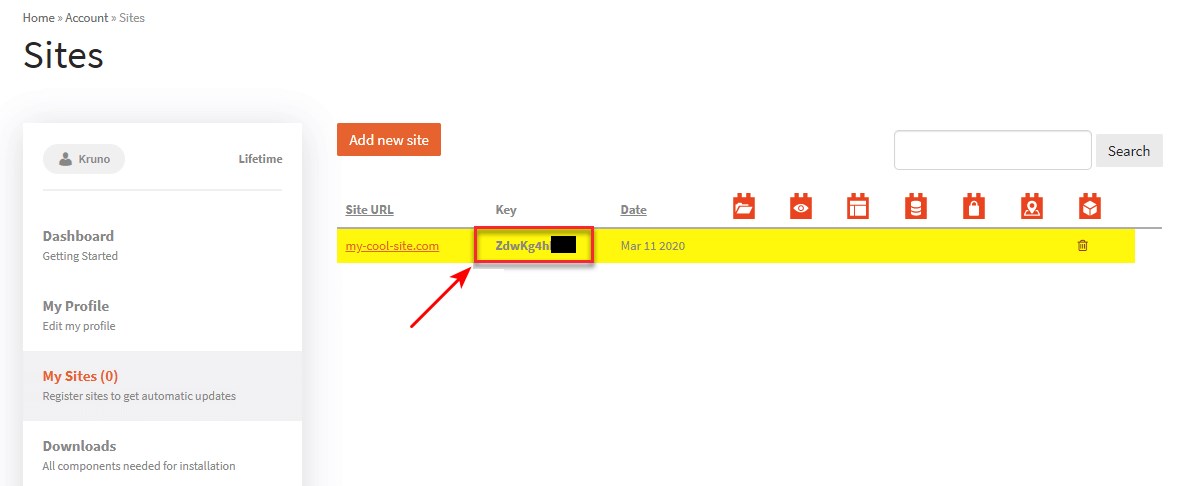
4. From your Toolset account, copy the site key.
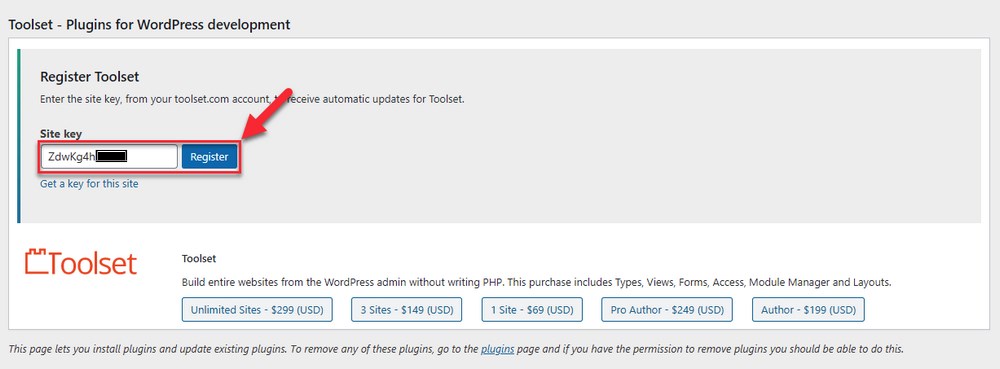
5. Back on your WordPress dashboard, enter the site key.
7. Now that your website is registered, select the Toolset components you wish to download.
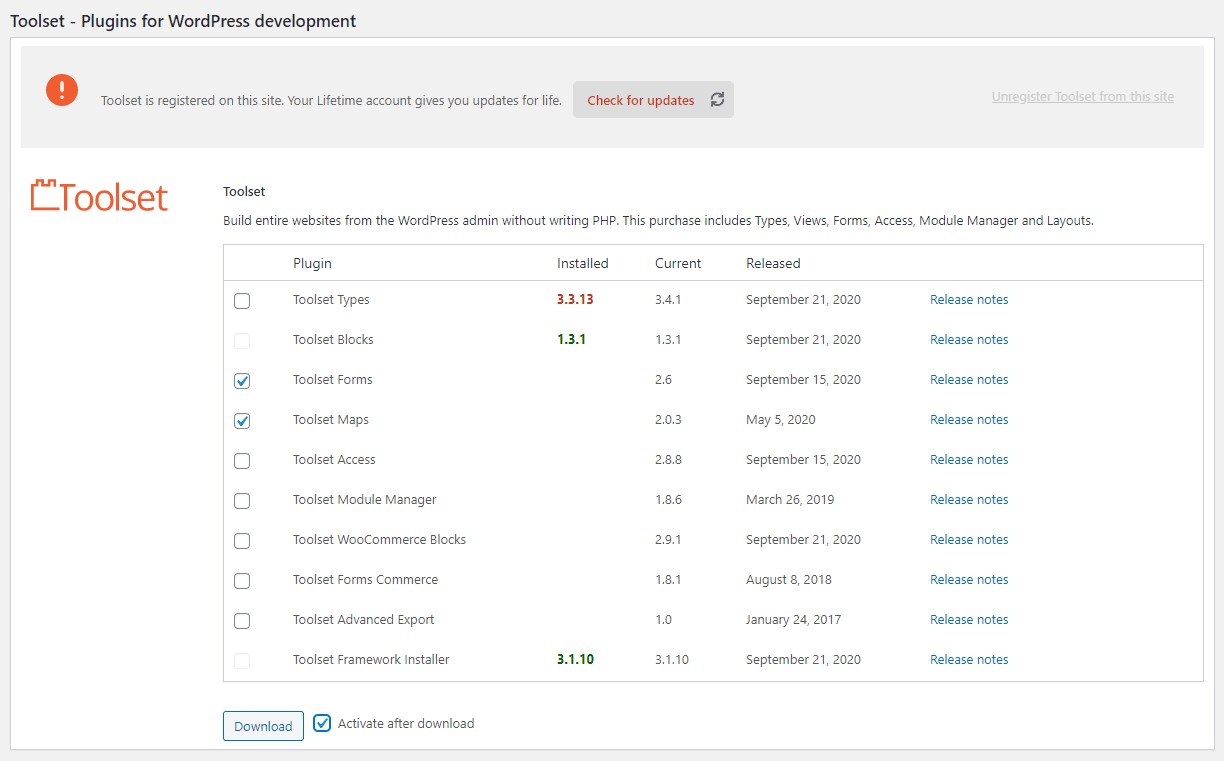
To activate them, simply check the Activate after download box.
And you are done! You now have the Toolset plugin and components all installed on your website.
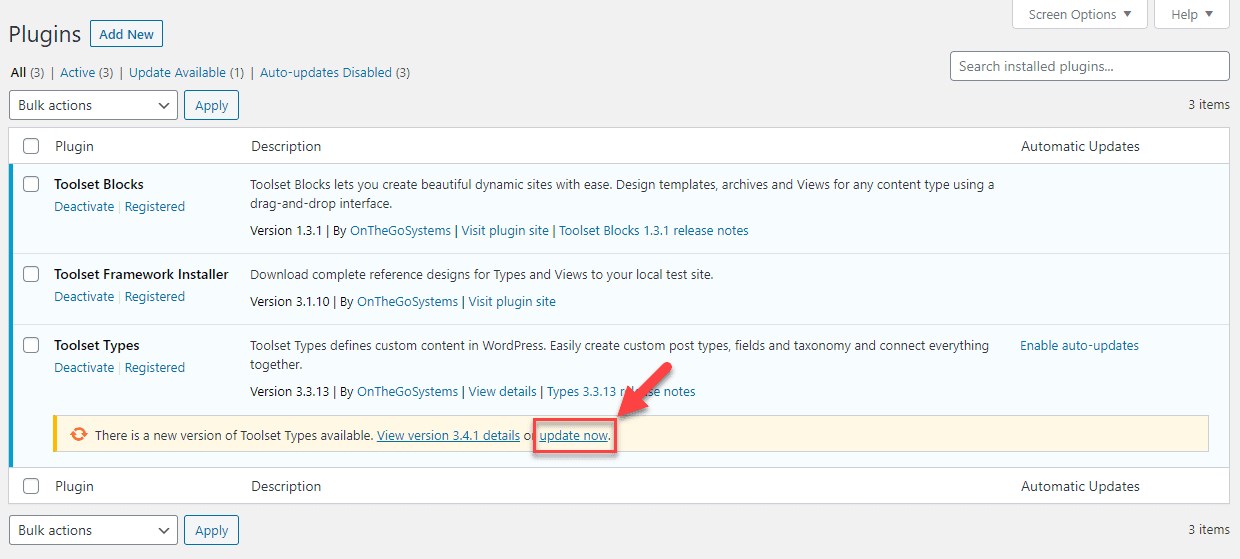
Like any other WordPress plugin, you can update the Toolset components automatically. Just click on the Update now, under Plugins > Installed Plugins.
Step 5: Create A Real Estate Site Using Astra and Toolset
Great! We’ve completed a lot so far but now the real fun begins.
We’ve bought the domain and hosting, installed WordPress, the Astra theme, and the Toolset plugins and components. It’s now time to populate the website with the content, properties, images, and everything you’ll need for your website.
We’ll now show you how to build the following features needed on a real estate website,
- Create custom post types for different properties (condos, apartments, villas) and agents
- Create custom fields to add information such as the number of bedrooms, bathrooms, so on
- Create taxonomies to categorize your properties
- Create templates to display properties
- Create post-relationships to link the estate agents with the properties they promoting
- Create an advanced search for users to find the best properties easily
- Create maps to show the property locations and search results
- Create a form in the front-end for users to submit their property listings
Toolset’s Discover WP offers an entirely free testing ground where you can create an account and a test site with all Toolset plugins and Astra. It includes a working real estate site prototype.
It’s a great way to experiment with colours, layout and options before committing those to your new website. Try it and see what you can create!
We understand working on a new platform can be overwhelming. To make things easier, we recommend you check out the reference sites available in your WordPress dashboard.
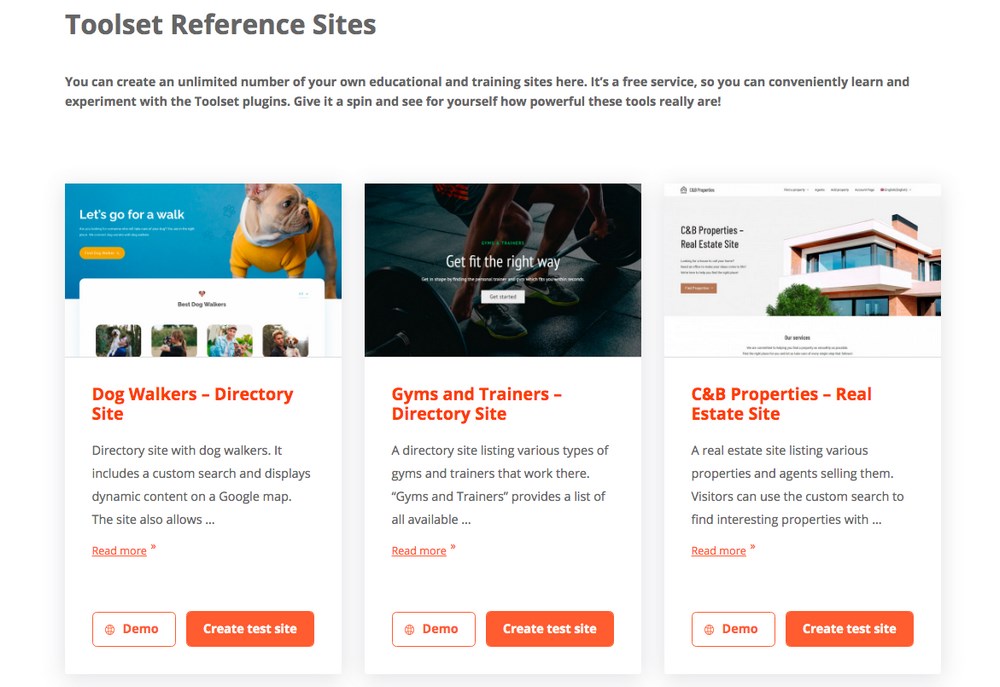
Reference sites are ‘done for you’ websites that you can use to build your website. You can learn and experiment using the Toolset plugins. They are a good launchpad (reference) to learn the various aspects of creating your site.
To access the reference sites, you’ll need to first install the Toolset Framework Installer add-on.
Assuming you have the Toolset Types plugin installed and active, go to Plugins > Add new and select the Commercial tab.
Scroll down to the Toolset – Plugins for WordPress development section.
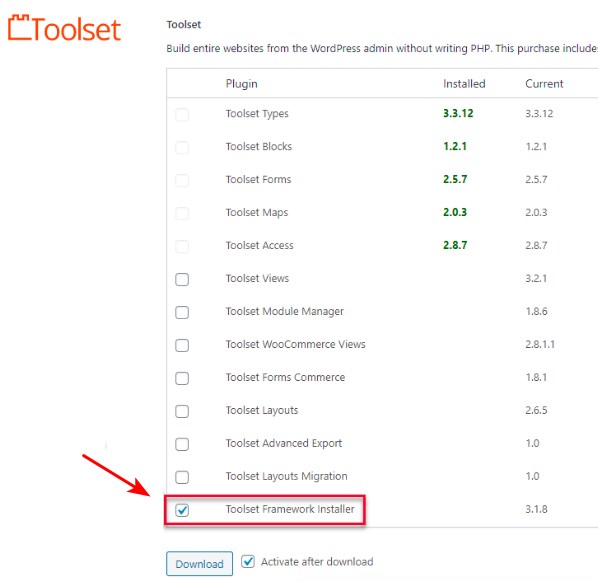
Select Toolset Framework Installer, and ensure the Activate after download option is checked. Then click Download.
Now that the Toolset Framework Installer plugin is installed and activated, head over to Toolset > Reference sites in your WordPress dashboard and select the site you’d like to install.
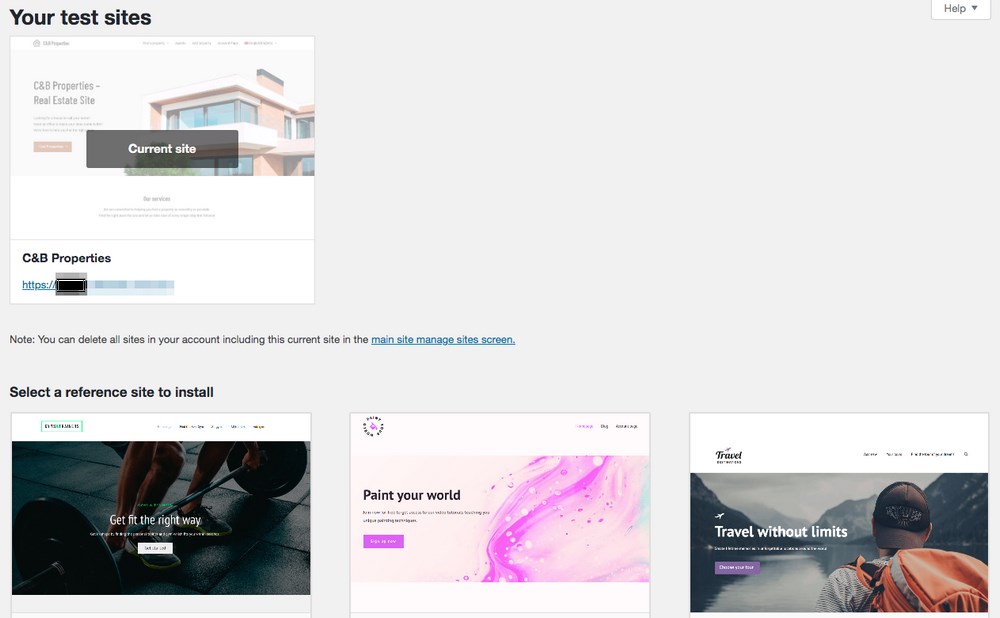
You’ll notice that the reference sites recommend installing a few additional plugins. If these are not already installed, go ahead and install them.
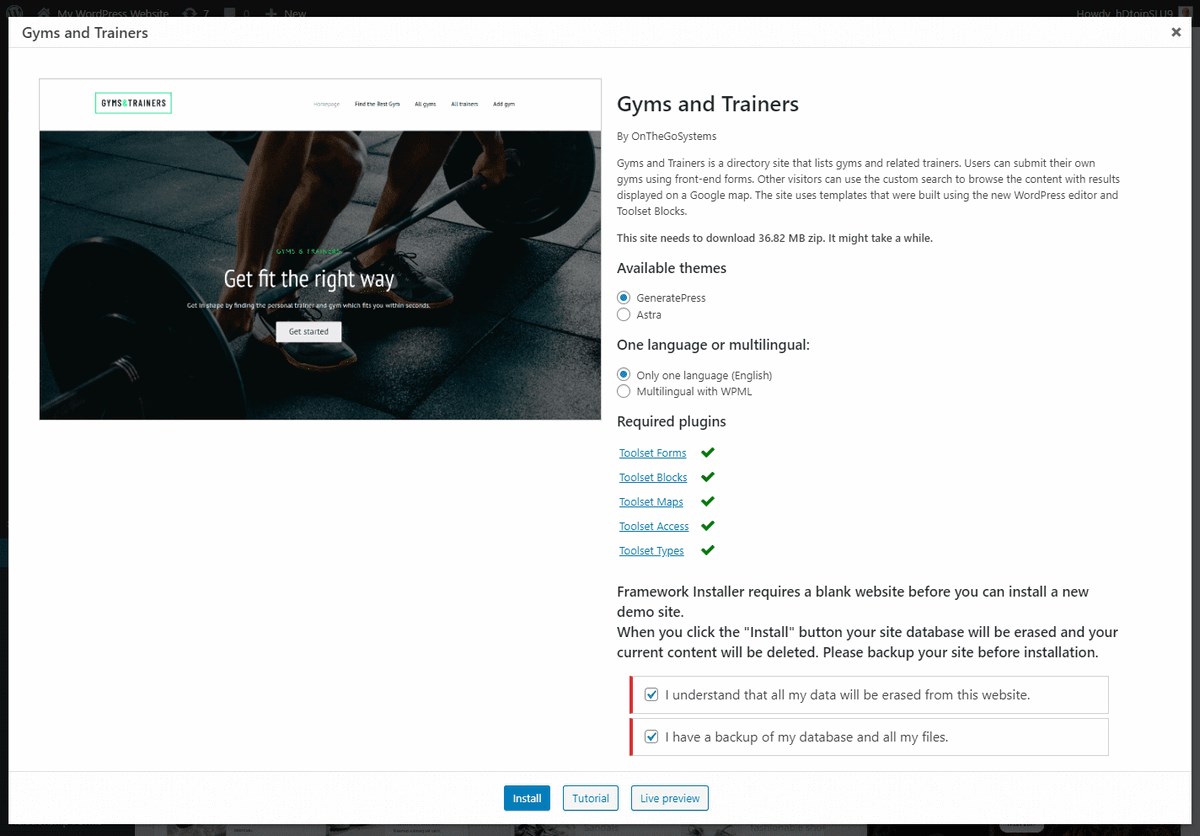
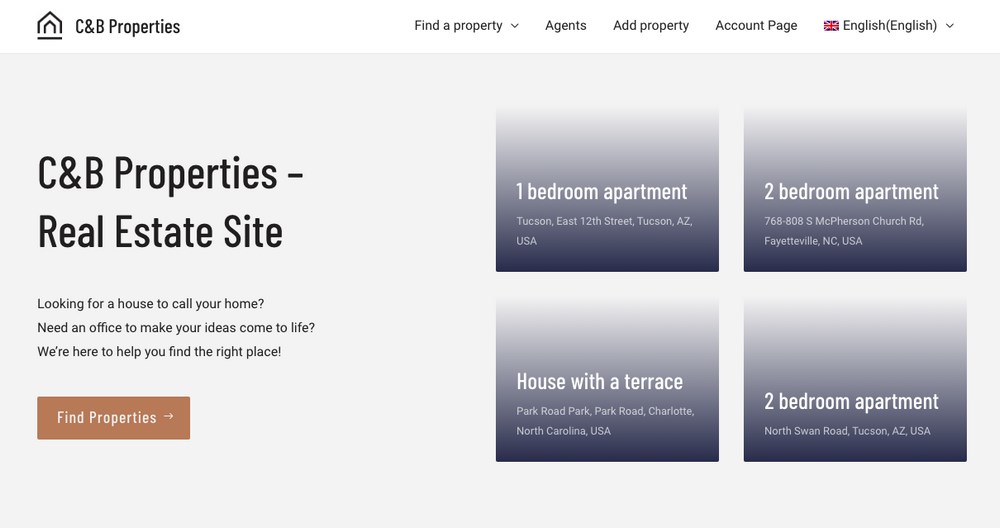
Since we are creating a real estate website, the reference site selected is ‘C&B Properties.’
Ok, let’s get started building our real estate website!
Create Custom Post Type
Do you want to showcase all the apartments or the condos available on your website?
For instance, how about a URL such as ‘https://yourdomain.com/condos‘ to display all the condominiums available in your inventory. Well, simply create a custom post type.
Head to the Toolset Dashboard in your WordPress admin and click on Add new post type.
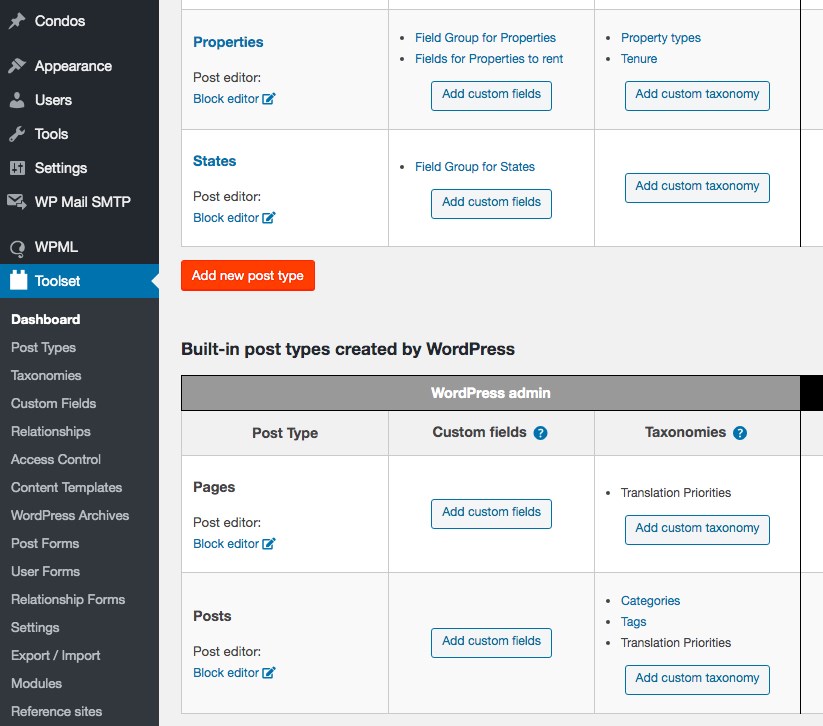
We now have to name our post type. For instance, we’ve named our post type ‘Condos.’
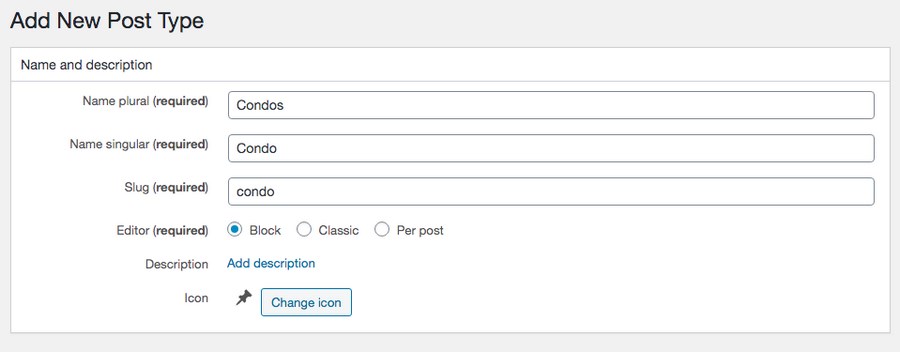
Have the name entered both in singular and in the plural. The slug will be auto-populated.
While most of the other options can be left to their default values, you could scroll down a little if you’d like to add a taxonomy to this post type. We’ll cover taxonomy a little later in this article.

Once you’re done, click on Save Post Type.
And that’s it. You created a custom post type.
Create Custom Fields
After creating a custom post type, we need to add some custom fields.
For instance, in our condos example, wouldn’t you like to add how many bedrooms or bathrooms or balconies your condo has?
This can be accomplished by creating the custom fields for each feature.
Custom fields is a feature that allows users to add additional information when creating a post. Custom fields, once created, give us a template with sections that we’ll have to fill in to add the property descriptions.
Go to your Toolset Dashboard and click Add custom fields against the post type you want to add the custom fields.

If you have already created custom fields, you could choose to duplicate or use them by clicking on the Choose from previously created fields button.
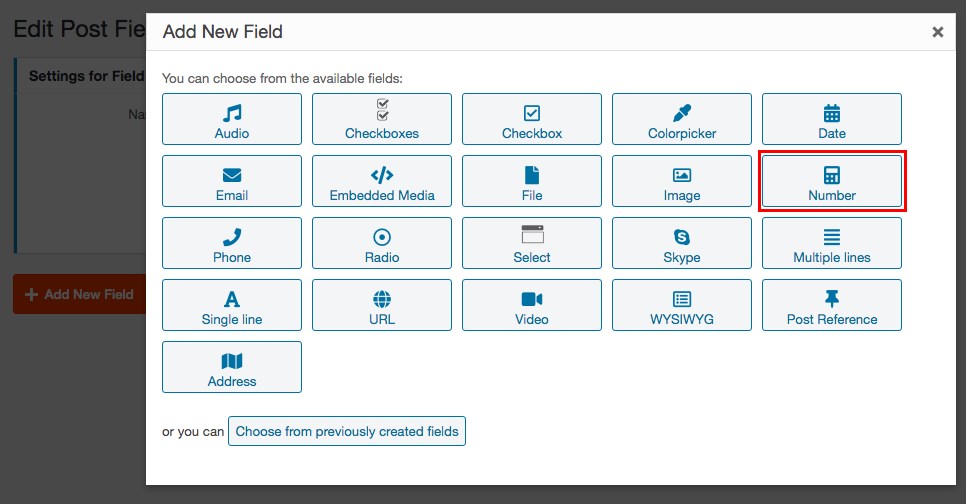
Considering this is the first time we are creating custom fields, select the type of field you’d like to create.
For instance, we’d like to add a custom field to enter the number of bedrooms. So, we need to select the Number field from the options shown in the image above.
If you’d like to add a video, a URL, or an image as custom fields, you could do so by selecting the appropriate fields.
Once you’ve selected the field type, you can go ahead and create your custom field.
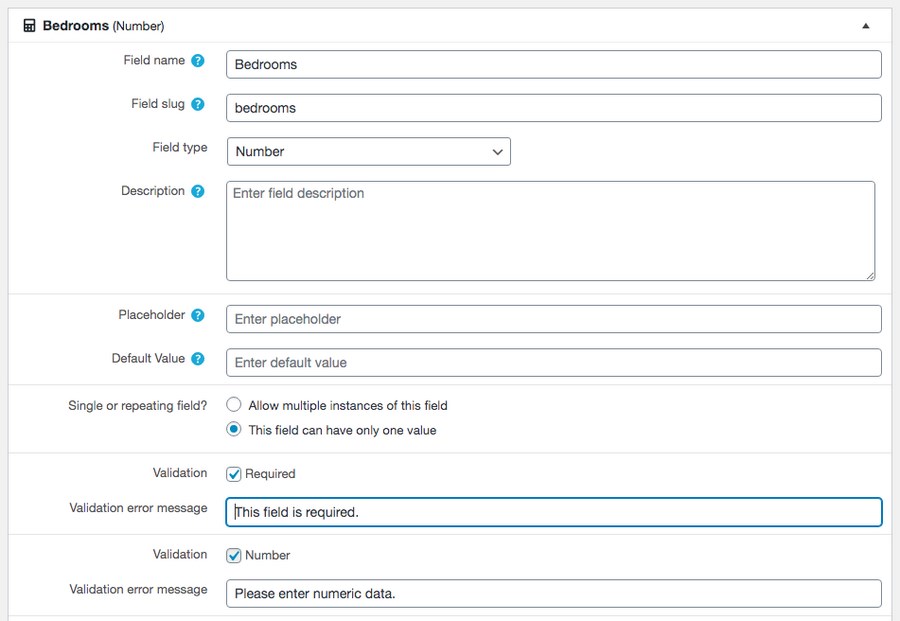
As shown above, we’ve created a custom field ‘Bedrooms’. The slug is auto-populated. The remaining details are pretty self-explanatory.
You could choose to display additional information based on your website requirements. For instance, you could display a validation error message if you’ve checked the Validation box, and so on.
Once you’re done adding the first custom field, you can either click on Add New Field to add more or click on Save Field Group once you’ve completed adding all the fields for this group.
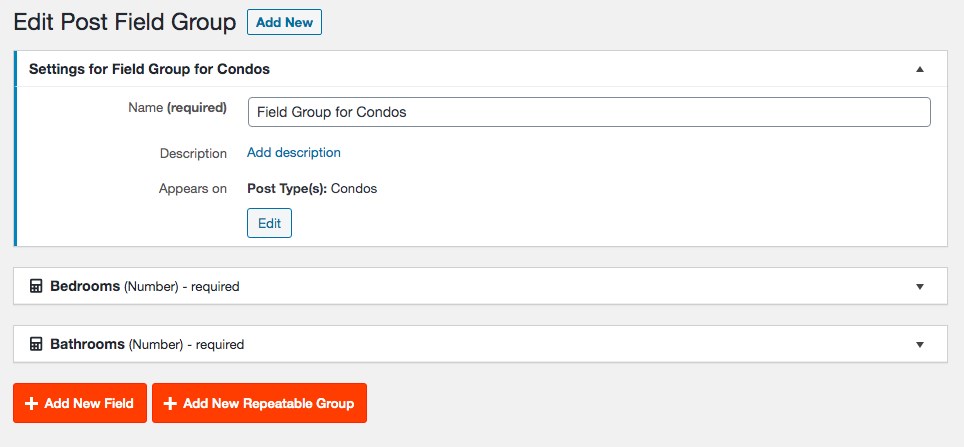
The custom fields have now been added to the field group.
If you were to click on Add New under the post type you created (i.e., Condos in our example)…

… you’ll notice the custom fields you’ve just created.
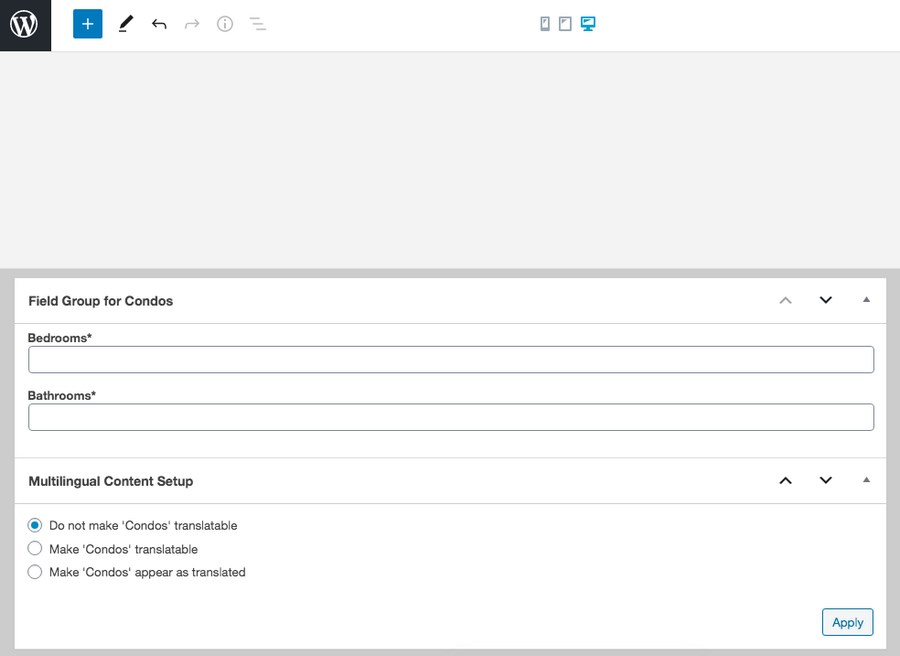
Now, every time you create or edit your condos posts, you can add or update your custom fields.
Create Custom Taxonomies
You have properties for sale, and you have properties for rent. You also have properties that are furnished and unfurnished properties.
How about creating categories for each of these?
That’s precisely what you can achieve by creating custom taxonomies.
Custom taxonomies help you group your properties based on different categories, in turn, to help home buyers easily find properties that match their requirements.
To create a custom taxonomy, click on Add custom taxonomy against the post type.

Now, name your taxonomy both in the plural as well as in singular.
For example, we’ve named our taxonomy ‘Property Type.’ The slug gets auto-populated, as in the previous instances.
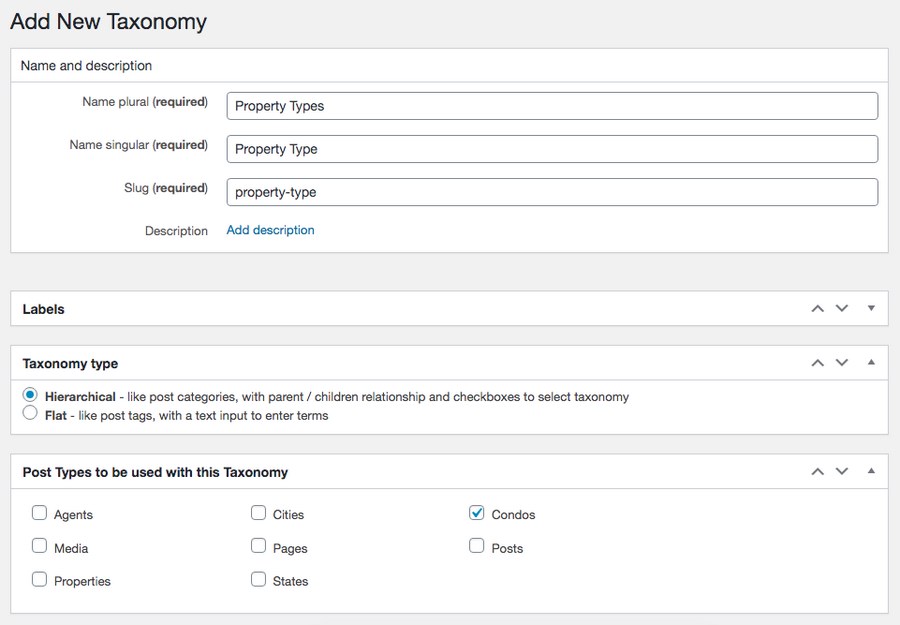
Next, select one of the taxonomy types.
You can choose from either a hierarchical or flat taxonomy type. If you select the hierarchical type, you can nest taxonomies as parent and child terms.
For example, our parent term could be ‘Property Type’ and the child terms could be apartments, condos, villas, and so on.
We’ll leave it to the default ‘Hierarchical’ type.
Finally, select the post type to which you’d like to add this taxonomy to, which in our case is Condos. Once you’re done, click on Save Taxonomy.
You’ll notice the custom taxonomy created under your post type, which is ‘Property Types’ under ‘Condos’ in our example.
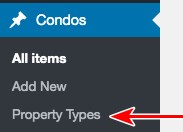
Now, head over to your post type and click on Add New.
You’ll notice the custom taxonomy appearing on the right side of the page.
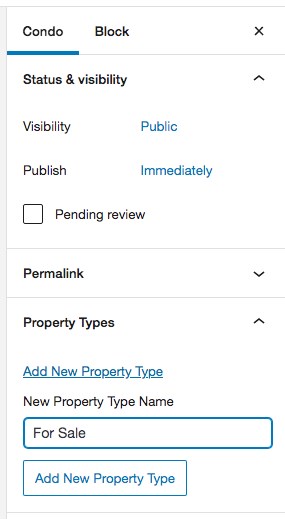
Click on Add New Property Type and group your property accordingly. For instance, we’ve added the property type ‘For Sale.’ This way, we can group the properties based on them being available for sale or rent.
Once you’ve added a property type (For Sale), the next time you create a new property post, you can just select the property type you’ve just created or add a new one accordingly.
Create Template to Display Properties
Wondering how to display your properties? We do that by creating a template.
A template is designed once and used to control how a post appears on the website’s front-end. You design these templates visually through a drag and drop editor without editing any file or writing a single line of code. Templates also save time and effort and are a major benefit of Toolset.
The templates that you create using Toolset can include your custom fields, taxonomy, related posts, and just about anything coming in from your WordPress database.
To create a template, you insert the fields, arrange them in a layout of your choice, and then design how to display them on the front-end.
To begin, under the Toolset dashboard, click on Create Content Template against the post type you want to design a template for.

Use the WordPress block editor to design your template.
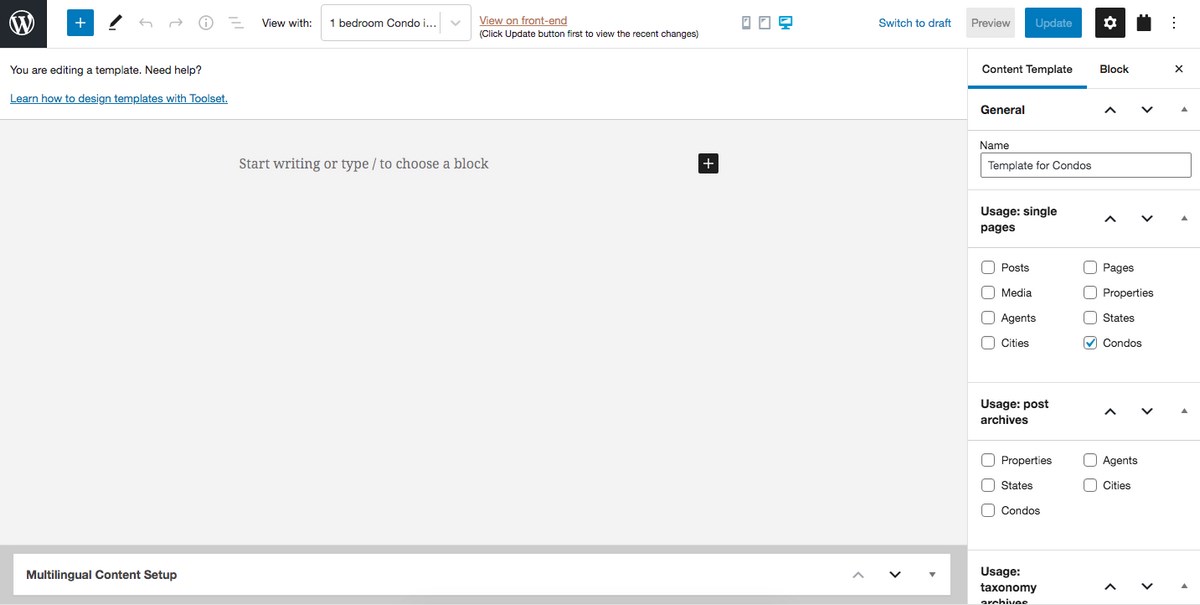
To create any part of the template, simply select the blocks from the Toolset section.
For example, as shown in the image below, use the Toolset’s Heading block to add any heading that will display a field.
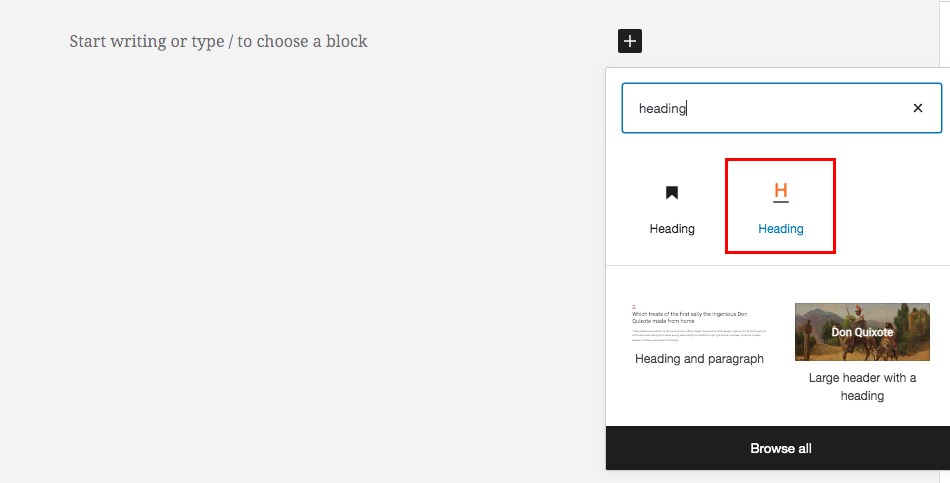
Then, enable Dynamic Heading Text. This will ensure that the text corresponding to the field is displayed in the block.
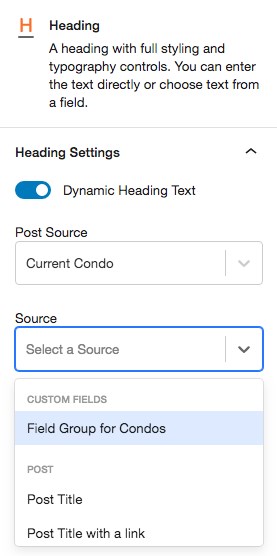
For instance, as shown in the image above, the Post Source is the current post being displayed by the template. And the source for the heading can be one of the options under the dropdown.
Shown below is an example of displaying the Post Title in a template.
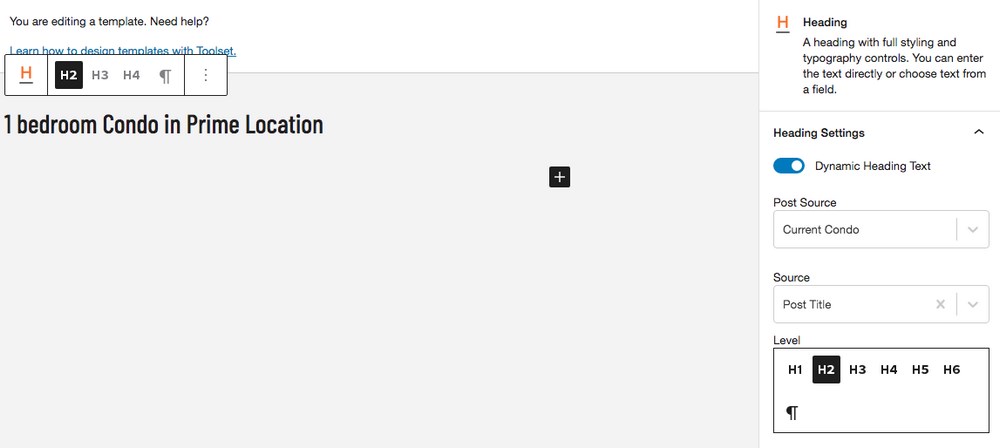
You can design your template the way you wish to by adding various Toolset blocks.
For example, you can arrange the content in columns, display parts of the template conditionally, use containers, display a list of related posts, and so on.
To help you further create your templates, check out these videos on Creating Templates to Display Custom Posts in WordPress.
Create a Post-Relationship to Connect Houses With Agents
Typically an estate agent would be promoting multiple properties. In such cases, it helps to connect the agent with multiple properties (post) on your real estate website.
Using this feature, every property listed by an individual agent would link back to their profile. Any changes to that profile will be automatically updated on any of their properties. It’s a simple and very efficient way to keep everything up to date on your website.
You can connect different posts (posts, pages, custom types) using post relationships. They can help avoid duplicate content and ensure consistency across your website.
Let’s consider an example to understand the power of post-relationship.
On our real estate website, each estate agent will list multiple properties. There are also chances of a property being represented by different agents.
Now, let’s say that you want to update the image or the contact details of a particular agent. How do you do this?
Without the use of post-relationship, we’re guessing you’d have to edit each of the property pages where this agent features. If your website has a few pages, you’re good. But, what if your site lists thousands of properties and agents?
Post-relationships solve this problem!
There will only be one post entry for each agent that will include all their details. The various properties featuring this agent will all point to the agent’s profile. When you edit the agent’s page, it immediately shows across all the property listings and pages in which the agent is included.
On our real estate website, let’s create a post-relationship between the properties and agents.
Head over to Toolset > Relationships and click Add New.
A Toolset Relationship Wizard opens up. We start by selecting a relationship type.
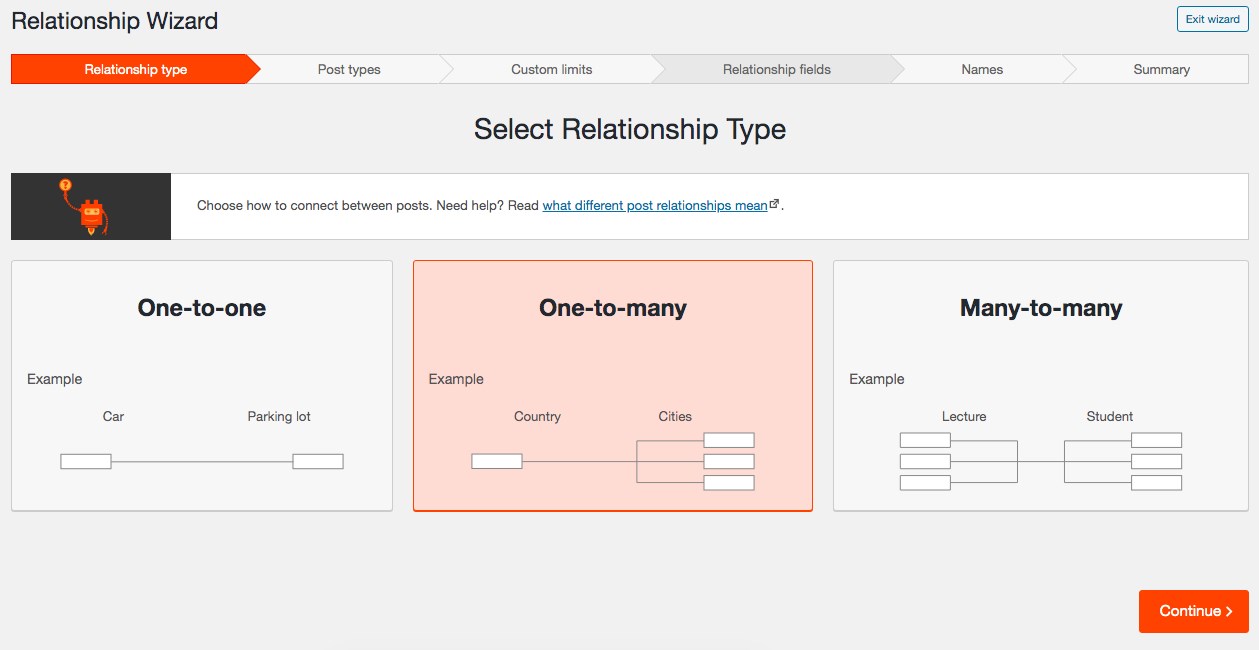
Since an agent could be promoting multiple properties, we’ll select ‘One-to-many.’ Click on Continue to proceed.
Now, select the post types to form the relationship.
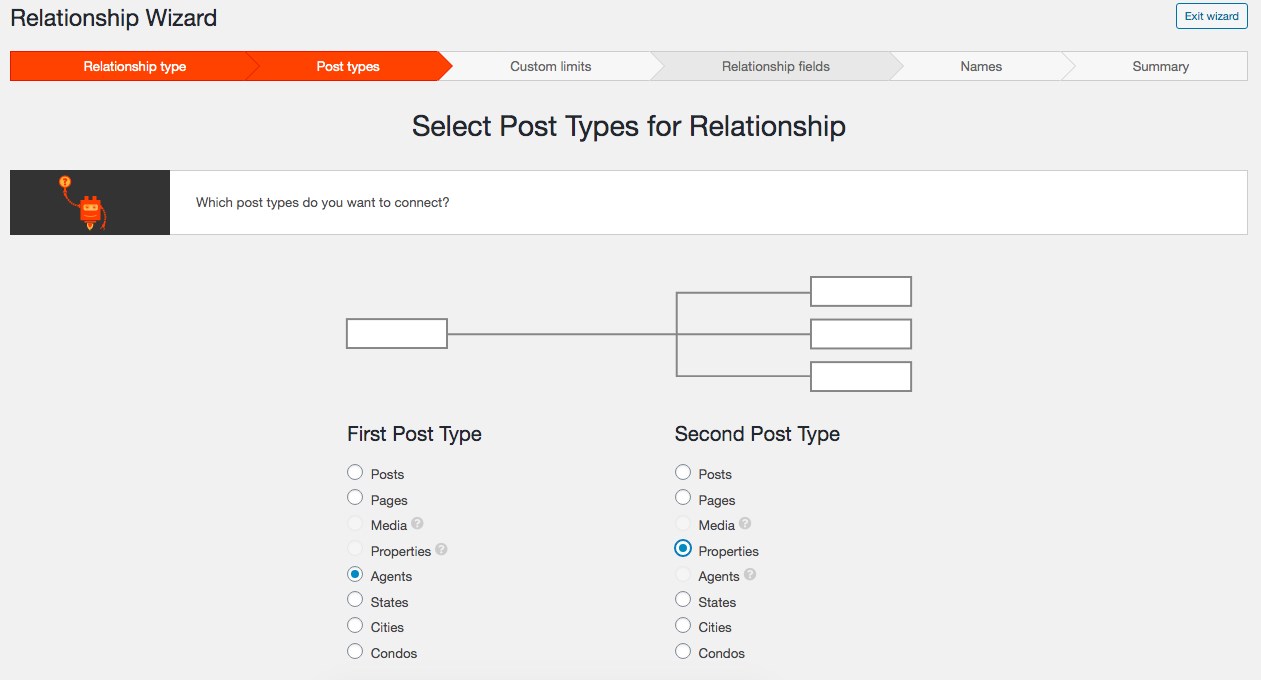
For instance, we’ll create a relationship between agents and properties (as against our previous example of Condos).
We’ll select the two as shown in the image above. Click on Continue.
You have the option to set a maximum limit to the number of properties (posts) that can be assigned to an agent.
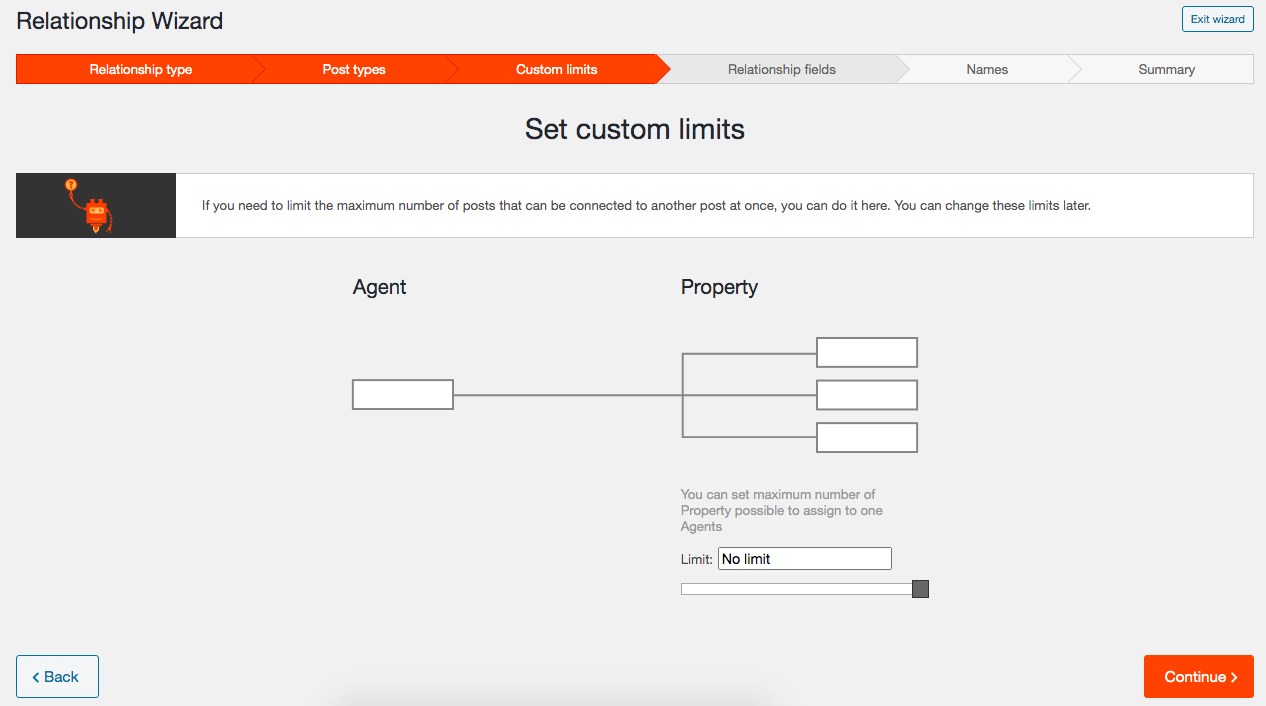
The default value is to set to No limit, and you could choose to leave it that way.
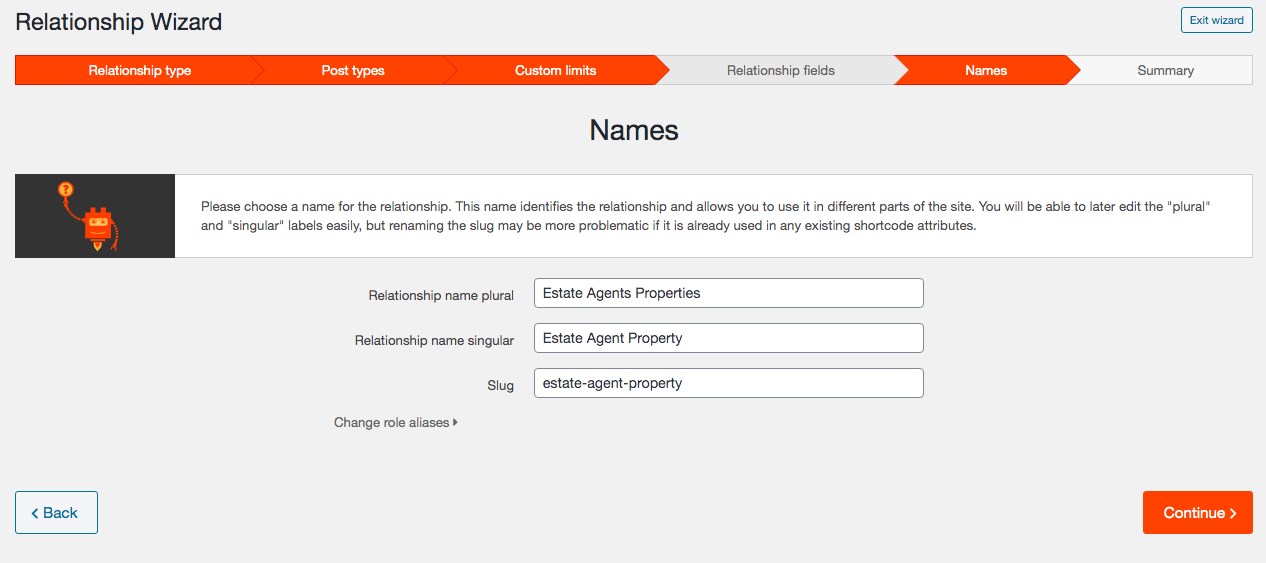
Next, you get to name your relationship, again in singular and plural. The slug (URL) will be auto-populated. We’ve named the relationship ‘Estate Agent Properties.’
Click continue to review your relationships in the final step.
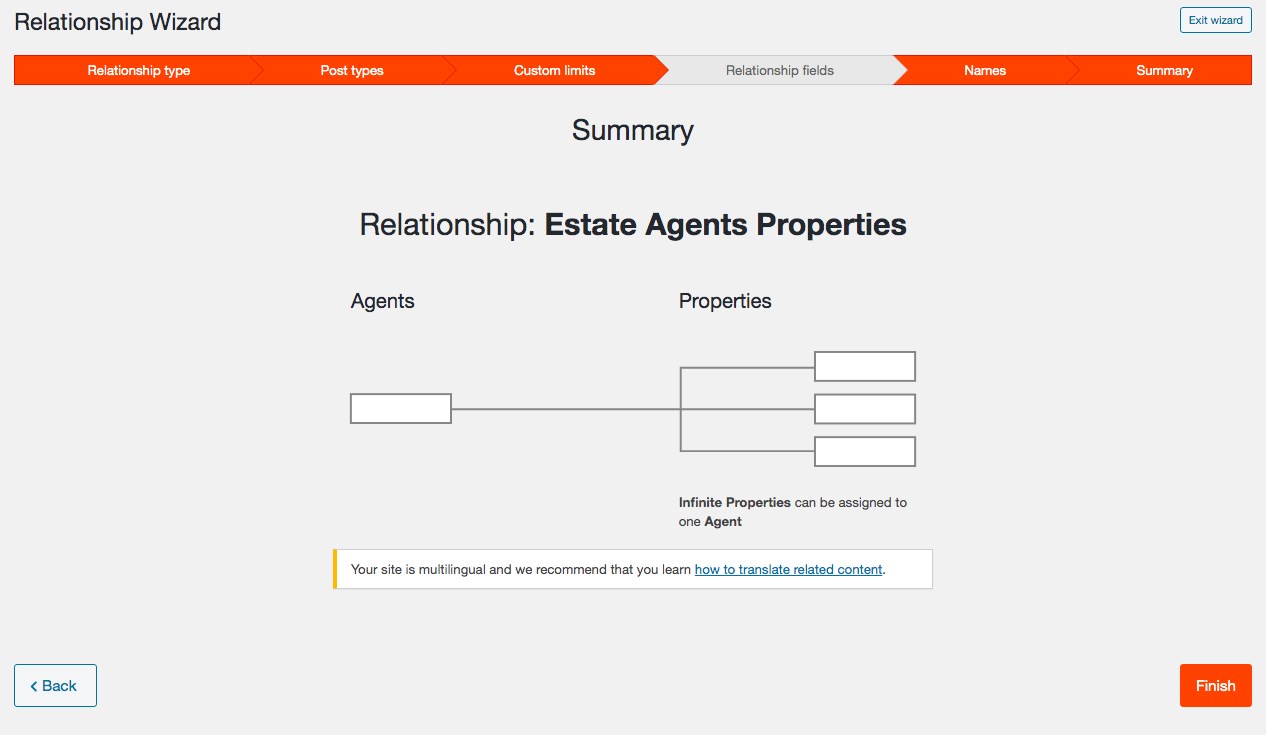
Once you’re done, click on Finish.
Our next step is to connect specific posts from the related post types.
For the sake of this example, we’re making use of one of the existing properties on the review site — edit one of the existing property posts available.
If you scroll a little, you’ll notice a new section, ‘Estate Agent Properties’ has appeared.
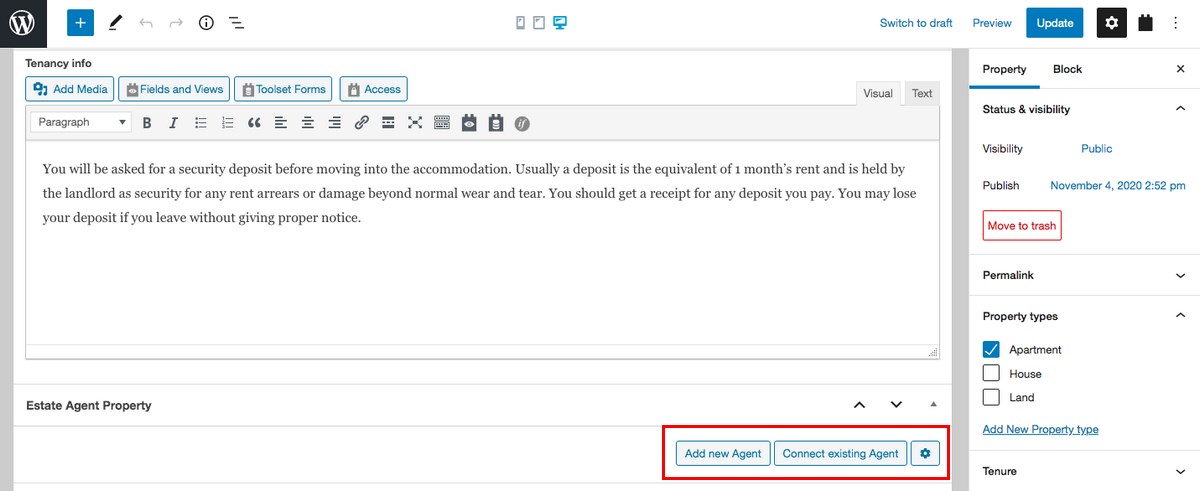
Now, you can assign an agent to this property.
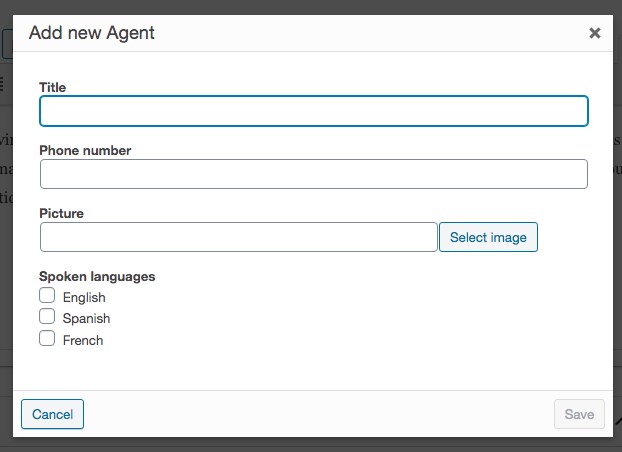
Either click on Add new Agent…
… or click on Connect existing Agent.
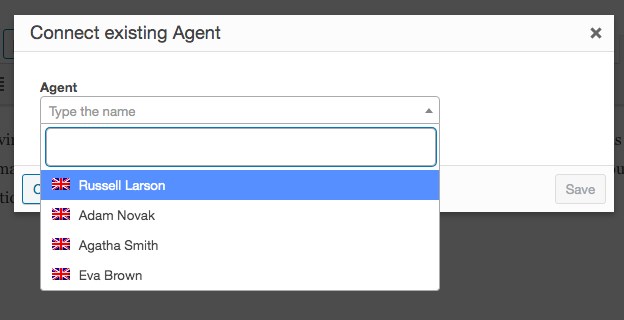
We’ll go with the latter and select one of the agents in the dropdown list. Once you’re done, click Save.
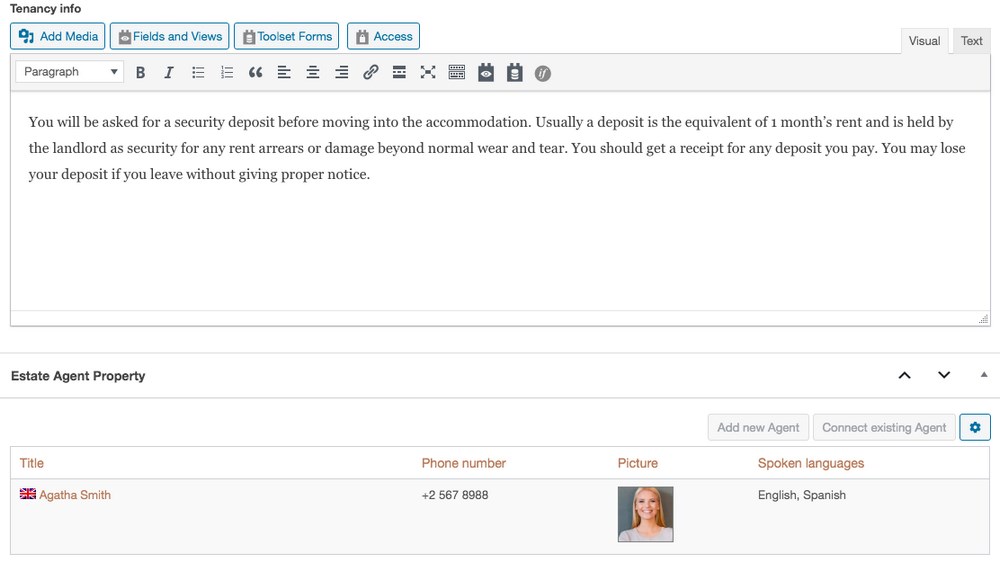
You’ll notice the agent has been added to the property. Click Update to save your post.
Remember our template for displaying properties? Now that you have connected agents and properties you can easily display information about an agent when displaying a property.
And that’s how you add a post-relationship!
Create an Advanced Search for Users to Find the Best Properties Easily
What is the one common feature you’d notice on any property website? Search!
The key to running a successful real estate website is to allow users to find the best properties quickly. Search is the best way to achieve that.
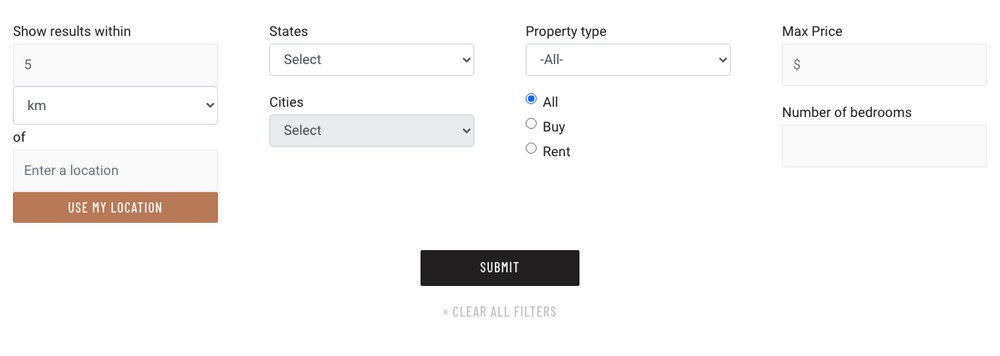
With Toolset, you can choose what to search, customize the search box, and display the results. You can also display custom search results on a map or set up the search control and results side-by-side.
You start by inserting a View block on your page. In Toolset, a View is your own custom list of items of any type.
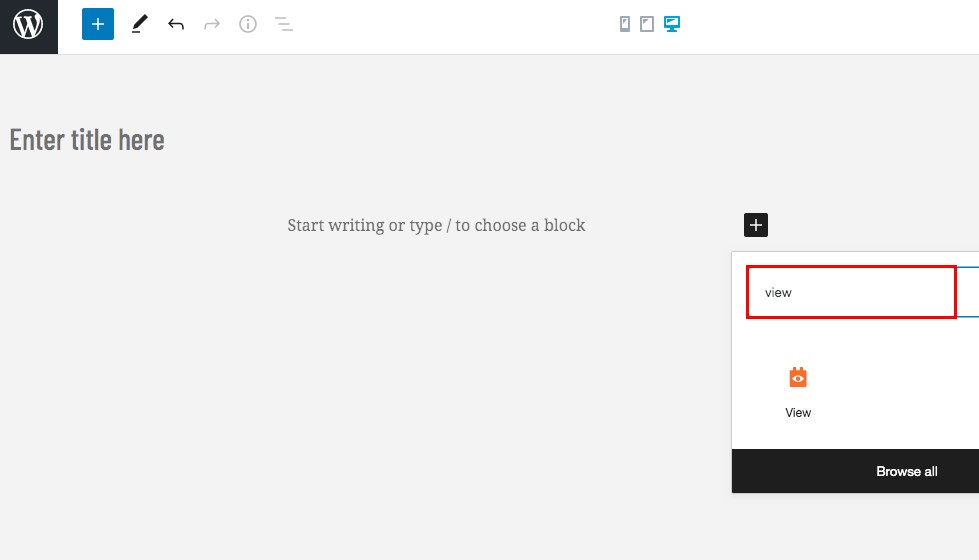
In the View creation wizard, you can either create a new view or use an existing view. Since this is the first time, let’s create a new view and enter a name for our view.
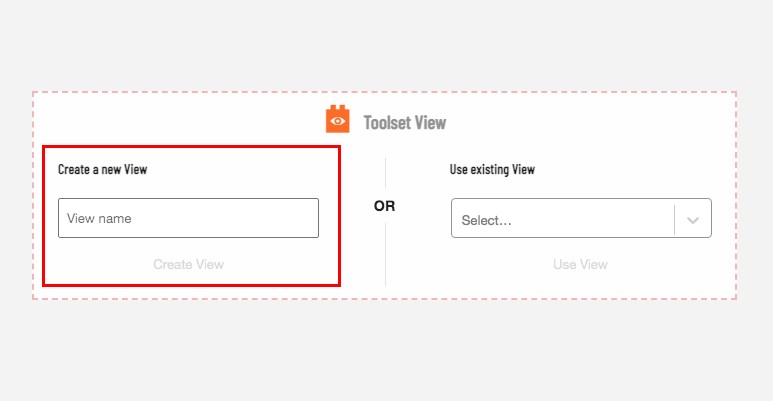
Once you’ve entered a name, click on Create View.

For instance, we’ve named our view as ‘Custom Search 1’, as shown above.
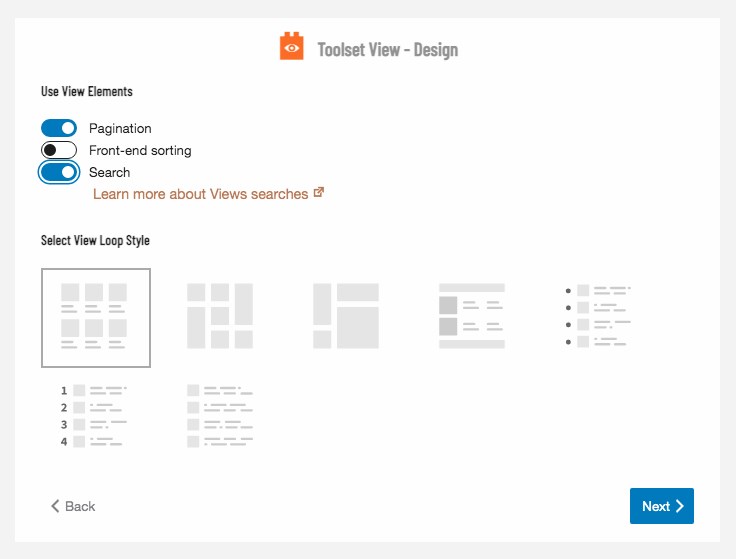
Next, enable the Search option amongst the View Elements options and click Next when done.
You get to choose the content you want to display in the search results.
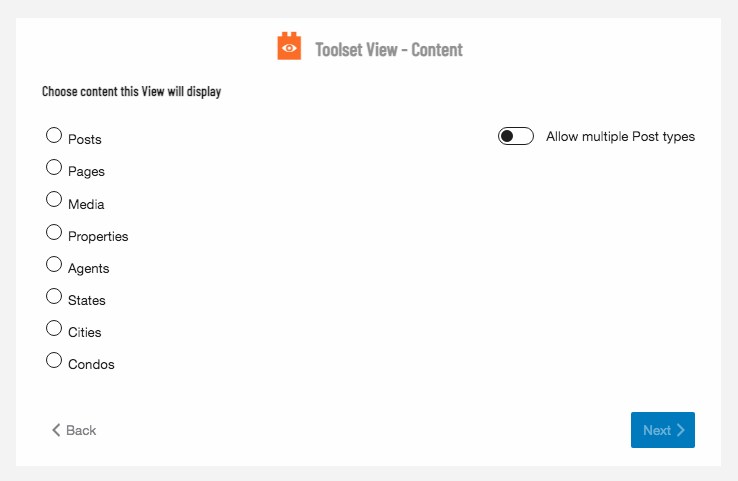
Select an option and click Next.
You now get to view a page that is essentially divided into two sections. The first section is ‘View Search,’ and the second is ‘View Loop.’
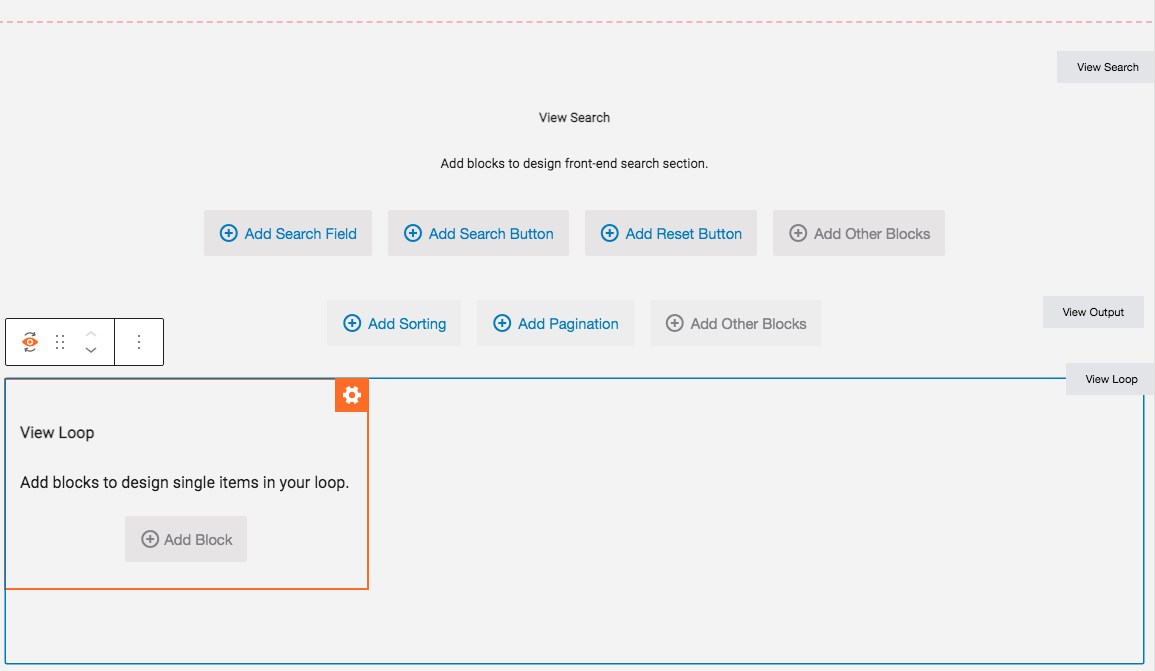
In the ‘View Search’ section, you get to add the search fields, i.e., the filters for your search. You could add a search field, a submit button (search button), and a reset button, among other options.
Click on ‘+ Add Search Field’.

From the dropdown options, select the filters you’d like to provide in your search box. You could select a single field or multiple filters.
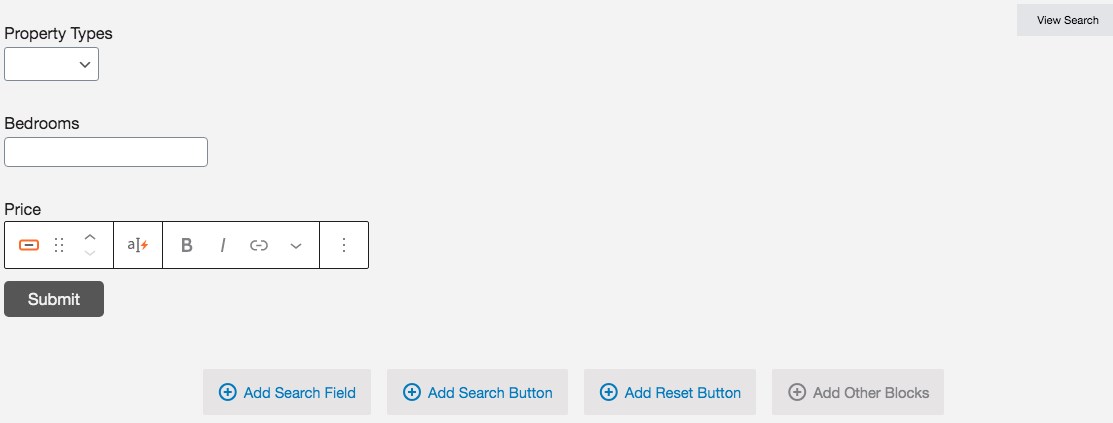
For instance, as shown in the image above, we’d added filters for property types, bedrooms, and price. We’ve also added a submit button by clicking on ‘+ Add Search Button.’
Want to provide your users a reset button? Click on ‘+ Add Reset Button’.
Once we are done creating our search filters, the next step is to design our search results. And this is accomplished from within the ‘View Loop’ section.
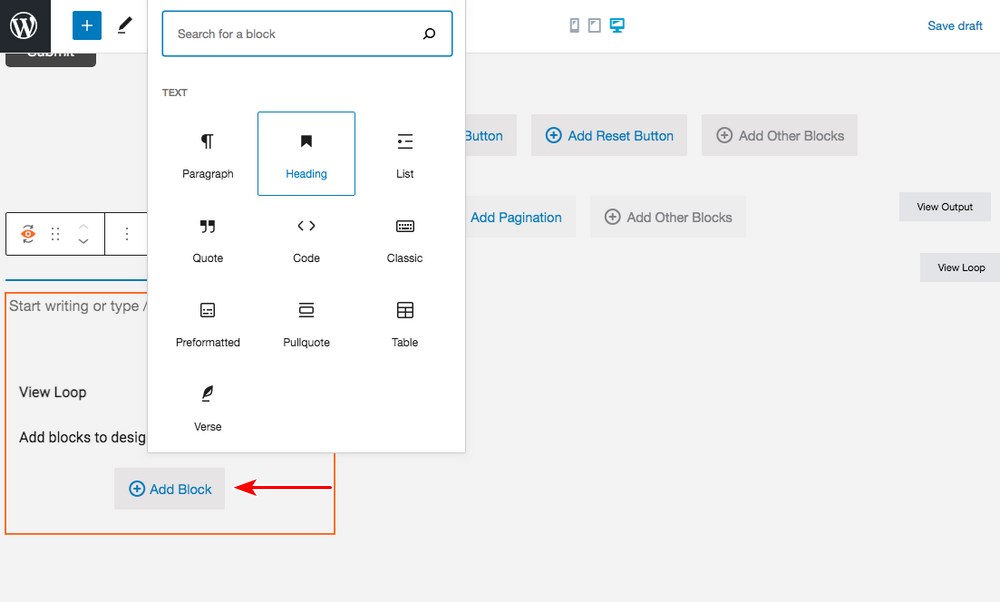
Click on ‘+ Add Block’ in the View Loop box.
You could add from the various blocks available. For instance, we’ve added the heading block and the images block, as shown below.
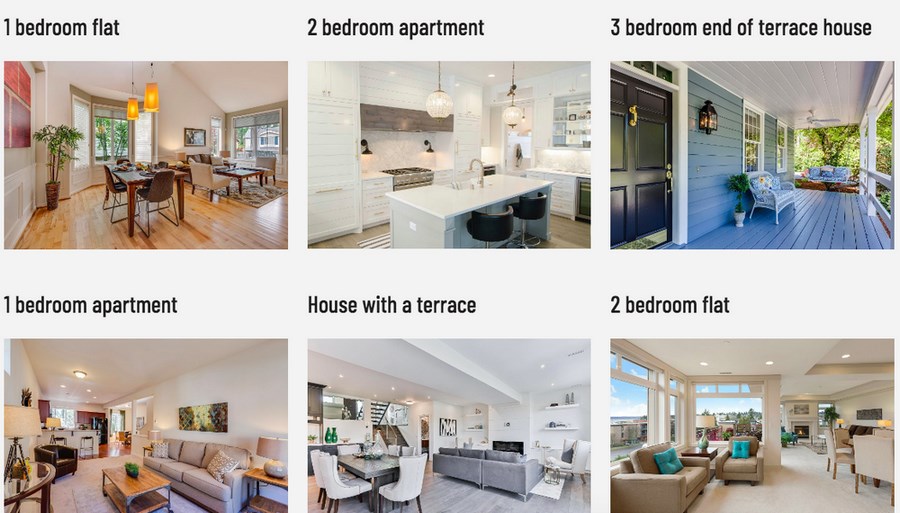
Just make sure you’ve enabled the ‘Dynamic Sources’ and selected the appropriate content to be displayed.
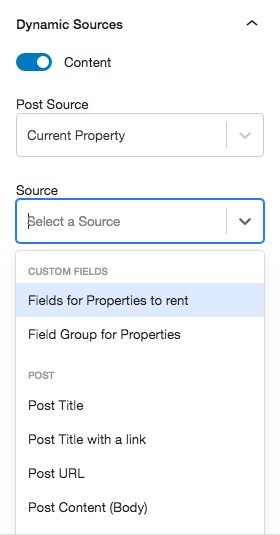
We wouldn’t want a text to appear in place of an image, would we?
Once you’ve designed your search results, click on Publish.
You can now add this search to any page within your website.
To help you create various custom searches, check out these videos to create custom search results in WordPress.
Create Maps to Show the Property Locations and Search Results
Real estate is all about location, location, and location.
So another key feature in a real estate website is a map. Maps are a great tool to help home buyers understand the exact location of a property.
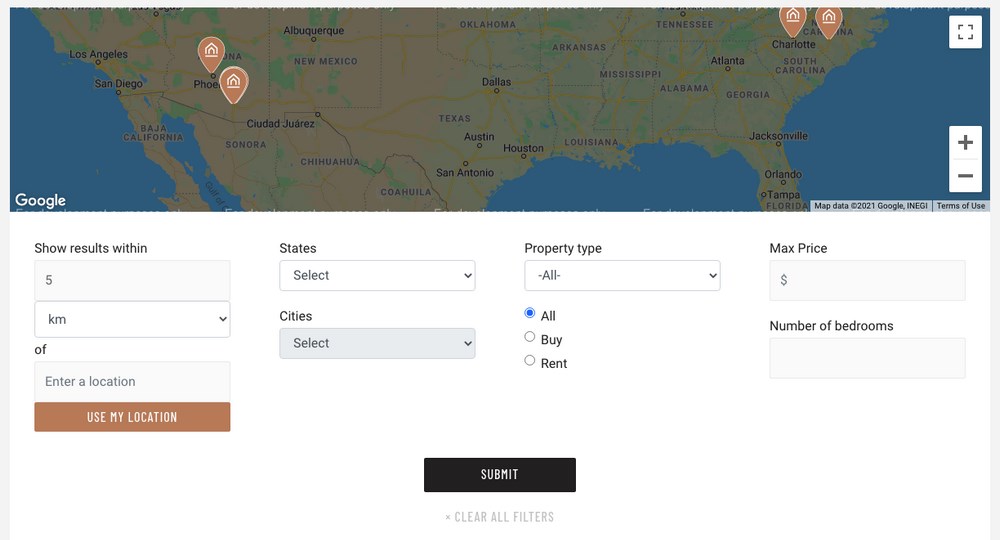
While creating a map in Toolset is pretty straightforward, there are a few prerequisites you’ll need to complete before using the maps.
First, we will need to have Toolset Maps installed.
For this, you’d need to go to the Plugins > Add New and click on the Commercial tab.
Amongst the list of Toolset plugins select Toolset Maps. Ensure you have the Activate after download option checked, and then click on Download. You can also download the plugin from your Toolset account page and have it manually uploaded to your site.
We then require a Google Maps or Azure Maps API key for the maps to function. To obtain an API key for both Google Maps and Azure Maps, you’ll need to set up an account on the respective platforms.
Once you have your API key, you’ll need to include it in the Maps tab, under Toolset > Settings as shown in the image below.
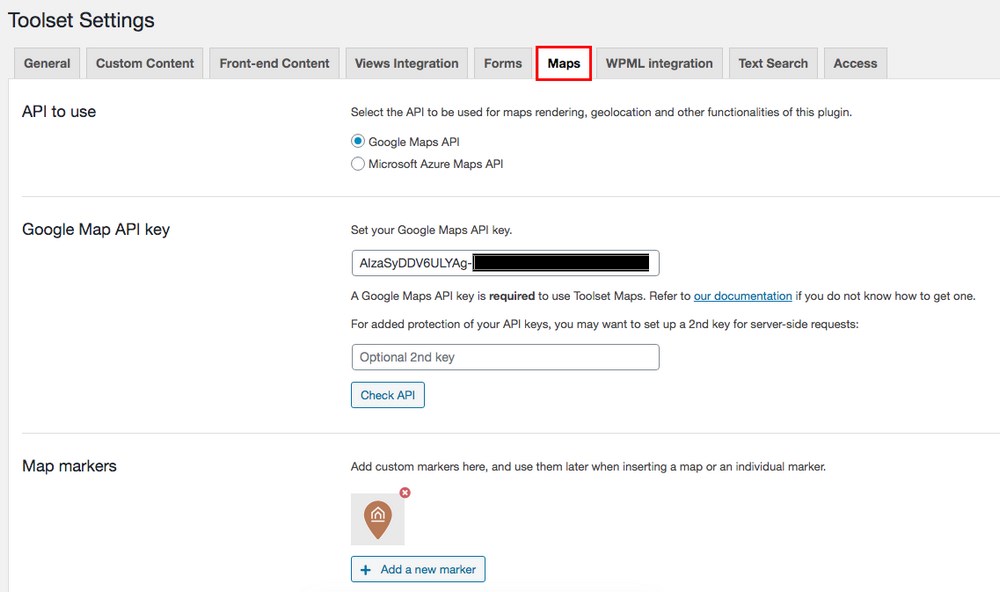
Need help getting the API keys? Go to Google Maps Platform or Microsoft Azure to create an account and obtain an API key for free.
While obtaining the API key is free, you need to set up your billing information. Once set up, you’ll have a limited amount of free API calls each month. You’ll be charged automatically if you exceed that limit.
Once you have installed and configured Toolset Maps, the next step to display the maps and properties seamlessly is to include a custom address field to your properties.
The goal is to be able to add a custom field for the address for every property you post, as shown below.
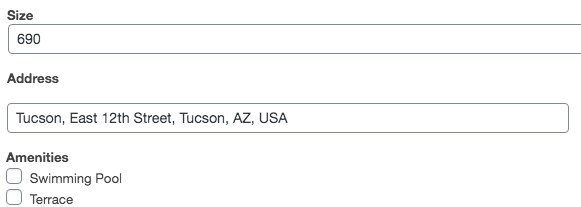
This address will then be used to display the location of the property on the map.
These custom fields appear at the bottom of the page, while creating a new post.
Creating a custom address field can be achieved by either creating a group of custom fields or editing an existing one.
For instance, head over to Toolset > Custom Types and edit the ‘Field Group for Condos’ custom type we created earlier.
You’ll notice the existing fields.

To add a new custom field, click on ‘+ Add New Field’.
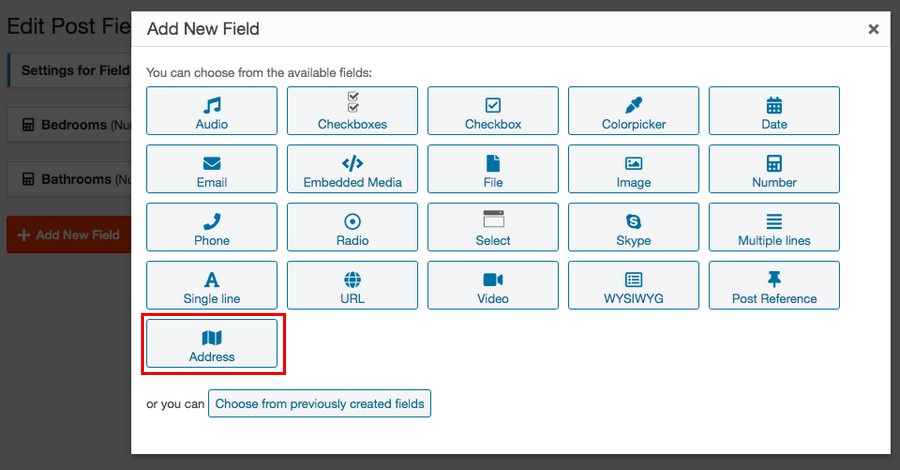
Since we are creating an address custom field, let’s select Address from the list of available fields.
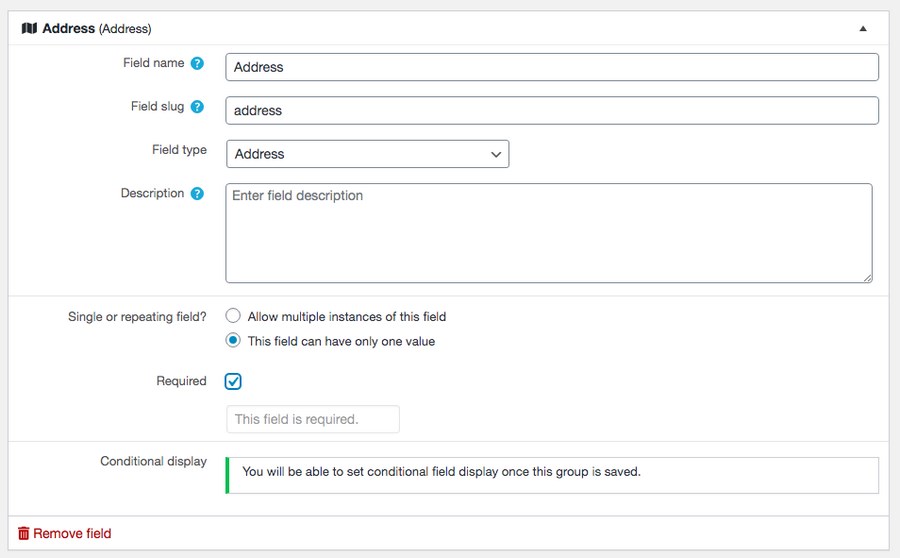
Once we’ve entered all the required fields, click on ‘Save Field Group’.
Now if you were to add a new post, you’ll notice the Address field included in the list of custom field types.
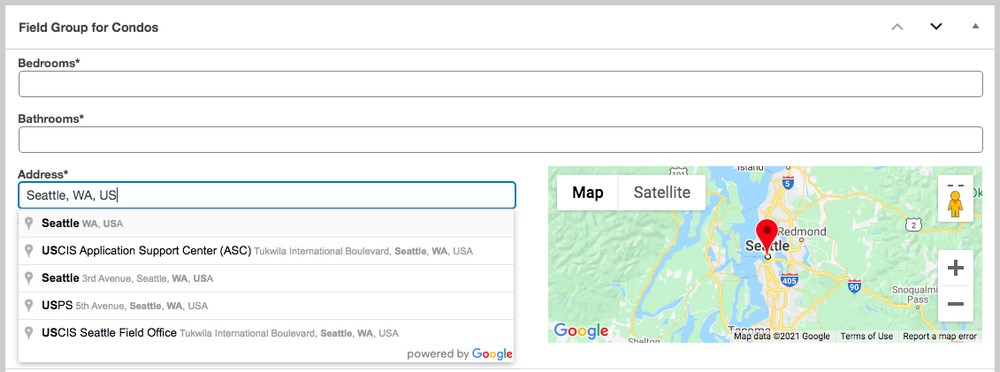
As you key in the location, your map’s autocomplete service will display the appropriate address.
For instance, we’ve used the Google Maps API key and the post page appears as shown in the image below.
Now that we’ve completed the prerequisites, let’s go ahead and add a map.
To include a map, we will need to place both the View and the Map blocks on the same page.
To begin, let’s create a new page and add a View block.
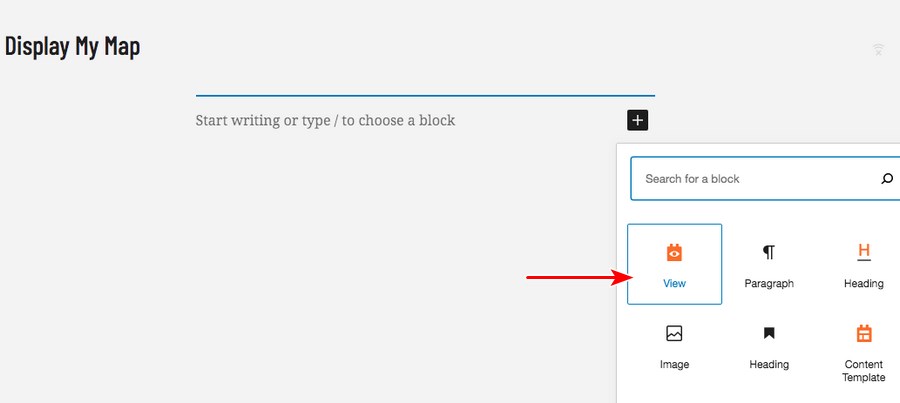
Add a view name under Create a new View.

And click on Create View.
Enable the search option and click Next.
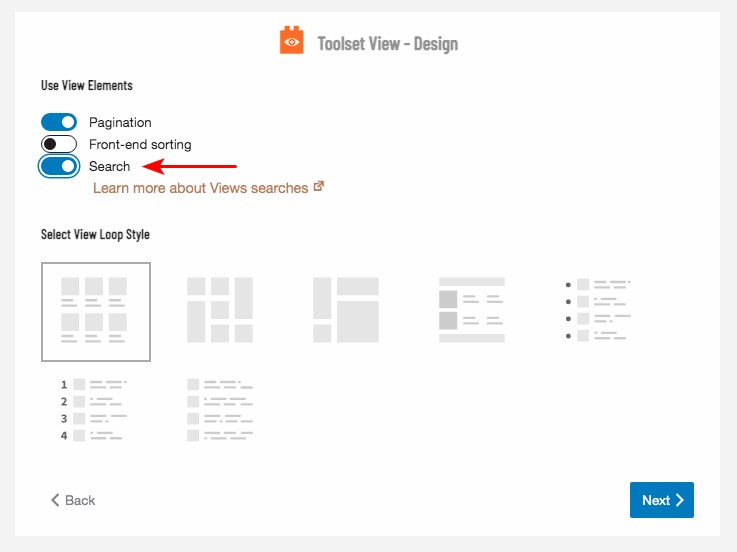
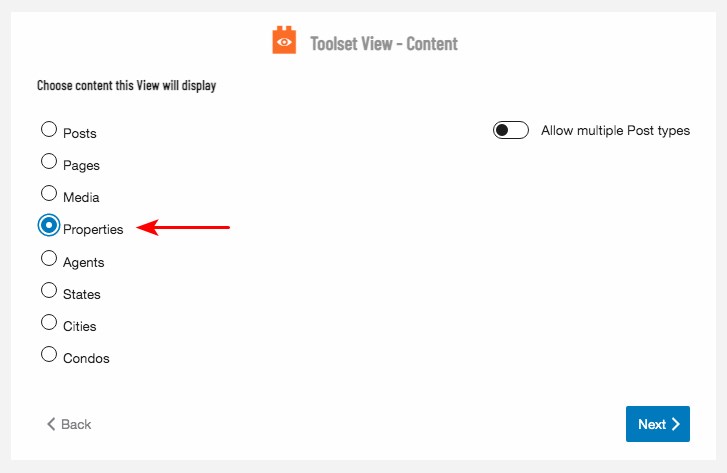
Select the content you’d like to display in the search results. Just as we did earlier, let’s select Properties, since we’ve got more posts in this particular category. And then click Next.
Now, we get to design our page, add the maps and customize the search results.
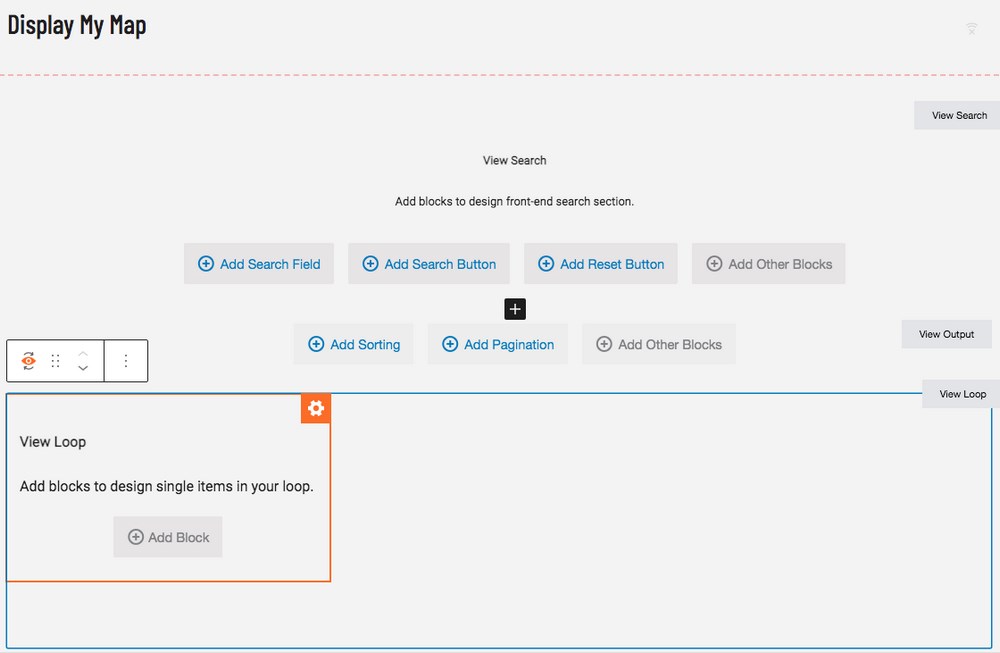
Since we’d like the map to indicate the location of the properties displayed on the page we’re creating, let’s first add the properties on the page.
For which, under the View Loop section, click on ‘+ Add Block’.
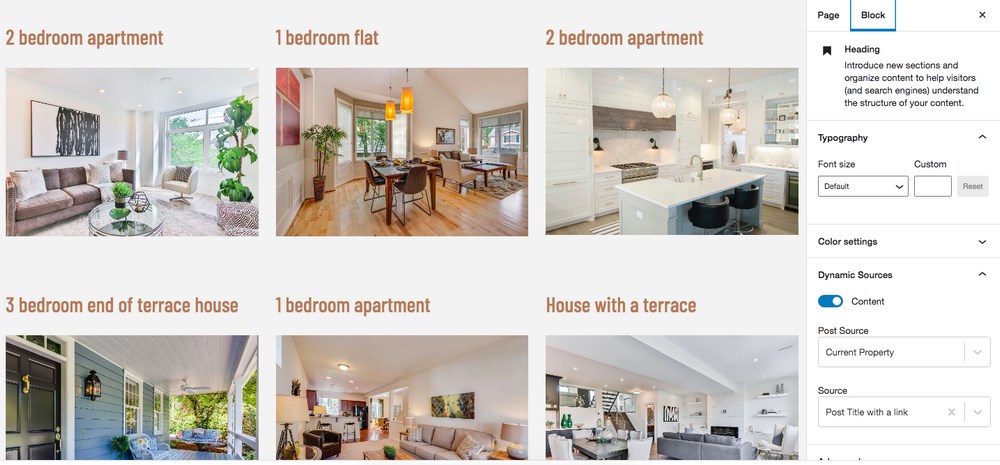
Add the fields you’d like to display on the results page. For instance, we’ve added the title and the image. Remember to enable the dynamic option, as we explained earlier.
Your view should appear as shown below.
Next, we’ve got to add a map block.
The map block cannot be inside the View block, so you’ll have to add the map in a completely new block. You notice two add block icons (+).
Choose the one which is outside the view block. And add the Map block.

Your map will be added to the page.
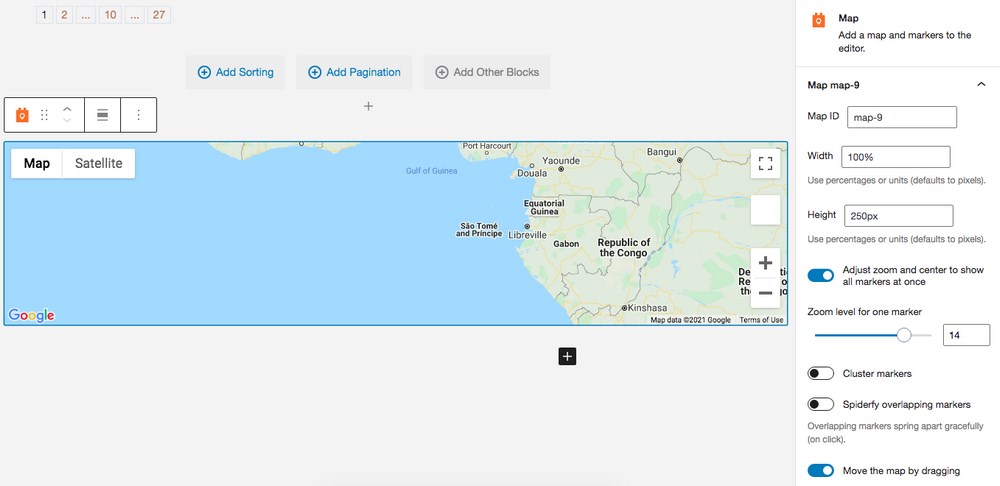
There are a number of customization options that’ll show up on the right side of the page. From selecting the width and height to zoom options and many more.
While you could choose the options that best fit your site, we’d like to draw your attention to the next tab, the Marker marker-8 tab, which includes the Source for the marker option.
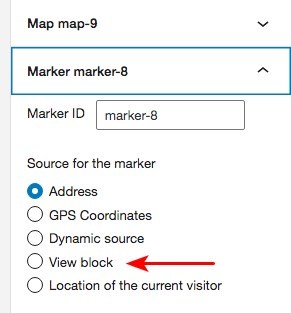
By default, the Address option is selected. Select View block.

Once selected, you’ll notice the map displayed with the markers indicating the various property locations.
While this is a personal preference, you could choose to display the map either on the top or the bottom of the page.
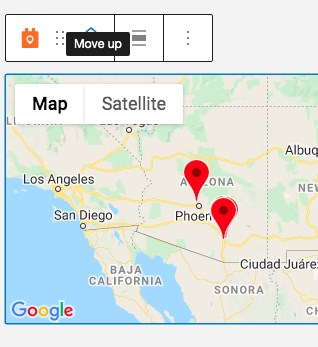
If you’d like to move it to the top of the page, as we’ve done, click on the Move up option that WordPress provides for each block.
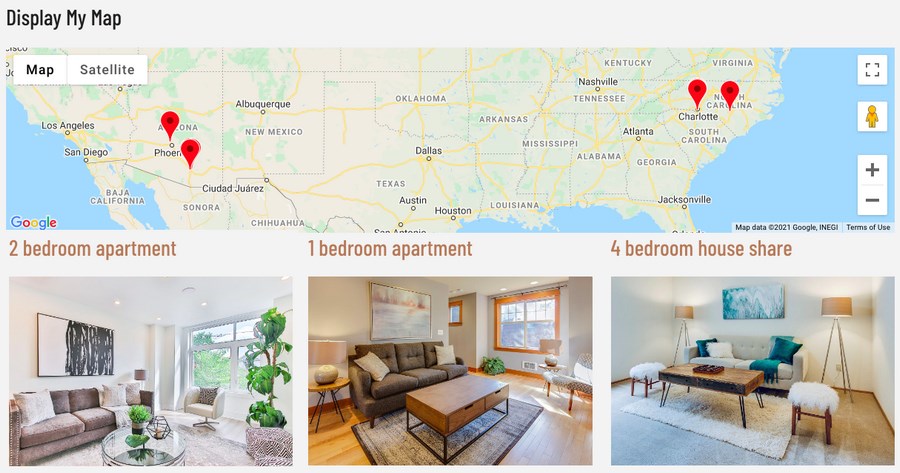
You’ve now successfully added a map displaying the property locations, as shown in the image above. How simple was that?
Create a Front-end Form for Users to Submit Their Property Listings
Want to allow homeowners and users to advertise their property on your website?
Piece of cake!
The easiest way is to provide a form on your website with all the relevant fields included.
For instance, let’s say we have created a form on the front-end of our website, as shown below.
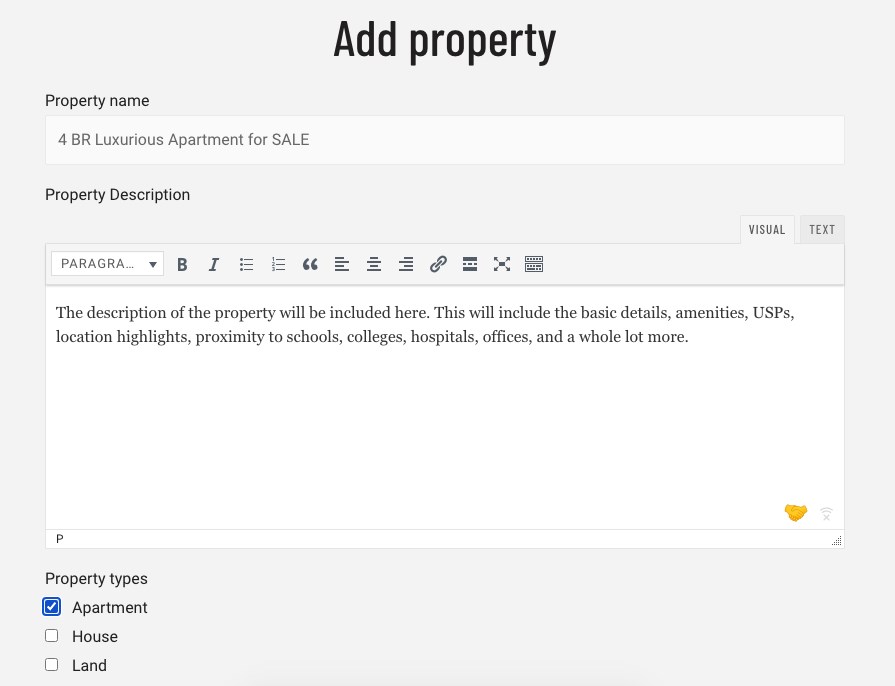
A user submits the form after filling in all relevant fields.

The user is prompted that the property details submitted are under moderation.
Now, if you check the list of posts in your backend, you’d notice that the property has been added to your list, pending approval from your end.

Thus allowing users to easily add property details to your website.
And thanks to Toolset’s drag and drop editor, creating a form couldn’t be easier!
Head over to Toolset > Post Forms and click Add New.
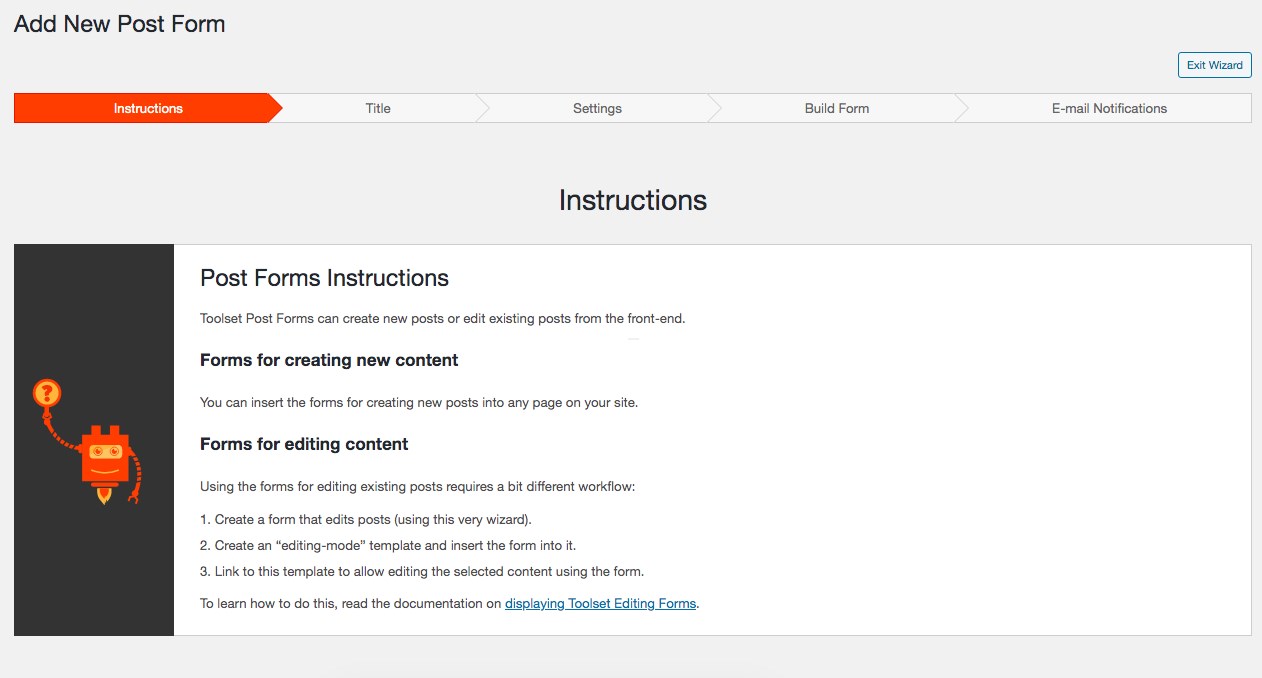
Click Continue to proceed with creating your form. Start by adding a form name.
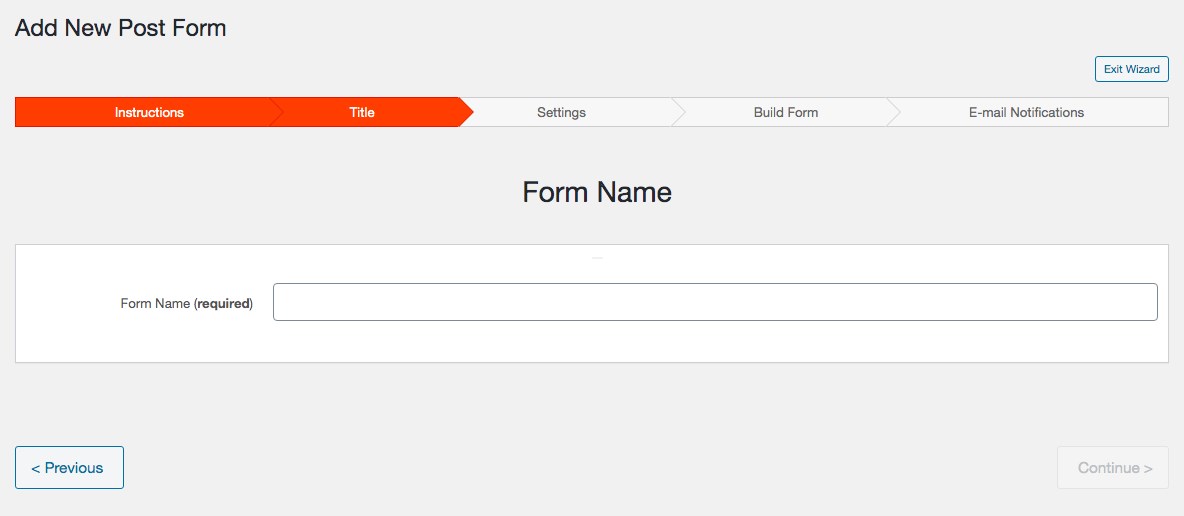
On the next screen, select from the various settings provided.
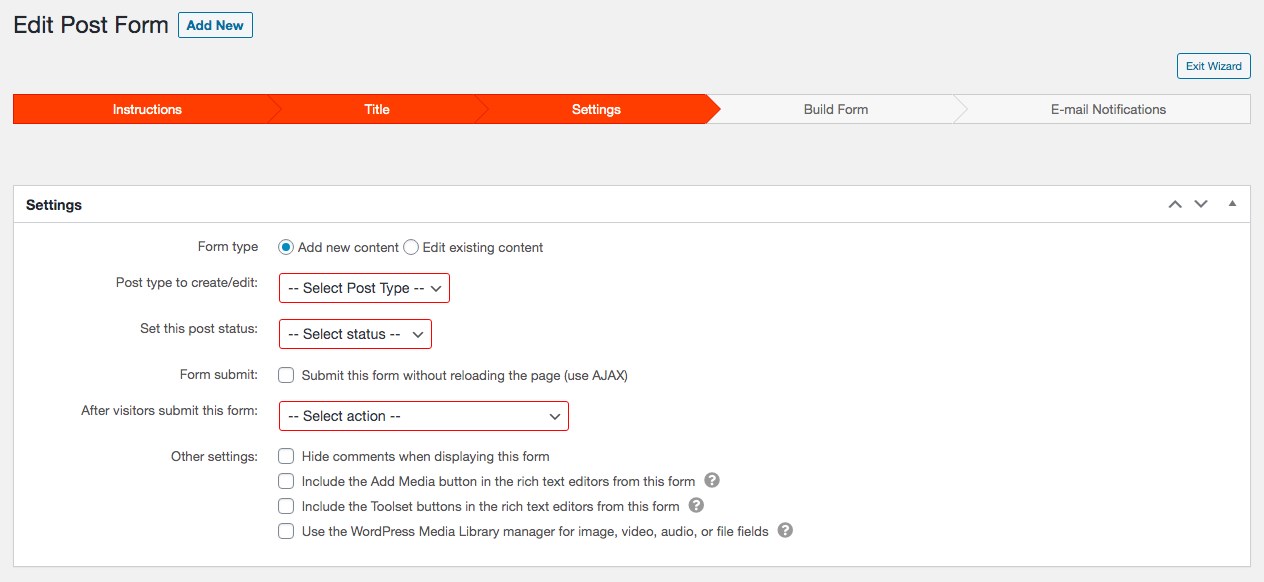
The option available is self-explanatory. For instance, once the user has submitted the property details, you could set the post status to draft, pending review, private, or published.
Similarly, once the form is submitted, you could set the option to keep displaying the form, display a message instead of the form, display the post, go to a specific post, or go to a page.
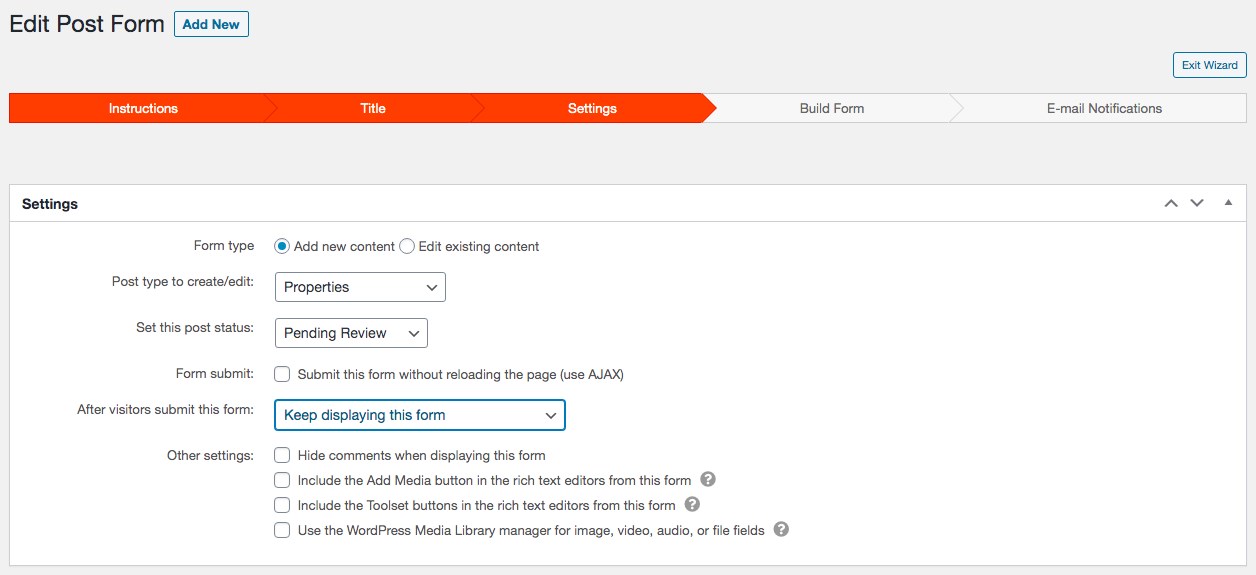
Once you have completed the steps, click on Continue.
You’re now on the Build Form tab, where you can drag and drop the necessary fields to be displayed on the front-end of your website.
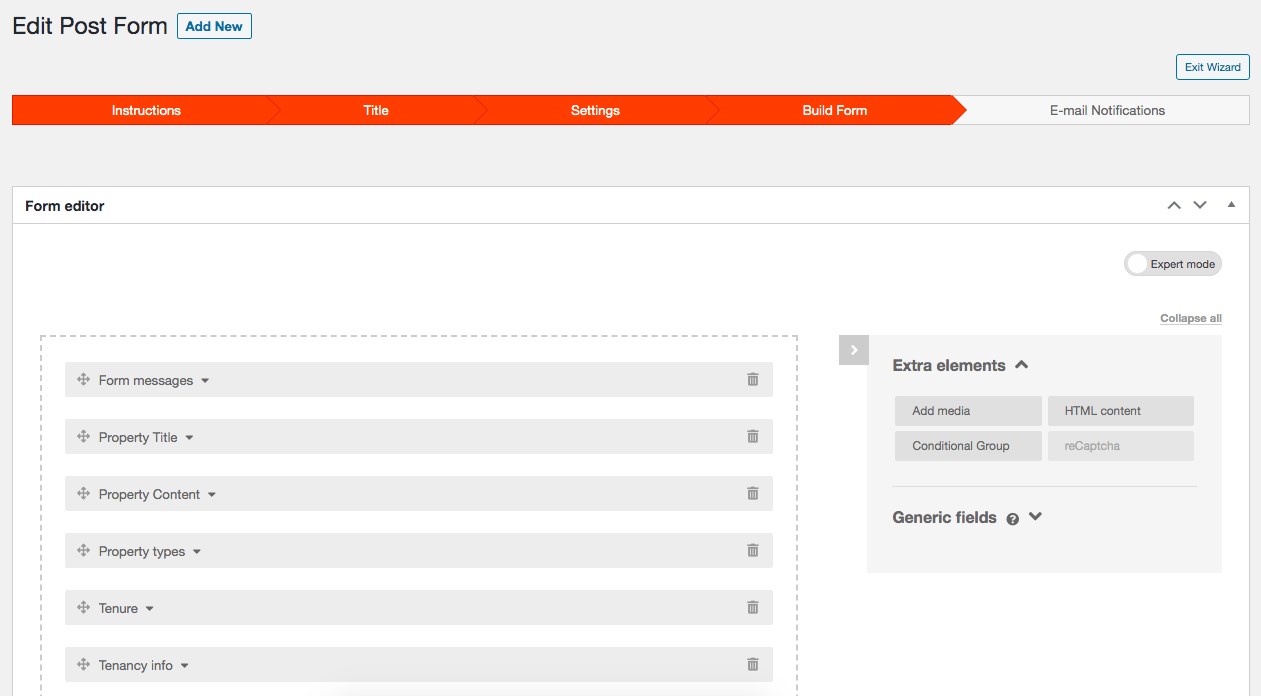
You could choose to add or delete the fields.
The final tab is Email Notifications. You can ‘+ Add new notification,’ such as notify users when their listing goes live.

Click Finish when you’re done.
Like we added maps, head over to the page or template where you’d like to add this form.
For instance, let’s create a new page.
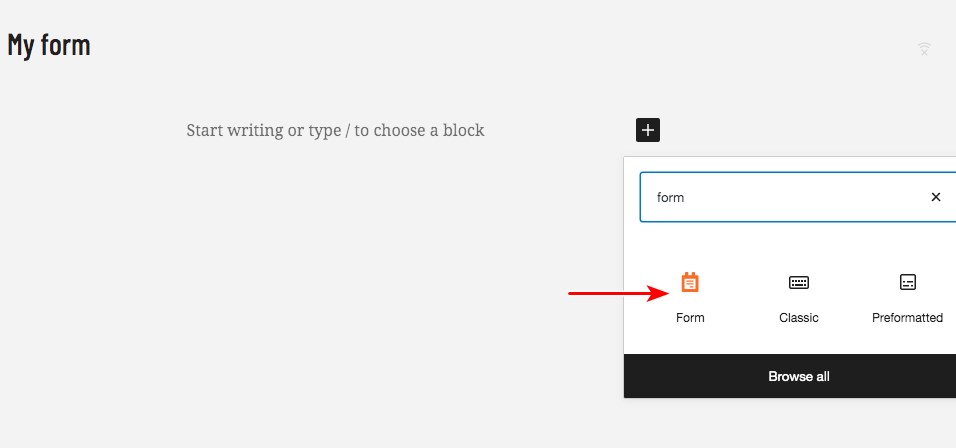
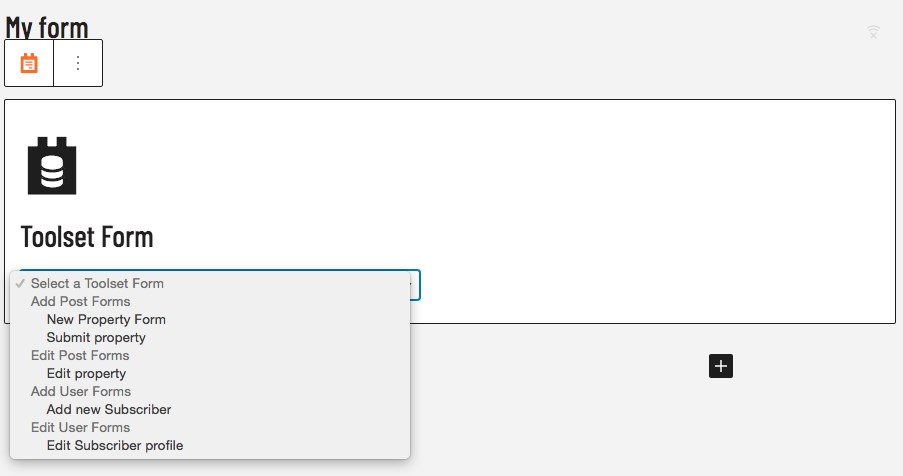
Select the form you want to insert into the page, from the list of options in the dropdown.
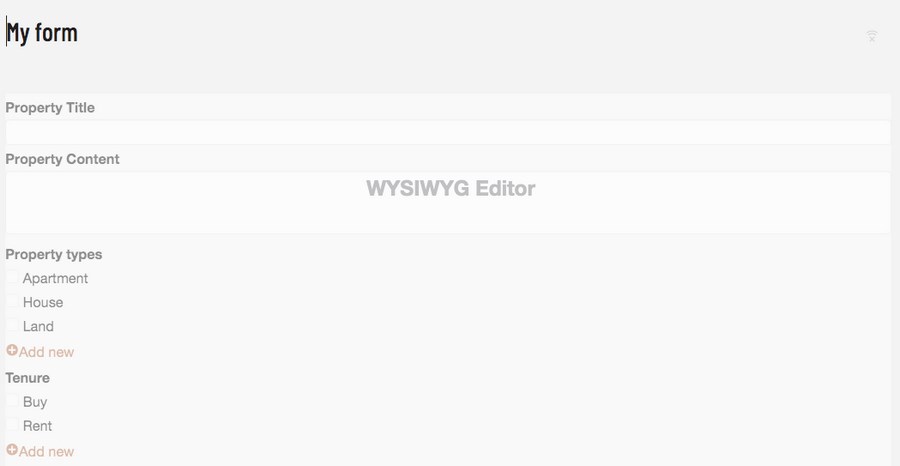
This will then add your form to the page.
Once you’re done, click on Publish.
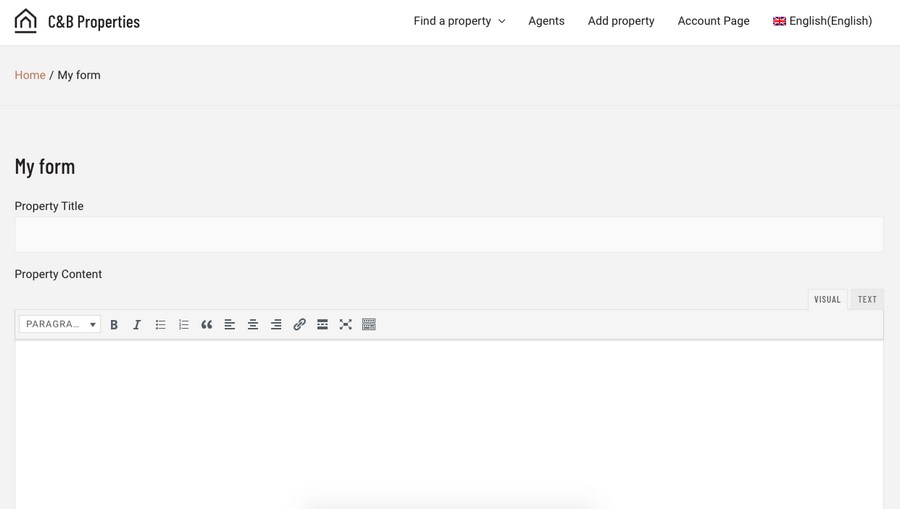
You’ve just included a form on the page. That’s how simple it is to add a form in Toolset!
How to add IDX Real estate search on your website?
Adding IDX support to your real estate website can be key to making your business run much more smoothly.
IDX stands for Internet Data Exchange. A technology that will allow you to view and display MLS properties on your website.
Note that MLS is only available in the USA. If this is where your business is based, using IDX will offer you great benefits, as you’ll be able to:
- Show more properties without extra effort. Increasing your chances of conversion.
- Have always the most up-to-date information. As the listings are updated on an hourly basis.
- Improve user experience and time on page. Thanks to the filters and the search engine included in this technology.
- Capture leads. Since this technology allows direct integration with forms.
IDX will help you with your website’s SEO and give you a competitive advantage over other websites that don’t use it. In this industry, you need every advantage you can get!
To implement IDX in your WordPress website you might want to use Showcase IDX as it’s one of the leading solutions on the market.
Their $55/month lite plan will give you everything you need to get started, including the customizable map, lead capture tools and behavioral-based automated emails.
The $90/month platinum plan unlocks market reports and allows you to further customize the widgets and the search map.
Conclusion
There are several ways to create a real estate website. From simple standalone websites to complex property listing websites, the options are plenty. But when it comes to features, flexibility, customization, and costs, we recommend going with Astra and Toolset.
Yes, there is a learning curve upfront. And creating a full-fledged and functional website using Toolset may take a while.
In return you can build a powerful, flexible website that you control. That you can maintain and that you can develop and grow. We think that’s well worth the time and effort it takes to learn how they work!
To help with the learning curve, we created a free course on creating WordPress Real Estate Sites using Astra and Toolset. Through this course, you’ll be able to explore every element of the Toolset in greater detail.
Now you really have no excuse!
Which feature of Toolset did you like? We’d like to know!
Disclosure: This blog may contain affiliate links. If you make a purchase through one of these links, we may receive a small commission. Read disclosure. Rest assured that we only recommend products that we have personally used and believe will add value to our readers. Thanks for your support!




I am already building this website using Astra Theme
Cheers!
I already build the website Next Level Real Estate using Astra Team
Glad to hear that, Jack!
Thank you for sharing the detailed explanation of the real estate website. Thanks for the awesome ideas. I have been searching for tips on real estate. Now I have got clear and wonderful views. Bundle of thanks to you.