Wondering how to increase the traffic to your online store? Do you want to increase sales and conversions on your eCommerce store? I’m guessing your replies to the above two is a big yes! Well, this article will help!.
We will cover step-by-step how to create coupon codes with WooCommerce and help you generate more sales.
In addition to the built-in and default method of creating a coupon with WooCommerce, we will share some smart ways to entice customers into visiting your online store by installing a few powerful plugins.
The Power of Coupons
Coupons feed into our desire to save money and grab a bargain. There is something in all of us that likes to think we are getting a great deal.
It’s estimated that over 90% of American consumers actively use coupons. They use them to save money, try new products, experience new things, and enjoy whatever benefits the coupon offers.
They can be a very powerful inducement which is why we recommend using them in WooCommerce!
Coupons can also create a sense of urgency and, in a sense, a fear of missing out on a great discount and saving some money. For this precise reason, coupons and discounts work well.
Coupons, discounts, and offers are also a great way to drive traffic to your online store. In addition to increasing traffic and sales, a coupon can also be used as a lead magnet to help build your email list.
And just in case you’re wondering what a lead magnet is…
Lead Magnets and WooCommerce
A lead magnet is a marketing term used to indicate a giveaway, purely to collect the customer contact details.
For example, a lead magnet can be a discount coupon, a buy one get one coupon, trial subscriptions, ebooks, free consultations, or something completely different.
The purpose of a lead magnet is to generate leads. You generate leads and nurture your audience by providing value. Then, slowly but surely, you can close in on a sale.
An example of a plugin to help with email opt-ins and lead generation is our very own Convert Pro. With the intuitive drag and drop editor, you can easily create opt-in forms in a matter of minutes.
Before we dive into this article, here are some statistics around coupons to help you understand how powerful they can be.
- Over 90% of all consumers have used coupons in some way.
- Approximately 31 billion digital coupons were redeemed worldwide in 2019.
- 38% of consumers prefer getting coupons and discounts on their mobile devices.
- 60% of consumers love receiving digital coupons.
- 68% of consumers believe that digital coupons generate loyalty.
- The value of digital coupon redemption reached $47 billion in 2017.
- 77% of consumers spend $10 to $50 more than intended when redeeming coupons.
- For 89% of consumers, price is the main factor affecting purchasing decisions.
(Source: Valassis)
In this article, we’re going to cover some of the most popular ways to create coupons for your WooCommerce store.
Is creating coupon codes with WooCommerce too technical? Absolutely not! It’s probably way easier than you think.
So before we jump in, we’ll assume you have WooCommerce installed on your WordPress website. If you don’t, check out our article on How To Build A WooCommerce Website With Elementor and Astra Theme.
How to Create Coupon Codes With WooCommerce
To begin, we will cover how to create coupon codes using default WooCommerce tools.
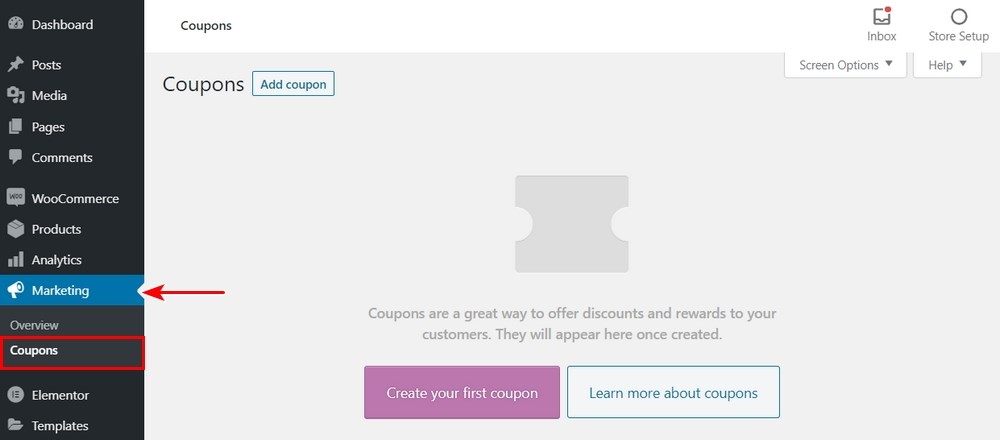
Head over to WooCommerce > Coupons.
What you will notice is a prompt stating ‘Coupon management has moved!’. The Coupons tab has now been moved to under Marketing.

Thus, in the future, you could access the coupon section by heading over to Marketing > Coupons. And yes, you could go ahead and click on the ‘Remove legacy coupon menu’ button if you want.
If you are creating coupons for the first time, you’ll see the following screen.
If you already have an existing WooCommerce store with coupons created, you’ll see a list of the coupons, as shown below.

To create a new coupon, click on the ‘Create your first coupon‘ or the ‘Add coupon‘ button.
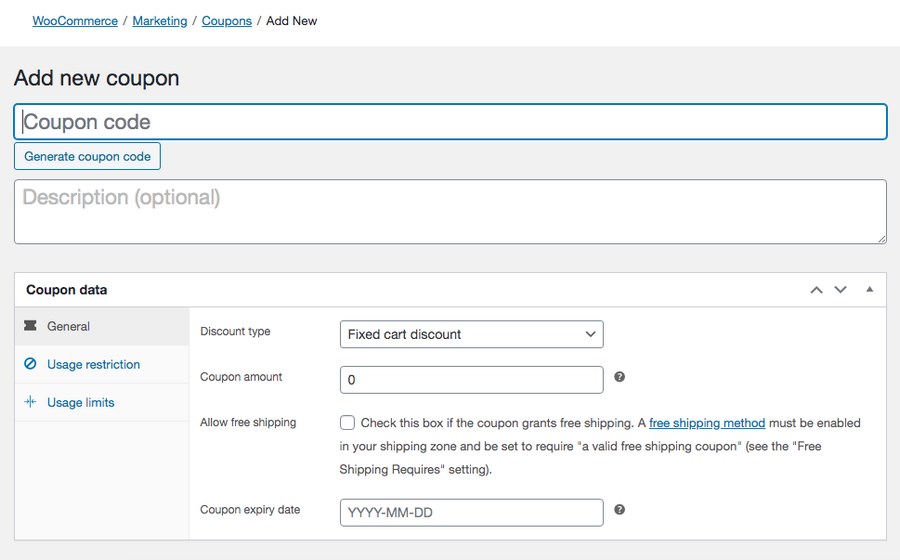
Start by coming up with a unique name for your coupon code. The coupon code is what you’d be promoting or sharing with your audience. It would help to come up with a unique and creative name.
With so many occasions, holidays, events, and regular sales promotions, it does get a little challenging to come up with a creative name. It does help make your coupon code stand out from the crowd where everyone else runs similar offers though, so is well worth doing.
For instance, if you create a coupon code for the massive Black Friday sales in 2021, you could create names similar to BF2021, BLACKFRIDAY2021, BFLOOT, WOWBF, WOW100OFF, and so on.
If you prefer, you could also create a system-generated code. Just click on ‘Generate coupon code‘.
Once you have decided on a name, your next action step would be to run through the three tabs, General, Usage restriction, and Usage limits.
Under the General tab, you can decide on the type of discount you’d like to offer among the various options available. It could be a percentage discount, a fixed cart discount, or even a fixed product discount.
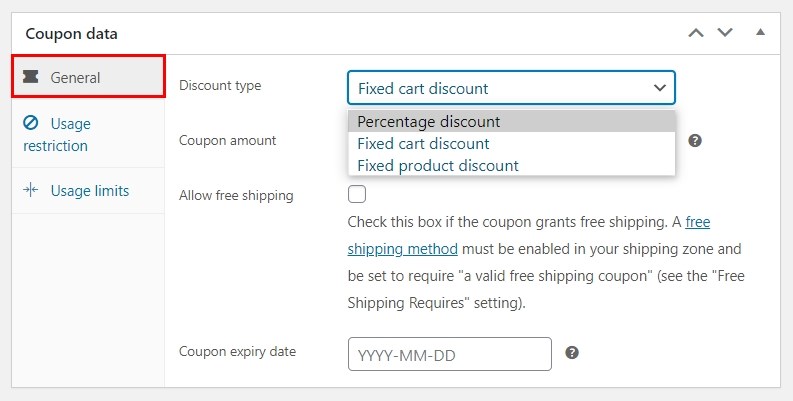
Once you’ve decided the type of discount, you could decide on the coupon’s value. The coupon value will be either a percentage or a fixed number, based on the type of discount you’ve selected.
You could also choose to offer free shipping and an expiry date for your coupon code.
The next tab is Usage restriction. As the name suggests, you could set various restrictions on the usage of the coupon.
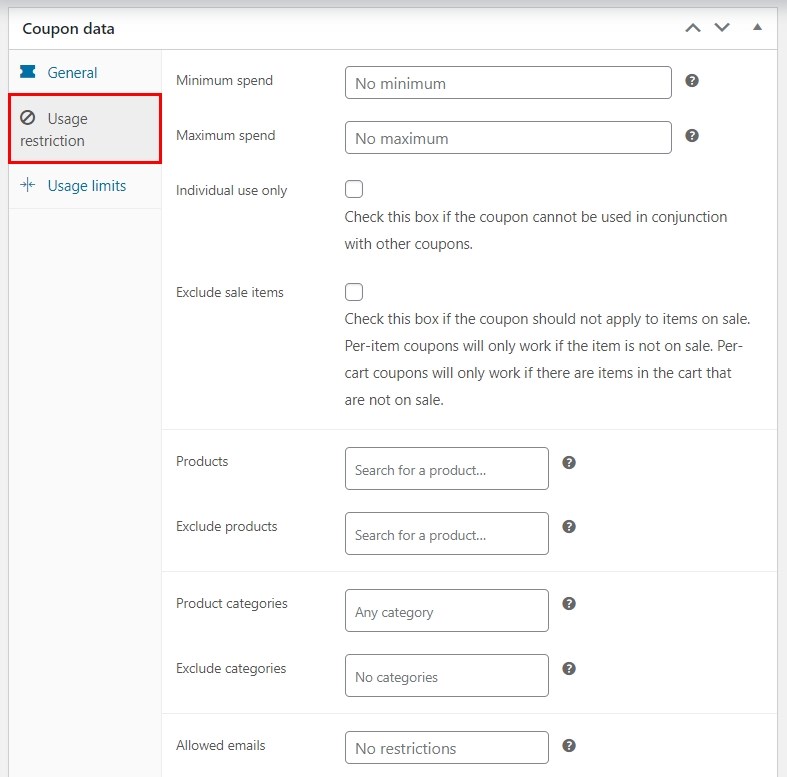
For instance, you could set a minimum spend (subtotal) and maximum spend (subtotal) to use the coupon. You could choose to exclude the usage of the coupon on items that are currently on sale.
You could also choose to include or exclude products and categories for which the coupon can be applied.
The last tab is Usage limits. Depending on the discount type you’ve opted for under the general tab, you may see an additional field.
If you’ve selected the fixed cart discount option, you’d notice the following two fields, usage limit per coupon and usage limit per user.

The usage limit per coupon, as the name suggests, is the total number of times the coupon can be redeemed before it is used up. The usage limit per user is the number of times an individual user can redeem the coupon.
If you opted for the percentage discount or the fixed product discount, an additional field will be included, called Limit usage to X items. Where X represents the maximum number of individual items this coupon can apply when using the product discounts.
You could choose to leave it blank if you’d like to apply the code to all items in the cart.

For example, enter 5 into the box and the coupon can be used five times before expiring.
Once you have entered the various required fields, click ‘Publish’.

You’ve just created your coupon code!
WooCommerce Coupon Extensions
WooCommerce gives you the option to go beyond creating the essential coupons we just covered.
You could create Personalized Coupons, Smart Coupons, URL Coupons, WooCommerce Store Credit Coupons, Free Gift Coupons, and Group Coupons, as shown below.

However, to use them, you’d have to consider buying the coupon extensions individually. For this very reason, we recommend a very popular plugin called Advanced Coupons.
Create Coupon Codes With the Advanced Coupons Plugin
The Advanced Coupons plugin is one of the best coupon code plugins on the market. It allows you to create various smart coupons such as BOGO (Buy One Get One) deals, loyalty programs, shipping discounts, among many more, to help boost your sales.
Go ahead and download, install and activate the Advanced Coupons plugin in your WordPress dashboard.
Once the plugin is activated, click on ‘Add coupon’, under Marketing > Coupons.
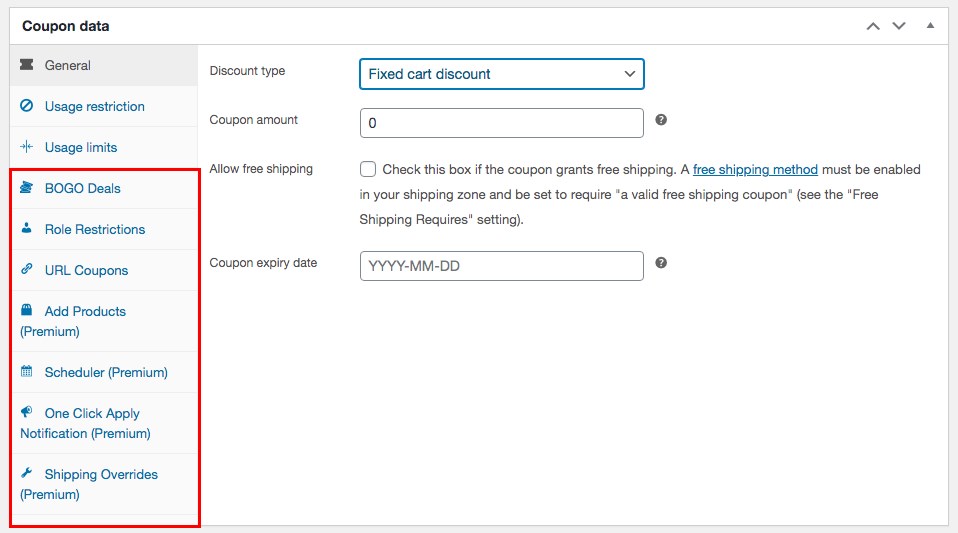
You will notice a set of new tabs added to the default WooCommerce coupons menu. Some of the options are only available in the premium version of the plugin.
Let’s dive in and create some smart coupon codes.
How to Create a Buy One Get One (BOGO) Coupon With WooCommerce
Ok, let’s be honest here. Have you ever made a purchase simply because of a Buy One Get One deal? We know we have, on numerous occasions!
BOGO coupons are a great way to entice customers into purchasing a product in your store. You could offer a buy one get one free, or even a buy one get one at 50% off. The fact that the customer could miss out on a great deal and save some money, will entice them into purchasing the product.
This feeds into the psychology of coupons we talk about earlier.
To create a BOGO coupon, click on Add coupon under Marketing > Coupons. Then click on the ‘BOGO Deals’ tab.
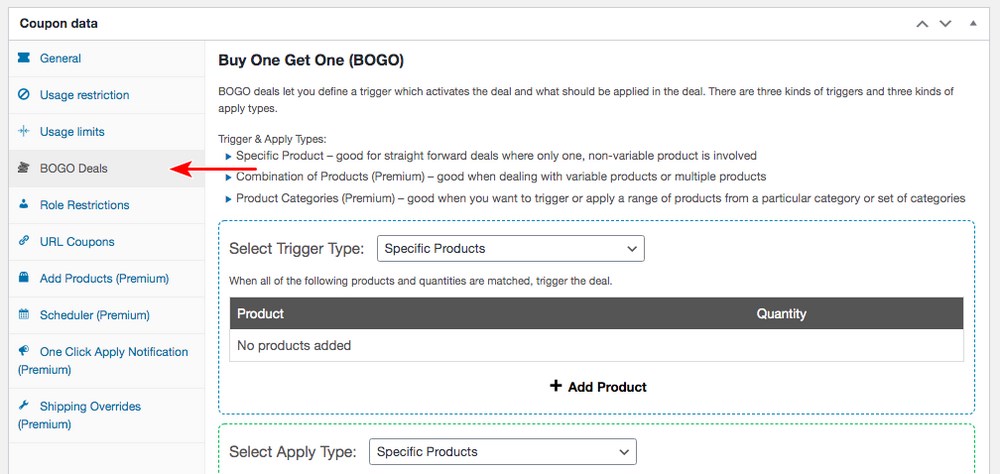
Enter a coupon code name of your choice and then set the conditions for the BOGO deal.
BOGO deals can be activated based on a specific trigger. Once the trigger’s activated, you can set the deal to be applied to the offer.
The trigger could be activated on selecting a specific product, a combination of products, or a particular product category.

Once you have selected the trigger type, add the product(s) for which the BOGO deal is for. You can apply the BOGO deal to either a single product or several products.
Your next step is to select the products that have to be included in the BOGO deal. You can add either a specific product, a combination of products or apply it to a product category.

After selecting the type, add the products you’d like to include in the BOGO deal. You could choose to give the product for free or at a specific percentage discount. This can be achieved by using the dropdown under the ‘Price/Discount‘ heading. You could either offer a percentage discount or a fixed discount.
For example, let’s say you’ve selected an outdoor tent (specific product) or outdoor camping equipment (product categories). Based on the selection, we’ll offer accessories for the tent for free or a barbecue set at a discount of 50% respectively.
If there are no additional settings or cart conditions you’d like to set, click on publish to create your BOGO deal.
How to Create a URL Coupon With WooCommerce
How many times have you clicked on a link which had a coupon code already applied to it? You may have received an email, came across a social media post, or seen an offer online. Chances are, you’ve clicked on a link and the coupon was applied automatically.
This is a URL coupon.
Typically, you add a coupon code during the checkout. However, the URL coupons tool makes it easy to apply coupon codes.
So, how exactly do you create a URL coupon with WooCommerce?
Click on ‘Add Coupon’ under Marketing > Coupons. Create a coupon name, and set the discount type and the coupon amount in the General tab. You could also choose to set the usage restriction and the usage limit in the respective tabs as we did earlier if you like.
Once you’re done with the above, click on publish.
For instance, we’ve created a coupon code WOWURL. Once you’ve clicked on publish, head over to the ‘URL Coupons’ tab.
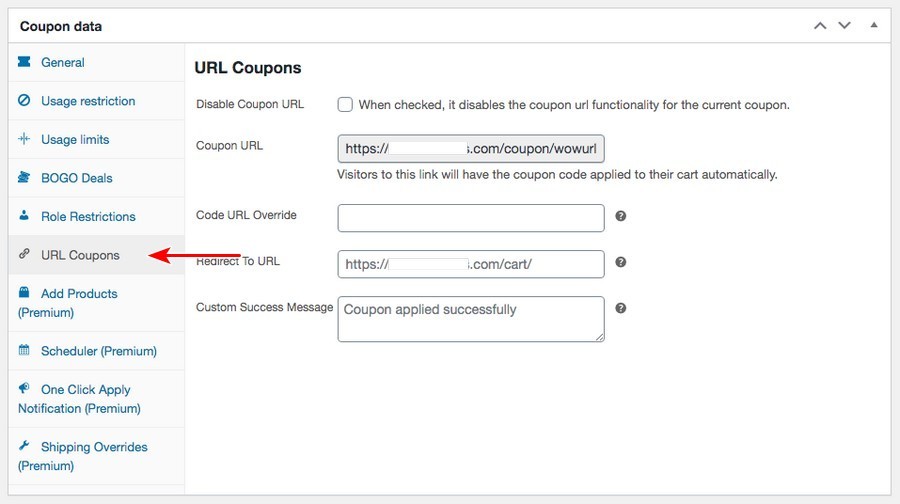
You’ll see your coupon in the URL Coupon tab. You can make any changes you like in the center pane.
If you’ve made any changes, click update. You can now share the coupon URL or promote it.
How to Create a Free Gift Coupon With WooCommerce
Don’t we love the word free? Most of us love the thought of getting a freebie however big or small it might be. Well, at least we do!
Want to drive more traffic and eventually sales on your online store? Do you want to create a lead magnet to build your email list? Consider creating a gift coupon.
A gift coupon is a voucher, a card, or a piece of paper that has a value printed on it and can be exchanged for goods or services.

Offering a freebie or a gift coupon is a great way to build on your email list and drive more sales and reward your existing customers.
And how do you create a gift coupon with WooCommerce?
It’s very similar to how we created a URL coupon, with a couple of key differences.
Click on ‘Add Coupon‘ under Marketing > Coupons.
Create a coupon name, then scroll down to the coupon data area and click on the ‘Add Products‘ tab.
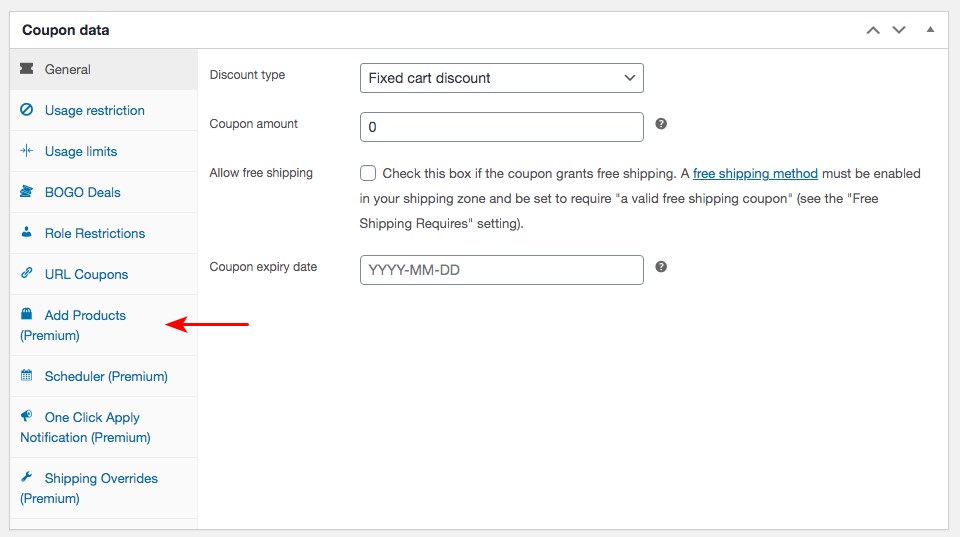
The ‘Add Products’ option is available with the premium version of the plugin. If you have the premium version of the Advanced Coupons Plugin you’ll see the entry. If you’re using the free version, you won’t.
Under the ‘Add Products’ tab, you’ll need to click on the ‘+ Add Product’ button.

Select the product you’d like to offer as a gift. Then, under the ‘Price/Discount’ column, select the ‘$: Override price‘ option. And finally, click on the Add button.
If you’d like to add more products, you could choose to do so by clicking on ‘+ Add Product‘ and repeating the process.
The products will be added to the customer’s shopping cart when they enter the coupon code.
On completing all the above steps, click on the publish button. You’ve just created your gift coupon!
How to Create a Pre-Scheduled Coupon With WooCommerce
Do you want to promote an offer while you are on vacation? Do you want to create a sense of urgency, thereby maximizing sales with a limited period offer? You could try using the Scheduler option in your Advanced Coupon plugin.
Scheduling your coupons allows you to plan ahead and prepare for a potential rush during the offer rather than worrying about turning your coupons on and off at specific times.
For instance, you could schedule your coupons for holidays and events such as Black Friday Sale, Christmas, New Year, Valentine’s day, and so on. You could also create a 24-hour sale and schedule your coupons to go live and end the sale accordingly.
To create a pre-scheduled coupon with WooCommerce, click on ‘Add Coupon’ under Marketing > Coupons.
Create a coupon name, and set the discount type and the coupon amount in the General tab.
Then click on the ‘Scheduler’ tab.
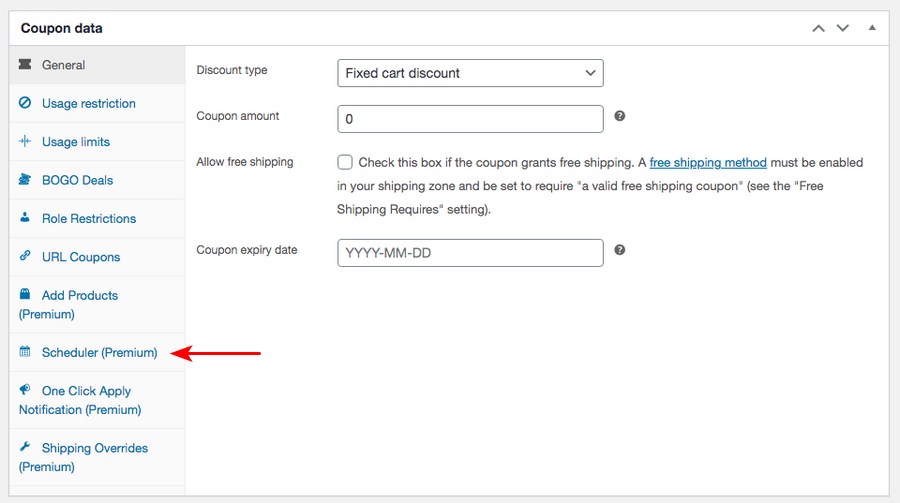
The Scheduler option is available only with the premium version of the Advanced Coupons Plugin.
Under the Scheduler tab, you can choose a coupon start and expiry date.
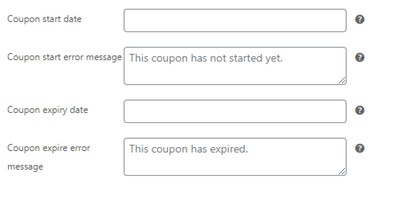
The coupon will be triggered at 12:00:00 on the start date you’ve selected and expire at 23:59:59 before the end date you’ve selected. The timezone depends on what you’ve set in your WordPress dashboard.
Timezone settings can be accessed from Settings > General > Timezone.
Once you’ve completed the above steps, click on the publish button. You have now scheduled your coupon codes!
How to Promote Your Coupons
Now that you’ve created your coupon codes with WooCommerce, the next step is to get the word out. You’ve got to promote your coupons so people know they are then and actively engage with them.
Let’s cover the various digital touchpoints to create an impactful promotional strategy.
Here are some common methods you could use to promote your coupons. These are tried and tested methods that should yield positive results.
We use them ourselves and they work incredibly well!
If you’ve built an email list, mail your audience the coupon code. It could either be a coupon code or the coupon URL. You could also include the coupon code in your system-generated emails, thank you emails, confirmation emails, transaction emails, and so on.
The idea is not to miss out on an opportunity to ensure the coupon code is sent to anyone interested in your business.
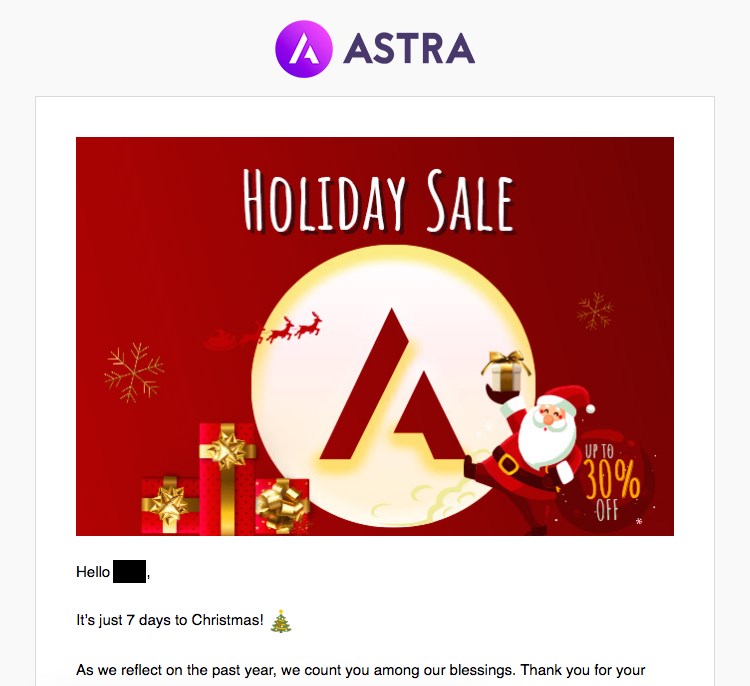
Here’s an example of a coupon URL. We’ve applied a 30% discount on our own products during the Christmas sale.
While there are several plugins on the market, one that we highly recommend is our own Convert Pro plugin. It is an ideal plugin to install for your email opt-in and lead generation. It helps you build your email list, and helps with conversions too.
Social Media
It makes sense to promote your offer everywhere you can on social media.
Use your Facebook and Instagram story. Promote a limited period offer to create a sense of urgency. Ask your followers to share and engage with your post to receive a gift coupon.
Approaching social media influencers can be a great way to help promote your codes. You can have these influencers promote your product and coupon code with their audience, for a small fee.
You could also use relevant hashtags such as #coupons #deals #promotion #sale to promote your own coupons.
Lead Magnets
Create a lead magnet on your website. Either showcase the lead magnet as soon as someone visits your store, spend a certain amount of time on your store, or when they are about to leave.
For example, you could offer a 25% discount as soon as a user visits your store. To obtain the discount voucher, they’d have to provide you their email address. You could offer a further 5% discount if they were to leave your store without making a purchase.
The lead magnet could be a BOGO deal or even a gift coupon. Not only does this help you in offering a coupon to entice the customer into purchasing a product from your store, but you also get to build your email list, which will, in turn, help promote new offers and coupons at a later point.
Our own Convert Pro can help with email opt-ins and lead generation. It uses a drag and drop form builder to make it easy to create and implement forms on your site.
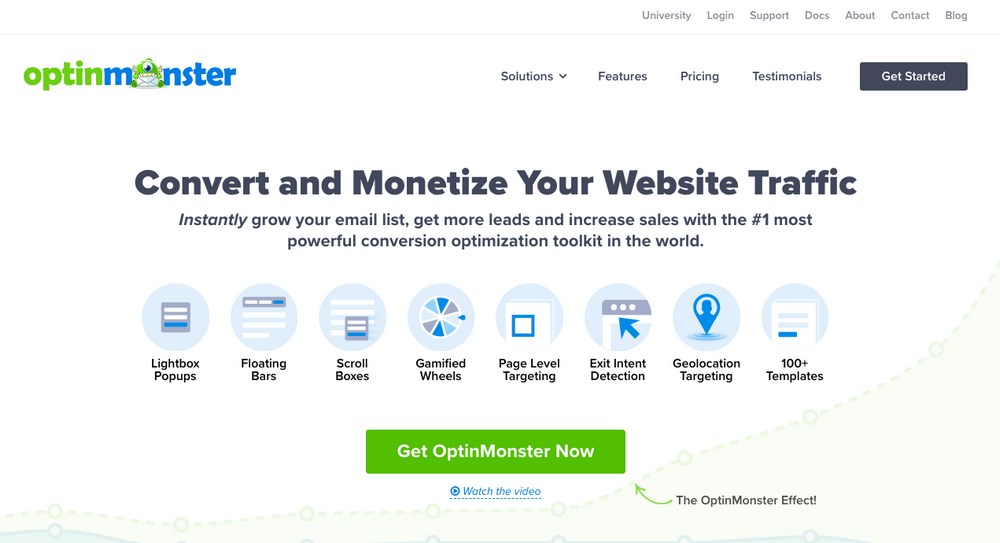
Another plugin you could consider using is OptinMonster.
Gamification
Most website visitors will enter their email address willingly for a chance to win a freebie. Gamification is a psychological trick used by smart marketers to increase their sales and conversions instantly.
Spin to Win is a discount coupon wheel opt-in form that adds gamification to your website. Your visitors can play a game, win discounts and special offers after playing the game.
You could use any free Spin to Win plugins from the WordPress plugin repository or consider using the OptinMonster plugin.
Advertisements
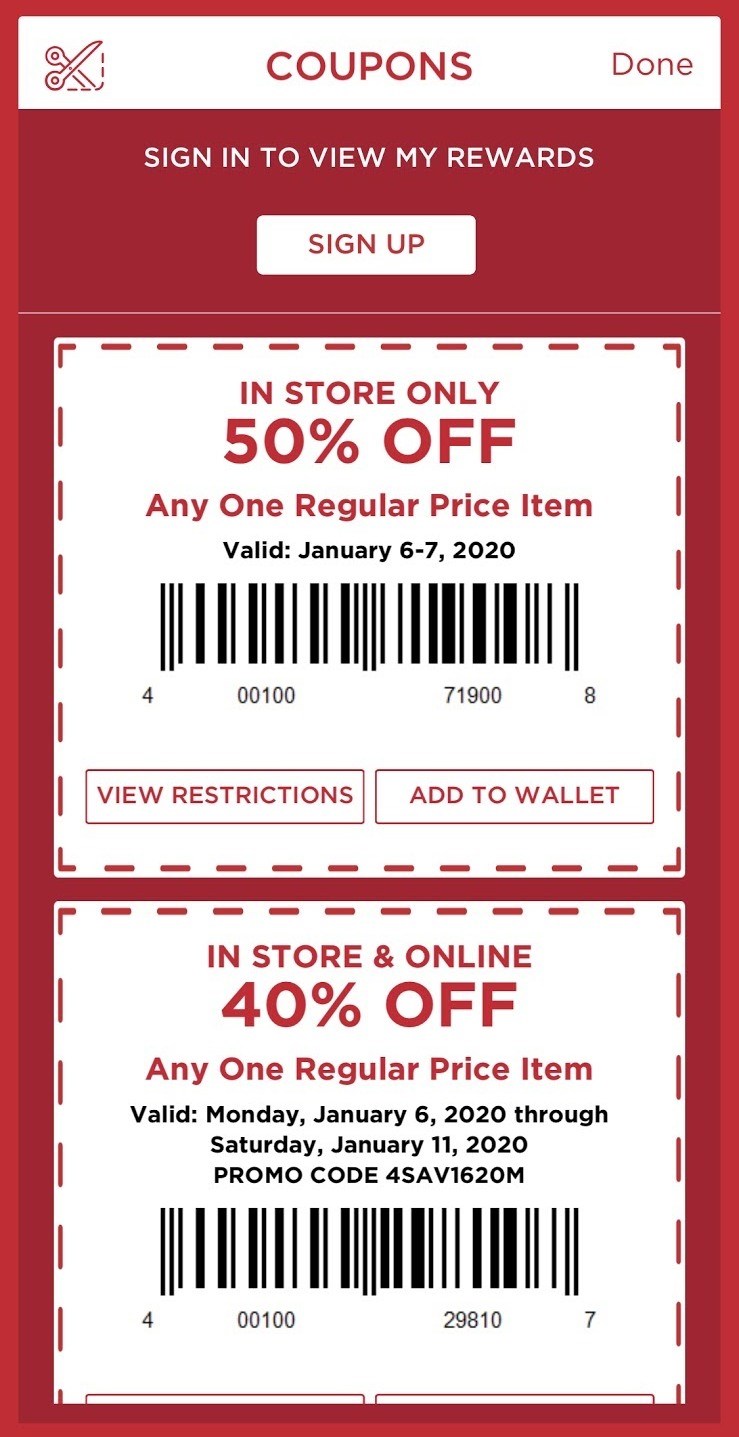
You could consider running advertisements on social media or even on the Google display network. The ads can run by having the coupon code included in an image, as shown below.
(Source: bigcommerce.com)
SMS
Similar to building your email list, if you have your customers’ mobile number, you could consider sending your discount coupon code(s) via text message. Obtaining permission to text your customers is critical here.
Offline Events
How many times have you been handed over a card containing a coupon code at a trade show?
You could hand out cards or flyers that have your coupon code included. Not only can you build a face-to-face interaction with your prospect, but you also stand a chance to build on your email list and collect other contact details.
Conclusion
Coupons are an effective method to boost your traffic and improve sales. They feed into human psychology and are so ingrained, not everyone realized they are being influenced by them.
If you run a WooCommerce store, give coupons a try and incorporate them into your marketing strategy.
We hope the methods mentioned in this article help you create effective coupons for your store.
Feel free to use the steps here to create the coupons but see if you can come up with some creative way to use them in your store. Share those ideas in the comments if you like!
What WooCommerce coupons do you use? Which do you think works best? Have any examples of coupon offers that really stand out? Tell us about your experiences below!
Disclosure: This blog may contain affiliate links. If you make a purchase through one of these links, we may receive a small commission. Read disclosure. Rest assured that we only recommend products that we have personally used and believe will add value to our readers. Thanks for your support!



I thought it would be challenging to add coupon code functionality to my WooCommerce website. But you guys made it so easy for me. Thank You.
Cheers, glad it helped!
Thanks for this guide. The basic WooCommerce coupon functionality is enough for me now.
This article was very informative. 👍
Glad to hear that the guide has helped! 🙂
I used to be able to add a start date for my coupon code but this is no longer an option now or am I missing something?
Hello Heather, sorry we are unaware if WooCommerce has removed that option.
Thanks for sharing the detailed information very informative blog. I’ve learned something new today, keep up the good work!
free gifts for woocommerce is best plugin most attrective for multiple gift and discount. And free gifts to the customers of your online store in a powerful and flexible way.
Thank you for sharing this post! Really interesting!
Very helpful article that is not too pushy on the plugin. Thank you.
But I wonder how I could change the display of the coupon on the product page.
For instance, now there is a magnet in the corner of each product with a text that says “sale!”.
How could I change that text and put the % of discount instead?
Or how to strikethrough the existing price and show the discounted price with a different color?