Do you own an online store? Do you want to add multiple variations of products?
If so, this guide to WooCommerce product variations is exactly what you need!
Just like physical stores, online stores come in different forms and sizes. Powered by WooCommerce, WordPress offers enough utility to cater to virtually any type of eCommerce store.
As a WooCommerce store owner, one of the more popular features you can take advantage of is the ability to add multiple buying options for a single product or even a single product website.
Though they are very useful, navigating WooCommerce product variations can be quite challenging, especially for new users.
However, once you master them, you’ll quickly discover how powerful they are and how your store can benefit tremendously from them.
If you’ve ever felt confused when trying to set up WooCommerce variable products, rest assured that you’re not alone. That’s why we’ve compiled all the best advice you need to master WooCommerce product variations.
You’re probably interested in knowing:
- What WooCommerce variable products are
- How WooCommerce variations work
- How to set up WooCommerce variations
- How to manage variable products for optimum conversion
- The best plugins and tools for WooCommerce variations
In this article, you’ll find answers to all these and much more. Let’s dive in!
What Are WooCommerce Variable Products (And How Do They Work)?
By default, WooCommerce lets you add six different product types to your store. Of all these, only variable products allow you to offer multiple buying options for the products you list on your store.
For example, an electronics store may have a stock of the same mobile phone in various storage and color options.
To offer your buyers the ability to choose from several product variations, you’ll need to select the Variable Product option while setting up the product. In WooCommerce terms, these different buying options are called Attributes.
Attributes
Attributes are simple descriptors or properties assigned to different product variations to supply the buyer key information about what they’re about to purchase. These product attributes can be size, material, color, model, or something else entirely.
On the front end of your product page, you can offer your buyers the option to select multiple attributes of the same product. However, site users can only select from these attributes. They cannot add a new one.
For example, a site visitor may order a “brown” “leather” “size 45” shoe. This is called a product variation.
Variations
The final selection a buyer makes consisting of one or more attributes is called a product variation. While attributes can exist without variations, you need to first add attributes before setting them up. We’ll talk more about this in the section about setting up WooCommerce variations.
In our example from the previous section, the keywords, “brown”, “leather”, and “size 45” are values of the ‘Color’, ‘Material’, and ‘Size’ attributes. The product variation is a combination of these attribute values.
When you add only attributes to your products, they only display information to your site visitors. In other words, buyers do not get to select the combination of attributes they’re opting for.
Now that we understand what WooCommerce attributes and variations are and how they help to create variable products, let’s take a look at how it all works in reality.
How To Create and Manage WooCommerce Product Variations
If you have any experience with WooCommerce, setting up WooCommerce variations with this step-by-step guide should be completely hassle-free. All you need to do is tweak some settings which are available by default in your WordPress dashboard.
If you prepare a video tutorial instead. We got that covered as well.
Of course, you need to already have WooCommerce installed and activated on your self-hosted WordPress site. Once you’ve done these, you can follow these steps to get your variable products running.
Step 1: Install Variation Swatches for WooCommerce Plugin
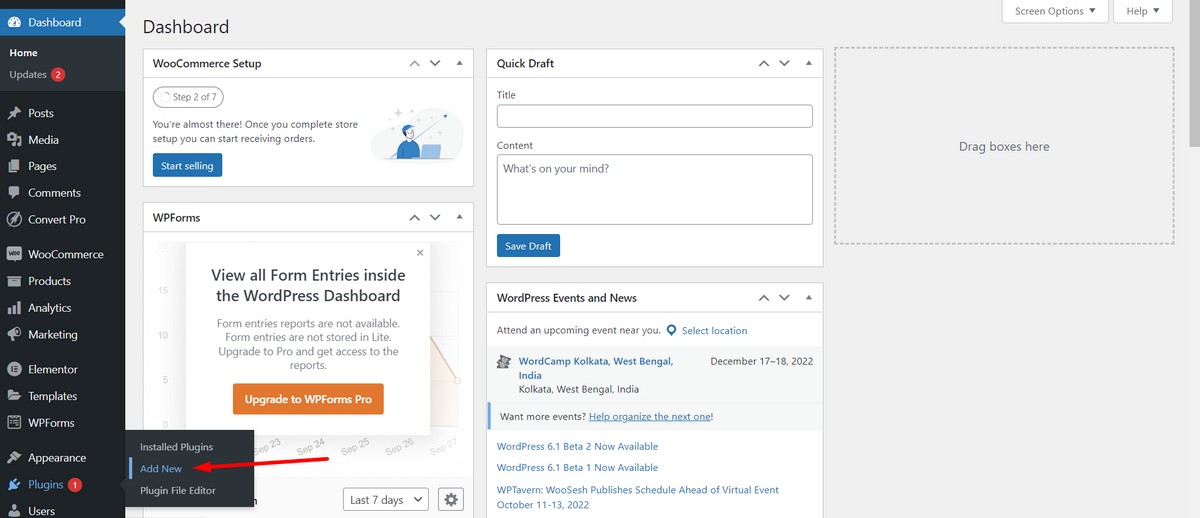
Go to your WordPress admin dashboard and then navigate to the Plugins > Add New.
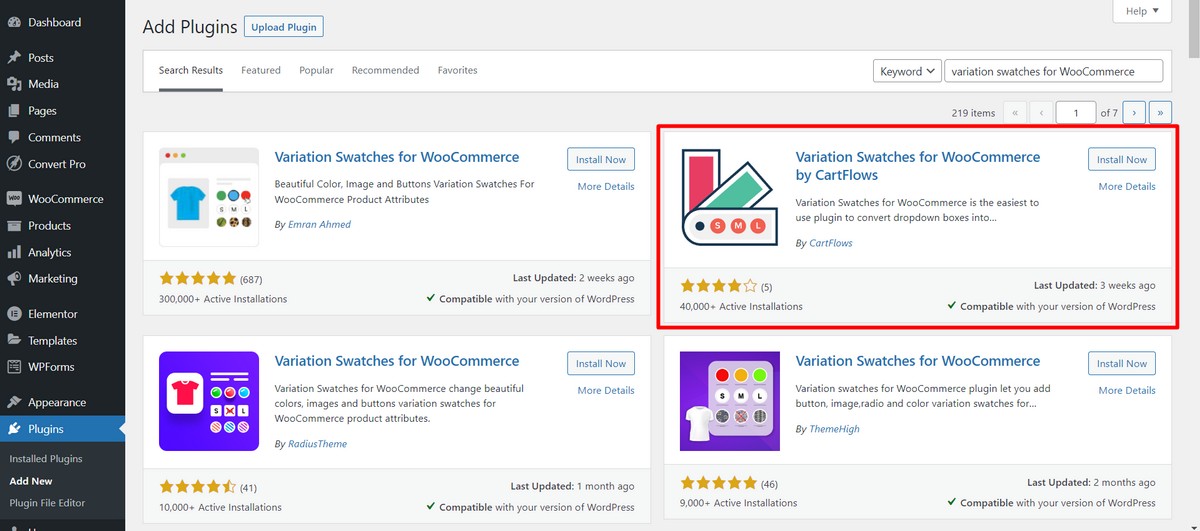
Now, search for the keyword, “variation swatches for WooCommerce”. Then you’ll see the following plugin developed by CartFlows.
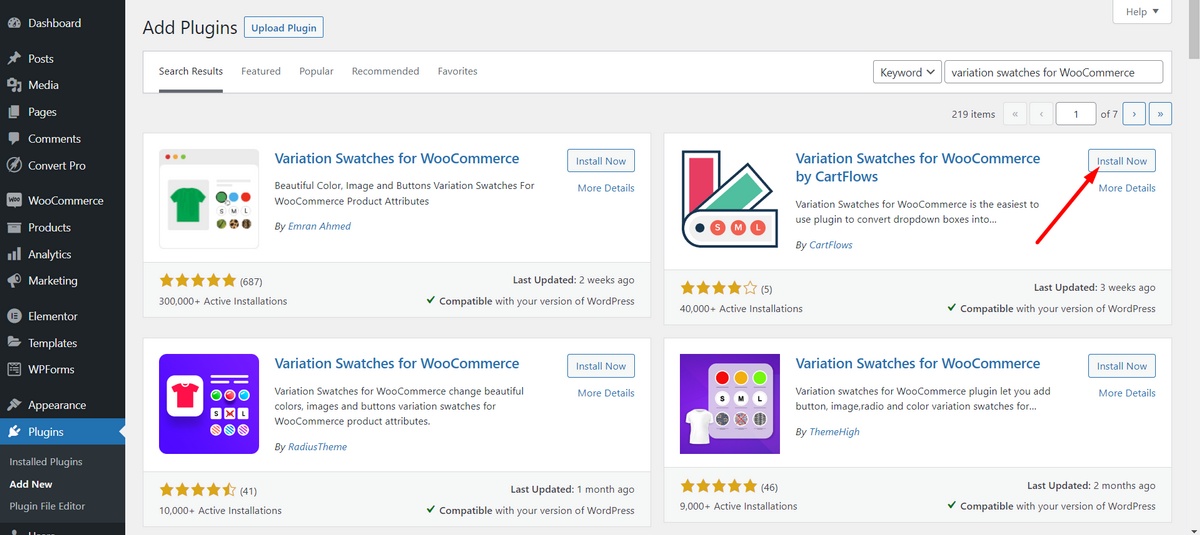
Now, click the Install Now button.
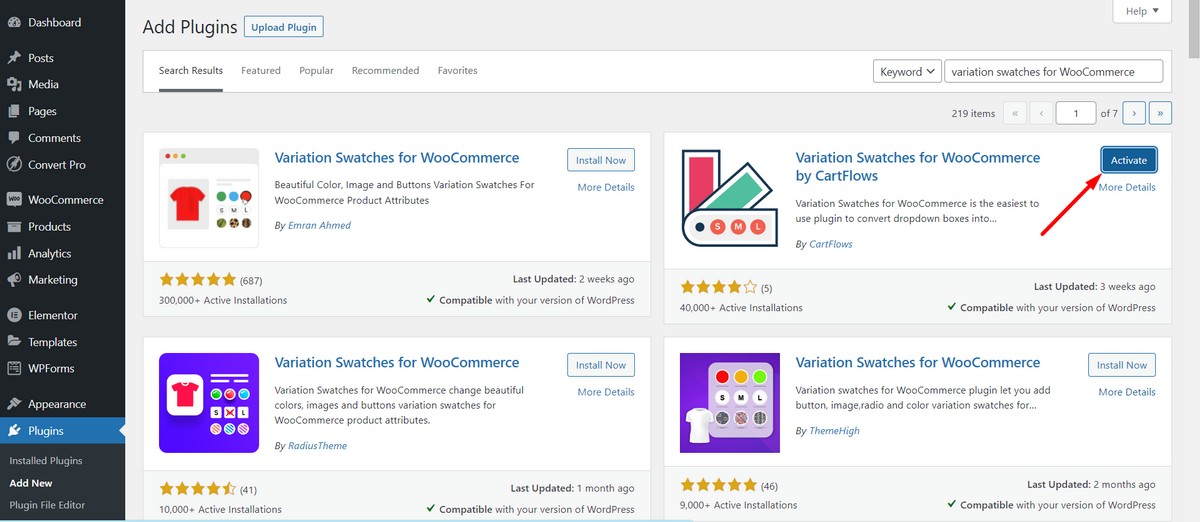
Next, Activate the plugin.
That’s it.
Step 2: Add Global Attributes to Your Store
Since we’ve previously discussed the role attributes play in setting up variable products, we’ll first add them to your store. Adding global attributes makes it possible to apply them to new or existing products more easily in the future. This can save you a lot of time.
To add new global attributes to your store, all you need to do is navigate to Products > Attributes in your WordPress dashboard.
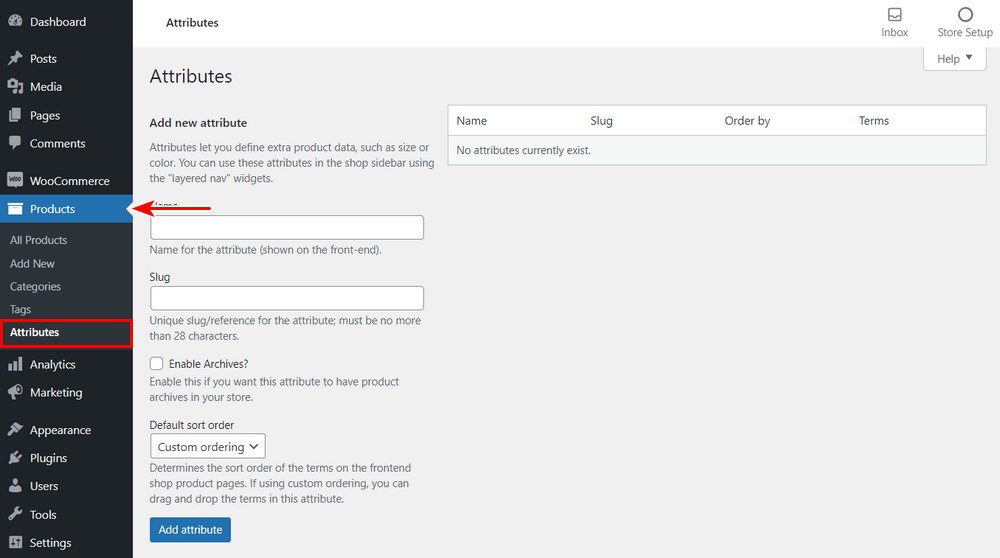
Attributes’ Settings
On this page, you can set all the properties of your new global attribute:
- Name: This is the attribute’s title (such as ‘Color’, ‘Size’) that reflects on your site’s front-end. It’s the first property your site visitors get to interact with.
- Slug: Besides the main attribute name, you can choose to assign another version to your attribute. The slug, if added, replaces the attribute name in the Uniform Resource Locator (URL).
- Archives: Additionally, you can enable archives for the attribute you’re creating. When enabled, WooCommerce creates a page with all the products associated with this attribute. You can then easily follow the page’s URL (e.g. https://onlinestore.com/color/green/) to view the products.
- Default sort order: You can choose from four available options how you want the terms in this attribute to be sorted on the frontend. For example, you can select the Name option. This means if a ‘Size’ attribute consists of values, ‘Small’, ‘Large’, ‘Medium’, these terms will be arranged in an alphabetical order. Similarly, you can select Custom ordering to drag and drop the terms on the next page.
Next, click Add attribute to save your preferences. Now that you’ve created your first global attribute, click on Configure terms to add the necessary values to it.

On the next page, you get to add new values to your attribute. In our case, we have to fill the fields under the Add new Size section (since the attribute name is ‘Size’.)
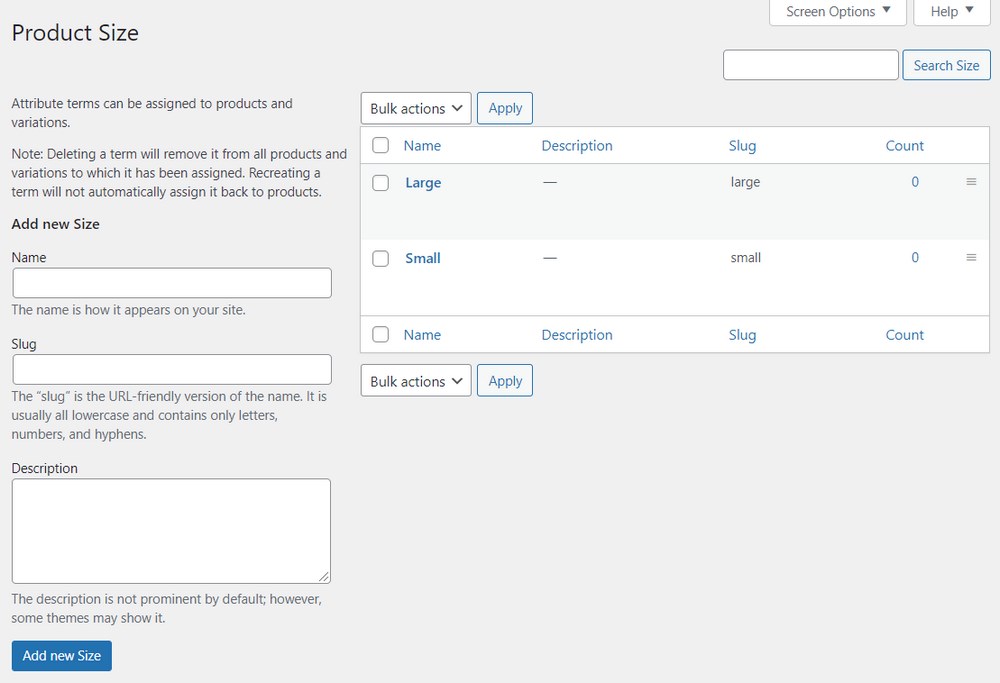
The Name and Slug properties are similar to what we had on the previous page. Additionally, you can add a description to the new attribute value. Depending on your site theme, the description may or may not be displayed.
You can add as many attributes as you like to your WooCommerce store. Similarly, there’s room to attach as many values to each one as well. Once you’re done, click Add new Size and your global attributes are now ready for use.
Step 3: Add a New Product and Select the Product Type
Having created attributes you can use sitewide, it’s time to add the new product that we’ll apply them to. Of all the product types available on WooCommerce, you can only add variations to variable products. To create a new variable product or edit an existing one, go to WooCommerce > Products.
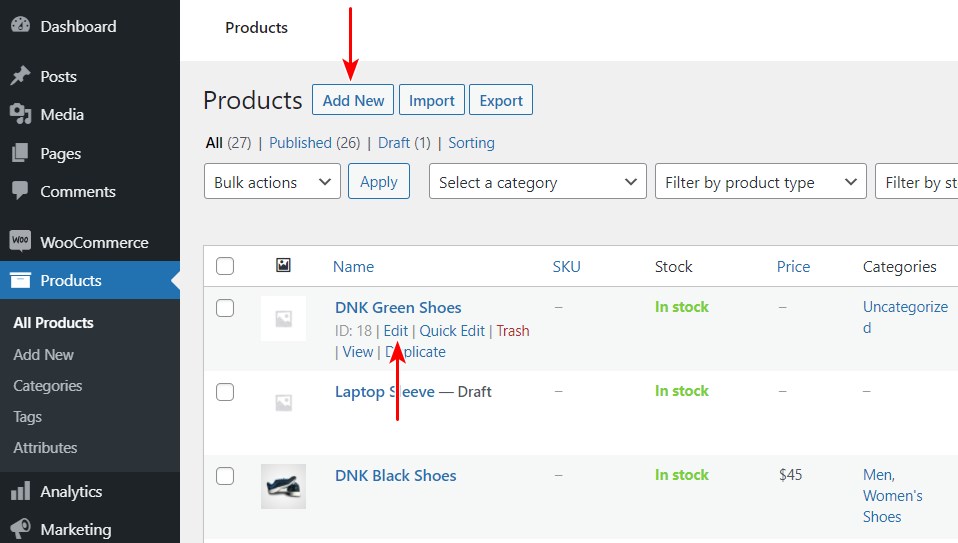
Click Add New to create a new product. Otherwise, hover over an existing product and click Edit on the interactive menu that appears.
On the product settings page, scroll down to the Product data section. The first dropdown menu in this section allows you to select the product type.
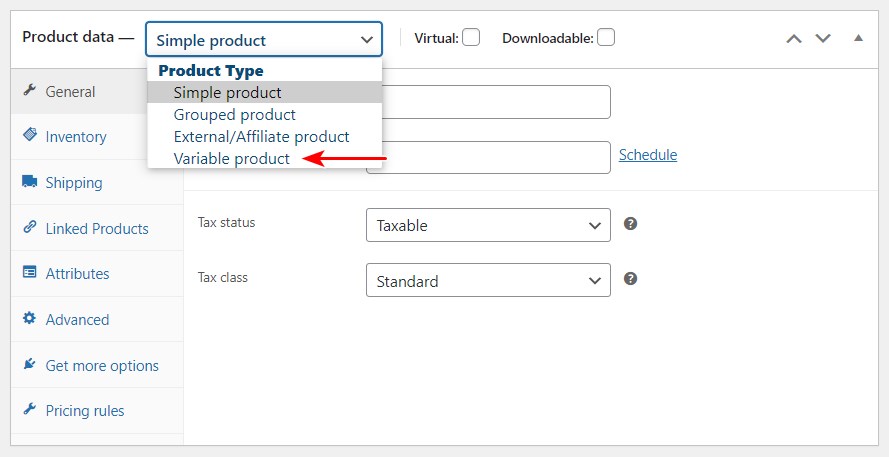
Here, you want to select the Variable product option. Immediately, the settings menu changes to help you set up your variable product. Different tabs allow you to define the product.
For example, you can set your shipping options in the Shipping tab or add upsell products in the Linked Products tab.
For setting up WooCommerce variations, we’ll focus on assigning attributes to the variable product.
Step 4: Assign Variable Attributes to the Product
As we mentioned earlier, variations require assigned attributes to function properly. There are two ways you can assign attributes to your product. You can either use global attributes (the ones we created in the first step) or create custom attributes.
Global attributes are great if several products in your store share the same attributes. On the other hand, custom attributes are more suitable if they’re peculiar to a certain product.
Assigning Global Attributes
To assign global attributes to a product, navigate to the Attributes tab under the Product data section. Here, you get to select any of the attributes you created previously.
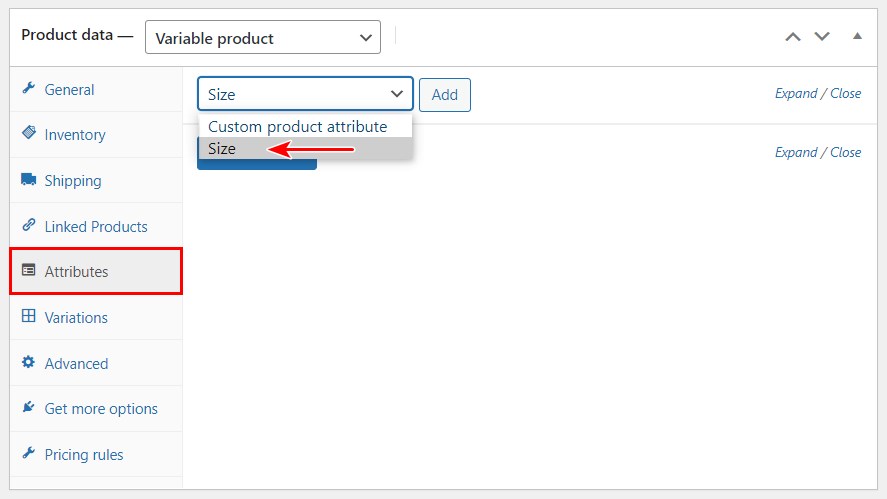
After selecting your global attribute of choice, click Add to apply it to the product. Afterward, the selected attribute’s settings menu appears. Here you can add all the values you want.
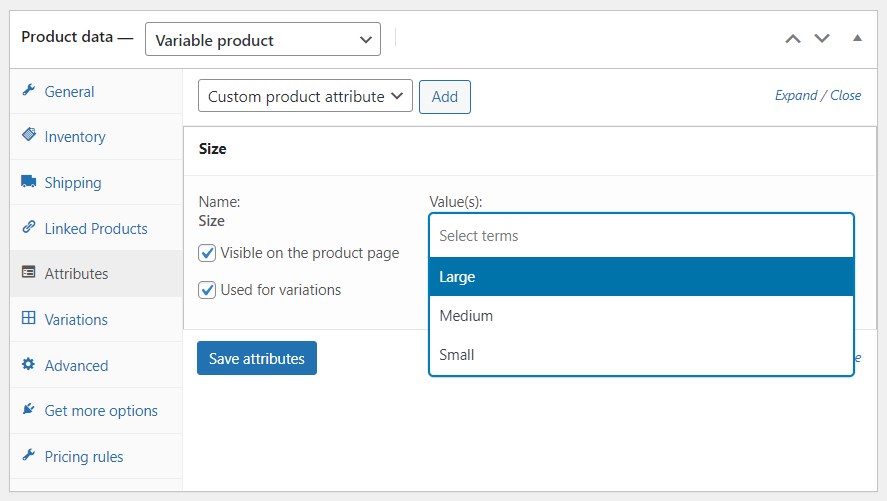
In our example, we’ll add all the size values, ‘Large’, ’Medium’, and ’Small’. Except in rare cases when you choose not to, you want to check the Visible on the product page and Used for variations boxes.
Then, hit the Save attributes button to save all your changes.
Assigning Custom Attributes
Alternatively, you can add custom attributes to a particular product. To do this, select the Custom product attribute option instead of choosing a global attribute you created previously.
This method also lets you add attributes and their values quickly and easily. All you need to do is type in corresponding values in the Names and Value(s) fields.
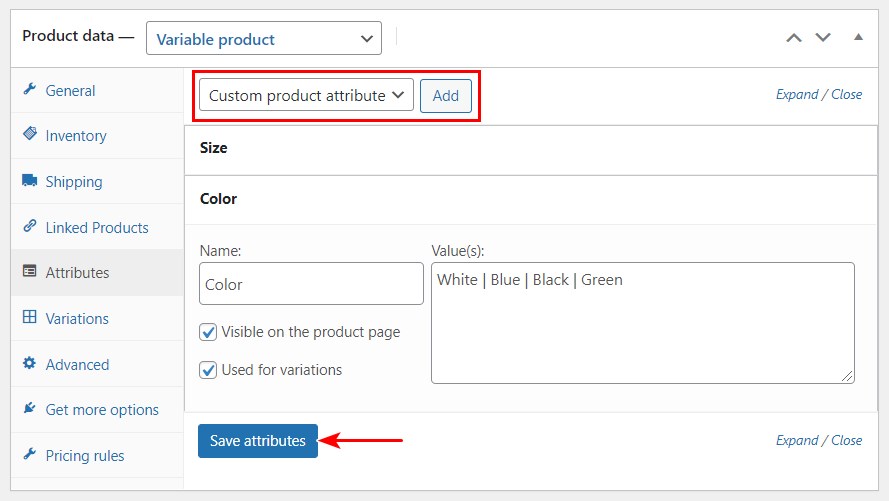
When adding multiple attribute values, separate each term with a “|” sign. Then, check the Visible on the product page and Used for variations boxes as well. Once you’re done, click Save attributes and you’re good to go.
Next is the final step of adding variations to your product and publishing them on your store.
Step 5: Display WooCommerce Variations on Your Store
Finally, it’s time to create multiple WooCommerce variations based on the attributes you assigned to the variable product.
You can go about this by going to the Variations tab. Here, simply hit Go next to the Add variation field.
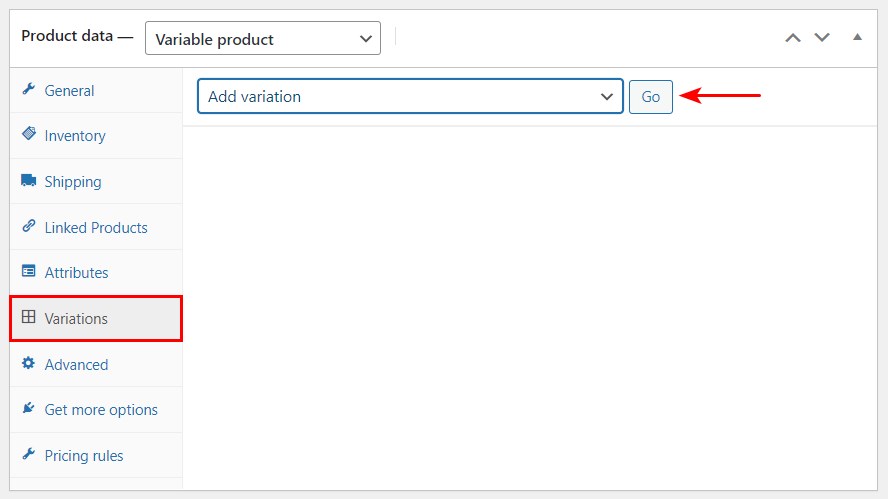
Now, you can create variations that are a combination of the existing attribute values.
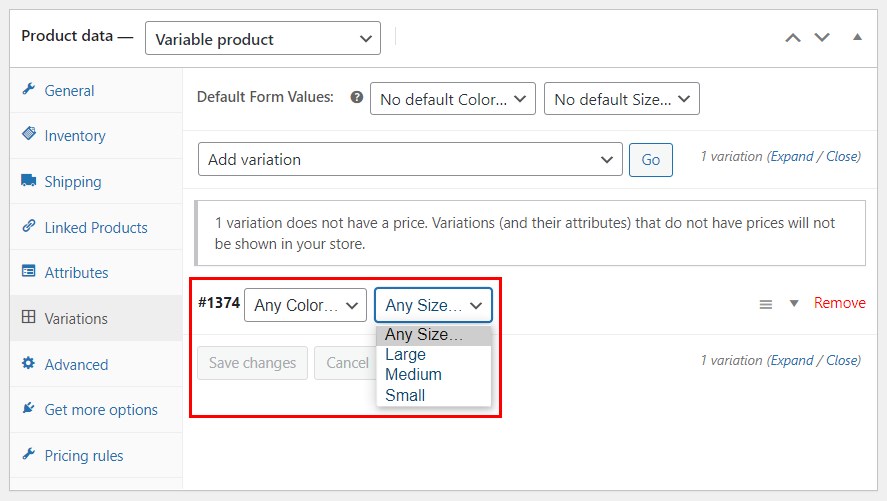
For example, in our case, you can create a variable for a ‘Large’ ‘Blue’ T-shirt. When you’re done, click Save changes.
To make things even easier, you can simply select Create variations from all attributes in the Add variation dropdown menu.
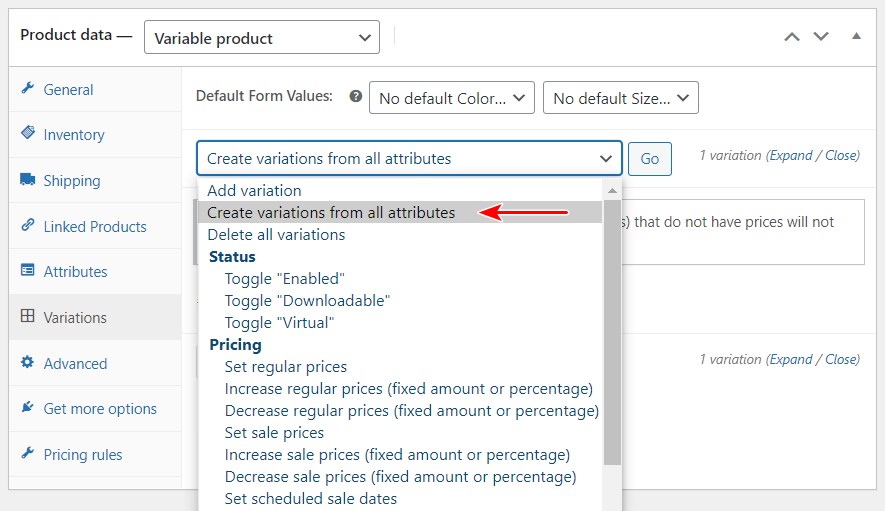
After clicking Go, WooCommerce automatically creates variations from all the attributes assigned to the products.
In our example, we’ll have 12 different variations, since we assigned 2 attributes containing three and four values respectively.
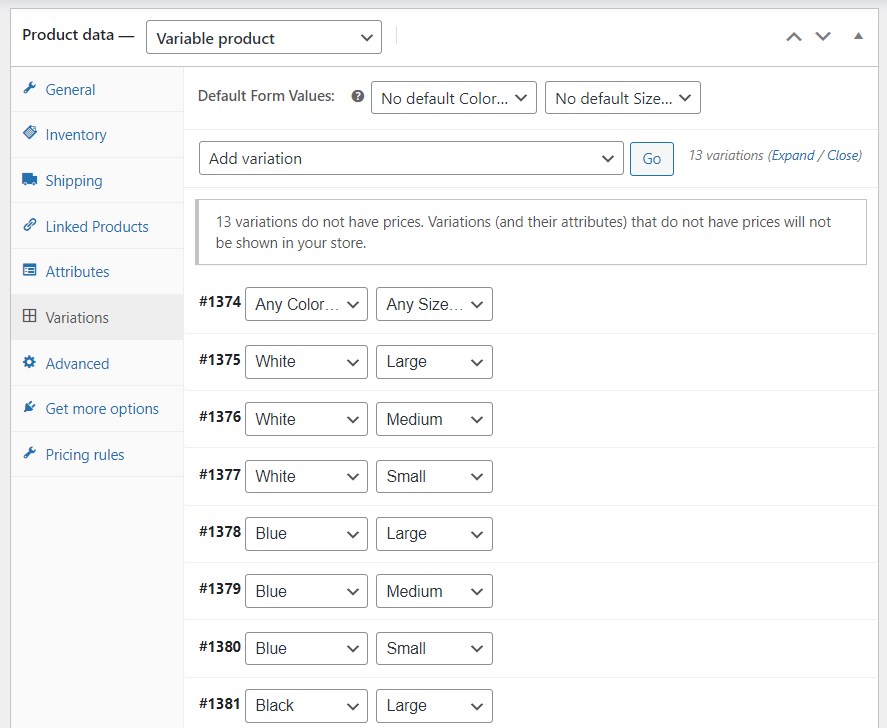
However, these product variations do not contain prices and other important properties yet. To change this, hover over any variation field and click on the empty white region. This reveals a settings editor below.
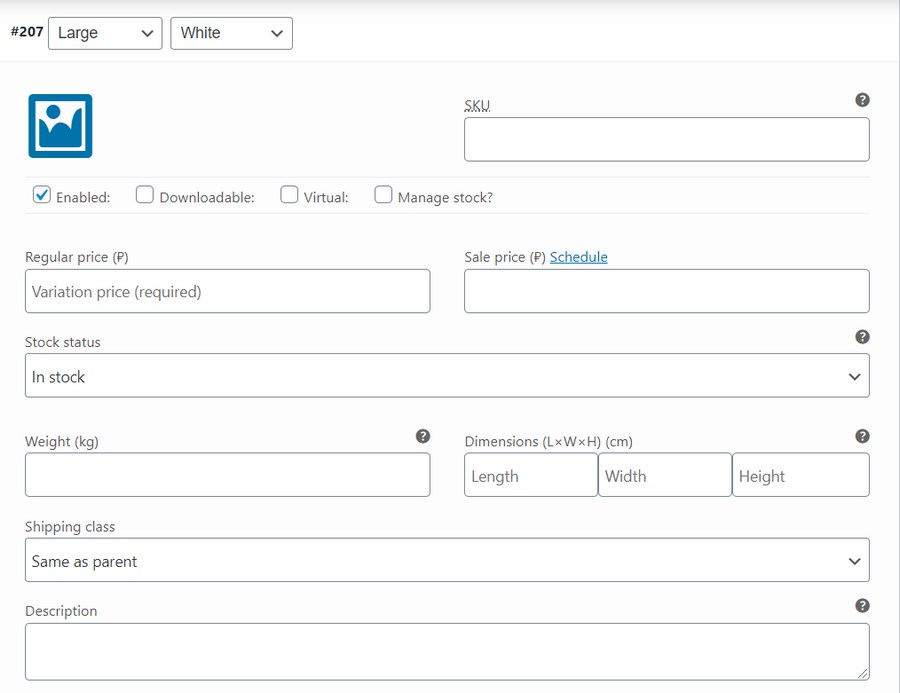
Here, you can edit the variation just like any other typical WooCommerce simple product.
There’s room to add a product image, a regular price and a sale price, enter the weight and dimension values, or even make it downloadable. Similarly, you can toggle the variation on or off by checking or unchecking the Enabled box.
Since each variation has its unique settings menu, you can easily set distinct prices or dimensions for different variations of the same product.
Once you’re satisfied with all your settings, you can preview your variable product by clicking Preview in the upper right corner of the page. The final result should resemble this.
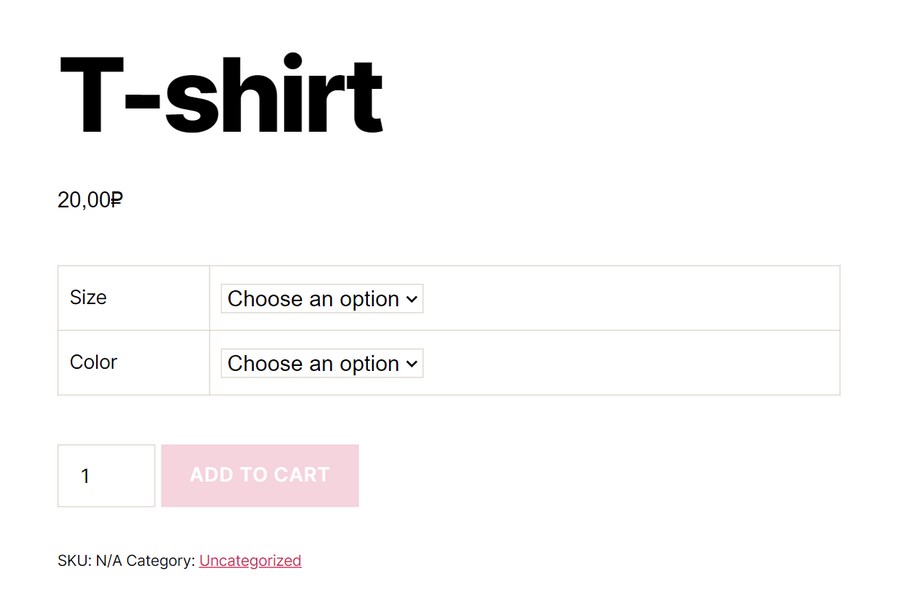
The buyer can select a T-shirt size and color on the frontend. At this point, it’s safe to say, “Mission Accomplished!” Your WooCommerce variations are now set and ready for use!
Understanding and creating product versions might seem difficult in the beginning, but it’s the only way to go if you’re using WooCommerce.
Different sizes, colors, or materials are basic variations in almost any eCommerce store, so it’s highly beneficial for you to learn how to master them.
Keep in mind that with the default variation dropdowns, your store will look just like your competitors’.
Step 6: Customize Variations Swatches
It’s important that your WooCommerce product variations stand out and are enticing to buyers, making it easy for them to find what they need.
That’s where Variation Swatches plugin comes in. With it you can customize it as per your needs.
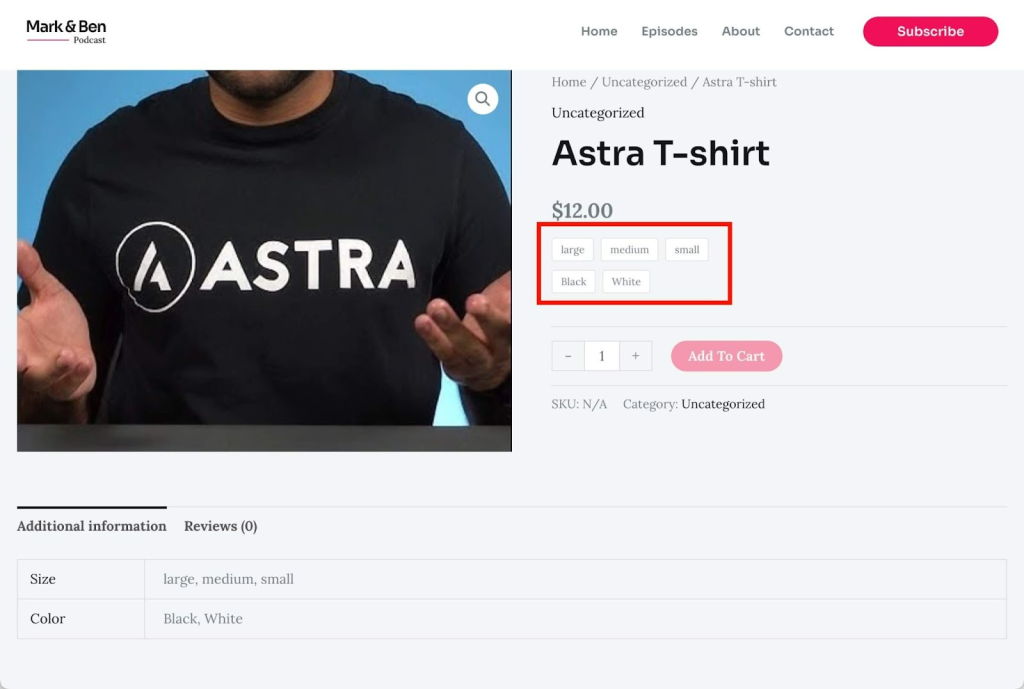
CartFlows variation swatches plugin allows you to use 3 different types of swatches:
- Label: The default option, more useful than the dropdowns.
- Color: Useful for displaying different colors.
- Images: A dynamic swatch that you can use for anything. The best case scenario is using the image of the product itself.
These 3 swatches can be displayed in 3 different shapes: square, rounded corners, or circle. You can choose the exact size too!
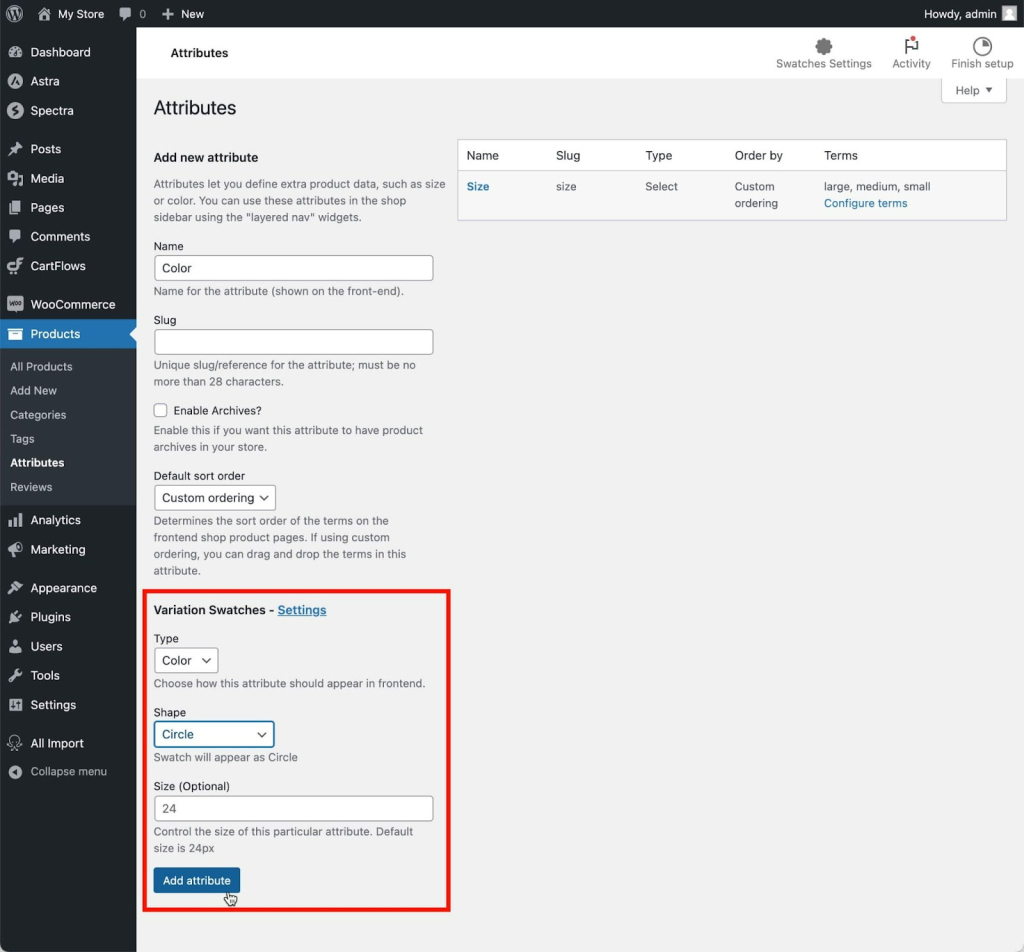
Note:
If you want to change the swatch for an already created attribute, click the Edit button on that attribute.
Let’s say you want to display the color of a t-shirt using the actual color, so you choose the attribute type to be color.
The next step would be to define the swatch terms.
In this example this would be picking the color that matches the name of the label.
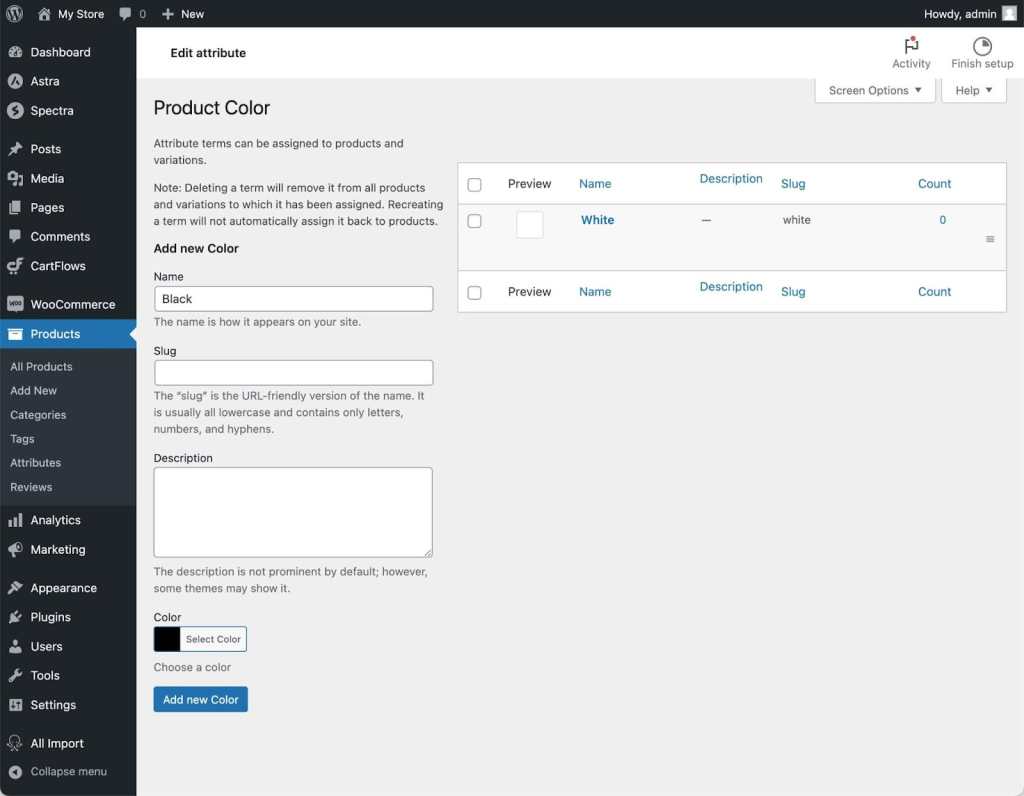
If you already had your terms created you can edit them to read however you like.
Now you have much more attractive swatches that will invite your buyers to click, check out the different options and buy!
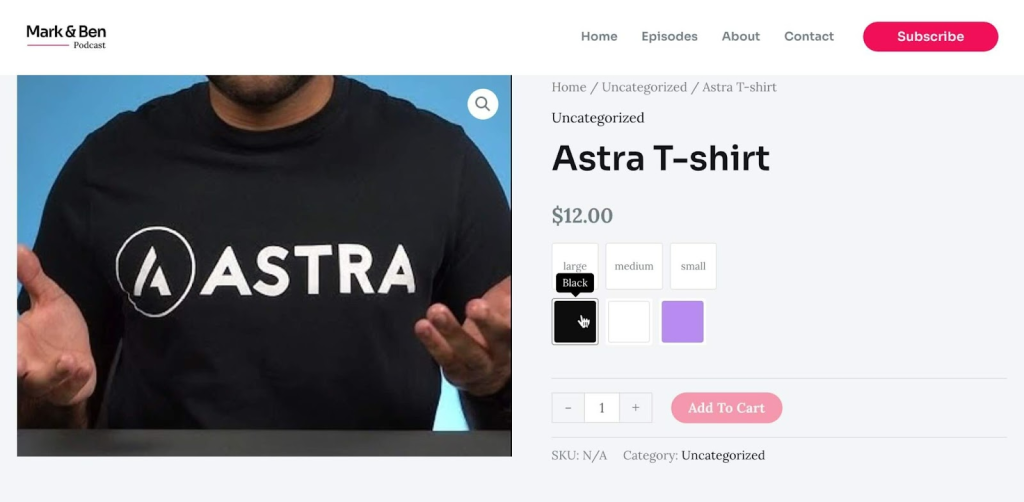
We like to see what we’re buying so how about adding an image for each variation? That’s where additional variation images come in.
You can do this from the same section where you added the price for each variation. You just need to include different images for each color variation in the variations panel.
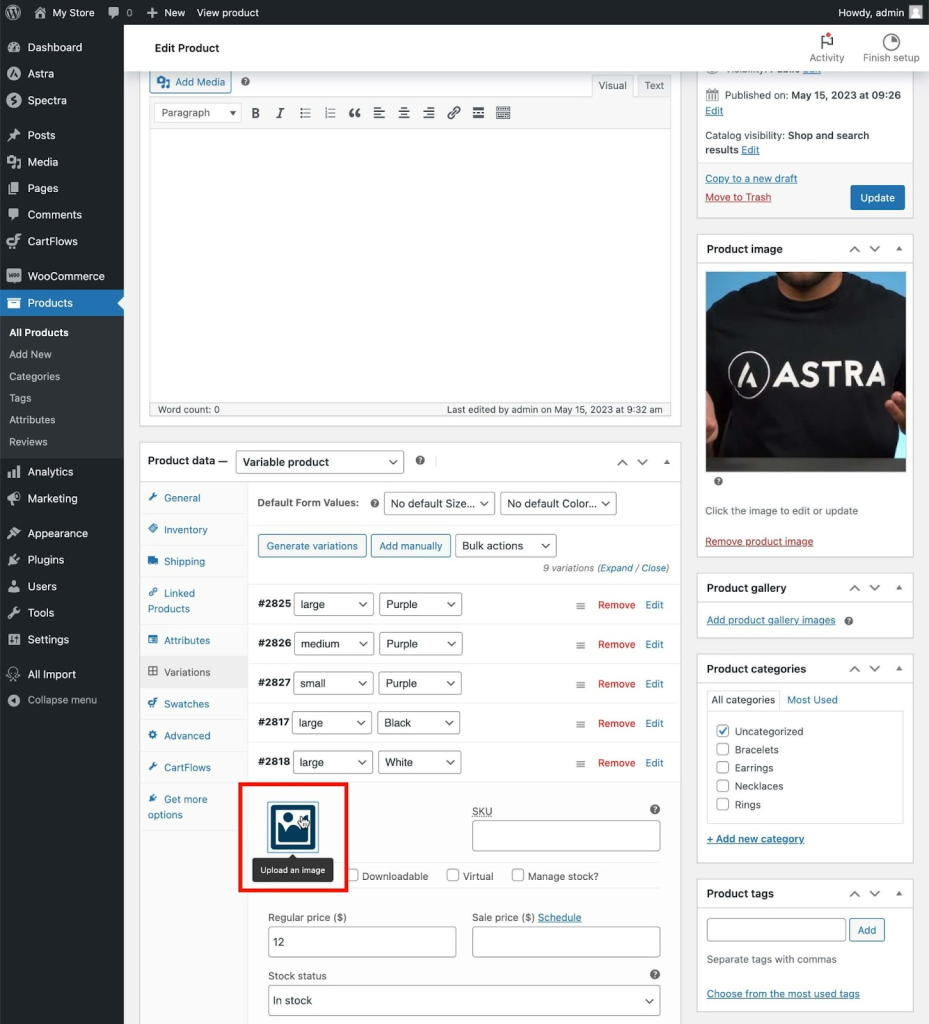
WooCommerce variation images are added from the variations panel
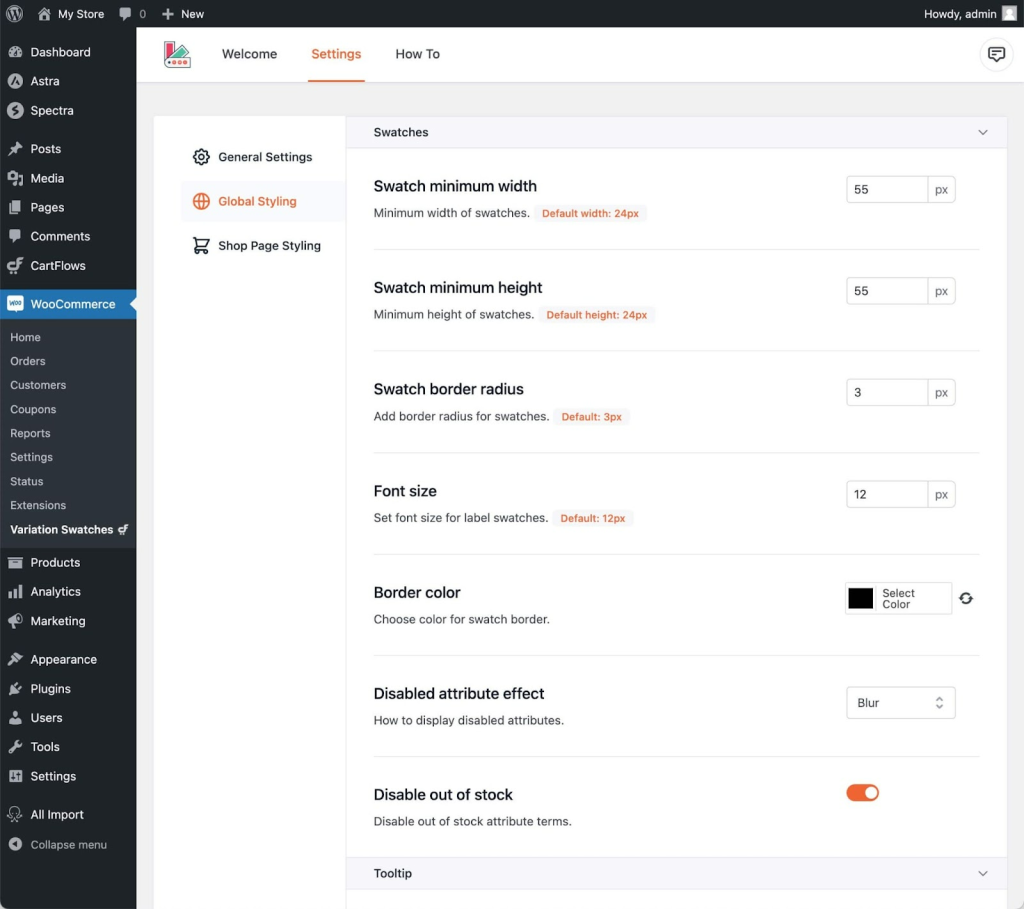
There are many more things you can configure with Cartflows:
- Label styling.
- Tooltip styling.
- Swatch styling.
- And more.
You’ll find the options within the plugin settings panel.
Examples of Product Variations in Ecommerce
There are many product variations that you can use in your eCommerce store to offer more options to customers and maximize sales.
Here are some examples of them in use on our favorite stores:
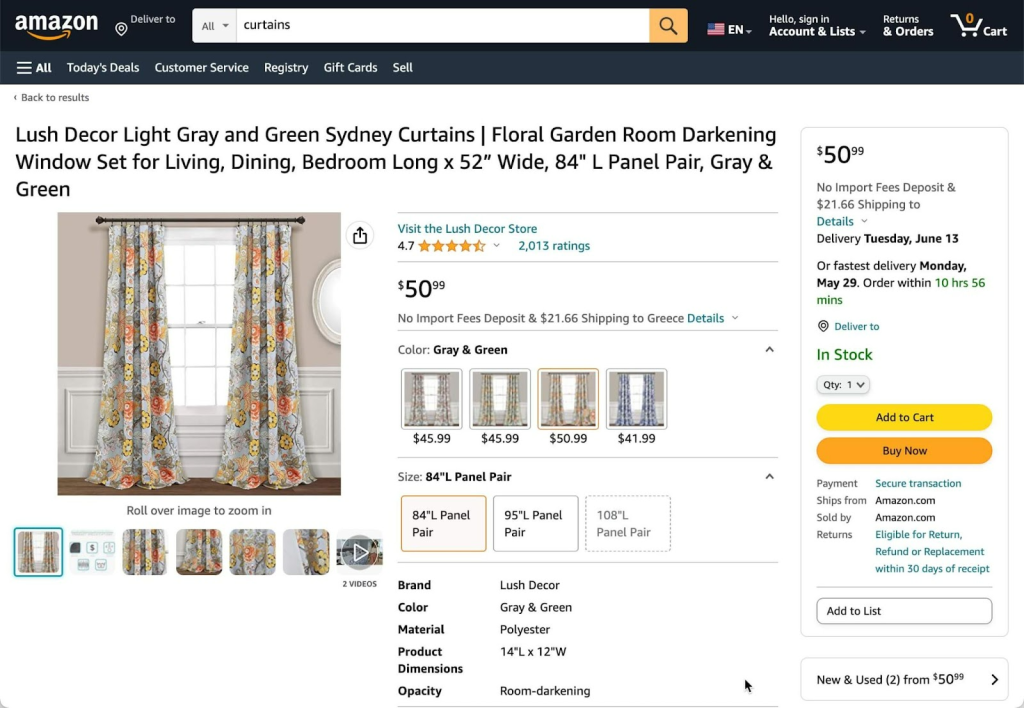
Colors: A typical option for clothing, shoes, and accessories.
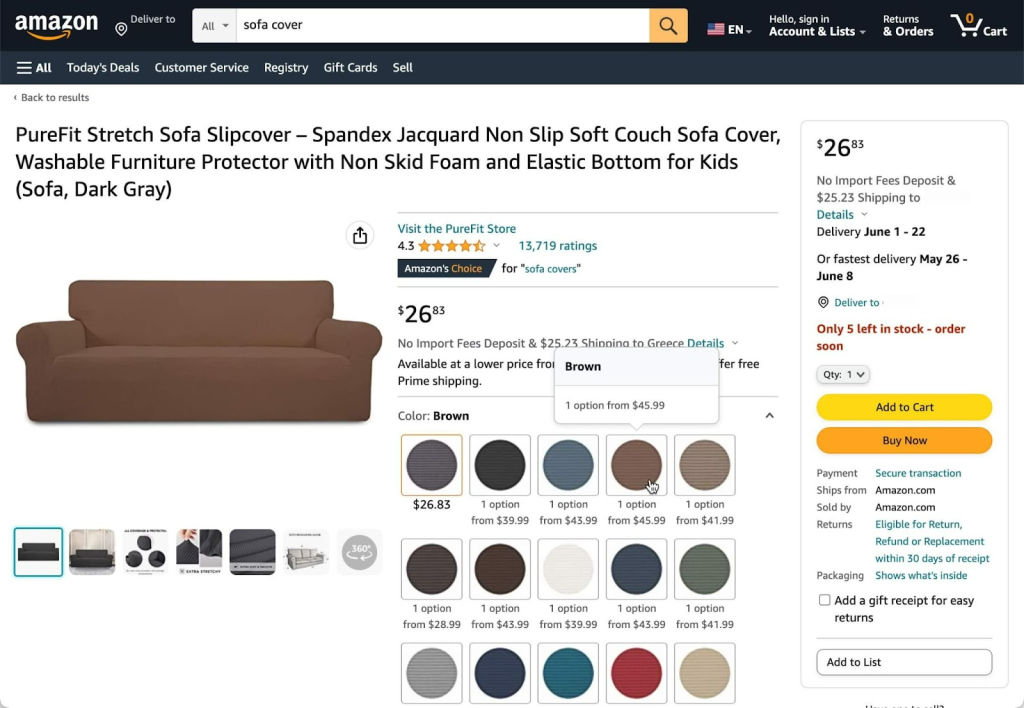
Patterns: A product can have the same color but offer different patterns that change its appearance.
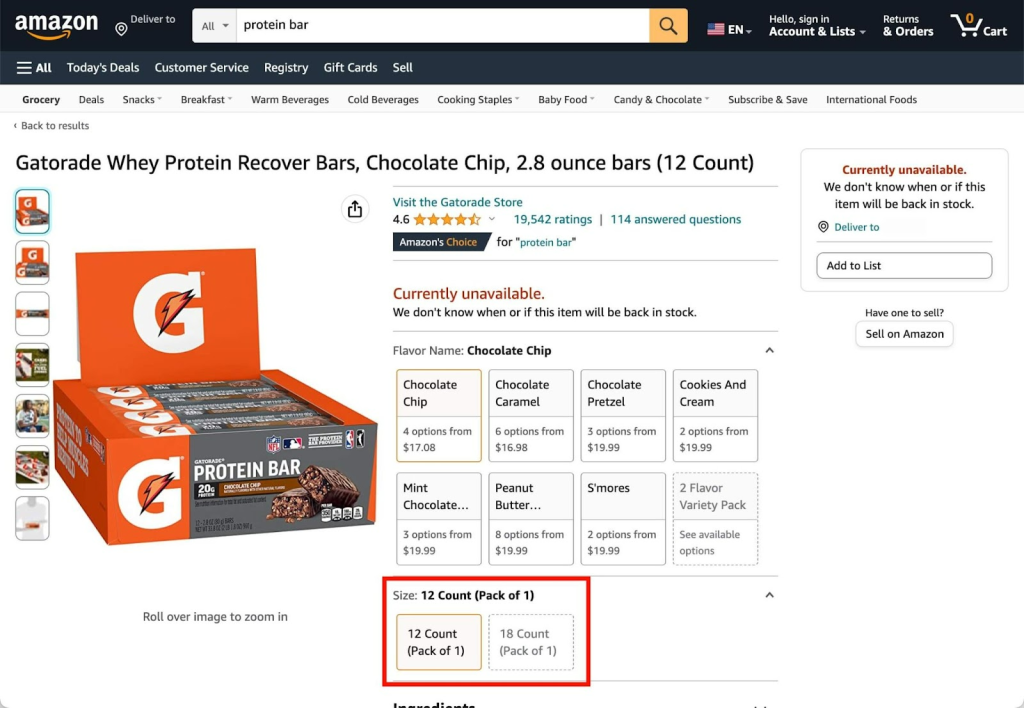
Sizes: Not only for clothing and physical size but also for other products where you can select different amounts of the product.
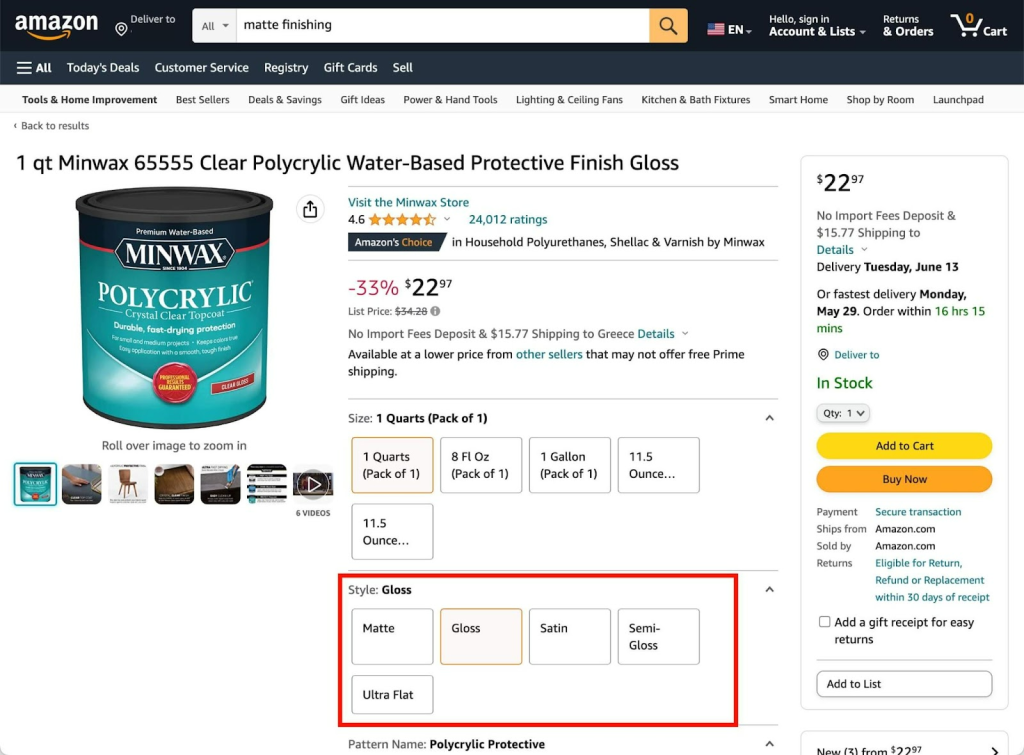
Materials: Offer a more affordable version and a version with premium materials. Matte or glossy finish, or a version made from recycled materials.
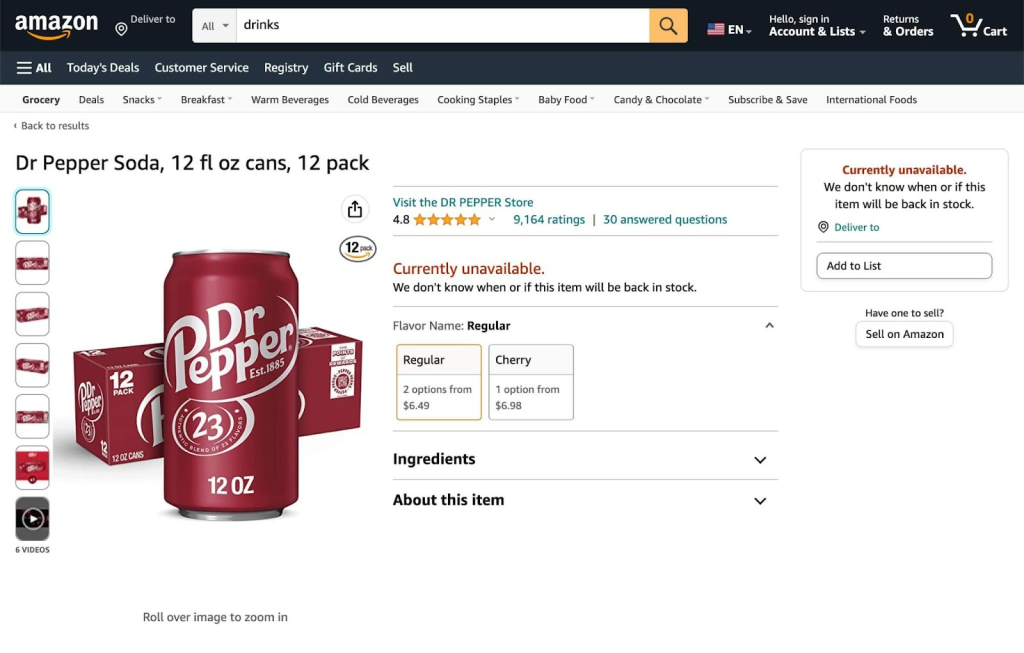
Flavors: Very useful for food stores.
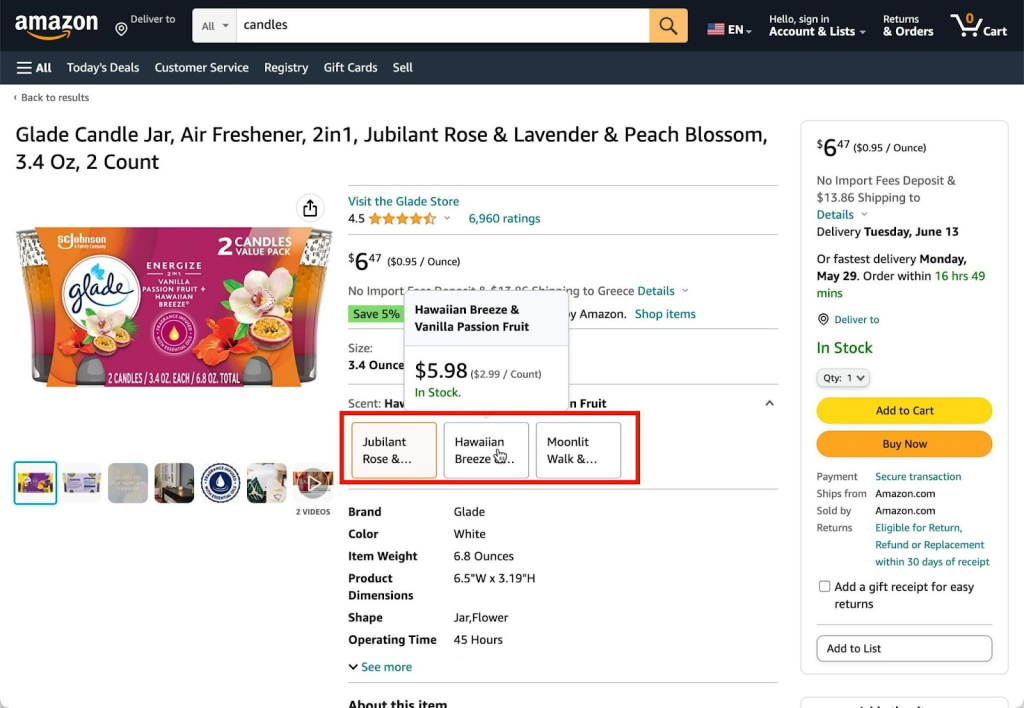
Scents: Candles, air fresheners, and even kitty litter can have different scents.
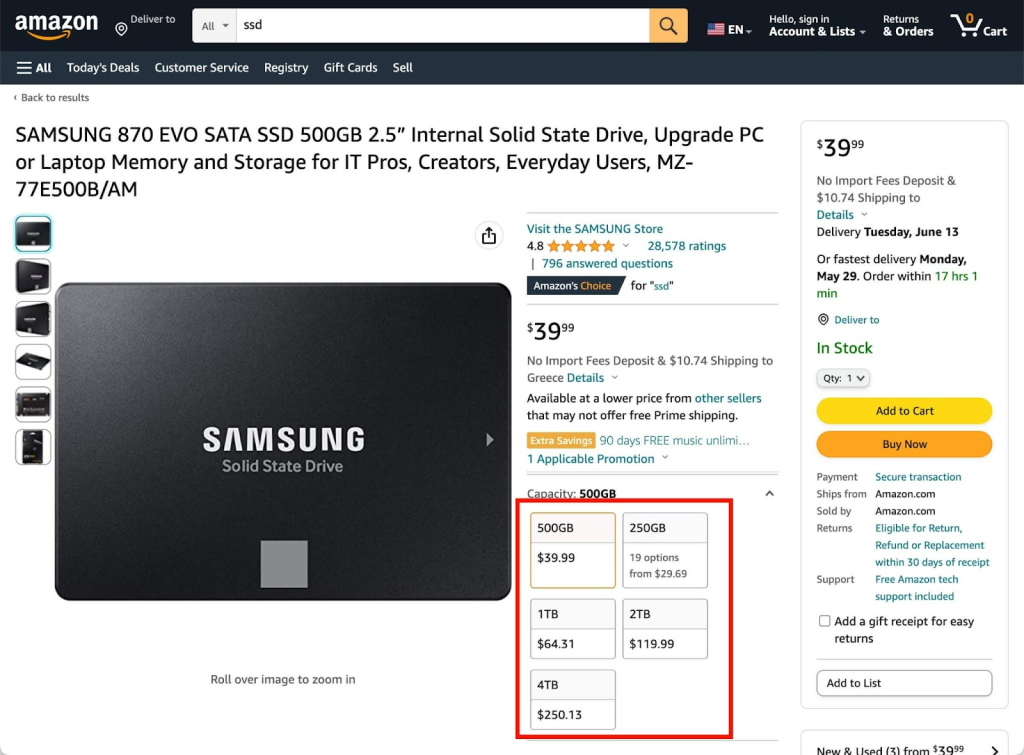
Tech configuration: Many tech products will have different size configurations, such as storage capacity, pixels, or power.
There will be many more product variations available depending on the type of product you are selling. Even left-handed versions!
Providing a variety of variations gives customers more choices and enhances their shopping experience.
While it’s more work, it should also translate into more sales!
How To Import Products With Variable Attributes?
If you sell only a few products with limited variations, adding them to your online store shouldn’t be challenging.
However, if you are selling hundreds of products with several variations, manually adding them to your store will be time-consuming, to say the least.
Fortunately, you can add your products with all their variations using the product CSV Importer and Exporter feature that comes built-in with WooCommerce.
You can import, export, and even update all the products in your store with a single CSV file. The tool supports all product types, including product variations.
Here’s how it’s done, step-by-step.
Step 1: Create a CSV File
A CSV can be created using the online spreadsheet in Google Docs or the free spreadsheet in OpenOffice.
While you can use Microsoft Excel, we recommend avoiding it due to formatting and character encoding issues.
To import new products or update the existing ones, you need a CSV that contains the product information.
You can either export a CSV from an existing store or download one from GitHub and replace the sample data.
Want to create one from scratch? You could also do that as long as you follow the columns and formatting of the Product CSV Import Schema.
Here are a few things to consider while creating your CSV:
- Should be in UTF-8 format
- Dates included in the file should be according to the store’s local timezone
- Separate multiple values in a field with commas
- If you’re referencing an existing product ID, prefix the id with id:. E.g., id:20
- If you’re referencing an SKU, no prefix is required. E.g., SKU201
- Products that are under draft are not exported. Only published products are
- Denote the taxonomy term hierarchy with > (E.g., ‘Clothing > Tshirts’), and terms are separated with commas (E.g., ‘Blue, Green, Red’)
- Images need to be pre-uploaded to your store
While all the columns in your CSV are essential, it’s particularly important to note the SKU column.
SKU stands for Stock Keeping Unit and is a unique number assigned by store owners to keep track of their product stock levels.
If a product has different attributes, such as colors and sizes, then each variation has a unique SKU.
When adding your products, input an SKU for the parent product and for each variation you’re going to create.
For instance, in the below example for a t-shirt, the SKU is TEA-OG.

And for each of the variations, there’s a separate unique SKU.

E.g., for the attributes S (small) and Y (yellow), the SKU created is TEA-OG-YLW-S.
While the SKU is something the store owner creates internally for their reference, it’s recommended that you follow a similar naming convention.
Step 2: Import the CSV
Once you’ve added all your product details and your CSV is created, it’s time to import the data into your WooCommerce store.
From your WordPress dashboard, navigate to Products > All Products and click Import.
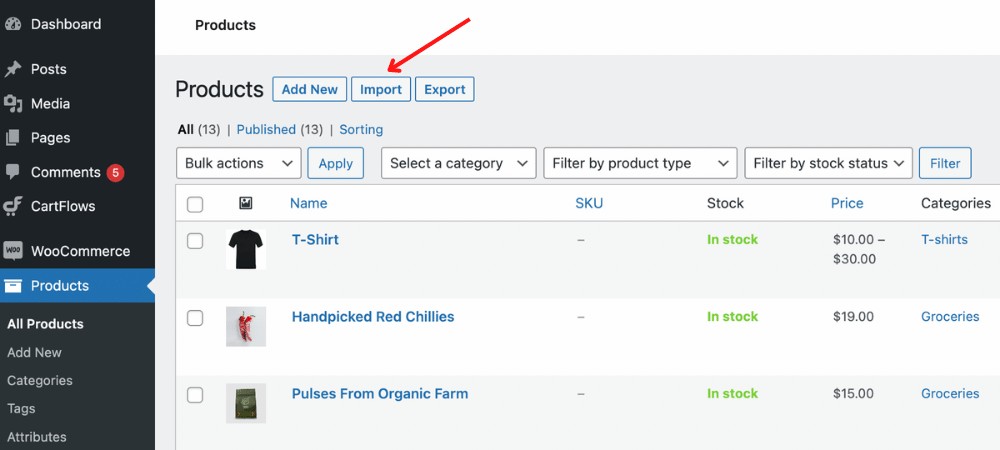
This is where you upload your CVS file.
Click Choose file and upload the CSV you just created.
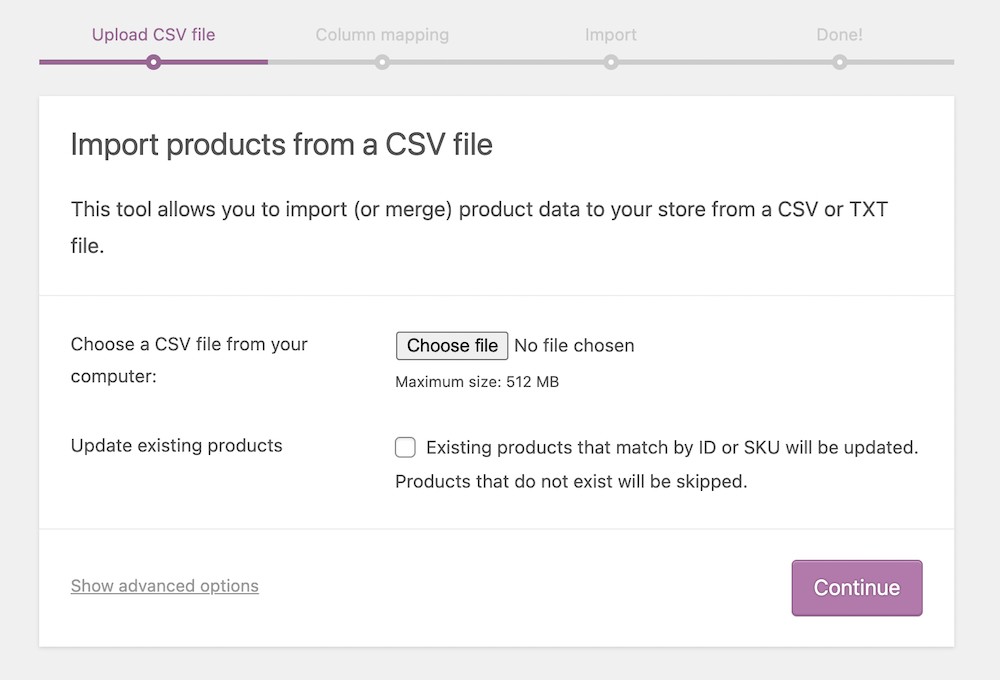
If you have existing products in your store and want them updated, check the box against the Update existing products option.
Under the Show advanced options, the CSV delimiter is, by default, a comma. If you use an alternate delimiter in your CSV, you could mention the same here.
Click Continue to proceed to the next step.
In this step, you map the column names with the fields in your CSV.
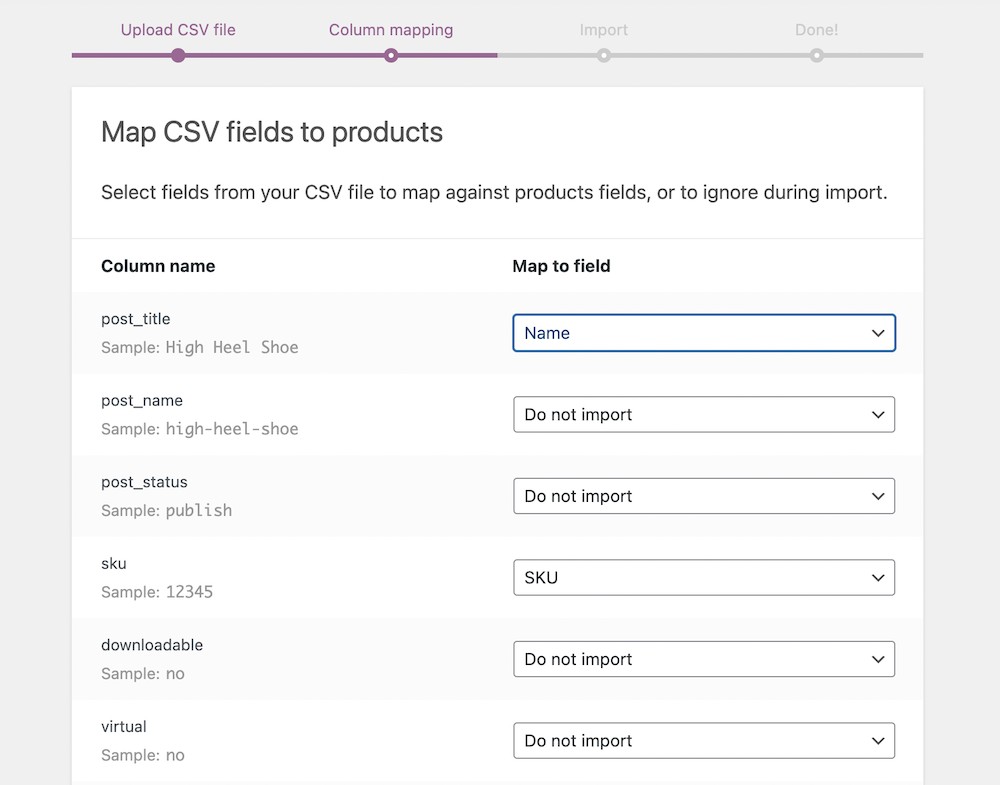
For instance, the column post_title may be mapped with the Name field in your CSV. Likewise, sku with SKU in your CSV.
This way, all the fields in your CSV are mapped with the corresponding columns in your store.
Once you’re done, click Run the importer.
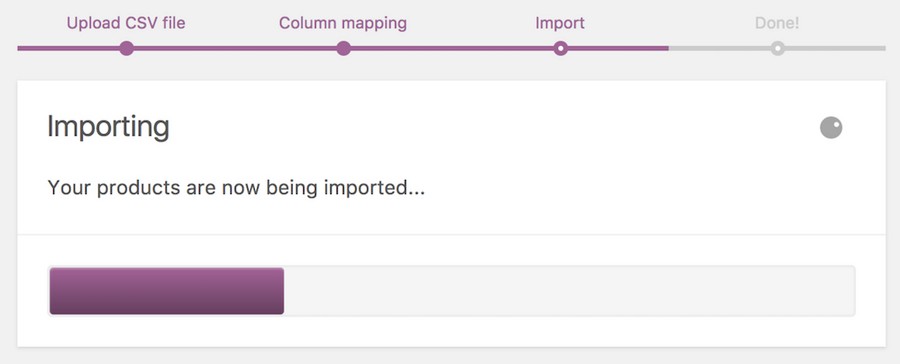
The importing will commence and will take a while.
Once done, you’ll be notified how many products have been imported.
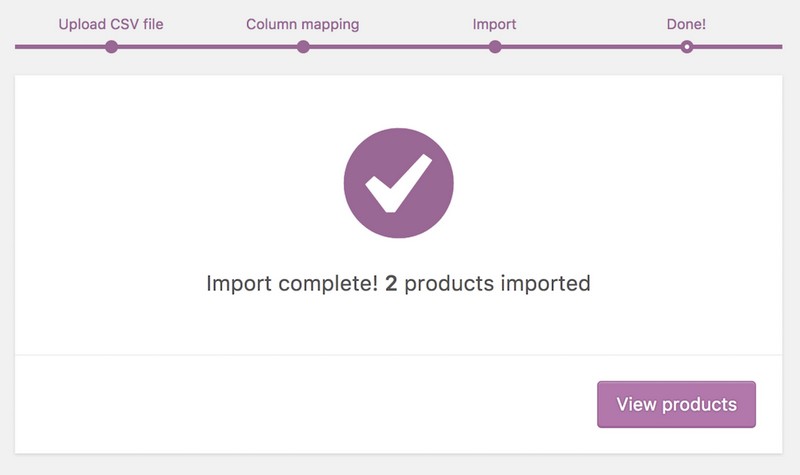
You could also follow the same process to update the products in your store.
Other Important Settings for WooCommerce Variations
WooCommerce offers a lot of flexibility when it comes to variable product settings. Populating the data fields for each variation can be a long exhaustive procedure. Depending on the type of product you’re selling and your consumers’ preferences, there are certain fields you can leave unfilled.
Let’s quickly do a quick walkthrough of all the major menu tabs and define each variation data field.
General Settings
While in the Variations tab of your variable product data editor, you can tweak all the general settings of each individual variation.
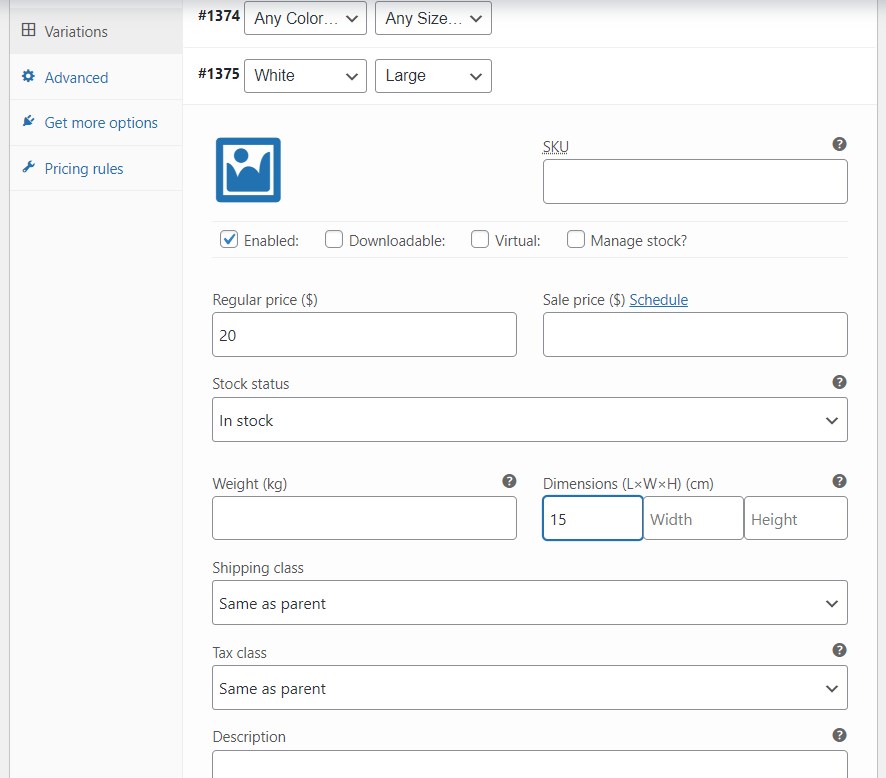
Here’s a summary description of the properties:
- Enabled: This box allows you to enable or disable the variation for a unique product.
- Downloadable: This is for product variations that can be downloaded. When the box is checked, WooCommerce adds additional fields namely Downloadable Files, Download Limit, and Download Expiry. You can upload the download files in the first field. The other two fields let you set the maximum number of times the files can be downloaded and when you want the download to expire.
- Virtual: A virtual product is a non-physical product. If you check this box, all the shipping settings for this variation will disappear.
- Regular price: This is the usual price at which you want to sell the product variation.
- Sale price: Optionally, you can also add a price for when the product is on sale.
Inventory Settings
To manage a variation’s inventory, check the Manage stock? box. Immediately, two new fields replace the Stock status field.
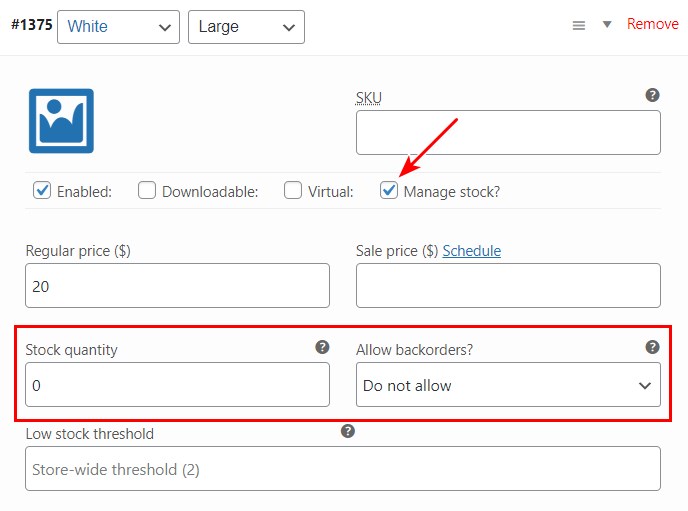
Input the variation’s quantity in the Stock quantity field. Also, you can choose to handle or not handle backorders in the Allow backorders? Field.
Alternatively, you can choose to manage all variations’ inventory on a product level. To do this, navigate to the Inventory tab.
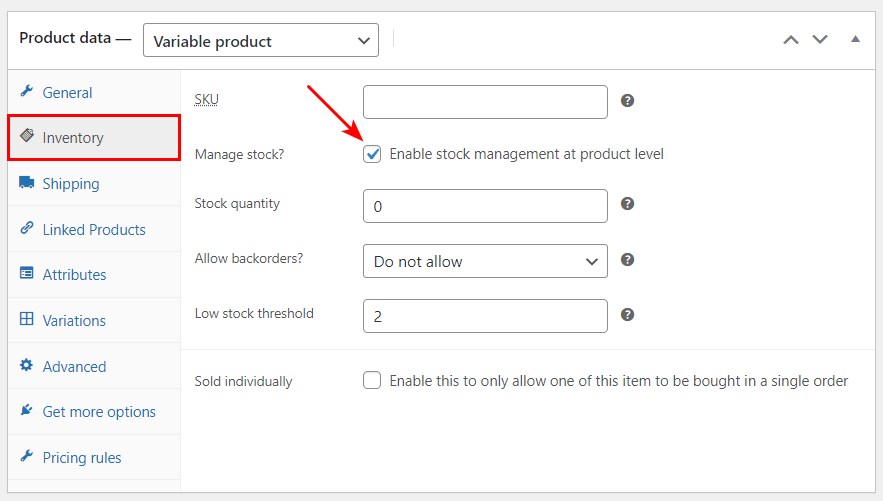
Here, you can add a Stock Keeping Unit (SKU) value and choose to permit only one unit of the product to be added in a single order by checking the Sold individually box. In the same way, you can manage stock for the entire product here. Stock quantity values entered for individual variations override the general product settings.
Similarly, you can add shipping settings (Weight, Dimensions, and Shipping class) on both product and variation levels.
In case you choose, the Linked products tab makes it possible to add Cross-sells and Upsells to the product.
Setting Defaults
When tweaking your product settings, you can easily set default variations for the end user. This means when the buyer visits the product page, these set attribute values will be selected by default.
To implement this, go to the Variations tab of the Product data section and select the value(s) of your choice next to the Default Form Values field.
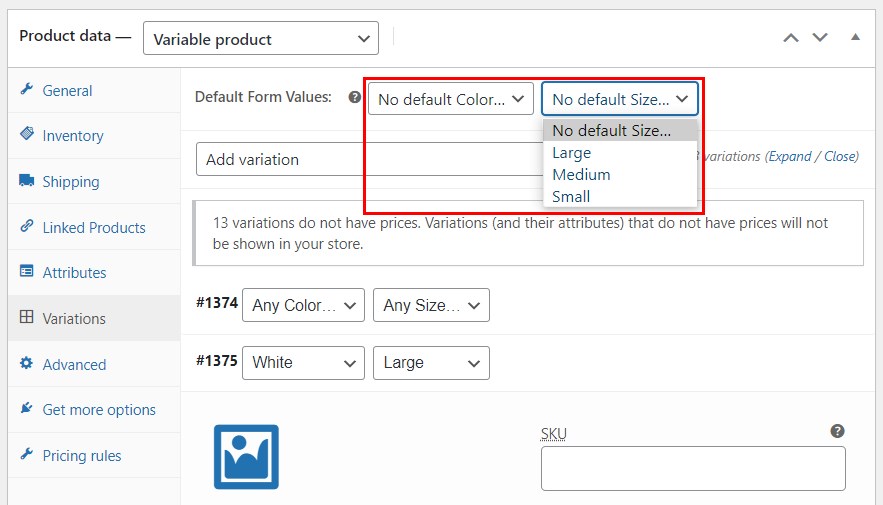
Now, when the user navigates to the product page, the default form values will already be pre-selected.
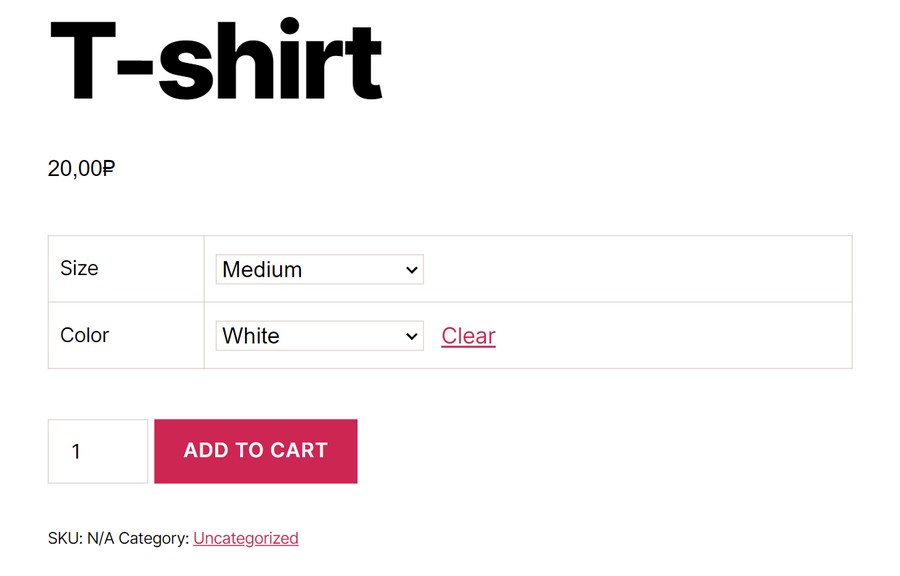
Setting default variations can be very useful for products where demand for a particular product variation is high. This way, the ADD TO CART button is automatically clickable, thereby saving some time. If the buyer chooses, they can still go ahead and select a different combination of attributes.
Bulk Editing
There may be cases where you want to apply a particular setting to all the product variations (e.g. adding the same dimensions or shipping class.) All you need to do is find the unique setting in the Add variation dropdown menu.
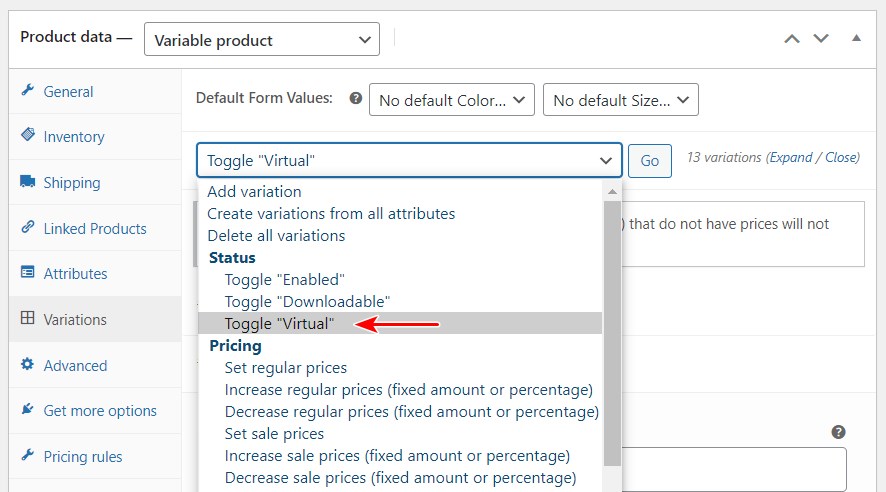
Select the necessary option and click Go. Immediately, a prompt pops up on your screen letting you enter the required value.
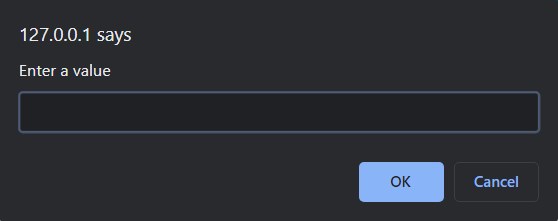
Enter the corresponding value and hit OK. WooCommerce then applies the value to all the variations below.
We’ve now covered all the settings associated with creating WooCommerce variations. However, beyond setting them up, you may also want to learn certain tips and tools you can use to maximize your store’s success when using variations.
Let’s talk about some of them.
Best WooCommerce Variation Swatches Plugins
Though WooCommerce offers a lot of flexibility and utility for product variations by default, additional plugins can help you add even more functionality to your variable products.
There are lots of WooCommerce variation plugins designed to execute different tasks. We’ll discuss seven of the most effective and interesting ones we’ve used before.
- Variation Swatches for WooCommerce by CartFlows
- Product Variations Table for WooCommerce
- Discount Rules for WooCommerce
- WooCommerce Quick View Pro
- Variation Swatches for WooCommerce
- WooCommerce Show Single Variations
- WooCommerce Bulk Variations
1. Variation Swatches for WooCommerce by CartFlows

Variation Swatches for WooCommerce is a sibling plugin to CartFlows. It can be used even if you don’t have CartFlows installed and it’s completely free.
With this plugin you can automatically convert all dropdowns to labels and display them on product pages, shop pages and archives.
You can also display colors and images and modify their shape and size to match the overall style of your store.
It’s possible to display tooltips that help the user understand the different variations of a product. Ideal for more complex variations or where the differences may be less obvious.
Variation Swatches for WooCommerce is very easy to use and is compatible with popular page builders such as Elementor, Beaver Builder and Spectra.
It’s also compatible with Astra and any other theme, such as Avada, Divi, or GeneratePress. So you won’t have any problem implementing it into your WooCommerce store.
2. Product Variations Table for WooCommerce
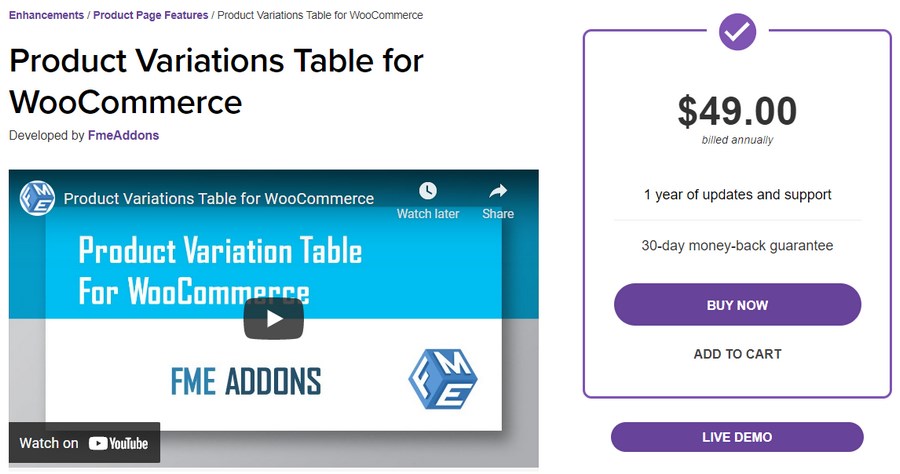
Beyond color swatches and user-friendly selection interfaces, certain sites often require a different approach to displaying variations.
Another effective method is to use tables that allow the shopper to compare multiple variation properties simultaneously. Product Variations Table for WooCommerce by FmeAddons can help you achieve that.
One popular use case for this approach is an online store selling electronic devices such as smartphones and camera gear. A store owner can use these tables to display different specs of different product models.
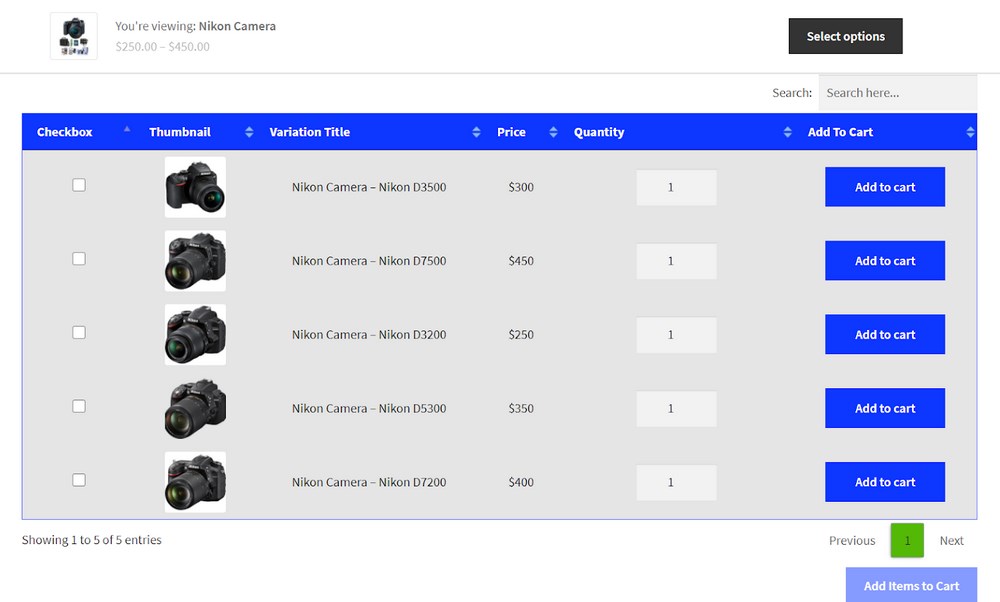
While browsing your products, visitors can use the two arrows beside each attribute to sort the variations accordingly. They also have access to an Ajax-based (real-time) search filter. So, shopping time can be shortened by simply searching for a particular attribute.
As the cherry on the cake, the buyer can also add as many variations as they like to the cart right from the table.
Want even more utility? The plugin lets you customize the table layout as well. This way, your landing pages will include only the most important attributes your customers care about. You can display the price, storage size, color, or images. The choice is completely up to you!
If that still doesn’t cut it for you, you may want to try out an alternative, WooCommerce Product Table. This is a more generic WooCommerce table plugin that lets you compare multiple products in a table. But as a plus, you get the option of choosing from multiple attributes in a typical dropdown menu.
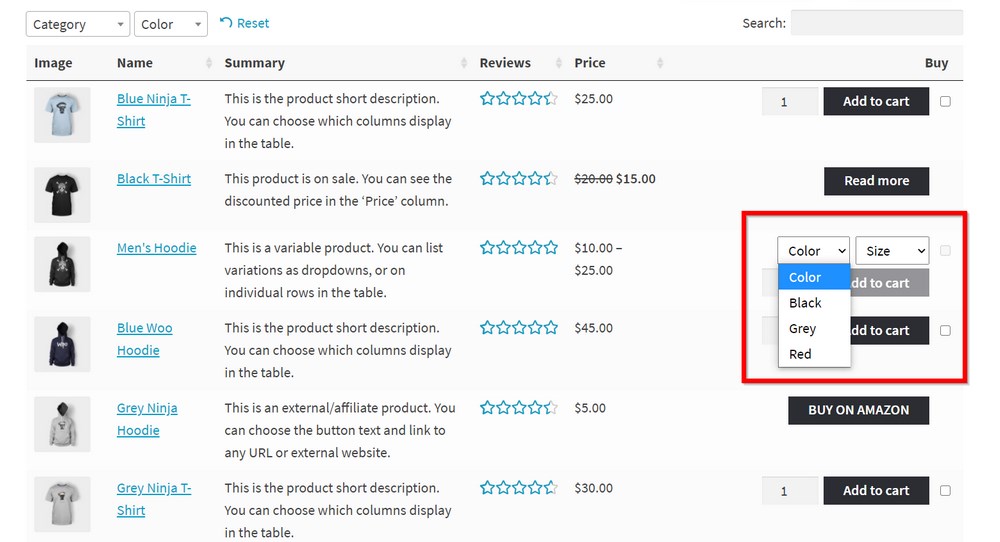
Site users can also send their final choice straight to the cart without navigating to any other page.
3. Discount Rules for WooCommerce
Another feature shoppers may appreciate is variable pricing for your variable products. If you’re offering several variations for each of your products, managing regular and discounted pricing for each variation can be rather tedious. This is where Flycart’s Discount Rules for WooCommerce comes in.
The plugin lets you offer your buyers store-wide, quantity-based, cart-based and other types of interesting discounts for each unique variation. All you need to do is set specific rules based on the conditions you want.
Here are some popular ways you can configure discounts for your product variations:
- Based on individual products: This type of discount is configured for a particular product and all its variations. It can either be a percentage or fixed price discount.
- Based on specific attributes: Another option is to apply the discount rule to all the products attached to a specific attribute. For example, you can offer a $15 discount on all ‘Size 46’ shoes storewide.
- Using a BOGO deal: A Buy One Get One (BOGO) deal is a quantity-based discount. You can offer a free unit of your product for every particular number of units (say three or four) purchased. You can apply it to products, variations, attributes, or store-wide.
- Based on the cart subtotal: This discount rule is activated based on the buyer’s cart subtotal. For instance, you can offer a percentage discount or even a free product when the subtotal is over $250.
Discounts are a proven way of boosting your sales and customer loyalty. This plugin helps you to leverage that advantage, even with variable products.
4. WooCommerce Quick View Pro
Are you looking to speed up your site visitors’ shopping process even more? Then WooCommerce Quick View plugin may just be what you need. No doubt, color swatches are a great way to display variations on your site. However, your buyers will appreciate being able to select from different variations of multiple products all on the same page.
WooCommerce Quick View helps you achieve this. When installed and activated, the plugin adds a Quick View button to your product search page. This way, users no longer need to visit individual product pages.
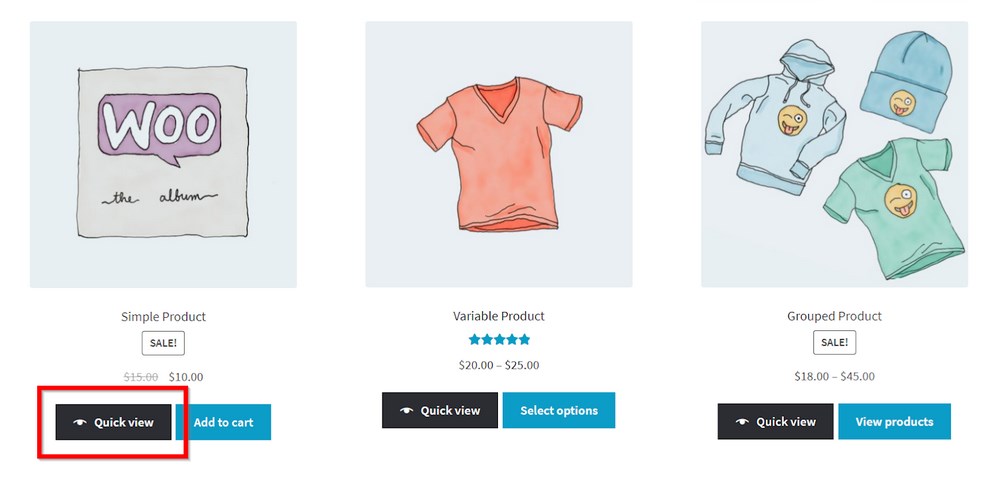
Once they click the Quick View button, a pop-up window appears letting them select a variation of their choice. When they’re done, they can click Add to cart and simply get back to their shopping hassle-free.
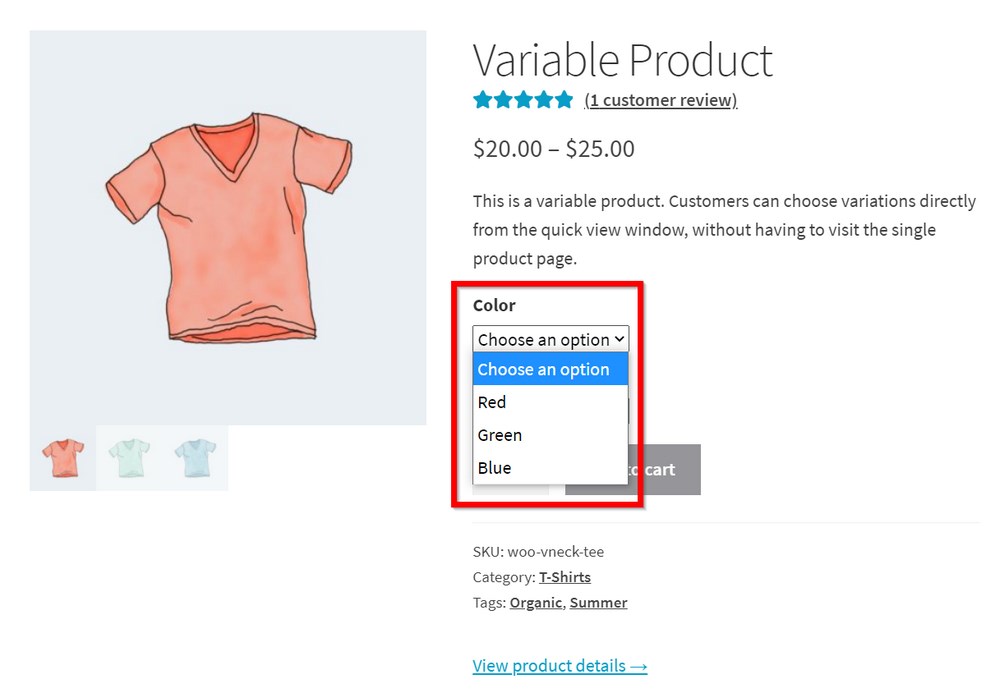
You can use WooCommerce Quick View together with WooCommerce Product Table. Their combined utility adds quick view buttons directly to your product table layout.
For site owners looking to deliver the best shopping experience to their consumers, this plugin is a great addition. More often than not, fewer clicks equals more sales. It supports other product types as well. So, the improved user experience isn’t limited to your variable products alone.
5. Variation Swatches for WooCommerce
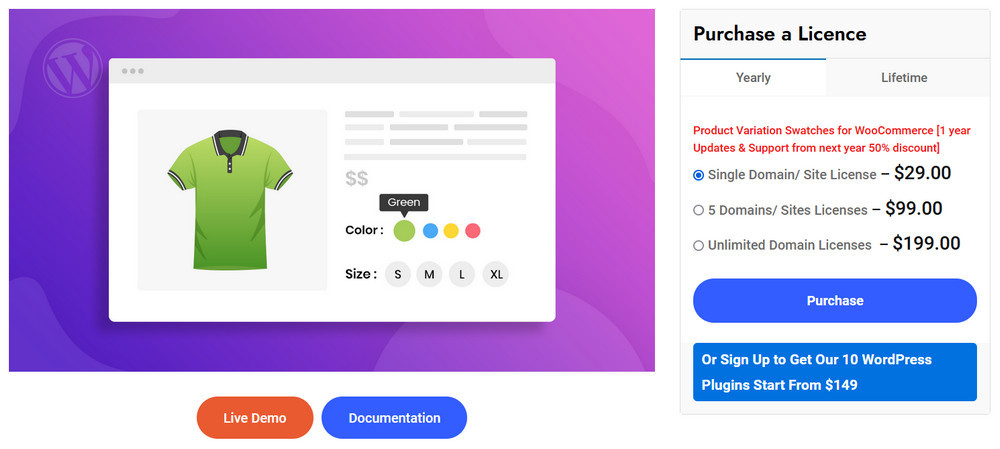
The user experience of a WooCommerce store ultimately decides sales. Few features can enhance that experience better than the ability to showcase variations in images, colors, and labels rather than the default dropdown fields.
Variation Swatches for WooCommerce Pro helps you achieve all that and more.
This premium plugin lets you customize the borders, backgrounds, and images of your product swatches.
Tooltip is the feature that stands out most for Variation Swatches for WooCommerce Pro. You can select rounded or squared swatch layouts with tooltip background, tooltip control, font color, and even font sizes.
The plugin supports the display of dual color variations. It is optimized to improve loading speeds. It facilitates the addition of the shopping cart to the category/archive page. You can also control attributes in the category/archive page.
The free version of Variation Swatches for WooCommerce includes the ability to control swatch sizes on the product page and choose whether to cross out, blur, or hide out of stock items. It also lets you work from quick view pop ups.
6. WooCommerce Show Single Variations
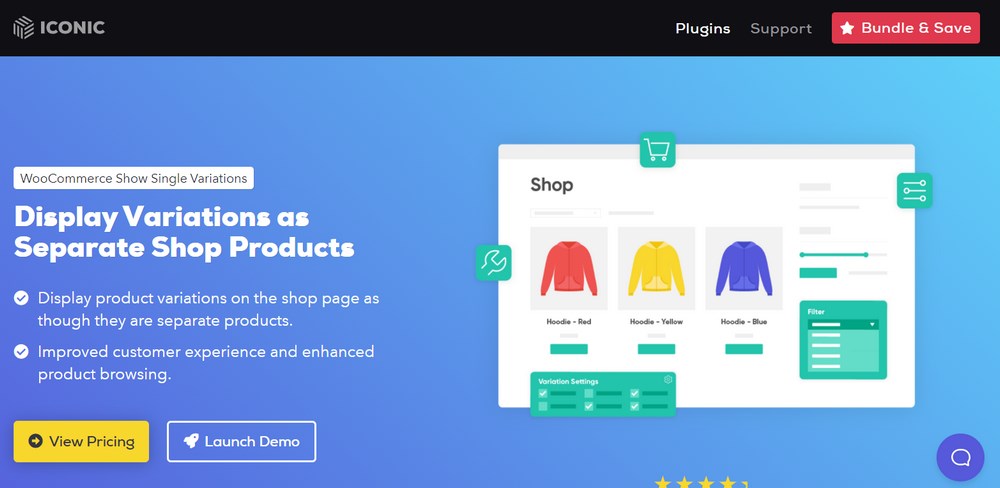
For certain buyers, having to choose from different combinations of product attributes may appear to be additional work. For such shoppers, displaying product variations as individual products on the shop page should do the trick.
If you want to do that automatically, WooCommerce Show Single Variations can help you.
The plugin’s function is very straightforward – display individual variations as products! For easier navigation, a ‘Variation’ tag is added to variations to distinguish it from other product types.
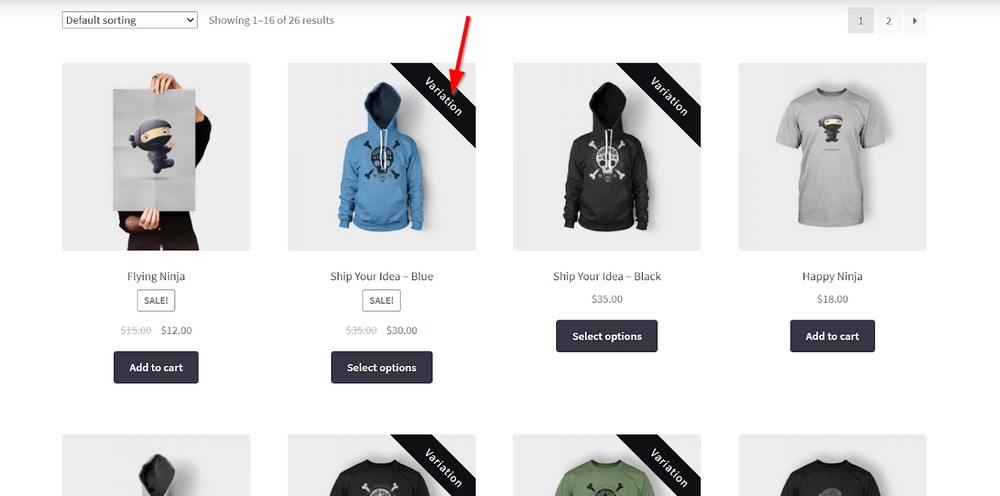
As additional features, front-end users can filter products with the accurate search feature to display only the most relevant variations. Similarly, the ability to add to cart straight away further enhances the entire customer experience.
7. WooCommerce Bulk Variations
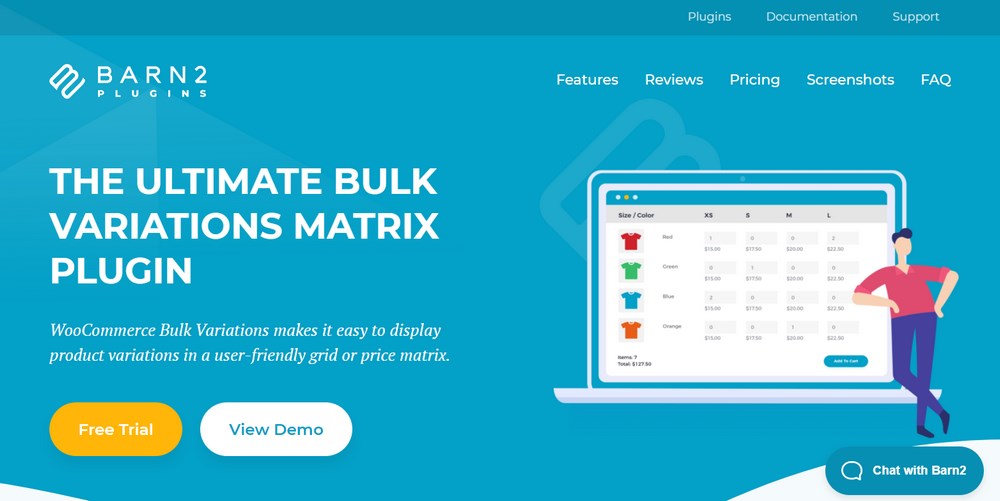
Last but not least is the WooCommerce Bulk Variations plugin. It works just like any product table plugin. However, it adds even more flavor to how you display product variations. The tool lets you present two attributes and their values in rows and columns simultaneously. The buyer can then enter the item quantity for the particular variations they want.
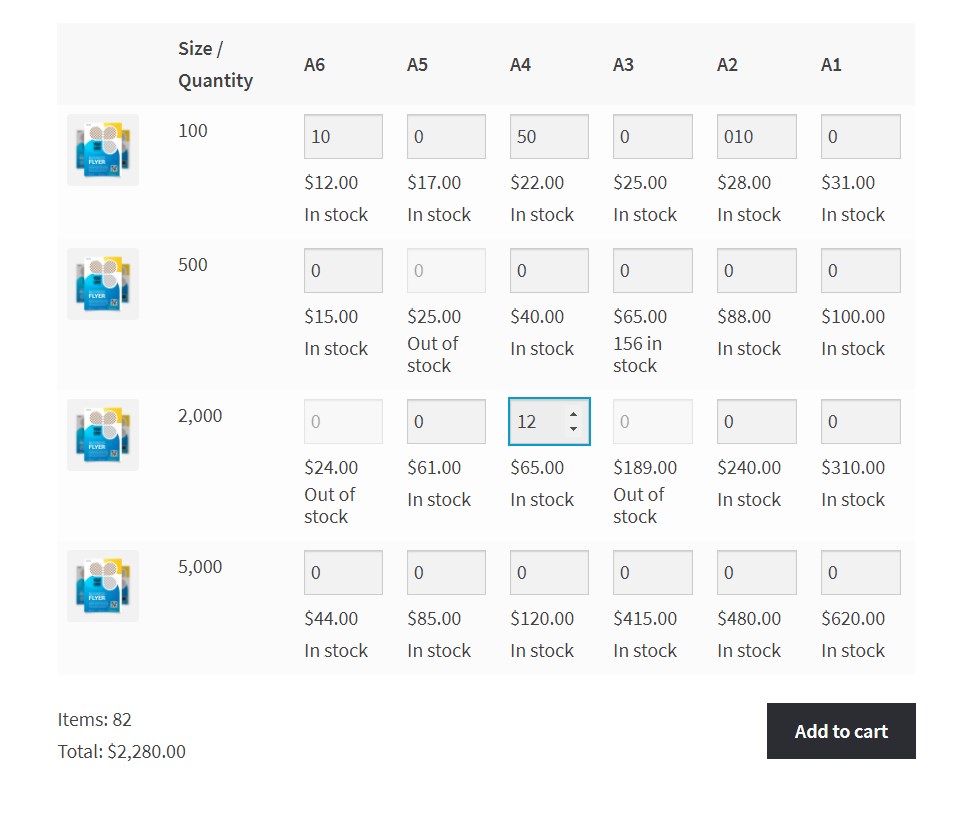
Having made their selection, they can simply click the Add to cart button and continue with their shopping. If you own a WooCommerce wholesale store, your buyers will find this plugin particularly useful. Unfortunately, if your product variations rely on three or more attributes, the plugin may not be ideal.
Frequently Asked Questions 2026
Time To Create Your First Variable Product!
It’s no longer news that WooCommerce is your best bet at building a powerful eCommerce store on WordPress. One of the many functionalities it brings to your store is the ability to offer your buyers different variations of the same products.
If you get stuck trying to set up your first WooCommerce variation, follow these easy steps and you’re good to go:
- Add global attributes to your store.
- Add a new product and select the product type.
- Assign variable attributes to the product.
- Display WooCommerce variations on your store.
Once your variations are ready, you can use some interesting plugins such as Variation Swatches for WooCommerce by CartFlows to offer your site visitors even more. These plugins bring different features that help to enhance the overall customer experience.
Now you know how to add variations to your store, we hope this helps you get closer to your conversion goals. Are you looking to learn more about other product types WooCommerce supports? Check out our article on how to add and manage products in WooCommerce.
If you have other questions, share them in the comments section below!
Disclosure: This blog may contain affiliate links. If you make a purchase through one of these links, we may receive a small commission. Read disclosure. Rest assured that we only recommend products that we have personally used and believe will add value to our readers. Thanks for your support!



Hi, I am looking for a functionality to introduce more fields in the additional information (features of the products) of a variable product. Just as width, weight and dimensions, would other fields can be created like varitation featured, for example: power, that change depending on the product variation you choose.
Example:
Coffe machine C100 – Varition 2 Cups – dimension: 20x30x60 – power: 4500W
Coffe machina C100 – Variation 3Cups – dimension: 30x60x60 – power: 5300W
In this case, the dimensions and the power field are variable and are characteristic of the machine; it is not a product variation.
Do you know some plugin or how can I do these configuration?
Thanks, regards.
I am using the Astra theme with Woocommerce. All are updated. I have tried adding a variable product using color as my attribute with 6 color variations. I have followed the tutorials and documents to the letter however it is not working properly on my store page. The store page shows the product with a “select options” button. When you press the Select Options button, it opens the product which has an “Add to Cart” button but the variations are not selectable. They are visible in the product description box but not selectable. I cannot get this working. Any ideas for a fix?
I am trying to use one of the plugins you list on this page – 6. WooCommerce Show Single Variations – but it’s not compatible with the Astra theme, in particular the paging navigation. It will show the full list of pages but essentially only allows you to page the number of pages there would be if you weren’t show variations as products. In my case I have 16 pages when listing variations as products but paging only allows 2. If I turn of the plugin then the paging show s the 2 pages but obviously ai then lose all the variations! Can anything be done to make this compatible?