Are you struggling to get your WordPress website under that magical two-second threshold? If you suspect heavy images are the culprit, you could try using WebP images instead of regular PNG or JPG images.
WebP Images are a modern image format introduced and recommended by Google to improve loading speeds. In this guide, we’ll show you how to use them in WordPress.
Page loading speed has always been something Google and other search engines care about but now, more than ever, you can’t afford to have a slow loading website.
For one, slow-loading websites are proven to drive users off your website (particularly for mobile users).
More importantly, Google’s Page Experience algorithm is set to update in June 2021. When it does, it will send very little traffic to slow-loading websites.
Images are typically only a small proportion of the content on most web pages. However, they account for the lion’s share of file size. So if you’re trying to up your website loading speed, pay attention to your images.
So how exactly do WebP files help?
WebP files are a particularly light image format and can reduce file sizes by as much as 25-34% when compared to other file formats such as PNG and JPG.
WebP vs. JPG vs PNG for the Web – Comparison
To help you understand what makes WebP images so special, we’ll go through a detailed comparison of WebP images compared to PNG and JPG images.
First, let’s walk through a bit of jargon.
When image files are compressed, they are either lossless or lossy.
Lossless compression produces images that lose little to none of their quality when compared to lossy images. They can also be decompressed and reverted to their original state.
The reason this is possible is because the compression process for lossless images works by removing only irrelevant bits of data encoded into the images. PNG files are generally lossless files.
Lossy images are fundamentally altered and have bits of core information permanently stripped away. This results in smaller file sizes than lossless images, but with visible reduction in quality when you attempt to zoom in on them.
A good example of lossy images are JPG/JPEG files.
Then there are WebP images.
WebP images are a great option to have because they can be subjected to either lossy or lossless compression. In both cases, they provide superior compression but without the proportionate loss in quality when compared to PNG and JPG files.

One Google study showed that lossless WebP images can be up to 26% smaller than compressed PNG files. Lossy WebP images generally come out 25-34% smaller than JPG files.
When you consider these massive gains come without any compromise in image quality, it makes sense to use WebP images wherever possible.
Before we move on to showing you how to use WebP images, there is a little more you should know about them.
Some Advantages and Disadvantages of WebP Files
As we’ve already stated, WebP files tend to be much lighter and therefore load faster than JPG or PNG files.
For the average website with few pictures, the increase in loading times will be marginal. But, these effects are multiplied on image-heavy websites such as eCommerce stores.
WebP images do have a few challenges. We’ll walk you through some simple solutions, but you need to have these in mind before you get started.
Firstly, WebP files are not universally supported by all browsers.
At 91% penetration of the browser market, this is not too much of a problem. Most major browsers like Chrome, Firefox, Edge and Opera do provide default support for WebP images.
Other browsers, like Safari, do not.
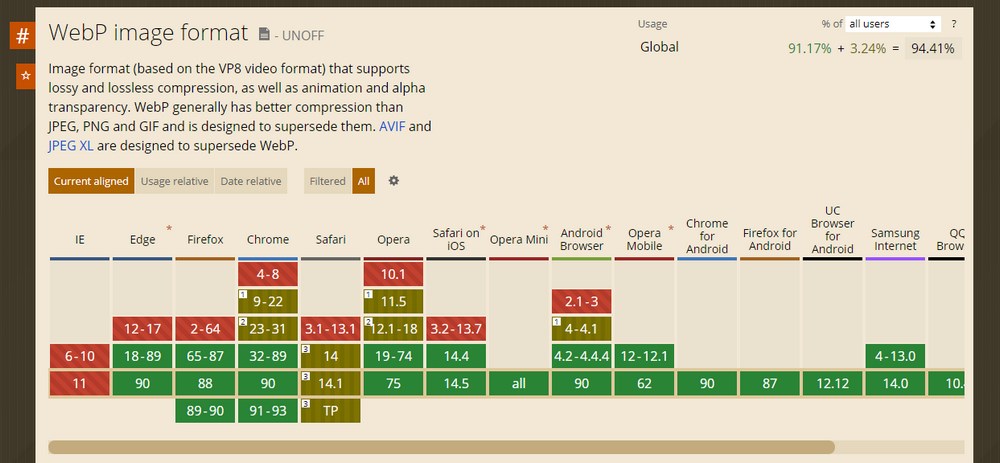
This doesn’t mean that you have to choose between a faster website or serving unappealing content to readers who use unsupported browsers.
All you have to do is maintain both PNG/JPG and WebP versions of your images and serve different versions to different groups of users depending on which browser they are using.
For example, by using a WordPress plugin, your website could show a WebP version of an image to browsers that support them, while automatically showing PNG or JPG versions of the same image to those that don’t.
It used to also be that WordPress did not offer native support for WebP images so you had to either use a plugin or write some code to get them to work in WordPress.
This is no longer true, as the latest WordPress update, WordPress 5.8, includes native support for WebP images.
Still, you’re going to need a way to deal with browsers that haven’t yet caught on to this development. There are several ways to get around this as you will see shortly.
How to Add WebP Images in WordPress – 3 Methods
There are 3 different methods of adding WebP images in WordPress. Here are they
- Method 1: Use a CDN
- Method 2: Use an Image Optimization Plugin
- Method 3: Add WebP Images to WordPress Manually
Now that WordPress allows for native WebP uploads, this is the best way to get started.
But, as we’ve mentioned, you’re still going to need to take into account browsers that don’t yet support WebP images.
The methods we will cover below will help you do this.
It’s worth noting that no one method is necessarily better than the other, so you can choose the one that suits you best.
They are:
Method 1: Use a CDN
Content Delivery Networks (CDNs) are an effective way to use WebP images in WordPress. CDNs are a network of servers that help to redistribute the load of delivering content from your website’s servers.
Generally, if you are using a CDN, it will cache your website’s content and serve it to users faster and more efficiently.
A CDN can easily be used to convert your PNG/JPG files into WebP files and serve these to selected audiences based on browser-type.
Some popular CDNs to use include Max CDN, Sucuri, Stackpath, Cloudflare, and KeyCDN.
Method 2: Use an Image Optimization Plugin
Even though WordPress now allows for WebP image uploads, you don’t necessarily have to upload your images in WebP format. In fact, we think it’s better to upload images in PNG/JPG format first and then convert them to WebP.
This is because, as we’ve said, not all browsers currently support WebP images.
For this to work, you’ll need to have the same images available in PNG/JPG format to display on browsers that do not support WebP files.
There are plugins that will allow you to achieve this quite easily.
Here are a few popular plugins you could consider using:
1. Imagify

Imagify is a free image optimization plugin, and one we recommend for converting your images to WebP.
While Imagify is free to get started with, it does have a cap on how much optimization you can do. Currently, users can use up to 20MB worth of optimization for free on a monthly basis. To get started, first install the plugin from the WordPress repository, and activate it.
You will be prompted to create an account (all you have to do is provide your email), after which, you will be sent an API key. Enter the API and proceed to configure the plugin.
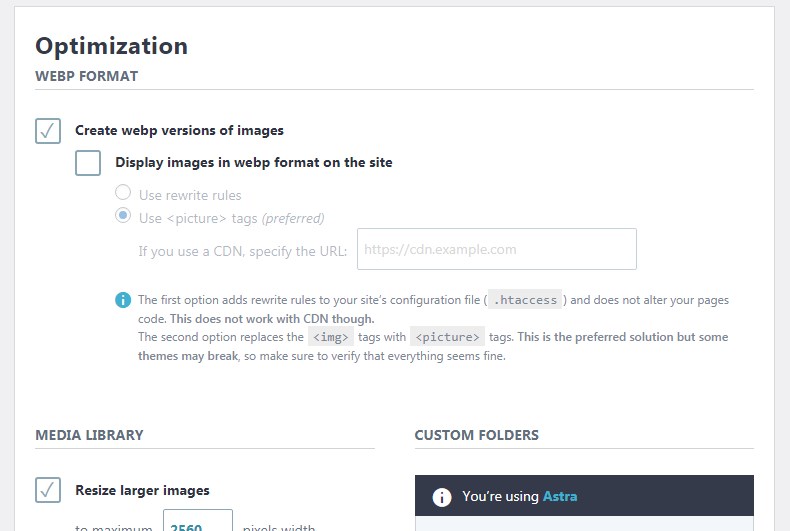
By default most of the options that you need are already set up for you. However, you do need to remember to enable the option to display WebP images.
You will see that the plugin has two ways of doing this. First, by allowing you to create rewrite rules, and second, by using <picture> instead of <img> tags.
In most cases, the second method is the preferred one, however, this won’t work with all themes. Imagify is free, simple to use, and effective which makes it a plugin we would recommend.
However, keep reading to see some alternative image optimization plugins as well as some other ways of getting the job done.
2. Smush
Smush is a multipurpose image optimization plugin for WordPress. You can use Smush to compress PNG and JPG files or to convert these into WebP files.
Smush has a ton of other useful features such as lazy loading, as well as a 45 point image CDN, all of which help to supercharge your website speed.
Although many of these amazing features are available for free, WebP conversion is only available in the Pro version. Depending on how many websites you’ll be working with, Smush Pro packages are priced at $6, $14, and $29 monthly, respectively.
3. Optimole
Optimole is an image compression plugin that offers WebP conversion and the ability to serve these dynamically using Amazon CloudFront.
In addition, the plugin provides the optimal viewing experience for each visitor to your website by automatically resizing images to fit their screen.
User experience is a major part of Google Core Web Vitals so this is a great feature to leverage.
You can get started with Optimole’s free plan which will allow you to serve up to 5,000 visitors monthly, or opt for a paid plan which will allow up to 25,000 visitors monthly.
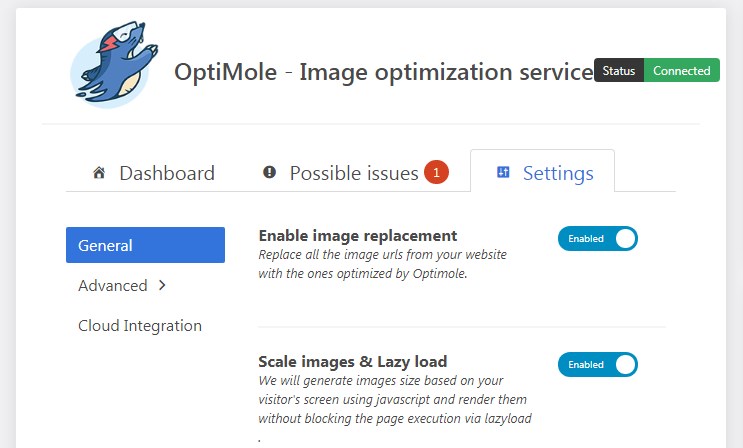
To use the free plan, simply install and activate the plugin. You will be prompted to open an account in order to receive an API key.
Once you have entered your API key, the rest of the process is done for you by default. Optimole will automatically optimize your images and provide default WebP support, along with other image optimization best practices.
4. ShortPixel
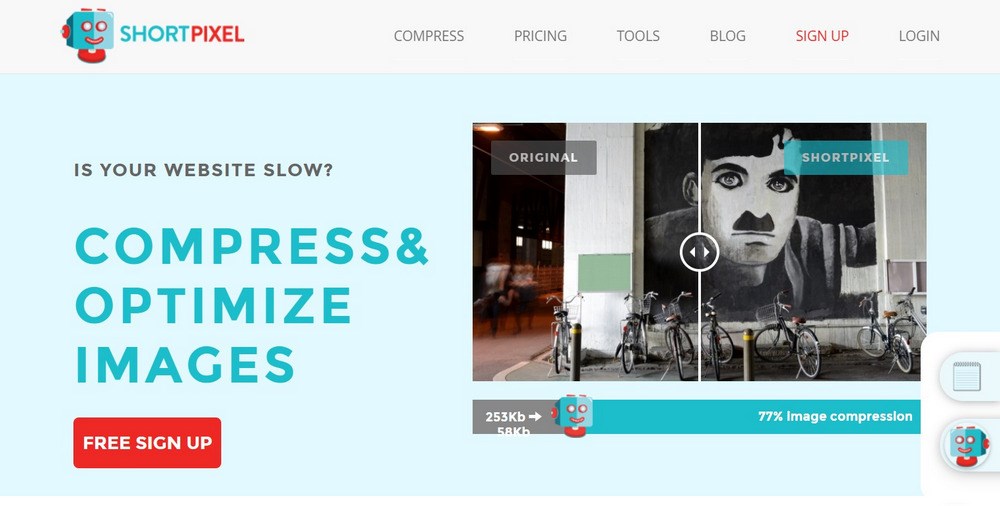
ShortPixel is a popular image conversion and optimization plugin. Just like the other plugins on this list, you can set up ShortPixel to optimize or convert your WebP images.
You can also serve PNG/JPG versions of your WebP files to Safari users and other unsupported browsers. ShortPixel supports conversion to WebP images in both lossy and lossless formats and offers other benefits such as its bulk optimizer.
One outstanding feature that ShortPixel offers is its unique glossy file format. Glossy images are designed to offer a compromise between the quality depreciation of lossy image files and the smaller file size of lossless images.
To get started with ShortPixel, download and activate the plugin, and get an API key by creating an account.
You won’t need to take much action beyond this point as most of the options are set up for you. However, to enable WebP conversions, you will need to navigate over to the advanced tab, and tick the option to allow WebP conversion.
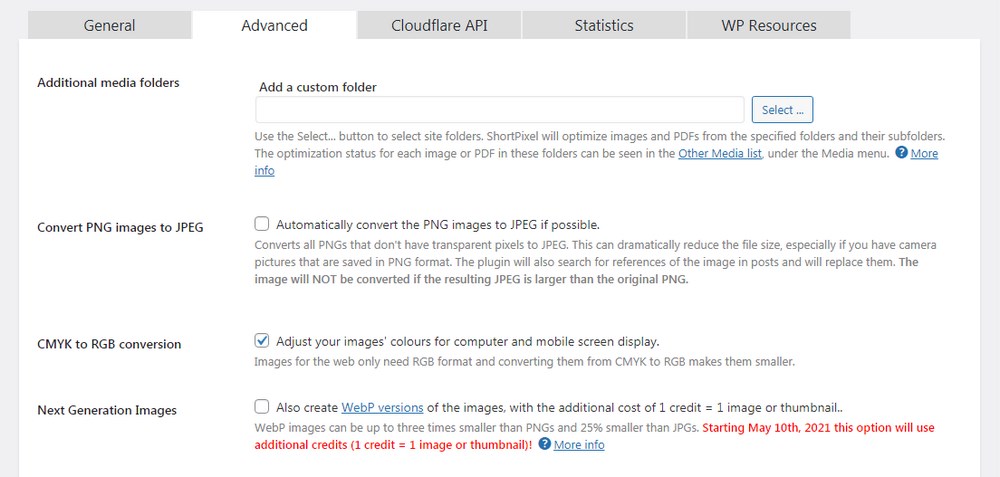
WebP conversion will cost one credit per conversion. ShortPixel offers 100 free credits once you open an account with a further 100 monthly. If you use these up, then you can purchase more.
Method 3: Add WebP Images to WordPress Manually
You may use a plugin or a CDN, or a combination of both to get the job done. The third option is to avoid either method and upload your WebP images into WordPress manually.
Here are the steps to take:
Convert Your Images into WebP
You will need to convert your images into WebP format before you upload them to WordPress. This is, generally, easy to do and can be done in a number of ways.
1. Use an Online Image Converter
The first method is by using an online image converter. There are several of these and there isn’t much that separates them in terms of quality.
One of the more popular ones is Online-Convert.com.
If you’re just building out your website, you can easily convert your images first and then upload them. But what if you already have a fully-built website, or have already populated your website with images?
To get around this, you can use a plugin that offers a bulk conversion feature. If you would like to do this manually, you’re going to need to get your hands dirty, by getting into the engine-room and writing a bit of code!
We’ll walk you through this process very shortly, but first, here is one more method of converting your images into WebP format.
2. Use an Adobe Photoshop Plugin
If you use Adobe Photoshop to create or edit images, you might want to save them in WebP format from within the app itself.
Although this is not possible by default, it is easy to do by installing a Photoshop image conversion plugin.
Now that you have successfully converted your images into WebP format, it’s time for the real heavy-lifting.
How Do You Successfully Upload WebP Images Into WordPress Manually?
There are different ways to get this done. If you are familiar with using Secure File Transfer Protocol (SFTP), you may simply upload your images directly into the uploads folder, without having to go through the media library.
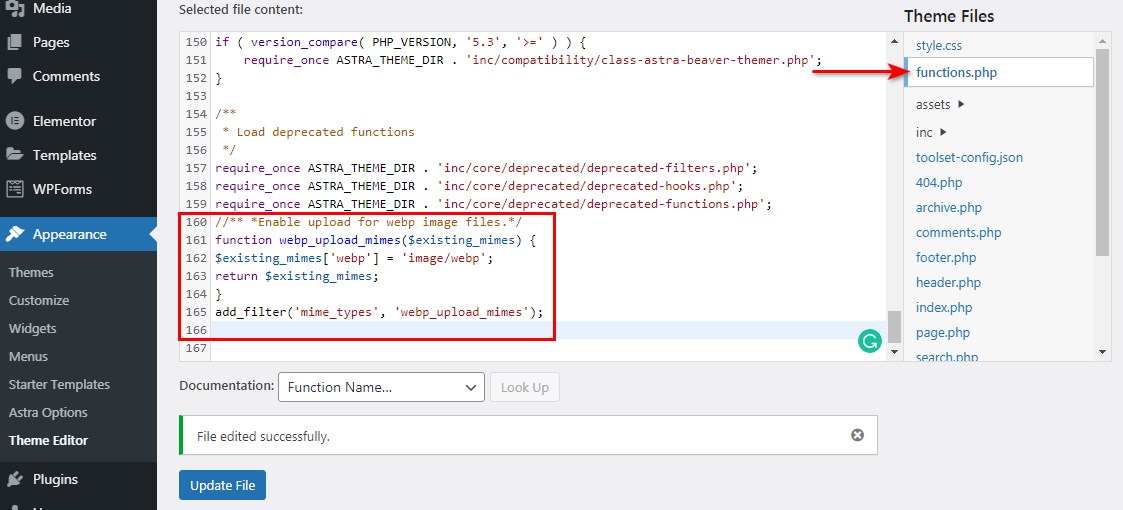
You could also write a little bit of code into the theme of your WordPress website. Here’s how:
- In the backend of your WordPress installation, navigate to Appearance > WordPress editor.
- Open the file named “functions.php” and paste the code below onto the bottom of the page:
//** *Enable upload for webp image files.*/
function webp_upload_mimes($existing_mimes) {
$existing_mimes['webp'] = 'image/webp';
return $existing_mimes;
}
add_filter('mime_types', 'webp_upload_mimes');
That’s it! You can go ahead and upload your WebP images without any hassle.
If you would rather avoid working in the WordPress editor at all costs, you can achieve the same effect by installing a plugin called Code Snippets.
If you are going to use a plugin , it might be best if you simply use a dedicated image compression plugin and avoid the manual approach altogether!
Getting Started With WebP Images
Now you know what WebP images are and how to use them to speed up your WordPress website. Your next step will be trying out any of the methods we have introduced you to.
Here’s one final tip: To fully optimize your website, you should start by using a fast, lightweight WordPress theme. Our theme, Astra, for example, is rated by many industry experts as one of the fastest WordPress themes out there!
If you’re really concerned about Website Speed, give it a try!
Do you use WebP images? Do they make a difference to your page load speed? Have anything you would like to share to new users of WebP? Share your thoughts below!
Disclosure: This blog may contain affiliate links. If you make a purchase through one of these links, we may receive a small commission. Read disclosure. Rest assured that we only recommend products that we have personally used and believe will add value to our readers. Thanks for your support!





WebP image format really great choice but as mentioned safari not supported. Any solution that if any browser does not support WebP format then jpg image will be served? Any plugin? like in the Astra feature image, we use WebP format but safari does not support any solution regarding this?
Hello Aaditya, Imagify should take care of this. We have covered the same here in this Video.
oops, you forgot to mention it does not work on safari
Yes, we did under the Advantages and Disadvantages section. 🙂
WebP might be on it’s way out according to this recent article from ShortPixel: https://blog.shortpixel.com/what-is-avif-and-why-is-it-good/
Probably, in the future! Until then I am sure, WebP Images could help. 🙂
Hi there. unless i missed it i dont think you covred what happens when safari is the browser in use. how does either the plugins / cdn / manual method fall back to using a png / jpg version instead please.
Hello Gail, this is where these plugins come into play. We have covered the same here.
Nice one. Well done.
But you didn’t tell us that if we add some code to the WordPress editor it disappears after updating the theme. Am I correct pls?
Yes, instead you can use the Child Theme to insert any custom code to ensure the code does not gets flushed out. Hope that clarifies. 🙂
Hi there thanks for this article. I use Astra pro theme and after reading this article I uploaded a webp image as a featured image but the thing is that Astra pro isn’t showing a featured image. Whereas if I upload webp images in a blogpost those images can be shown up.
Hello Harsh, that’s strange! If the featured Image is available it should be visible as expected.
If you are still facing any issues, please feel free to reach out to us through our Support Portal.
how to convert cdn(amazon s3) images into webp??
I am using towebp for bulking convert all my images to WebP instantly, it’s is a free online tool for converting WebP instantly without uploading files to standard JPG, JPEG, PNG, AVIF, GIF, and ICO. Meanwhile, convert all possible image formats to WebP image format.