Are you wondering how to find the WordPress login URL? Your search ends here!
After installing WordPress on your website, you should head over to your WordPress admin page to make changes to your site, customize your homepage, and publish your first blog post.
But before you do any of that, you need to log in to your WordPress admin page.
In this guide, I’ll show you how to find the WordPress login URL of your website so that you can easily access the admin page. I’ll also explain how to change the default login URL, how to secure it, how to customize it, and much more.
Let’s get started.
What Is the WordPress Admin Page?
The WordPress Admin Page or the WordPress admin area is the back end of your WordPress site. It is the first page you’ll see after you log in.
This is how it looks:
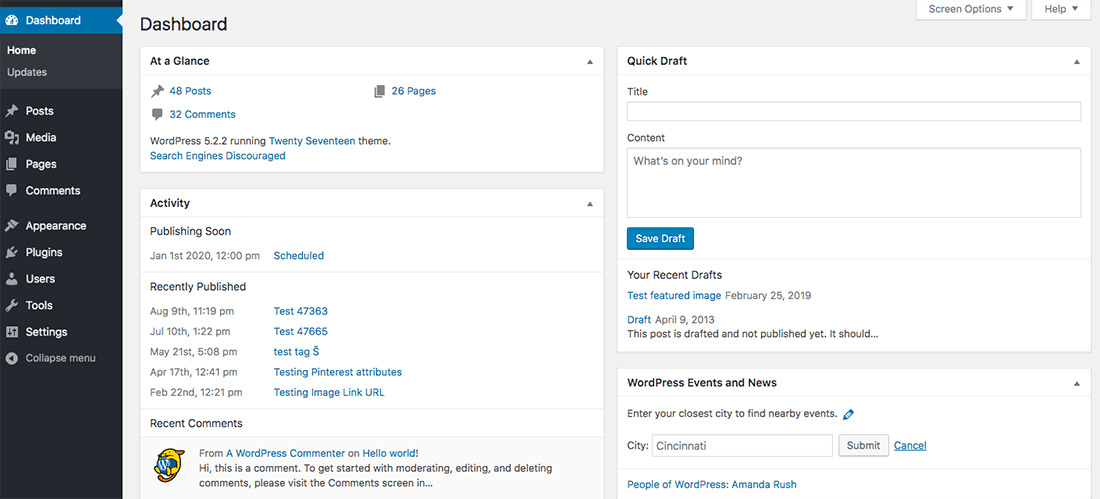
The WordPress admin page is also known as the admin panel, WordPress admin panel, WordPress dashboard or the WP admin dashboard.
The admin panel allows you to control your website and do important things like:
- Install themes and plugins
- Add or update pages of your website
- Publish new blog posts
- Moderate comments on your WordPress site
- Customize your website using the Theme Customizer
- And much more
In short, the WordPress admin page is the most important area of your website.
How to Find the WordPress Login URL
Now that you know what the WordPress admin page is, you must be wondering how you can access that page.
To open the admin page of your WordPress site, you need to go to the WordPress login page and enter your login credentials.
This is what a WordPress login page looks like:
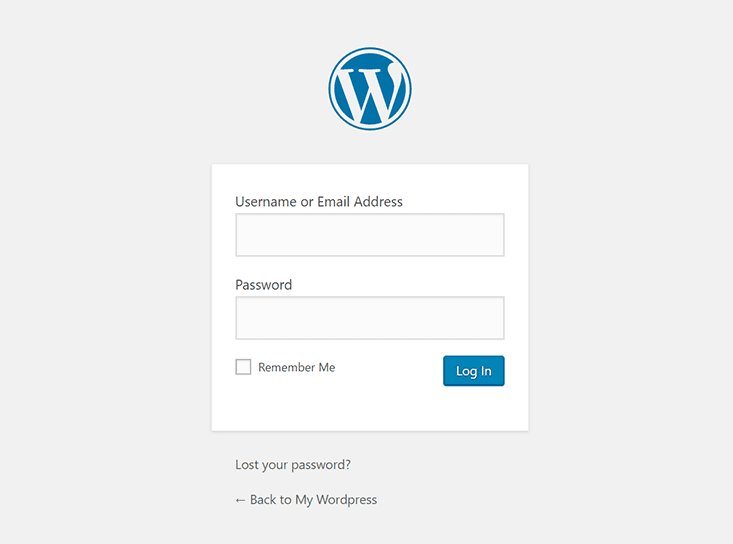
Now, the login page link of your website is not present on any specific page.
However, there are many ways to open the login page. And one of the most common ways is to type your website name (or domain name) into the address bar of your web browser, followed by a forward slash ( / ) and wp-admin:
http://example.com/wp-admin
Just replace example.com with your domain name in the above URL and paste it into the address bar of your browser. Once you hit enter on your keyboard, the login page of your WordPress site will open up.
You can now enter your username and password in the specified fields.
In case you don’t have the login credentials, you can check your email as most hosting providers will send such information to your registered email address.
If your host has an installer like Softaculous, you may have created the login credentials when setting up your website.
Finally, you need to click on Log In to access your WordPress admin page.
There are 3 other URLs you can use to go to the login page:
- example.com/login
- example.com/admin
- example.com/wp-login.php
Again, you just need to replace example.com with your domain name and you’re good to go.
WordPress Login URL on a Subdomain
There can be times when you’ll have to install WordPress on a subdomain. For example, you may run an eCommerce site and you have installed WordPress on a subdomain like blog.example.com.
How do you access your WordPress admin login page in such cases?
Here are the different ways using which you can go to the login page when WordPress is installed on a subdomain:
- blog.example.com/wp-admin
- blog.example.com/login
- blog.example.com/admin
- blog.example.com/wp-login.php
You can use any of the above URLs and replace blog.example.com with your subdomain to access the WordPress login page. Simple, isn’t it?
WordPress Login URL on a Sub-Directory
Just like subdomains, you can also install WordPress on a sub-directory. The URL may look something like example.com/blog.
To access the login page of your sub-directory, you can use any of the following URLs (replace example.com/blog with your sub-directory path):
- example.com/blog/wp-admin
- example.com/blog/login
- example.com/blog/admin
- example.com/blog/wp-login.php
This will take you to the login page. You can use your login credentials to access the WordPress admin area.
While experienced WordPress users can easily remember the login URL, new WordPress users may find it difficult to recall the login URL of their website.
So, is there any way to easily access the WordPress login page?
Luckily, there are 3 ways using which you can remember the login page without typing it every time in the address bar of your web browser.
1. Bookmark the Login Page of Your WordPress Site
The easiest way to remember any web page is to bookmark it in your web browser. This will help you to access the login page quickly every time you need it.
The process of bookmarking any link will differ depending on your web browser.
For example, if you’re using Google Chrome, all you have to do is go to the WordPress login page of your website and click on the star symbol present in the address bar. This will open a modal window where you need to select the bookmark folder and click on Done.
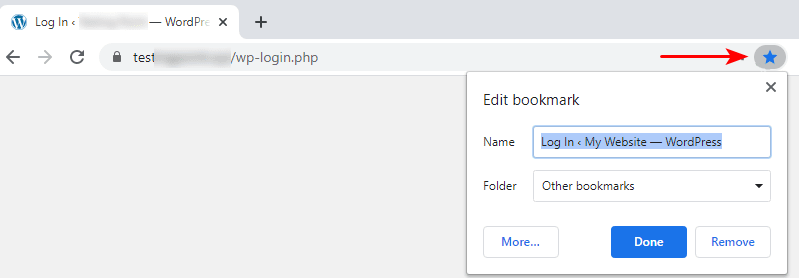
This will bookmark your login page on Google Chrome.
To open a bookmarked page, you can use the keyboard shortcut CTRL + Shift + O (or Cmd + Shift + O) to open the Chrome bookmark manager and then, search for the login page using the search bar.
If you’re using a different web browser, you may follow these instructions:
2. Add the Login Page Link to Your Website
Another way to remember the login page is to add the login page link to your website. This will help you to open the login page from your homepage.
Now, you can add the login link to the menu, sidebar, or footer of your website. Let me show you how to do it.
1. Menu
To add a link to the menu of your website, you should first go to your WordPress admin area.
Next, you need to head over to Appearance > Menus from the left sidebar. This will take you to the Menu page. Here you’ll have to select the menu, where you want to add the link, by clicking on the dropdown menu. Once done, you need to click on Select.
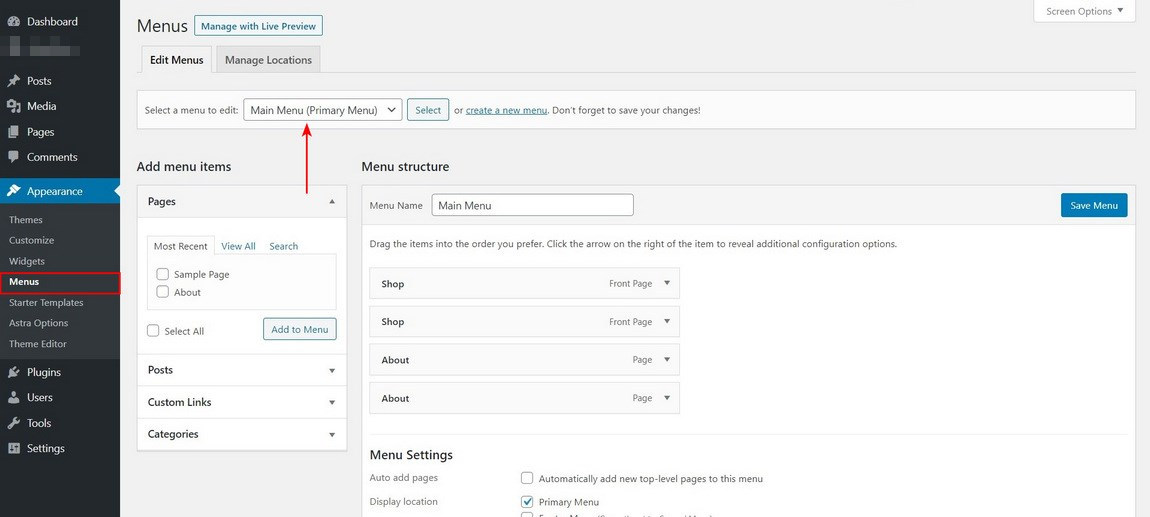
Next, you’ll have to click on the Custom Links tab, present under the Add menu items section, to add the login link. Here, you need to add the login URL of your website and a link text (e.g. Login Page).
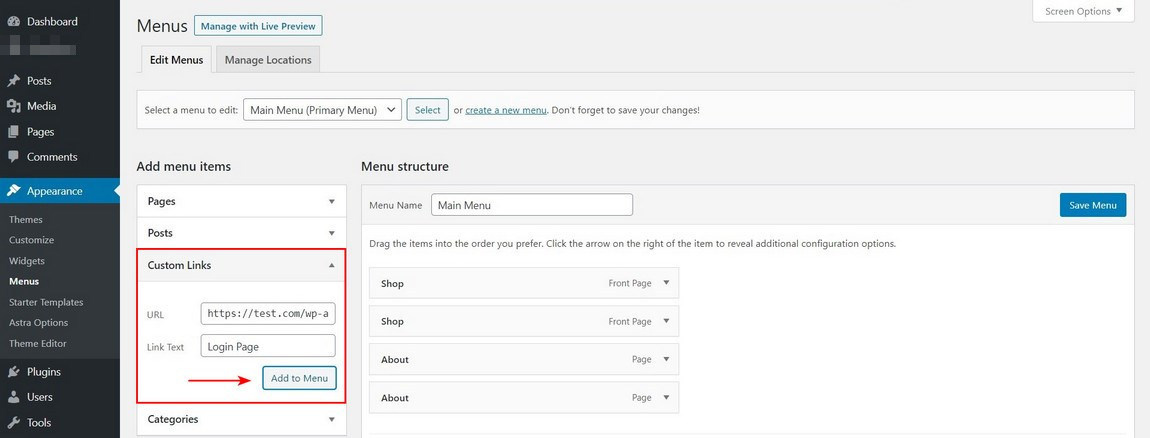
Once you’re done, you need to click on the Add to Menu button.
Next, you can drag and drop the menu item to arrange its position. And finally, you should click on Save Menu to save the changes.
This will add the login link to the menu of your website. Anytime you need to access the login page, just open your website and click on the login link in the menu to quickly open that page.
2. Sidebar and Footer
The process of adding a link to the sidebar or the footer is the same.
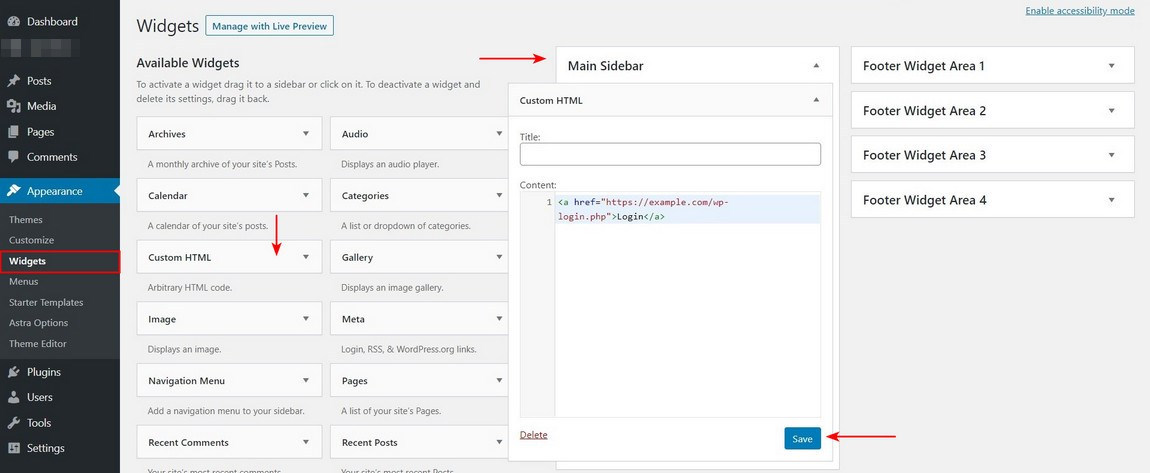
First, you need to head over to Appearance > Widgets from the left sidebar. On the Widgets page, you’ll see all the available areas where you can add a widget. This will depend on the theme you’re using.
In my case, I am using the Astra theme – so I have the following options:

Now, you’ll have to open any widget area (sidebar or footer) and drag the Meta widget, present under the Available Widgets section, to it. This will add the login link along with other links to your sidebar or footer.
If you just want to show the login link, then you should add the Custom HTML widget to the widget area of your choice and add the following code to the content area:
<a href="https://example.com/wp-login.php">Login</a>
Replace example.com with your domain name in the above code and then click on Save. You may keep the Title field blank.
3. Log in to WordPress Admin Page from Your Web Hosting Dashboard
Some web hosting providers including Bluehost, Cloudways, and SiteGround let you log in to your WordPress site from their dashboard.
To use this option, all you need to do is log in to your web hosting account and you will find the link to the WordPress login URL of your website on the dashboard. Click on that link to go to the login page of your website.
How to Change WordPress Login URL
Now that you know how to find the login URL of your WordPress site, the next thing I’ll show you is how you can change the login URL.
If you wanted to, you can make your login URL something like example.com/my-private-login-page by replacing the default URL.
Wait! Why should you change the login URL? The answer is simple – security.
The problem with the default login URL is everyone knows how to access the login page of any WordPress site. This can allow hackers to try to gain access to your website using brute force attacks.
The best way to avoid this security issue is to change the WordPress login URL to a different path.
The easiest way to change the login URL is by using the WPS Hide Login plugin. It is a popular plugin with more than 700,000 installations and will help you to create a new login URL by hiding the default one.
Before I show you how to use this plugin, please take a full backup of your website. You may read our step-by-step tutorial on how to take a backup of your WordPress site.
Now, to install the WPS Hide Login plugin, you need to first head over to Plugins > Add New from the left sidebar of your admin panel. On the Add Plugins page, you need to search for WPS Hide Login using the search box.

And you should install and activate the plugin once you find it.
After activating the plugin, you should go to Settings > General from the sidebar to access the General Settings page. Here you need to scroll down to find the WPS Hide Login settings.
Now you should add a new pathname (any text you like) to the Login url field. Just make sure you write it down somewhere or bookmark the new login URL, otherwise, you may lose access to your site.
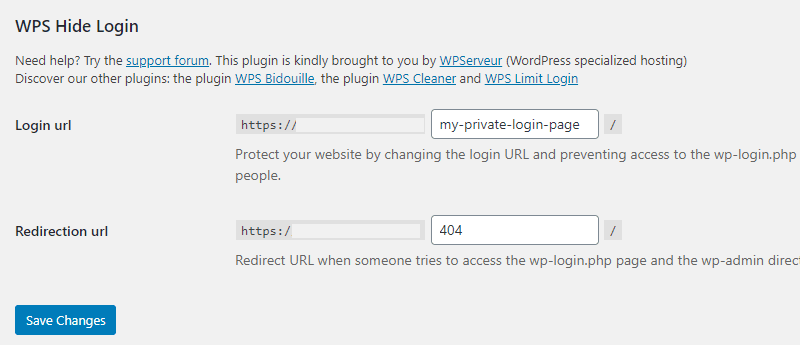
You can write 404 in the Redirection URL field to redirect the default login URL to a 404 or error page. Once done, click on Save Changes to store the settings.
You can now test your new login URL and make sure it is working properly.
How to Lock the WordPress Login Page
If you don’t want to change the default login URL, you should limit the login attempts to your website for security purposes. This will help you to lock the login page if someone tries to hack your website.
The best way to limit login attempts is by using the Limit Login Attempts Reloaded plugin. This plugin can help you to limit the number of login attempts and block a user if needed.
To install the plugin, you need to go to the Plugins > Add New page and then search for Limit Login Attempts Reloaded plugin. Once you find the plugin, you should install and activate it.

Next, you need to configure the plugin by going to the settings page of the plugin (Settings > Limit Login Attempts). On the settings page, you should click on the Settings tab to make any changes.
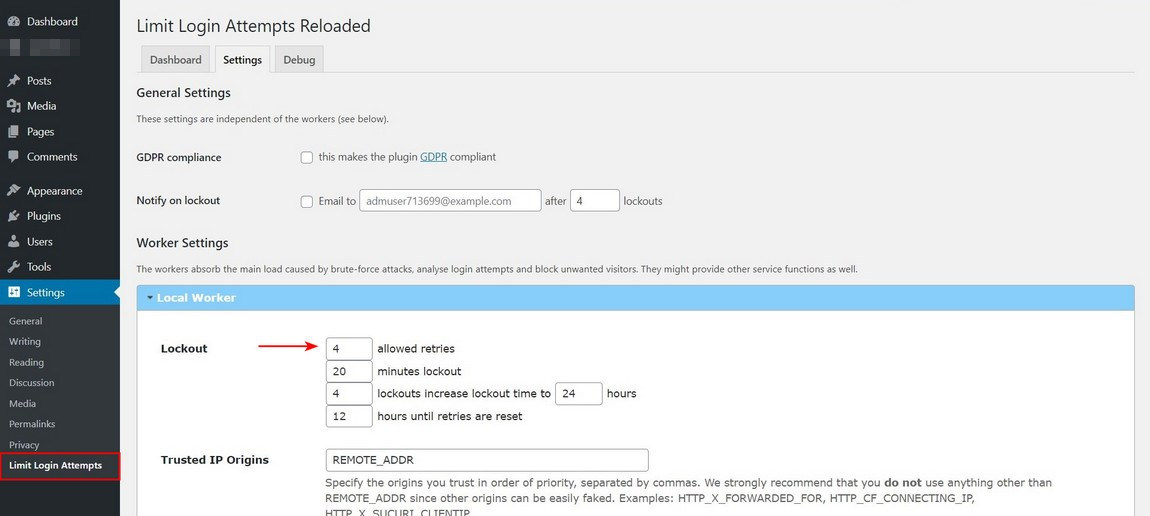
Here you can change the number of allowed login attempts. You can also control the time after which a user should be locked out if they reach the maximum number of attempts.
Finally, you need to scroll down to the bottom of the page and then click on Save Settings once you’ve made the necessary changes.
Let’s test our login page now by entering a wrong username and password combination.
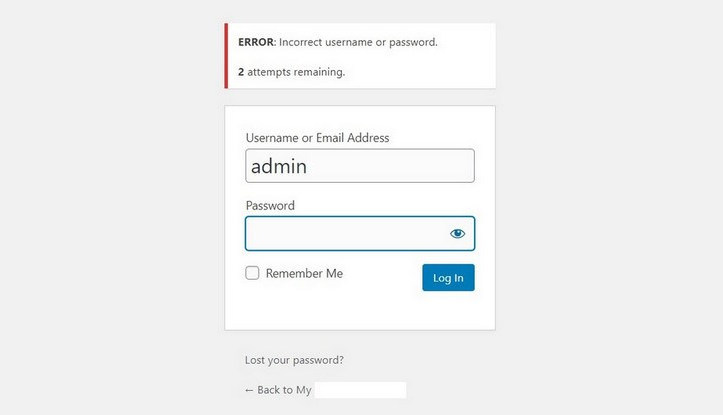
As you can see, the plugin is showing an error message and letting you know that you have two attempts left. If you enter the wrong login credentials two more times, then you’ll be locked out for 20 minutes.
How to Customize the WordPress Admin Login Page
Say, you’re managing a multi-author blog and your WordPress admin login page is accessed by multiple users. Customizing the login page can be useful in such cases.
Don’t worry, you won’t have to deal with any code to customize your login page. You can simply use the LoginPress (Custom Login Page Customizer) plugin for this purpose.
Let me show you how to use it.
First, you should head over to the Add Plugins (Plugins > Add New) page and then search for LoginPress using the search box. And then install and activate the plugin once you find it.

After activating the plugin, you’ll see a new menu item LoginPress on the left sidebar. To customize the login page, you should click on LoginPress > Customizer to open the Customizer page.
Here you can add or remove any element you want.
For example, you can add a background image by clicking on the Background option on the left panel. Then you can select a background color or image of your choice. You can even add a background video if you want.
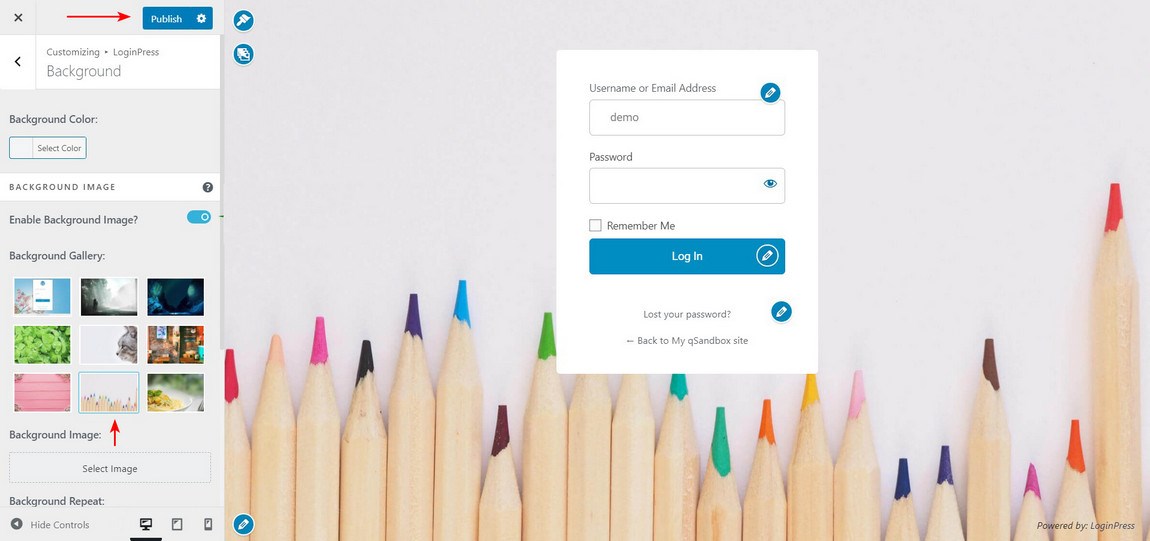
Also, you can replace the WordPress logo with the logo of your brand by using the Logo option. You can even disable the logo if you want.
You can play with the other available options (like reCAPTCHA, Customize login form, Button Beauty, and more) and customize the login page as per your requirements.
Once you’re done, you should click on the Publish button, present at the top-left side of the page to save the changes.
Common WordPress Website Login Issues and How to Fix Them
There may be times when you face login-related issues on your WordPress site preventing you from logging into your WordPress dashboard.
Don’t worry! You can easily solve most of these problems on your own.
So without further ado, let me share some of the most common WordPress login issues and how you can fix them.
Forgot Password
Losing or forgetting your password is one of the most common issues that can prevent you from accessing your WordPress admin page.
To solve this problem, you need to first go to your WordPress login page – example.com/login (replace example.com with your domain name). In case you’ve changed the login URL path, you should use that URL to go to the login page.
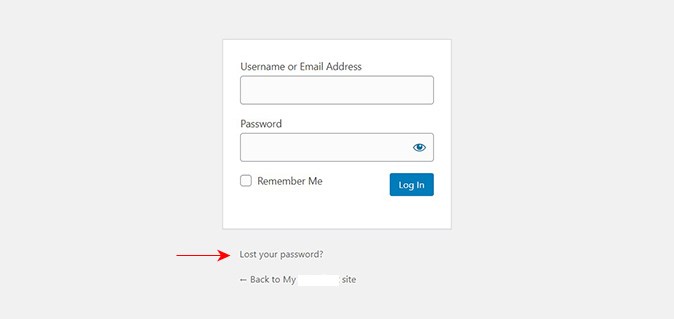
Next, you should click on the Lost your password link placed below the login form.
This will open a new page where you’ll have to enter your username or email address. Once you’re done, click on Get New Password.
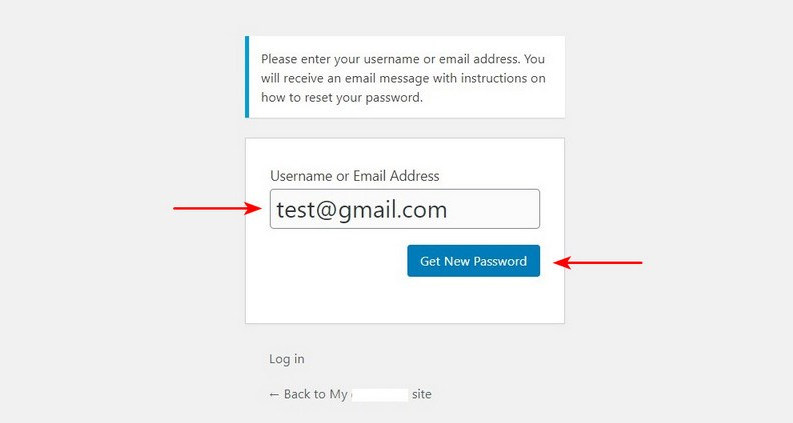
WordPress will now send an email with a confirmation link to your email address. You should click on that confirmation link to reset your existing password.
This will open a new page where you’ll be asked to select a new password. Once you’ve entered your new password, you should click on the Reset Password button.
Now you can go to your admin login page and log in to your site with the new password.
To avoid this problem in the future, you can write your password somewhere or use the LastPass password manager to store the login credentials of your website.
Forgot Username
What if you’ve forgotten the username of your WordPress account? Unlike the password, there is no option to retrieve (or change) the username on the login page. So what should you do in that case?
Well, you can open the database using phpMyAdmin to find (or change) your username in such cases. However, you should be very careful when making any changes in the database because it can affect how the website works.
So the first thing you should do is take a backup of your website using the UpdraftPlus plugin.
Next, head over to your web hosting account and open phpMyAdmin. In case you’re not sure how to find the phpMyAdmin option, you can search the hosting knowledge base or contact your web host support.
Once you open phpMyAdmin, you should select the database of your WordPress installation. Next, you should click on the wp_users table, present on the left sidebar, to open it.
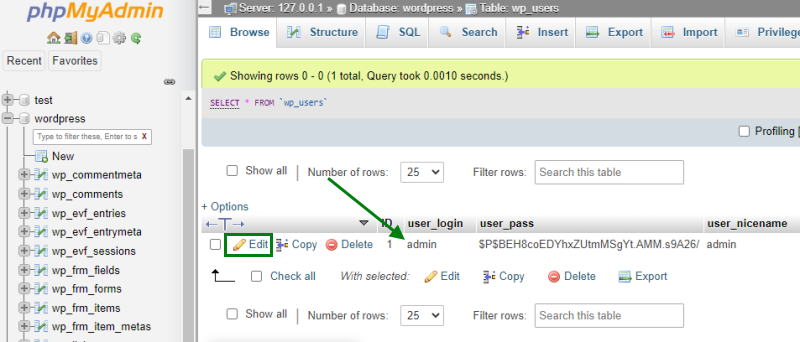
Here you can find your username under user_login. As you can see, my username is admin in the above example.
If you want to edit your username, you should click on the Edit link to open the edit page.

Here you can change the user_login value to anything you like (e.g. jamie). Once done, you should scroll to the bottom of the page and click on Go to save the changes.
Cookies are Blocked
In some cases, you may get the following cookie-related error:
Cookies are blocked or not supported by your browser. You must enable cookies to use WordPress.
This will prevent you from logging into your WordPress dashboard.
Since WordPress login needs cookies to work properly, you should make sure that cookies are enabled and working correctly.
You can also clear the cache of your browser in case you’re still getting the error.
Corrupt Login File
There can be some instances where the login file is corrupted. In that case, the login page will show an error message.
The best way to overcome this problem is to replace the corrupt file with a fresh login file.
First, you need to head over to the WordPress.org website and click on Get WordPress to download the latest version of WordPress to your computer.
Next, you should open the folder and copy the wp-login.php file to your desktop.
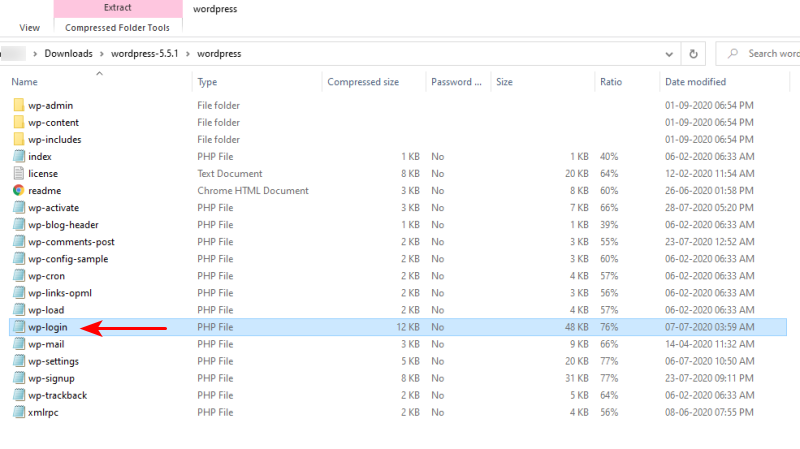
Now you’ll have to replace the corrupt login file with this new wp-login.php file. You can do that using FTP or the File Manager of your web host.
To use FTP, you need to download and install the FileZilla Client software on your computer. Next, you should open FileZilla to connect to your web hosting server. You can contact your web host support if you need any help.
Once connected via FTP, you need to open the public_html folder of your WordPress installation and delete the existing wp-login.php file. Finally, you should upload the new wp-login.php file from your desktop to solve the login issue.
Final Thoughts
In this article, you’ve learned how to find the WordPress login URL of your website. You’ve also learned how to change and lock the login URL for security reasons.
And you can also customize the login page of your WordPress site by following the steps mentioned in this article.
Do you’ve any questions? Please feel free to let me know in the comment section. Also, share this article on your favorite social media platform because sharing is caring!
Disclosure: This blog may contain affiliate links. If you make a purchase through one of these links, we may receive a small commission. Read disclosure. Rest assured that we only recommend products that we have personally used and believe will add value to our readers. Thanks for your support!



Woh, this is a perfect guide for new WordPress users.
I defiantly suggest to change common login URL and add limited login attempt plugin to make your website more secure.
Indeed, Lily!
Thanks for sharing your thoughts! 🙂
Thanks to this article, I got really good idea and motivation to work on User Registration for my business related websites.
Defiantly this will open lot’s of opportunities for my business.
Hello Katina,
Glad you found it useful. 🙂
I forget my Username and Pass, thanks to you guys I’m able to recover my ID Pass.
Hello Dario,
Glad you found the article useful! 🙂
With help of you guys, I just improved my website security little bit.
Nice tutorial and very detailed information on what to do.
Cheers to that, Cody! 🙂
I set my family photo on WordPress login page, so it keep motivate me to work.
heh
Hello Dustin,
Thanks for the comments!
I am so much grateful for this article. It just came at the right time for me. I have promptly used WPS Hide Login plugin to secure my current project’s backend login and it worked great. Also, the LoginPress is another great plugin.
Thank you so much once again.
Grateful regards 🙂
You’re most welcome, Segun! 🙂
Thank you for the information and advice in this beautiful article; I thank you for the effort.
Very interesting to read this article. I want to thank you for the efforts you had made in writing this excellent article. This article resolved all my queries. Keep it up.
Great post; this will help the beginner users of WordPress. I always want to avoid visitors and unwanted and malicious types getting on my login page. It’s better to use an entirely different login URL.
Hi, Thanks for sharing the content. I genuinely appreciate your information. I will bookmark your site and keep checking weekly for new information.
Thank you for the detailed tutorial. I have a question; I recently set up my website and subdomains. Whenever I try to login to my subdomain admin page, it redirects to my main domain. How to resolve this issue?
I wanted to thank you for your time just for this fantastic read!!