When you begin building an online store, it’s hard to get every detail right. Today, we would like to share with you a detailed guide on creating an online store using WordPress and WooCommerce.
Building an online store with WordPress is a great way to expand an existing brick and mortar store, experiment with new products, or supplement your current business income.
Stats:
According to a recent study by Optinmonster, more than two-thirds of the world’s population shop online and that number continues to grow every year. The global online shopping market is predicted to hit 4 trillion by the end of 2020.
In the past, we have helped many users start their online store. That is why we have decided to create our most comprehensive guide on how to set up an online store.
If you follow this guide, you can have a fully operational WooCommerce store up and running ready to generate revenue!
- What Are the Requirements of Setting up an Online Store?
- What Are the Benefits of Setting up an Online Store?
- How to create an online store using WordPress
- What Types of Online Store Can I Start
- Recommended Plugins for Online Store Owners
- How to Promote Your Online Store to Make Money
- Frequently Asked Questions
- Conclusion
What Are the Requirements of Setting up an Online Store?
Before you can start your online store, you need to understand the requirements. The most basic requirement is a computer with internet connection.
Other requirements are necessary when setting up an online store, they include:
- Domain name – This is your website name. It is the address visitors type into their browser to land on your website. Your customers will use it to access your store, view products, place orders, and make payments.
- Web Hosting – Web hosting is where your website is stored and made accessible to the world. A web host can make or break a store, choosing the right one is a must!
- Time – You will require time to set up the website, optimize the performance, and upload the products.
Using this comprehensive tutorial, you can set up an online store in less than 30 minutes. We’ll walk you through each step in detail.
What Are the Benefits of Setting up an Online Store?
If you do a quick search on the web, you will find thousands of marketplaces, including Amazon, Etsy, and Facebook. These marketplaces offer business owners a platform to showcase their products and make sales.
Why do you need to create an online store when you can upload your products to these marketplaces? Why struggle to look for customers when these marketplaces expose you to a larger pool of clients?
There are many advantages to having an online store built with WooCommerce. Let us explore them to answer these questions.
Control Over the Look and Feel of the Store
Setting up your online store with WordPress and WooCommerce allows you to modify the code and content according to your needs.
This gives you the freedom to build a unique store that creates an exceptional experience for your customers.
WooCommerce continues to gain popularity because of its flexibility. You can easily extend the functionality of your WooCommerce store using extensions, themes, and plugins.
For you to set up your store for success, there are some essential plugins you should not miss.
If there’s no ready solution for you, you can hire an eCommerce developer to develop your custom module.
We recommend using the Astra theme as it offers you full control of your store’s layout and feel.
Full Control Over What You Sell, How and for How Much
Creating an online store using WooCommerce gives you full control over what you sell. You can change the prices or offer incentives in the form of discounts to your customers.
You can also create custom selling scenarios depending on your requirements.
WooCommerce also allows you to sell your services online. This will save you a lot of money, time, and the hustle of opening a physical shop.
The core functionality of WooCommerce also allows you to accept payments for the products or services you sell.
To Avoid Expensive Processing Fees
Unlike most marketplaces, you’ll not be charged for your product listing if you create your own online store.
Marketplaces charge a commission for every transaction you make.
WooCommerce doesn’t charge transaction fees. While PayPal has fees, they are much lower as compared to the transaction fees in market places.
Alternatively, you can offer check payments, bank transfers, and cash on delivery, but PayPal should always be your first choice.
Collecting Customer Data
When you add products to these marketplace platforms, you have limited access to customer data. You might not be able to collect the following types of data, depending on the marketplace:
- Personal data – This category includes personal identifiable information like IP addresses, browser cookies, and device IDs
- Engagement data – This data includes details about consumers and how they interact with your online store
- Behavioural data – This is data that contains details such us product usage information, purchase histories, and qualitative data
- Attitudinal data – This is a type of data that encompases metrics on purchase criteria, customer satisfaction, the desire for a certain product, and many more
If they visit your online store, you have the chance to request for their email address.
This email address is essential for building your email list, which is crucial for your email marketing campaigns.
If it is your store, you can reach out to them again on your social media platforms. You can also use a marketing method called retargeting.
Retargeting enables you to create tailor-made ads for people who have visited your site previously. It increases the chances of making them repeat customers and boosts your overall sales efforts.
Building Your Brand
Marketplaces allow you to upload products and start selling them immediately. It might look like a tremendous upside at face value, but it creates an even bigger problem for you.
It is easy to set up shop on these platforms, but they have numerous other sellers. Most of them are your direct competitors.
Creating your online store with WooCommerce sets you apart from the rest, as it gives you the power to control how the store looks and how the customer gets to experience it.
Building your brand enables you to build trust. Trust is essential as it increases the chances of a customer making a purchase and coming back.
It Helps Avoid Price Wars
Marketplaces are packed with sellers promoting similar products. Here, consumers always have the upper hand, and the only way retailers can compete is by cutting prices. You have to resort to selling your products for shallow margins to compete.
Creating your online store will save you from the marketplace price wars since you are unique.
Get Repeat Purchases
According to the 80/20 rule of sales, at least 80% of your customers contribute to 20% of the revenue that you make. The rest (loyal customers) contribute to the largest chunk of your income (80%).
There is a need to have repeat customers. However, to build a customer list, you need a client database. You can achieve this by having your online shop.
You can also utilize email marketing tools to keep customers coming back for more.
Here is a summary of other benefits of creating your own online store:
- A direct, personalized communication process with your customers
- Improved customer retention and loyalty
- Total access to customer information (email, browsing, or purchase history)
- Faster dispute resolution
- Optimized business decisions, operations, products, and services
- Keep 100% of your sales revenue (instead of splitting it with third parties)
- Complete business autonomy (you set the rules)
It is worth mentioning that building a direct sales channel has a fair set of difficulties.
For example, you need to internalize sales and marketing efforts. Since you won’t have a multi-billion dollar corporation doing it for you, it is a lot of work. However, the benefits are immense if you do this correctly.
It is imperative you future-proof your business if you want it to grow.
How to create an online store using WordPress
Now that you know the benefits, here is what we will cover in this online store tutorial:
- How to register a domain name
- How to choose the best WooCommerce hosting
- How to get an SSL certificate for free (required for accepting payments)
- How to install WordPress
- Setting up HTTPS to use SSL
- How to create a WooCommerce store
- How to add products to your online store
- How to select and customize your theme (Astra Theme)
- How to extend your online store with plugins
- CartFlows plugin review
- Learning WordPress to grow your business
Step 1: Online Store Platforms to Build an eCommerce Website
Choosing the right platform is key to the success of your online store. With so many platforms to choose from, it is difficult to make the right decision.
An eCommerce platform is a software application that enables a business to sell products and services online. It helps business owners manage the website, marketing, sales, and other tasks.
Many eCommerce platforms can create an online business presence. The two most highly recommended platforms are:
- Shopify
- WordPress and WooCommerce
Shopify is a bundled eCommerce platform which eases the burden of creating an online store, accepting payments, and managing your inventory all from a single platform.
You don’t have to worry about the technical aspects of managing a website such as web hosting, security, caching, and other functions.
The basic plan for Shopify starts at $29 / month. You can upgrade to the Shopify plan for $79 or the Advanced Shopify plan for $299 per month. Each of the plans mentioned includes a domain name, SSL certificate, and web hosting.
The basic plan allows you to add unlimited products, two user accounts, unlimited file storage, and more. However, it does not include third-party tools and add-ons that you will need to take your Shopify store to the next level.
As your business grows, these costs will start adding up. You could end up paying a lot more than the basic plan. Another factor that affects your cost is payments. Shopify Payment Solutions cost 2.9% + 30 cents per transaction.
If you want to use third-party payment gateways or your merchant account, they will charge a flat fee of 2.0% for all transactions. You can reduce this fee to 0.5% by using the Shopify Advanced plan, which costs $299 per month.
The payment processing fees are steep if you use external payment gateways. Many users prefer WordPress and WooCommerce because of the flexibility they offer. (Shopify vs WooCommerce Comparison)
WooCommerce is an open-source eCommerce plugin built for WordPress. This plugin allows you to leverage the most powerful content management system (CMS) and use it to run an online store.
This guide will show you how you can set up an online store in WordPress using WooCommerce. Since it is an open-source solution, you can customize every aspect of your store.
You’ll need a domain name, SSL certificate, and a WordPress hosting account to start a WooCommerce store.
As mentioned earlier, the domain name is your website’s address on the internet—for example, www.example.com.
Website hosting is the server space you use to install your website so that it is accessible to the world.
SSL is used to facilitate secure network communication by identifying and authenticating the server and ensuring the privacy and integrity of the data you transmit. It also prevents eavesdropping on or tampering with information sent over the network.
It ensures that nobody deciphers names, passwords, and other sensitive information when sending them between the web server and the browser.
Some hosting packages offer free SSL certificates. We recommend using Bluehost because it is an official WordPress and WooCommerce recommended hosting provider. Here you can get started for $3.95 / month.
Bluehost has been in existence since 1966, and it boasts of being one of the oldest web hosting companies. They host millions of WordPress sites all over the world. (See Bluehost review)
It offers many different shopping carts: Zen, Cube, Agora, and OSCommerce. It also provides SSL security for your transactions as shown below:
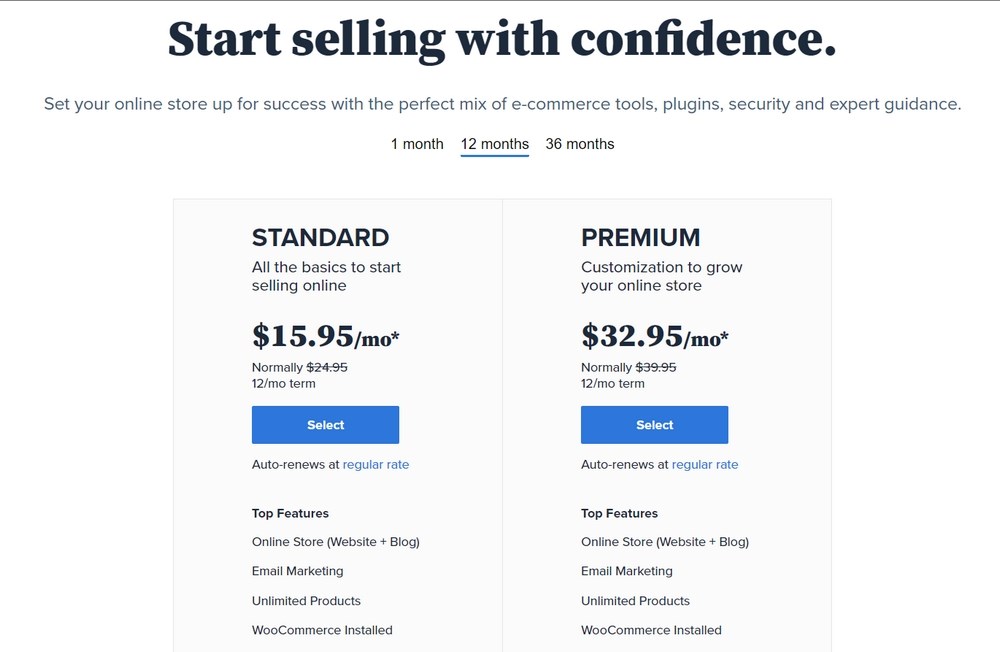
WordPress setup on Bluehost is seamless since it comes with helpful auto installation software.
Let’s purchase a domain + hosting + SSL. Open Bluehost and follow the steps that we will share.
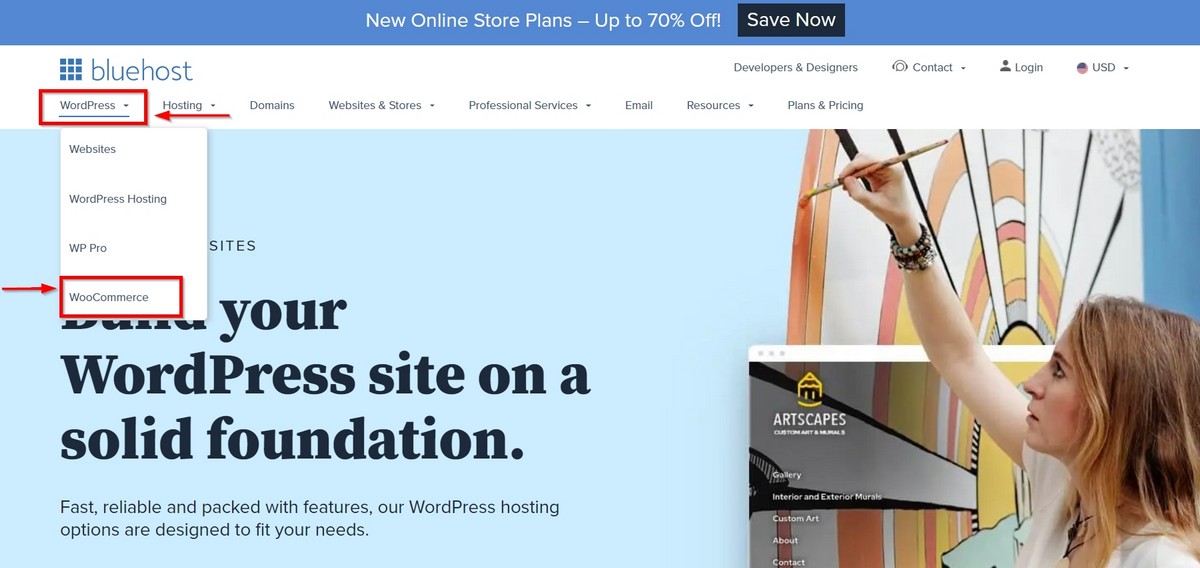
The first step is to choose the right hosting plan for your eCommerce store. Bluehost has optimized plans for WooCommerce that you should find under WordPress > WooCommerce.
They offer two hosting plans for WooCommerce, ONLINE STORE, and ONLINE STORE + MARKETPLACE, each for 1, 12, and 36 months.
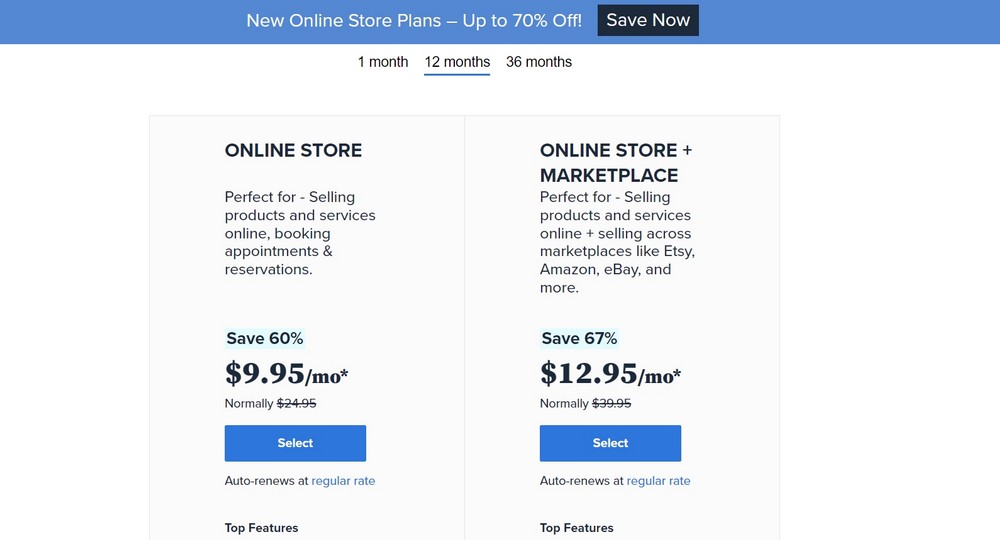
Choose the one that suits your budget.
Tip:
It’s better to go with more extended plans at discounted rates to keep the hosting cost predictable for a longer time.
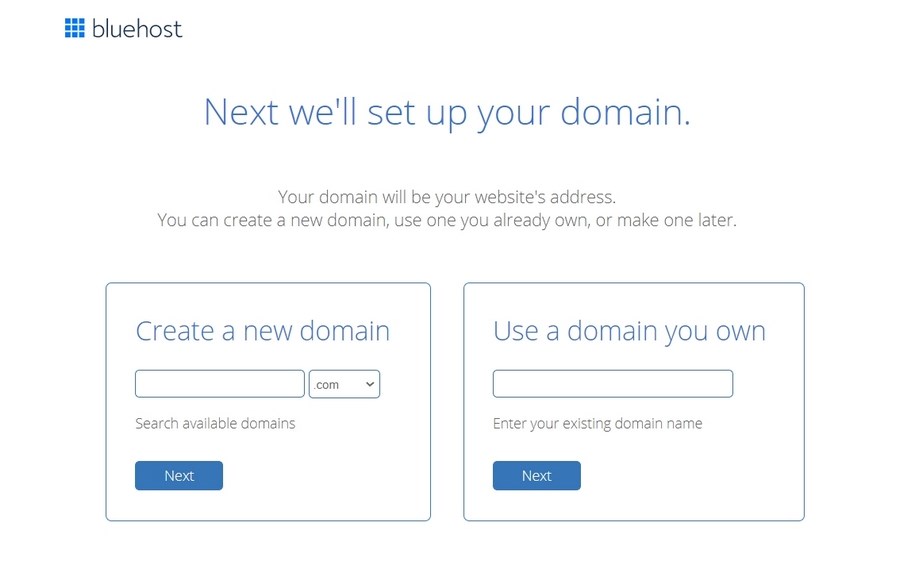
On the next screen, you need to enter the domain name for your website. You can create a new domain by searching through the available domain names.
The last step is simple. You need to enter your account information. You then need to finalize the package information to complete the process. You will also see some optional extras that you can purchase, but they are not necessary.
It’s entirely up to you whether or not you purchase these. From an expert’s point of view, we generally don’t recommend purchasing these add-ons. You can add them later on if the need arises.
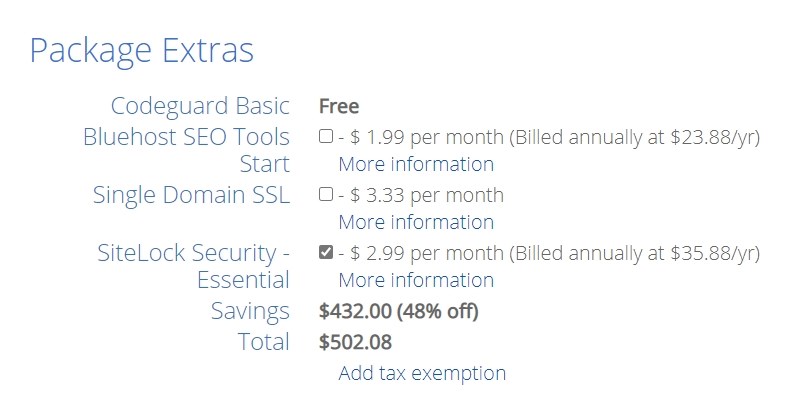
After the payment information, click on submit.
Once you set up your account, you will get an email. This email comes with details on how to log in to your web hosting control panel (cPanel). The control panel allows you to manage everything from support to emails, among other things.
Now you can log in to your cPanel. The first thing you will see is a popup informing you that WordPress with WooCommerce is pre-installed on your website.
On the popup, you need to click on the ‘Log in to your site‘ button. Clicking this button will take you to your WordPress site’s dashboard. That’s it! You have now finished setting up the hosting and domain part.
The packages provided by Bluehost includes free SSL. You do not have to buy an SSL certificate unless you want to use a premium version. A premium SSL certificate is an enhanced form of the standard SSL. It has some advantages like additional validation.
Now that the platform is ready, the next step is to set up your WordPress site and your online store.
Step 2: Set up WordPress for Online Store
When adding your domain name, Bluehost has a setup option that installs WordPress and WooCommerce on your website.
The first thing that you will see when you first log in to WordPress is a welcome message. Additionally, you will see a question asking what kind of site you want to set up. There are two options— either a Business or Personal website.
Click on the ‘I don’t need help‘ link.
Don’t worry about the two options, as we will walk you through all the necessary steps to get your website ready.
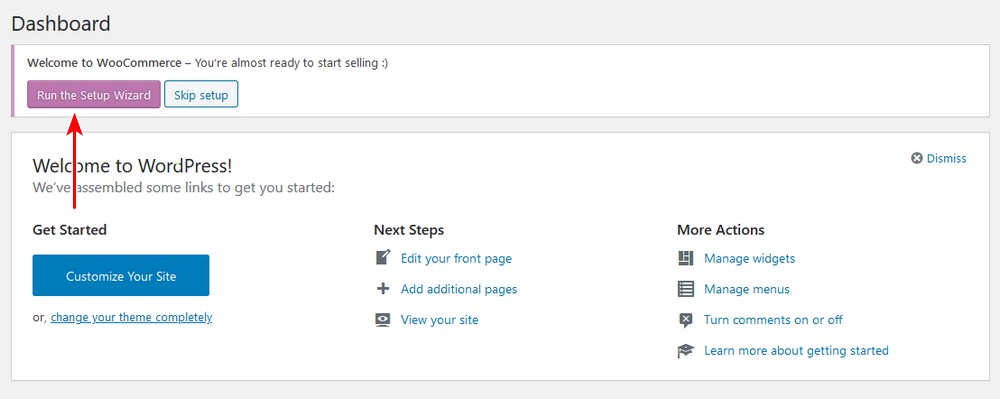
If you close your setup wizard, the WordPress admin dashboard should look like this:
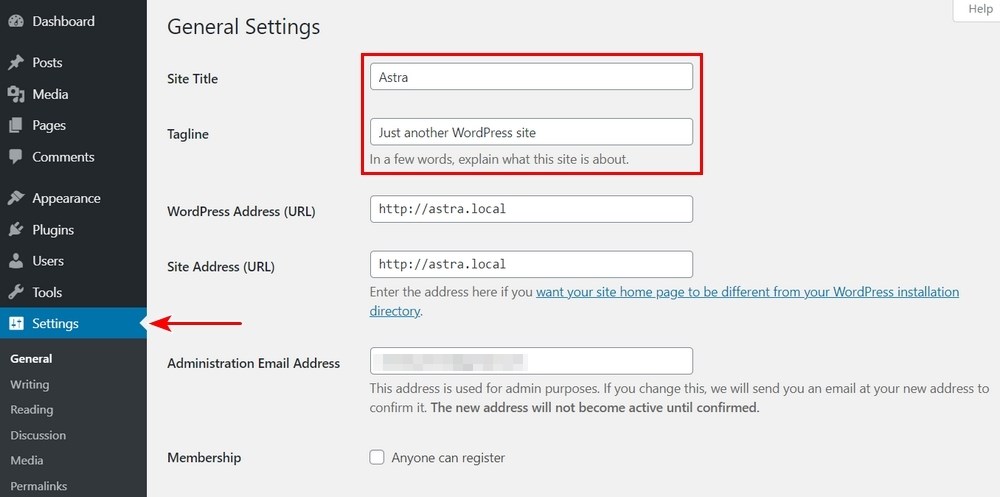
On the WordPress dashboard, navigate to Settings > General. On the General page, you need to set up your WordPress site title and description.
Setting up HTTPS to Use SSL
Bluehost hosting packages come with a free SSL Certificate. If you follow the instructions for setting up the online store platform correctly, the certificate will be pre-installed for you.
On the General page (accessed by navigating to Settings > General), change your WordPress Address and Site Address to use HTTPS instead of HTTP.

Once you do that, you need to scroll down to the bottom of the page. To store your settings, click on the save changes button.
Your WordPress setup is now complete.
The next step is to set up your online store.
Step 3: Creating Online Store With WooCommerce
There are a few things like payments, currency, and shipping information that you need to set up to start selling your products. As we had Bluehost set up WordPress and WooCommerce earlier, you just have some settings to configure before it is up and running.
On the Dashboard page, you will see a ‘Welcome to WooCommerce’ notification. This notification appears on your WordPress admin pages.
You need to run setup by clicking on the ‘Run setup wizard’ button in the notification.

On clicking that button, it will launch the WooCommerce setup wizard. Here you need to click on the ‘Yes Please’ button to get started.
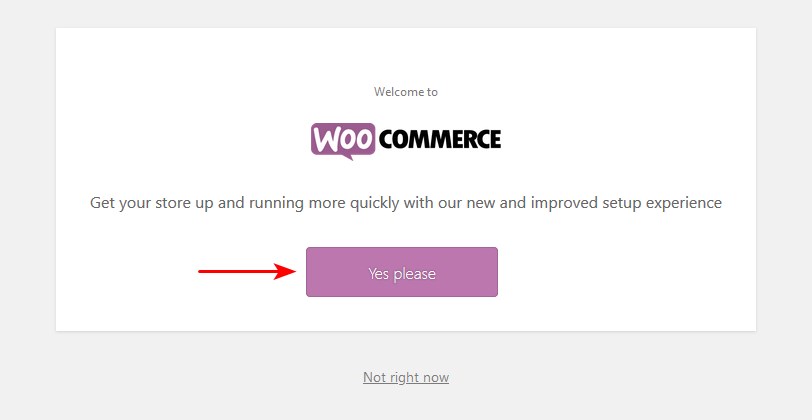
Once you click the continue button, it will bring you to the next step. On this step, you need to enter the location of your WooCommerce store.
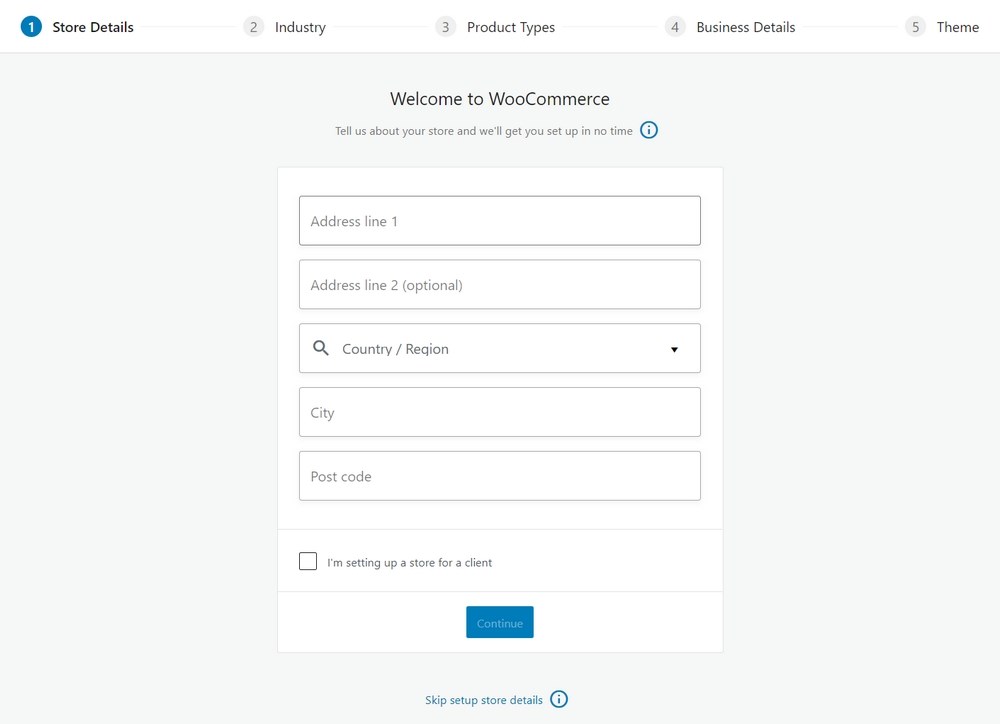
Click the continue button to move on.
On the next step, you need to enter shipping and tax information. However, if the need arises, you can change the shipping and tax information later on.
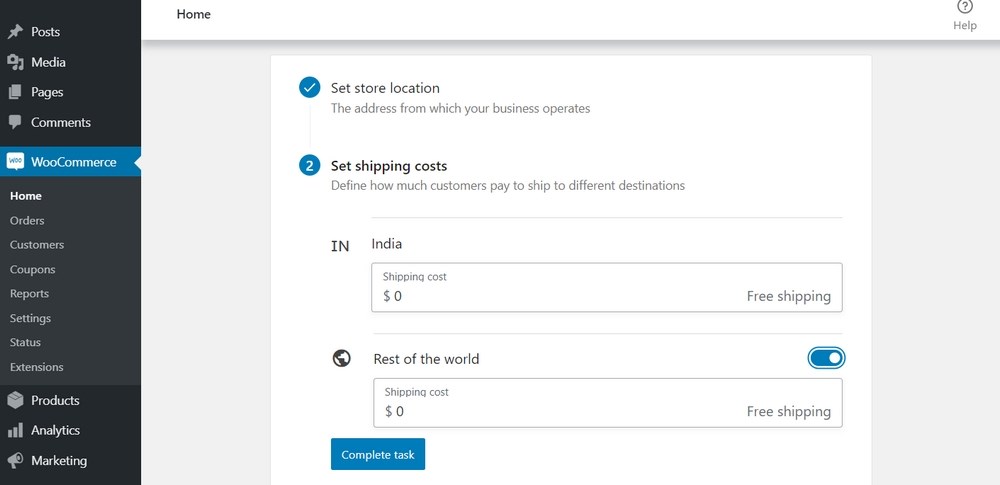
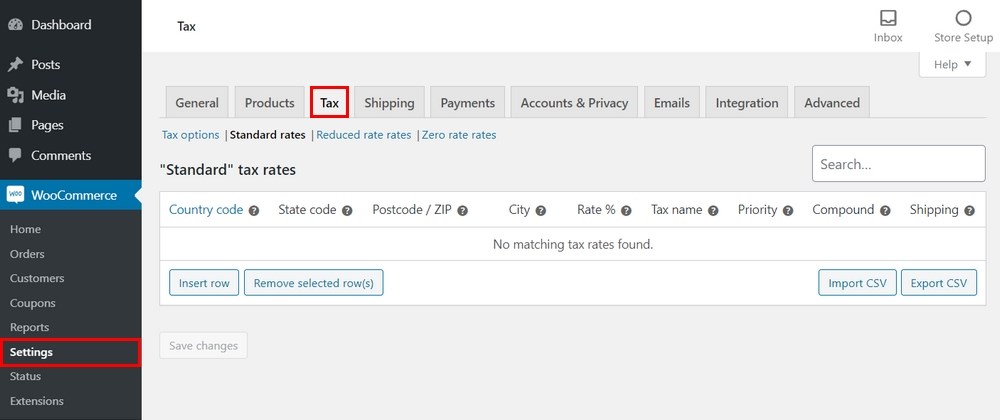
It is worth noting that WooCommerce can be used to sell both digital downloads and physical goods that need shipping.
On this wizard, you will see the two options. The first one is for shipping and the other for tax.
If you check the tax checkbox, WooCommerce will help you automatically calculate and add taxes to your prices. However, if you are not sure, you can leave it unchecked. You can always add tax information later within WooCommerce settings.
Once you complete that, click on the continue button to move on.
Now you need to choose a payment method for your online store.
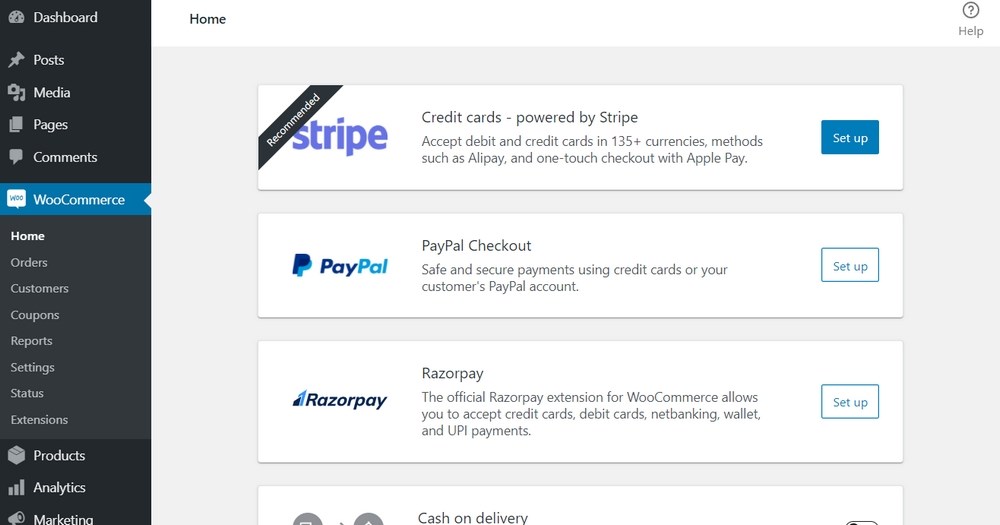
WooCommerce, by default, supports PayPal, PayPal Standard, and Stripe payment gateways. There are many other payment methods available for WooCommerce via third-party plugins. You can install them later on if you need them.
Related: How to Set Up PayPal Payments in WooCommerce.
The most popular and hassle-free way to accept payment is using PayPal Standard. To activate it, enter your PayPal email address and click on the setup button.
You can use Stripe as well, but you have to allow your customers to enter their credit card details on the checkout page without leaving your site and going to PayPal.
Pick the most favorable payment method that you prefer for your online shop. Setting up Stripe is also easy, and you can do that by following the instructions on the WooCommerce screen.
Once you complete that step, your WooCommerce online store is all set up. You can now add products.
Step 4: Add Products to Your Online Store
As you have seen, installing WooCommerce is a breeze. Once you finish the WooCommerce setup wizard, you are now ready to add products to start selling to your customers.
On the Dashboard menu, click on Products > Add new.
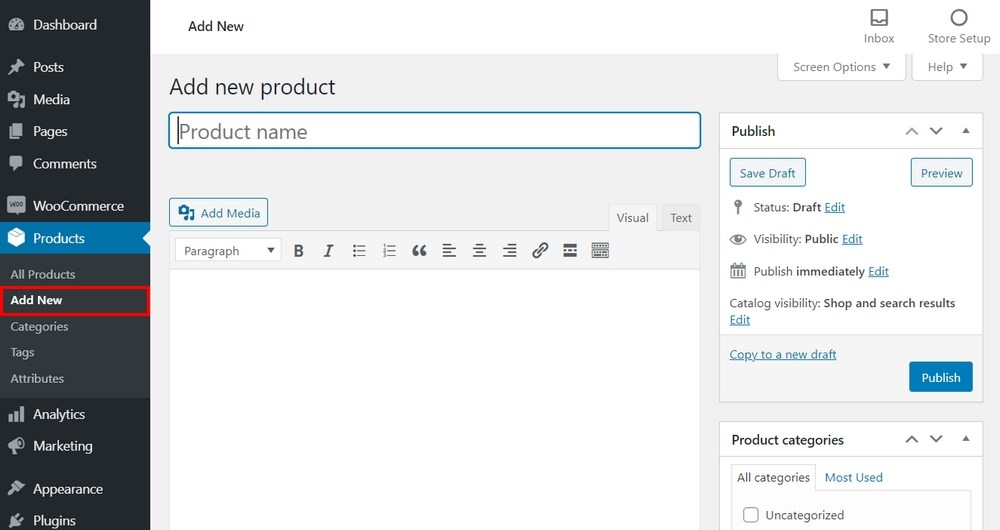
The WordPress editor launches with some new additions. Now you need to configure everything concerning the product.
Add the Title and Description of the Product
Enter the name in the title section. Then add a long description that explains the features and benefits of the product.
Additionally, you may opt to use a bullet point or numbers to improve this section’s readability. If you are not sure what to write, you can look for a product description template.
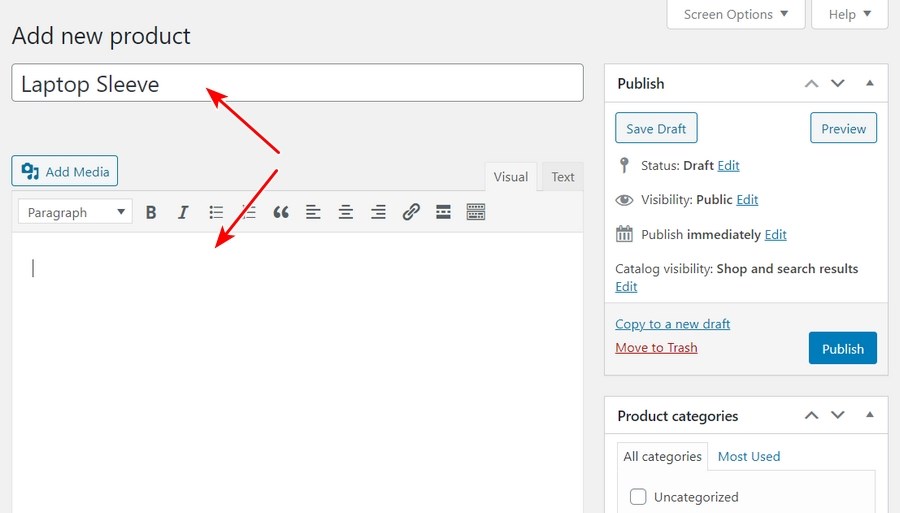
It is worth mentioning that when writing the title and description, you can go a step further by using organic keywords. This is a keyword that is used to attract free traffic through search engine optimization.
If you want to use semantic keywords, you need to add it in the long description. Semantic keywords refer to the meaning and intent behind a keyword phrase.
Choose the Product Type
Choosing the product type depends on what you are selling. By default, WooCommerce allows you to choose different product types.
They are:
- Simple product – It is the default, and it is common in most WooCommerce stores. For instance, a one-size-fits-all dress is a simple product.
- Grouped product – This is a product set or, in simple terms, combined simple products.
- External or Affiliate product – This option is for those running an affiliate store or having a drop shipping option on their online shop. Using this option, you can link the “Add to Cart” button to an external page.
- Variable Product – Use this option if your store deals with products that offer multiple variations like sizes and colors.
Additionally, there are two more options to modify the four core product types:
- Virtual – Use this option if you are selling a digital product that does not require shipment.
- Downloadable – Enable this option if the downloadable file is associated with the product.
Adding the product data using the dropdown and checkboxes in the Product data box is very easy.
This section appears just below the WordPress editor, where we added the product description as shown in the screenshot below:
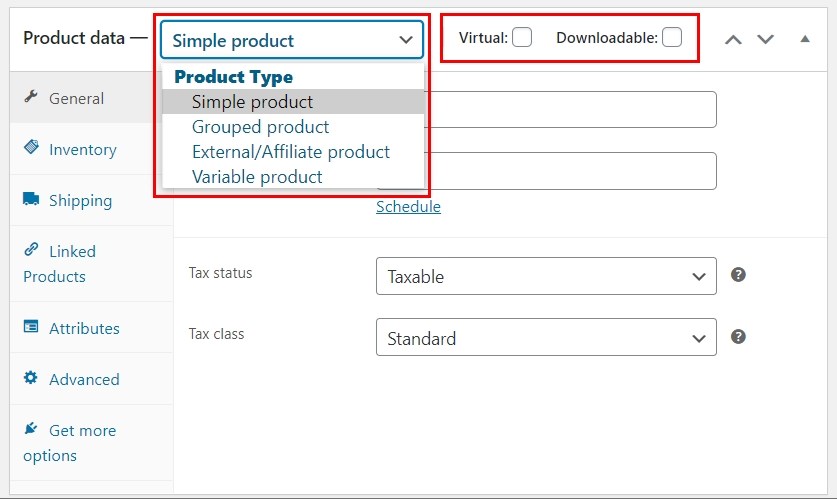
For this tutorial, we will use a simple product. However, the process is generally the same for other product types with a few additional options.
Fill Out the Product Data Meta Box
After you have selected the product type, fill the rest of the details in the Product data box. To navigate between different sections, use the tabs on the left when adding the product details.
The General Tab
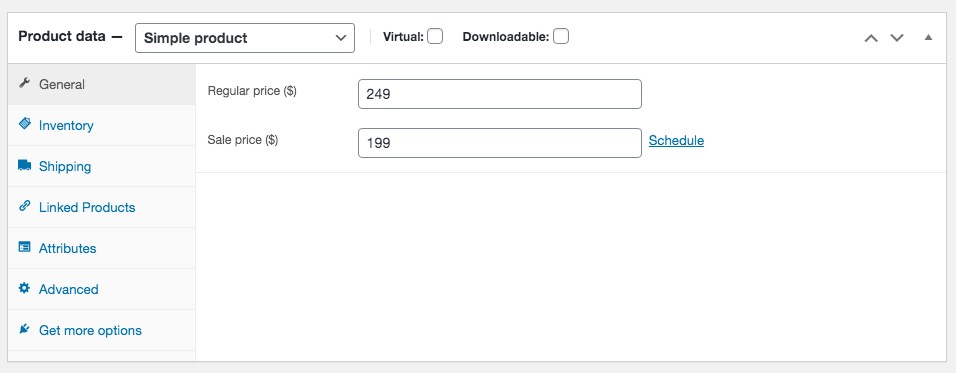
In this section, you should enter the regular price and sale price. You can use the sale price when you are running a discount campaign. Shoppers in your online store will always see the regular price until you mark it as a sale.
Additionally, you can add the Tax Status and if the product is taxable, then select the tax class.
Inventory Tab
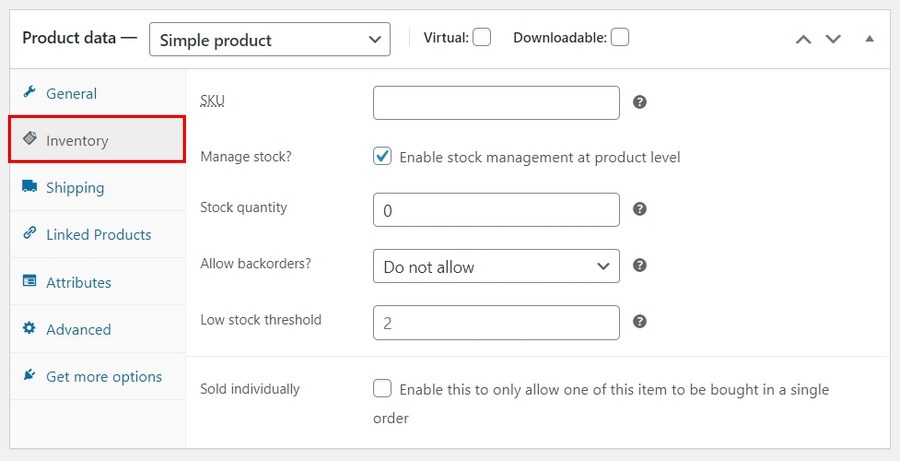
In this tab, you can effectively manage stock. Additionally, you will find the SKU (Stock Keeping Unit), stock status, and other options are there. SKU is the product code used to identify stock in lists, invoices, or order forms.
To enable the stock management option, you need to go to WooCommerce > Settings > Products > Inventory.
You can use the WooCommerce Product SKU Generator plugin to generate automatic SKU or assign them manually. SKU’s are used to keep the products distinctive and simplify inventory management.
Checking the “stock management on product level” option lets the WooCommerce stock management system automatically show the product. Here you can:
- Enter the stock quantity that will update automatically
- Allow backorders.
- Add the stock threshold
Shipping Tab
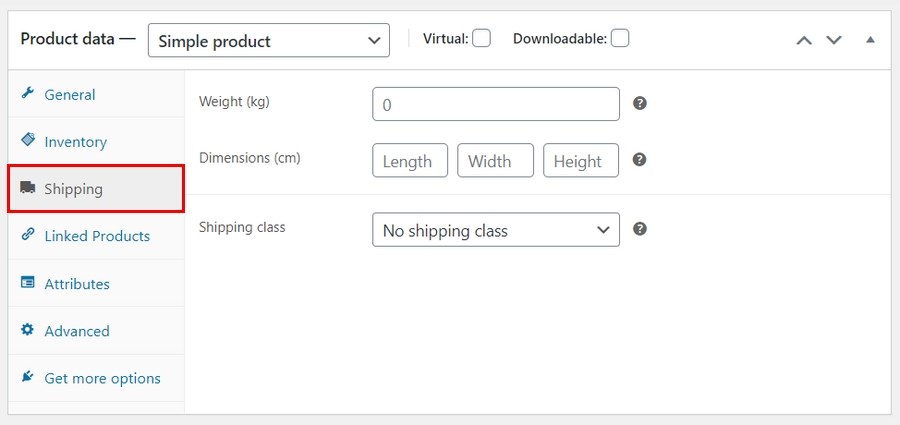
In this section, you can control the essential details about a physical product for shipping.
This tab lets you enter the weight and the dimensions of the product. Additionally, the shipping class is an option where products are grouped based on weight limits.
Linked Products Tab
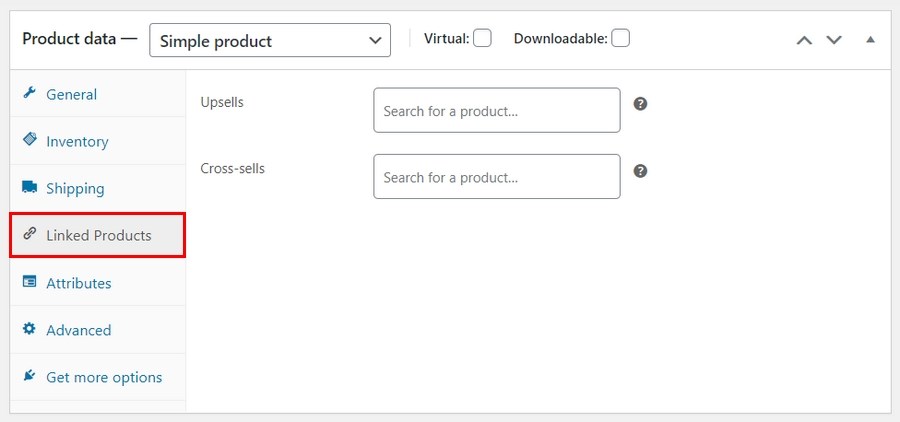
This tab allows you to add linked products. They will help improve the revenue of your store through upsells and cross-sells.
In a cross-sell, you link similar products on the product page that your customers might like. You can recommend a more expensive product with better features to add value to the product through an upsell.
Attributes tab
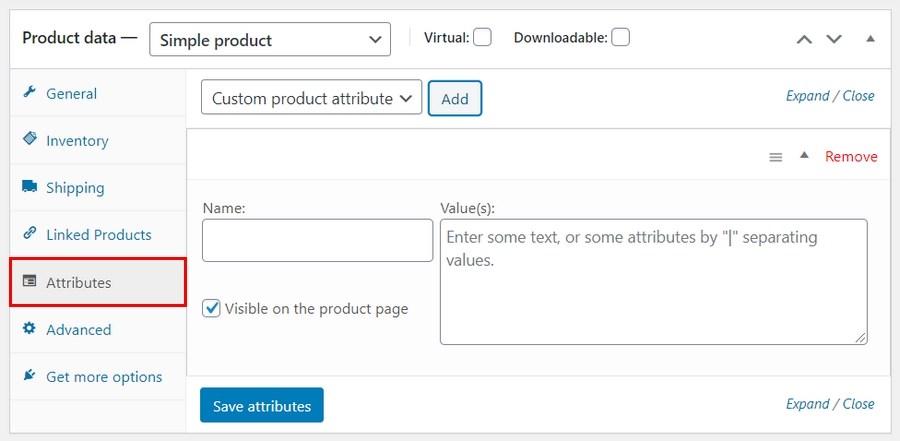
This tab allows you to add things like the product colour options, sizes, and so many more. It depends on the number of attributes your product will have. Variations and attributes go together.
Advanced Tab
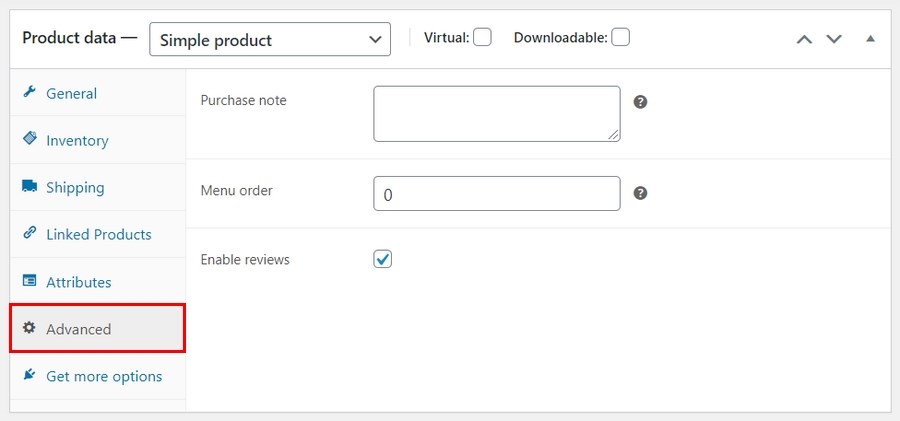
In this tab, you can add a purchase note that appears after a customer places an order in your store.
You can select the item’s custom ordering position and check the box to enable customer reviews.
Writing a Short Description
After finishing with the product data section, you can scroll down to the Product short description box.
It will appear at a prominent spot on your single product page, and the extended description will appear further down.
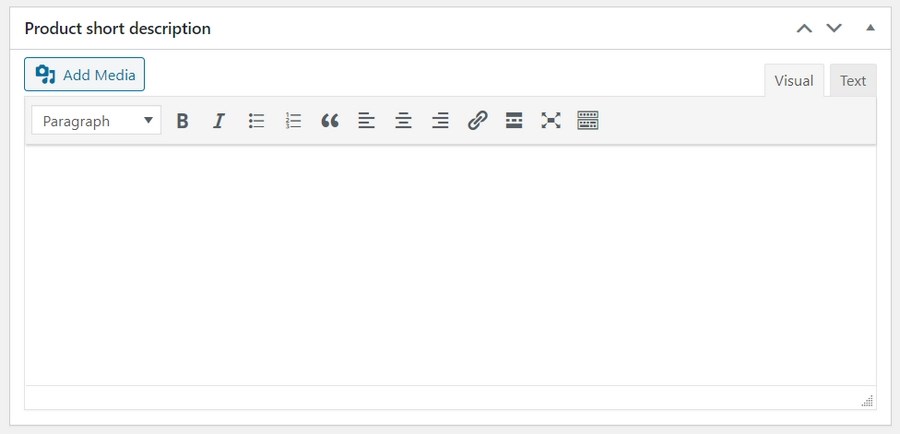
We highly recommend that you only add 2-3 sentences in the short description. The main reason is that the search engines pick up the short story more often, which is essential for your store’s SEO.
Final Touches
The product page is almost ready, provided that you have followed the simple steps that we have shared.
Before you publish your product, add some relevant information using the sidebar on the right.
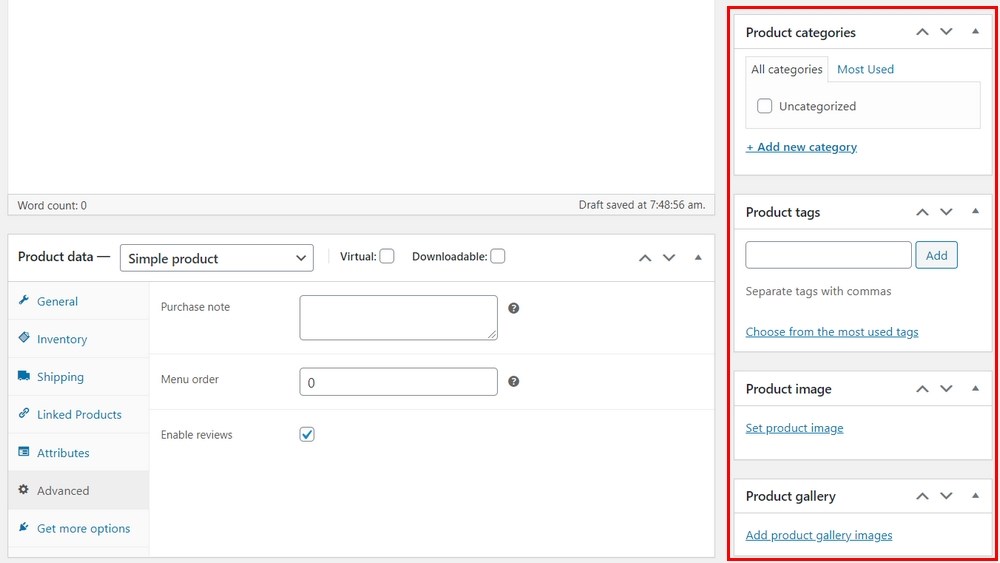
- Product categories and tags – They help you to organize the products in your store. Shoppers in your store will also be able to use categories and tags on your store’s front-end to find products. It will make it easier for customers to navigate through your products. You should try to make them logical and useful for your target customers.
- Product image – Add the product’s main image. This image will be the largest image on the single product page. This image will also appear on the catalog page.
- Product gallery – In this section, you can add extra images that appear in the gallery on the single product page.
After checking that you have added the correct details of the product you have added, click Publish to make your product live.
You can use the same template for adding the next product by using the copy to a new draft link below the publish box on the right sidebar.
Step 5: Selecting and Customizing the WordPress Theme
Themes allow you to control how your WordPress site looks to users when they visit it. In an online shop, a theme also controls how your products are displayed.
There are many WooCommerce themes, both free and paid, that are available for WordPress. The one WooCommerce theme that stands out is the Astra theme. This theme is developed by Brainstorm Force, which has been in operation for more than ten years.
The theme has more than 1 million downloads and a consistent 5-star rating due to excellent customer support. What stands out about this theme is that it integrates with page builders so effectively.
We have launched the Ultimate Add-ons for Beaver Builder and Ultimate Add-ons for Elementor plugin extensions, which are ideal for online stores. It integrates beautifully with page builders such as WPBakery Page Builder, Beaver Builder, Thrive Architect, Elementor, Divi Builder, Brizy, and Gutenberg.
Since your Bluehost hosting account automatically installs the Storefront theme for your website, you need to change it to the Astra theme.
You can achieve this by navigating to the dashboard and clicking on Appearance > Themes. You need to deactivate the Storefront theme.
Once that is done, you will see a search box on the theme page. Search for the Astra theme.
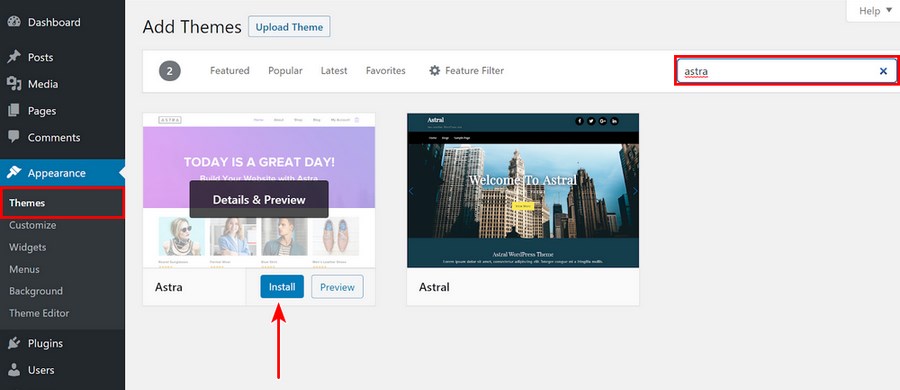
The reason for using Astra is that this theme is highly customizable and has many outstanding features.
It is a super lightweight theme. With the default WordPress data, a website using Astra should load in less than half a second. The loading speed is achieved by disabling jQuery and keeping resources under 50kb.
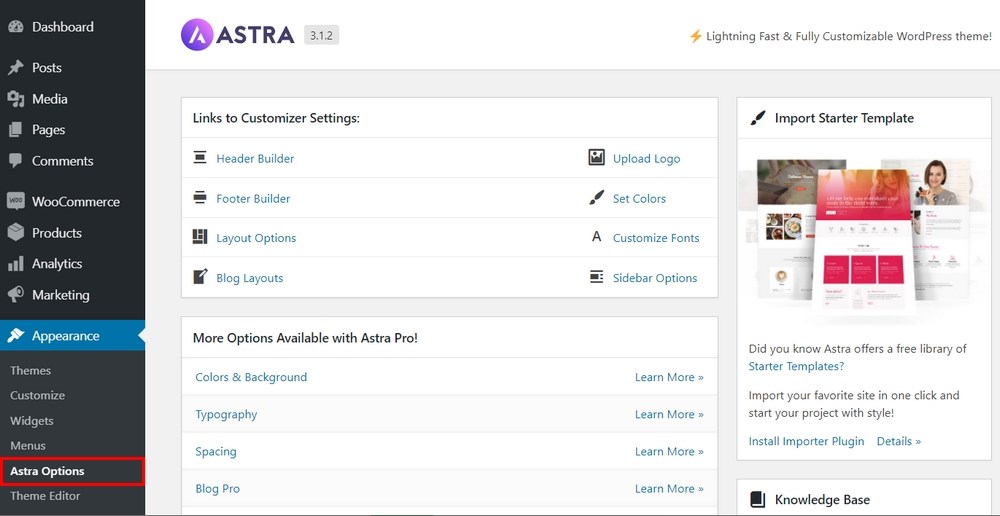
After activating Astra, you will notice a new page Astra Options, under Appearance, inside the menu bar. This page shows short links to customize different parts of your website.
Alternatively, you can reach the WordPress customizer from Appearance > Customize.
Here you can change how your newly added theme looks by replacing the standard values with the ones you like.
You can change typography and colors for the entire site, decide whether you need a sidebar, and change how buttons on your site should look.
You can add a logo, change how you want to see your site’s header and footer, and decide on the layout preferences for individual posts and pages.
There are many more settings at your disposal in the Customize menu.
You can do some experiments and see how it affects your website. You can always go back to the default settings using the Astra Customizer Reset tool accessible from Appearance > Astra Options.
You can also altogether disable features such as header, page title, featured image and footer bar header, page title, featured image, and footer bar.
This setup is great as you can customize how everything looks on a page-by-page basis.
The Astra theme doesn’t force you to install any WordPress plugins to work.
You will need to install the Astra Starter Templates WordPress plugin if you want to import a readymade website templates.
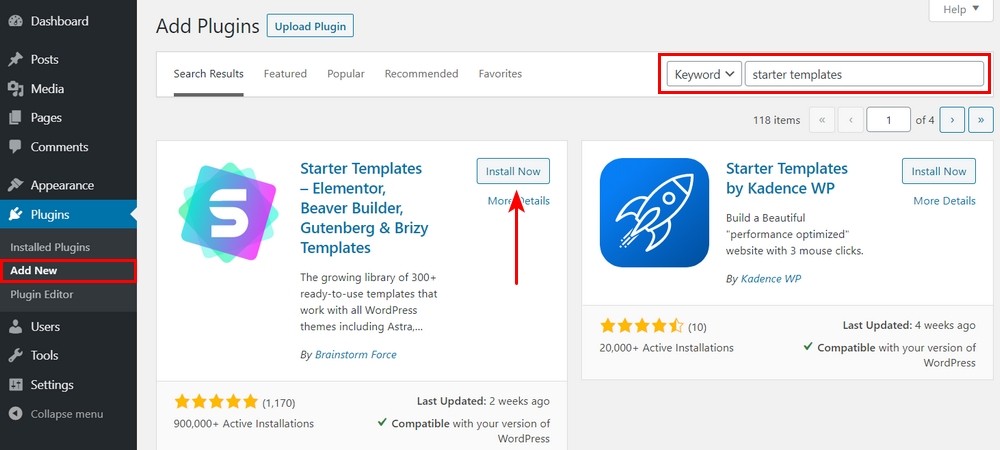
You can easily extend Astra’s functionality using plugins, as shown in the next section.
Recommended Astra’s templates:
Step 6: Extend Functionality Using Plugins
Now that you have chosen the perfect theme, your online store is ready. You might consider adding other elements such as a contact form, about page, a blog or newsletter opt-in.
To further customize your online shop with these features, you can use WordPress plugins. Plugins are applications that allow you to add new or extra features to your online store.
There are many free and paid plugins available that you can use.
Since you are starting an online shop, you need to optimize your store for more sales and revenue. We recommend the CartFlows plugin.
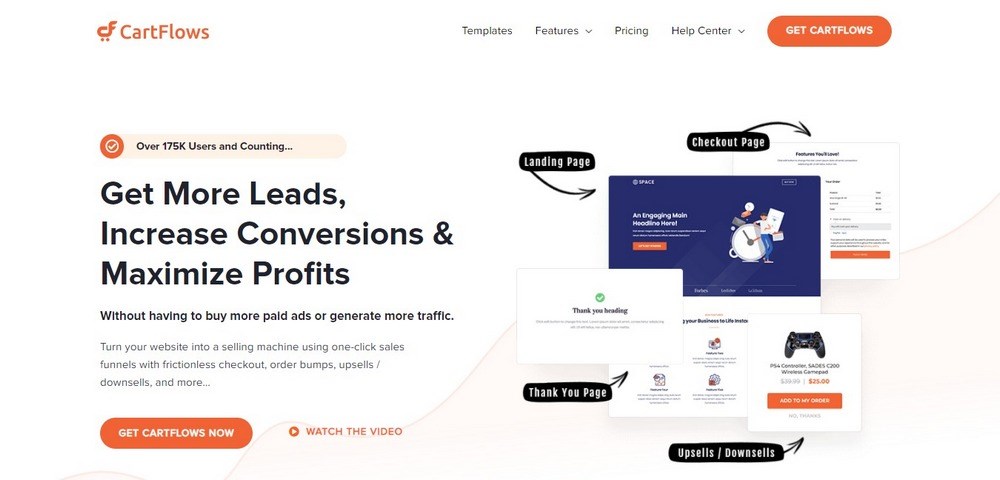
CartFlows lets you have all the functionality to build a complete sales funnel. A sales funnel concept is the journey your leads take to get from awareness of your brand (the widest part of the funnel) to conversion and beyond (the narrow end).
This plugin has templates for Divi, Beaver Builder, Thrive Architect, and Elementor. It is possible to use the Gutenberg blocks but using the page builder gives the best experience out of CartFlows.
Optimize Your Store for More Sales and Revenue Using CartFlows
The CartFlows plugin lets you optimize your sales funnels using key pages and features to help visitors complete purchases and become customers.
It integrates seamlessly with WooCommerce and lets you use a collection of pre-built pages you can import with a single click.
You can customize these pre-built sales funnels with ease to fit your purposes and style.
Here is a summary of what the plugin has to offer:
- Pre-built sales funnel pages for your online shop
- It has funnel optimization for both the pre- and post-sales stages
- It integrates with WooCommerce and all its official extensions
- It offers full customization options for each step of your sales funnels
- It has a ‘frictionless checkout’ to minimize distractions
- It allows you to target cart abandonment to regain lost leads
- It enables you to upsell and offer discounts incorporated into the checkout process
CarFlows has a free and premium version. The free version includes fewer templates. It doesn’t enable you to offer order bumps or discounts or allow you to modify your checkout fields.
The license for the premium version starts at $299 per year. Given that this plugin has many conversion-boosting features, it could very well pay for itself over time.
Install and Set up a Sales Funnel With CartFlows
The best way to install a WordPress plugin is to use the plugin search function.
The first thing you need to do is visit the Plugins > Add New page inside your WordPress admin area.
The next step is to find the plugin by typing the plugin name CartFlows.
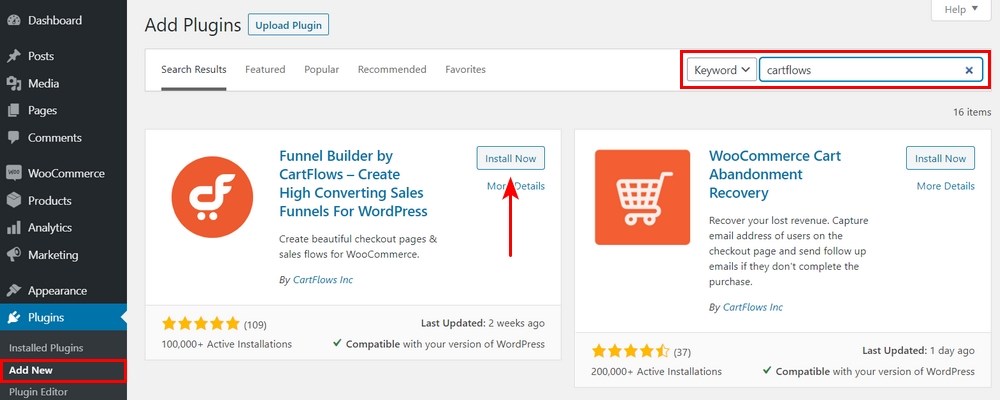
Download and activate the CartFlows plugin. The plugin will not work unless you activate it.
Now that you have installed the plugin successfully, the next step is to set up a sales funnel. You will see a new menu appear in your WordPress dashboard sidebar.
1. Create a Unique Flow and Choose a Template
Click on CartFlows > Flows, and you’ll see a list of all your existing sales funnels:
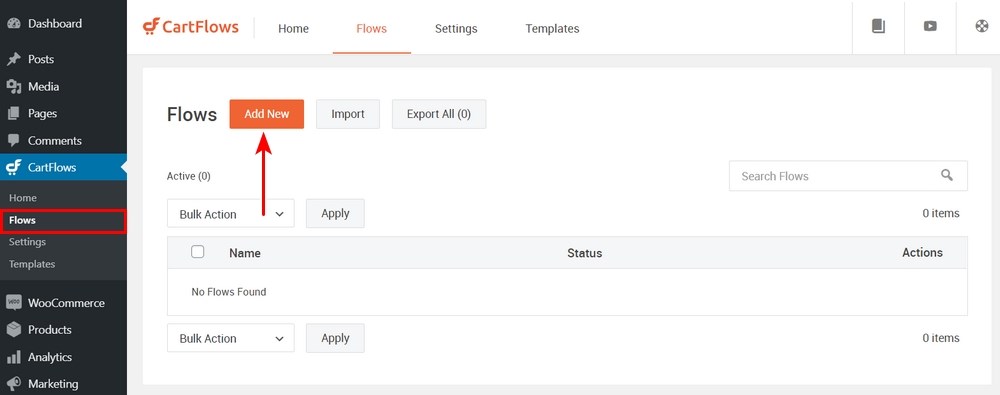
Click on Add New button to open the list of available templates. You can use the ‘Create Your Own’ option to put together a custom sales funnel.
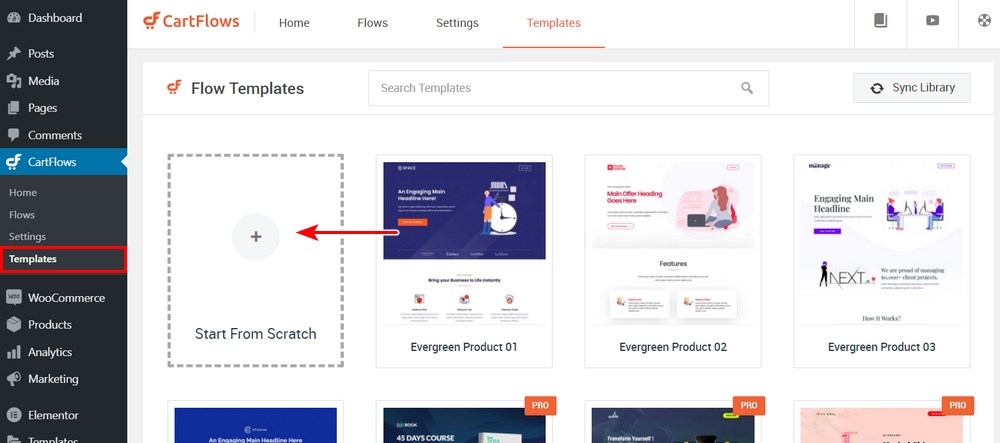
There are several templates, most of which are only available for premium users. Find one that suits you.
Click on Import. This action will add your new sales funnel.
2. Edit Your Sales Funnel Pages
After choosing the pre-built funnel, CartFlows will show you the pages that make up your ‘flow’:
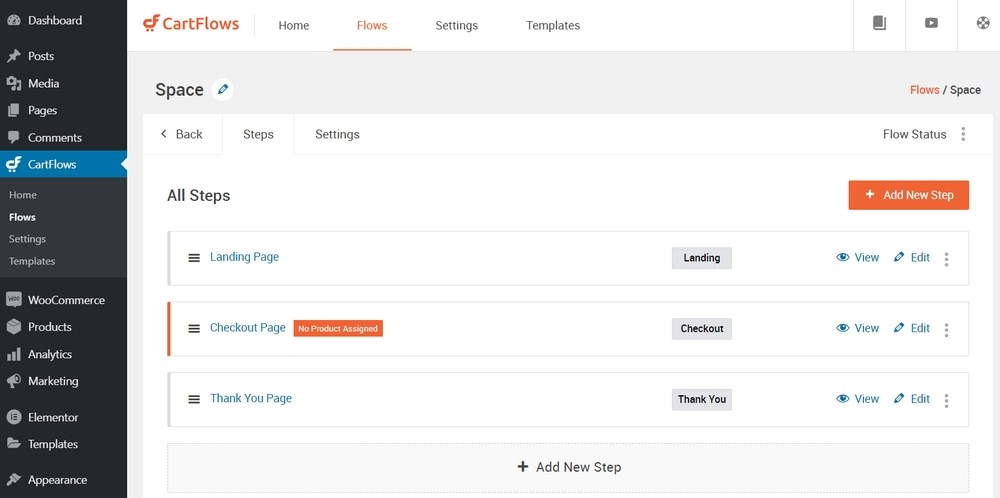
On this page, you can rearrange the order of your sales funnel pages or add new steps to adapt to the template you chose.
Clicking on the Edit button for any page lets you customize it in the WordPress editor or with your preferred page builder.
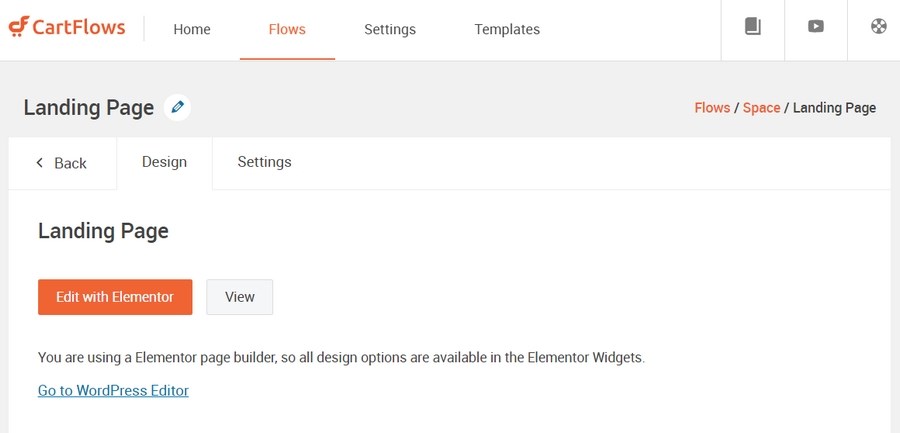
The best thing about this plugin is that every aspect of your sales funnel is customizable.
The templates show you how to incorporate testimonials, product images, and other conversion-boosting elements. These options allow you to make your pages more engaging, but you have the final say.
3. Connect Your Sales Funnel to Your Product
After editing your funnel pages, you need to connect your sales funnel to the product.
The CartFlows plugin enables you to assign every sale funnel you set up to one or more existing WooCommerce products.
This option helps optimize the conversion process for each of your offers by incorporating thoughtful, relevant order bumps and Thank You messages.
You need to assign flow to a product by returning to the Edit Flow area and look for the Checkout Page:
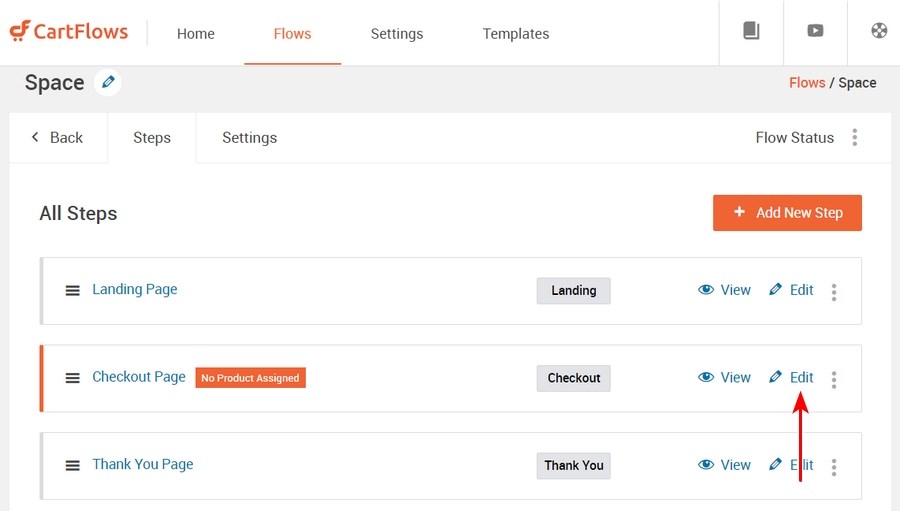
Here, you’ll see that it has an alert that says No Product Assigned. To open the page, click on Edit and look for the section that says Checkout Layout. After that, click on Select Product:
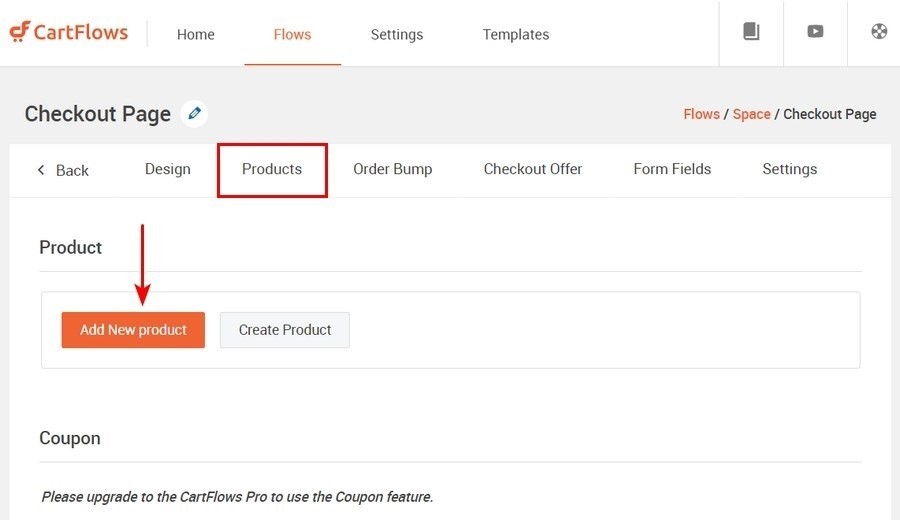
This page is where you can specify which item or service is associated with this sale funnel. Additionally, you can determine related upsells and discounts.
If you preview the checkout page, the product name will appear under Your Order:
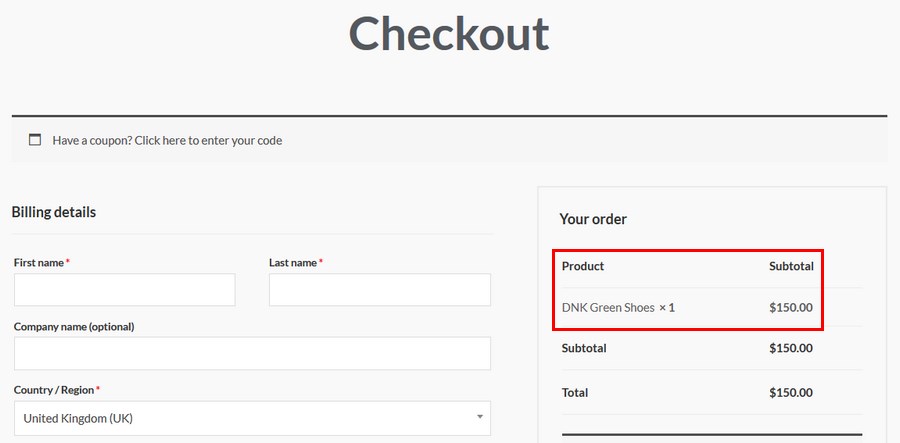
It is important to note that this plugin has a free and pro version. The free version has some limitations in flow and functionality.
The free version offers two landing page templates that you can use. It offers three templates for the Checkout and Thank you page.
You can create a custom thank you page and supports only a two-column checkout. This version also supports dynamic links and Facebook Pixel integration.
The pro version adds more features to the core of this plugin.
Here are the features of the pro version:
- 7 Landing Page Templates
- 7 Checkout Templates
- 7 Thank You Templates
- 7 Upsell Templates
- Order Bumps
- One-Click Upsells
- One-Click Downsells
- Custom Thank You Page
- Two Column Checkout
- One Column Checkout
- 2-Step Checkout
- Cart Abandonment
- A / B Split Testing
- Add Custom Fields
- Field Reordering
- Hide Fields
- Change Field Labels
- Dynamic Links
- Countdown Timers
What Types of Online Store Can I Start
Now you know how to set up an online store, it’s time to take it further and discuss which eCommerce niches are the best to pick in 2026 and beyond.
Overall, eCommerce presents a massive opportunity for small and big stores alike. Some segments are more promising than others.
There is no one niche right for everyone. You need to pick the one where you can perform better than the competition.
If you already have a business plan and niche selected, that’s great. Go ahead with creating an online store!
But, you can also consider any of the following segments we mention here. The list will offer more choices to help you polish your business plan.
Clothing Store
Statista predicts that online clothing sales in the US will generate $138 billion by the end of 2022, and it foresees to reach around $300 billion by 2025.
Clothing is such a diverse segment that you can find your place somewhere with the right business plan.
You can set up a clothing store for a specific niche, such as girls’ partywear, or you can target a wider audience by selling jeans and T-shirts for men and women.
Beauty products
Like clothes, beauty products have a universal demand.
Beauty products have a straightforward appeal with an audience that’s comparatively loyal. If a product works for them, they tend to reorder it frequently, which results in consistent revenue for stores.
Though bigger brands like L’Oreal have captured a considerable market share, there is still room for new entrants.
For example, a large number of people now prefer beauty products with organic ingredients that are less harmful.
This trend creates a huge untapped market for beauty startups to develop custom products for their online stores.
Jewelry Store
An online jewelry store is another avenue you can explore for your upcoming startup.
Platinum, gold, silver, costume jewelry, whatever you think you can sell online. The worldwide demand is enormous.
You don’t have to be a jeweler. Your aesthetic sense, love for jewelry, and passion for turning it into a successful business are enough to get going.
Just to give you an idea of how lucrative the market is, the costume jewelry market in the US stood at $33 billion in 2021. It is likely to rise up to $60 billion by 2026.
If jewelry is what inspires you, we have a detailed tutorial on how to start an online jewelry business.
Online Grocery Store
If you run a small corner store in your town, but now you have a desire to take it online, you can.
Unlike your offline store, an online store can grow much faster because online grocery is a booming market worldwide. Your main challenge is arranging delivery. The rest is easy.
By 2023, the annual spending per buyer will likely reach $1000 in the US as more people prefer to shop from the comfort of their homes.
Insider Intelligence predicts that online grocery will become a $243 billion market in the US by 2025.
Pet store
Do you love pets? Why don’t you start an online pet products and services store?
IBISWorld states that online pet food and supply sales are expected to hover around $18.1 billion in the US in 2022, with more than 4% annual market growth.
It’s a considerable market, but you need to be very specific as there is massive competition.
You can go with everyday products pet lovers need or introduce a new product and create a demand. Whatever you decide, it’s always better to hunt for a niche closer to your heart.
With Astra’s pet care website templates, you can easily launch pet store website.
One of the above niches can give you a good start. If you need more choices, here are some other popular ones to explore.
- Organic food
- Smart watches
- Cell phone cases
- Sell plants online
- Yoga products
- Headphones
- Bathroom accessories
- Smart home products
- Online fitness coaching
- Camping equipment
- Toys and games
- ebooks
- Secondhand products
Those are just a few of many stores you could launch!
Recommended Plugins for Online Store Owners
When you think of using WordPress for your eCommerce store, WooCommerce stands as an unmatchable option.
You also need supportive plugins to extend WooCommerce functions and improve the overall performance of your online store.
Here are some of the best plugins we think will make a difference in running a successful eCommerce store.
Variation Swatches for WooCommerce
Whether you plan to sell a physical product or a digital course on your online store, you would probably like to provide a great shopping experience.
Variation Swatches for WooCommerce can help you beautify the basic WooCommerce product variation to give users visually impressive options to interact with your products.
You can create size, colors, and brand variation swatches, but you can also change the size and style of swatches to improve the user journey.
Checkout Plugins – Stripe for WooCommerce
You built a nice store with a unique design, but your checkout page shows cash on delivery as the only payment option.
That’s less than ideal, which is where this plugin comes in useful.
Checkout Plugins – Stripe for WooCommerce connects you to Visa and Mastercard through the Stripe service.
You can painlessly set up a payment gateway that will provide users with the payment options like Visa, Mastercard, American Express, Discover, JCB, Diners Club and UnionPay.
You can also enable express pay options such as Apple Pay and Google Pay.
Convert Pro
To run a successful online store, you need to promote it and create leads. Convert Pro helps here.
Convert Pro is a lead generation plugin that can create unique popups and opt-in forms for converting visitors into customers. It provides an easy to manage drag and drop editor for creating forms and makes it easy to publish them on your website.
You can create popups when a user clicks on a link or an image. Convert Pro also helps you reclaim abandoned carts through personalized messages.
Yoast SEO
Every site needs Search Engine Optimization (SEO) which is why we think Yoast SEO is a must-have plugin.
To rank better in search engines, you must start from the beginning. Yoast is your best bet.
Its free version is more than enough for starters.
You can optimize page titles, configure metadata for search engines, perform keyword research, and generate a sitemap for your site.
The premium version makes more advanced features accessible for better search engine rankings.
WP Rocket
WP Rocket is a premium caching plugin you can use to speed up your website.
Website speed is an essential metric for search engine ranking. It is one of the reasons users will love or hate your site.
A slow-loading website will lose users’ interest and rank on search engines.
It’s easier to configure WP Rocket as the plugin handles most of the technical work in the background.
How to Promote Your Online Store to Make Money
If you have run a physical store, you likely know what promoting your business is all about. With an online store, it‘s a little different.
You need to bring your store in front of people who want to buy things. Depending upon the nature of the business and targeted audience, you will need a different strategy.
Here are some tips for promoting your online store to make money:
1. Make the Most of Your Email List
You should make the most out of your existing email list. If you have one, that’s awesome. If you have to start collecting addresses, no worries.
There are lots of online tools to help you build an email list of prospective customers.
You can start collecting emails from existing contacts – the people you know personally.
Some online stores would go with popup boxes on their sites to collect visitors’ email addresses.
You can use a WordPress plugin for this purpose. In return, you can give them a discount on one of your products or something valuable they will remember.
Remember, send emails regularly with something that raises their interest but don’t spam your users. They will find it offensive and may leave you for good.
2. Start SEO Yourself
SEO is a game changer for any website and should be part of your plan from the beginning.
Hiring an SEO expert could be expensive, but try the Yoast plugin to keep it cost-effective.
It should give you a great start and help you with on-page optimization techniques. You can always pay for an SEO later once you’re earning money.
The first thing people usually notice when your site appears on search engines is the title of your product page before they decide to visit your site.
Create impressive titles for your products and display them through high res images. Don’t forget to add a catchy description.
Blogging is an excellent tool for SEO. Add a blog to your site and try to create authority. Help users by publishing useful blogs about your products and industry.
Our article on WooCommerce SEO will explain it in detail. Check that out!
3. Social Media Is Where the Audience Lives
You can also take advantage of social networks. They are where most of your prospects likely spend time.
Post on social media regularly and make sure whatever you post is high quality and offers value to the audience.
If you already have a small audience, you can build on it.
If you start from zero, running low-cost social media ads with effective techniques can come in handy at this stage.
You don’t need to be present everywhere. Just choose the social platforms that are most relevant to your product and services.
Get active, build an audience and engage with them regularly. The rest will take care of itself.
4. Promote Your Uniqueness
You should offer something on your online store that others don’t.
Whether it is about an innovative product you have launched, an improved version of an existing solution in the market, or something else, you should figure out your uniqueness.
It could be a story behind introducing your product or a story about you. Once you know how different you are from others, make it public.
You can put it on your homepage, create text or video content and share it on social media.
You can use it to show a promise, a commitment that you should fulfill with your users.
5. Online Ads Can Work Quickly
You have an online store, a blog, and social media presence. It’s time you can try out some online ads.
Google ads can be an effective start to rank on the search engine.
Your SEO should rank you on the search engine, ideally on page one. Whatever you do to rank, the top google ads will show up first. Why not use them to drive traffic to your store?
You can see the results in real time and adjust your ads accordingly to attract visitors.
You can also advertise on Facebook, Instagram, and other social networks to promote your store.
Choose the platform where your audience lives. If the audience related to your product spends most of the time on Twitter, don’t spend your budget on Instagram.
Frequently Asked Questions
Can you make money with an online store?
Though opening an online store is simple, it is a challenge to make it a success. But fret not. All you need is to make a solid business plan that will make a difference. Find a niche where you can perform better than others. For example, if you love pets, it’s better to do deep research where other pet stores lack.
Do you need a business license to sell online?
An online store is just like any other business where you need to register a business name because this way the government can keep track of online ventures and their tax income.
Is Shopify really worth it?
However, Shopify is limited in ways WooCommerce isn’t. There’s more work involved with WooCommerce but you have complete freedom to build your store however you want.
How much does it cost to open an online store?
WooCommerce is a free plugin, but you need to pay a small transactional and processor fee when selling products in your store. If your business needs a third-party payment solution, you need to pay a small transactional and processor free on each transaction.
How to find products to sell in my store?
Conclusion
As you can see, building an online store with WordPress isn’t too difficult. WooCommerce provides you with an exceptional way to build your store with complete control over how it looks and feels.
It also provides the tools you need to build your store, sell products, take payments and manage deliveries. Everything a successful online store needs to work!
While it takes a considerable amount of time to complete all the steps, we think with determination and a little creative flair, you can set up an online store and begin building your customer base.
If you don’t have a reasonable budget and looking for a cheap way to build an eCommerce website, check this guide.
What do you think of our guide to starting an online store? Did we get everything right? Did we miss any step or detail? Let us know your thoughts in the comments section below!
Disclosure: This blog may contain affiliate links. If you make a purchase through one of these links, we may receive a small commission. Read disclosure. Rest assured that we only recommend products that we have personally used and believe will add value to our readers. Thanks for your support!




This is an informative post. Got a lot of info and details from here. Thank you for sharing this and looking forward to reading more of your post.
on demand mobile app development