Interested in building an amazing website?
Well, good news… It’s now easier than ever! There’s no need to hand-code each page from scratch or hire a team of professionals.
These days, all you really need is a plugin called Elementor. It’s one of the most versatile and accessible WordPress page builders on the market.
Even better, it’s totally free to get started!
In this Elementor tutorial, we’re going to cover how to use Elementor step-by-step and go over some of its best features.
By the end, you should have everything you need to build a WordPress website that impresses, in no time!
- 1. Installing Elementor in WordPress
- 2. Exploring Elementor Options
- 3. Elementor Free vs. Elementor Pro
- 4. How to Use Elementor’s Free Page Builder
- 5. How to Use The Elementor Theme Builder
- 6. How to Build Templates With Elementor
- 7. How to Create Popup in Elementor
- 8. Create a Mobile Responsive Website With Elementor
- 9. Why You Should Use Elementor
- 10. Pros and Cons of Using Elementor Page Builder
- Final Thoughts
1. Installing Elementor in WordPress
Elementor is a popular page builder that pairs well with lightweight WordPress themes such as Astra. This page builder allows you to control every aspect of the look and layout of your website’s pages and posts, with dozens of widgets adding functionality through a clean drag-and-drop interface.
To learn why Elementor is so famous, check out our in depth review on Elementor.
Now, keep in mind, Elementor itself is not a WordPress theme — it’s strictly a plugin. This is important because you’ll still need to choose a dedicated theme to handle other aspects of your website.
Once you’ve installed WordPress and a chosen theme for your site, there are a few different routes you can take to install the Elementor page builder:
Method 1: Elementor’s Website.
Visit the Elementor website and get the free version of Elementor. A download button is prominently displayed at the top of the home page.
Once you enter your email, your browser will automatically download the ZIP file.
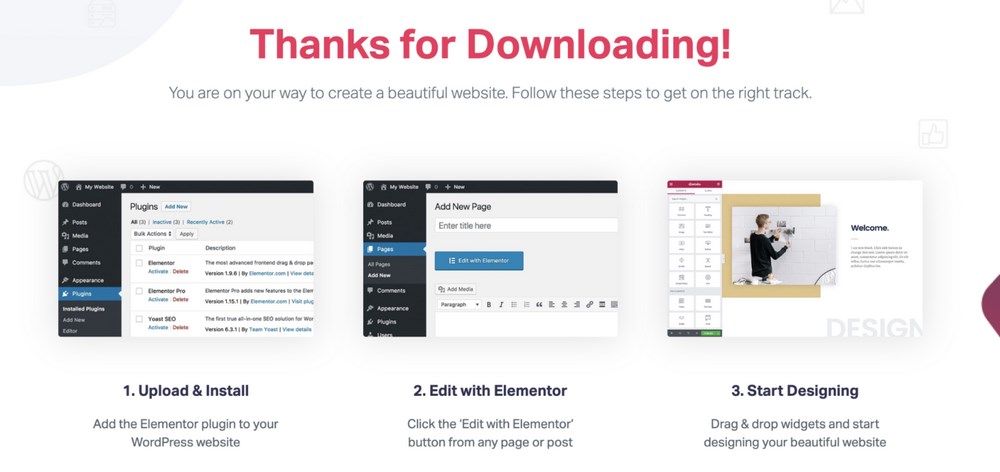
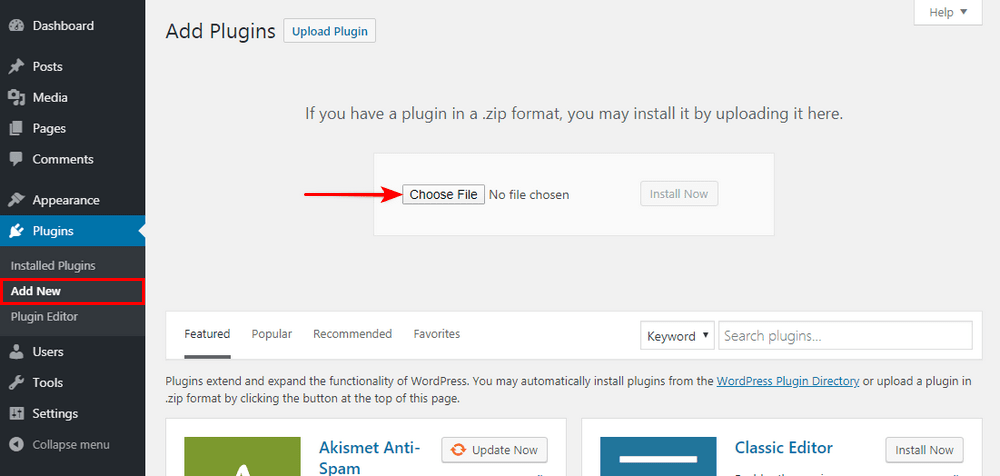
Next, navigate to the Plugins section on the back end of your WordPress website, click “Add New,” and upload the .ZIP file to your website via the “Upload Plugin” button at the top.
Once installed, just hit “Activate” and it’s ready to go!
Method 2: WordPress Dashboard
Log into the back end of your WordPress website and prepare to install the plugin by hitting the “Add New” button from the Plugins tab.
To find Elementor, just type the word “Elementor” into the plugin search bar.
The Elementor Page Builder should pop right up as the first plugin option for you to install.
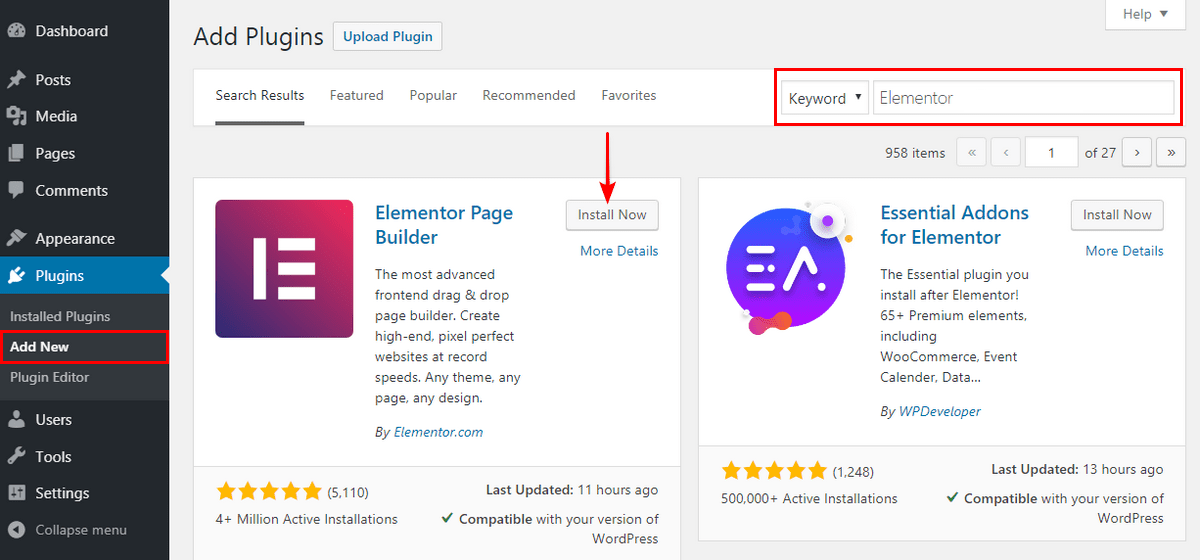
Just click “Install” and then “Activate” once downloaded.
Whichever method you choose to install Elementor, you’ll be able to find it in your list of installed plugins” from now on — and it’ll also have its own entry in the side menu.
From that area, you’ll be able to adjust the plugin’s settings.
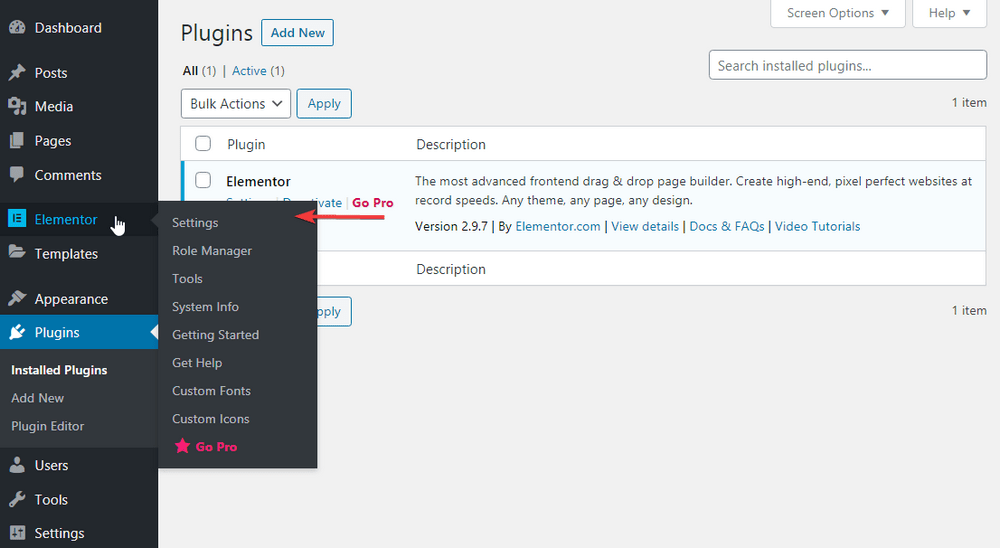
Unlike with many plugins, however, Elementor’s greatest functionality happens on the pages themselves.
That means you’ll spend most of your time using Elementor when you’re creating or editing pages and posts.
2. Exploring Elementor Options
We’ll take a look at building our own pages and templates with Elementor shortly, but first, let’s take a high-level look at the options you have with Elementor!
One of the most important features of any page builder is the ease of use. You need to be able to jump in and make your vision a reality without a lot of head-scratching and frenzied YouTube searches.
Fortunately, Elementor is one of the easiest page builders we have ever used. It’s a front-end editor, which means you can see exactly how the page is going to look while you work on it.
Once you get accustomed to the workflow of dragging widgets onto the page and tweaking properties in the sidebar, you’ll realize that it’s about as intuitive as it can be.
Most of the customization options you’ll find in Elementor are based on the widgets that come with the plugin.
Elementor Settings
Elementor has a handful of top-level settings you can find directly in the plugin. This allows you to do things like check which types of posts Elementor works with, set default font and spacing, and adjust responsiveness settings.
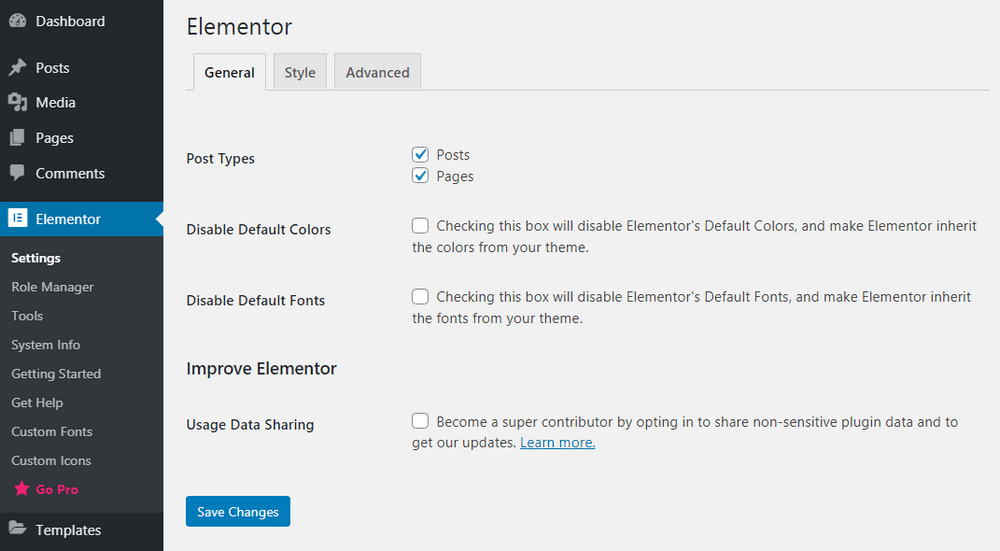
There’s also a handy Role Manager function in Elementor that lets you categorize which types of users can have access to the editor (note: this is only a feature in Elementor Pro).
What Widgets Are Included?
In general, Elementor is based on a drag-and-drop editor that accommodates sections, columns, and widgets.
The system is broken down as follows:
- Sections – Containers for columns and widgets.
- Columns – Sections that contain widgets.
- Widgets – Individual elements on the page.
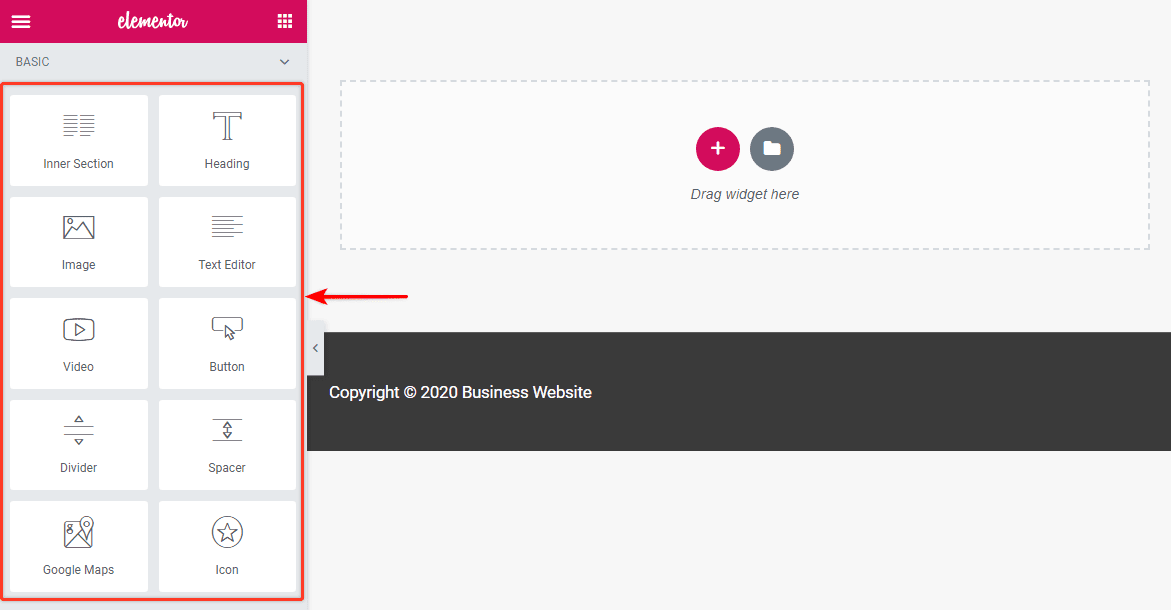
These widgets are simple categories of content that allow you to customize your webpage. In the free version of Elementor, you get access to basic elements.
Here’s a quick list of several basic widgets you’ll use often:
- Heading
- Image
- Text editor
- Video
- Button
- Divider
- Icon
- Spacer
- Google Maps
You get nearly 30 core elements that give you everything you need to make a functional web page.
Simply drag an instance of an element to the main page and customize it to your needs.
If these basic elements aren’t enough, it’s possible to get additional widgets by upgrading to Elementor Pro.
However, we would argue that most of what you can do in Pro is possible in the free version — it just takes longer.
It’s up to you whether you need the premium widgets found in the Pro version.
Here’s a quick sampling of the dozens of widgets found in Elementor Pro:
- Portfolio
- Form
- Flip box
- Price table
- Blockquote
- Call to action
These Pro elements will help make your site look slick and more professional, and are also designed to support eCommerce efforts, including in-depth integration with WooCommerce.
We have created a quick article on creating contact forms with Elementor Pro; check that out!
Lastly, Elementor does support third-party widgets.
You can find plenty of third-party Elementor add-ons that expand your available widgets further, or even develop your own widget with dev resources from Elementor!
Not sure you want to add extra widgets?
While it can be convenient to have widgets for everything you want to do on your website, it’s not absolutely necessary. There are still countless free third-party WordPress plugins that work well in tandem with Elementor and your WordPress theme.
3. Elementor Free vs. Elementor Pro
With that said, Elementor Pro does add several desirable features to speed up your workflow and give you even more control over the appearance and functionality of your website.
The additions of the theme builder, premium widgets, and global elements are all welcome, but you certainly don’t need them to make a great website.
Comparison Table of Elementor Features
Here’s a quick overview of the major differences you’ll find between Elementor Free and Elementor Pro.
| Elementor Free | Elementor Pro | |
| Price | Free | Starts at $49 per year per site |
| Number of widgets | 25+ | 50+ |
| Page builder | ✓ | ✓ |
| Theme builder | X | ✓ |
| Included 24/7 support | X | ✓ |
| Dynamic content | X | ✓ |
| Pro templates and blocks | X | ✓ |
| Integrations | X | ✓ |
This is a general snapshot of the differences between the two versions, but you can learn more about Elementor Free vs Pro.
Elementor Pro Pricing
If you’re thinking about picking up one of the paid versions of Elementor Pro, you should note that all three plans offer the exact same features!
The only difference between Pro plans is how many licenses you’re purchasing at once.
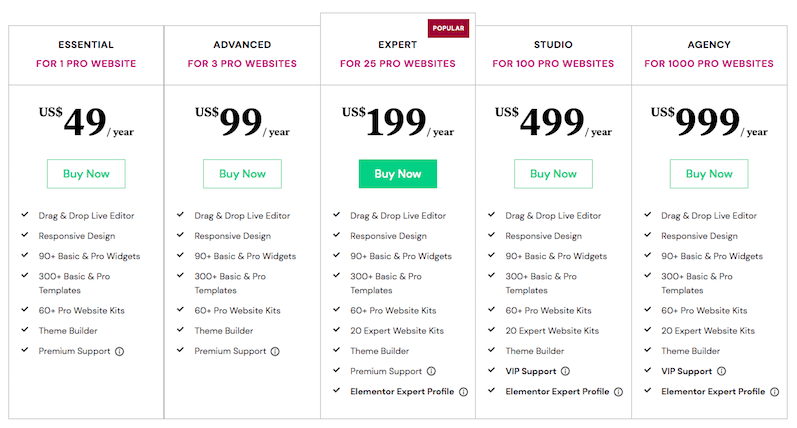
- With Essential, you get Elementor Pro for one website for $49 per year.
- With Advanced, you get Elementor Pro on 3 websites for $99 per year.
- With Expert, you get Elementor Pro on 25 websites for $199 per year.
- With Studio, you get Elementor Pro on 100 websites for $499 per year.
- With Agency, you get Elementor Pro on a massive 1,000 sites for $999 per year.
Which one is right for you? For individuals or small teams, Expert is definitely the best value, as long as it’s likely that you’ll manage more than one website with Elementor Pro in the next year.
You can always choose to start with Essential and upgrade to Advanced or Expert later on if you decide you like Elementor and want more licenses.
4. How to Use Elementor’s Free Page Builder
So, with all of that out of the way, are you ready to see Elementor in action?
This page builder works with custom post types and has plenty of readymade templates to choose from, but for this post, let’s see what it looks like to start at square one.
Step 1. Create New Post or Page
Go to the dashboard of your WordPress website and click “Add New” under Posts or Pages. For this tutorial, we’ll make a new blog post.
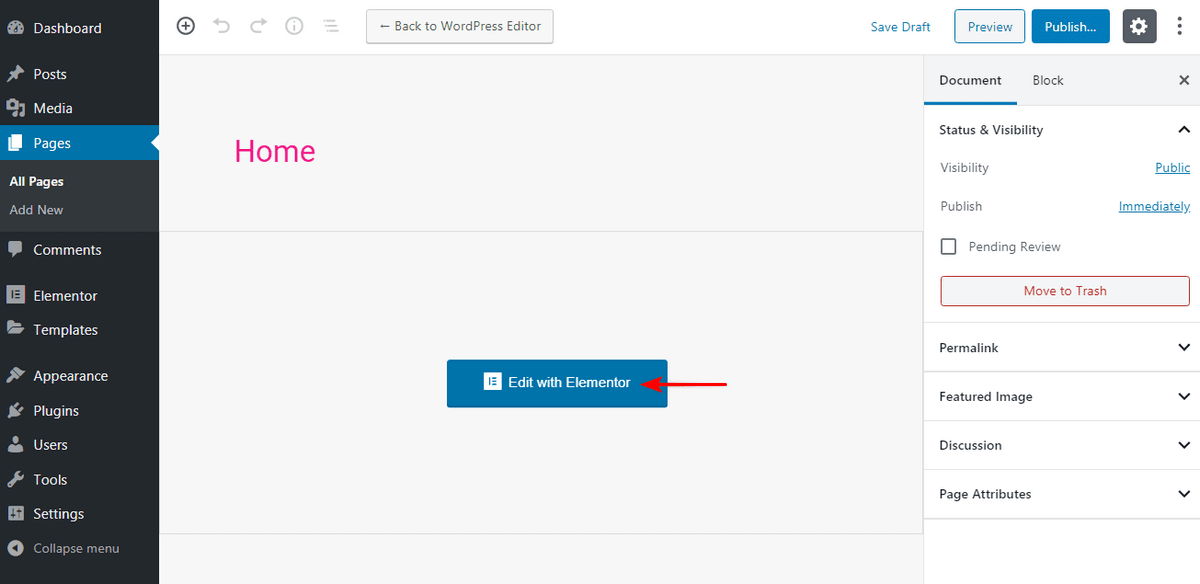
Step 2. Edit With Elementor
Once you get to this screen, you can choose to edit the page with the default WordPress editor. To use Elementor, you should click the “Edit With Elementor” button.
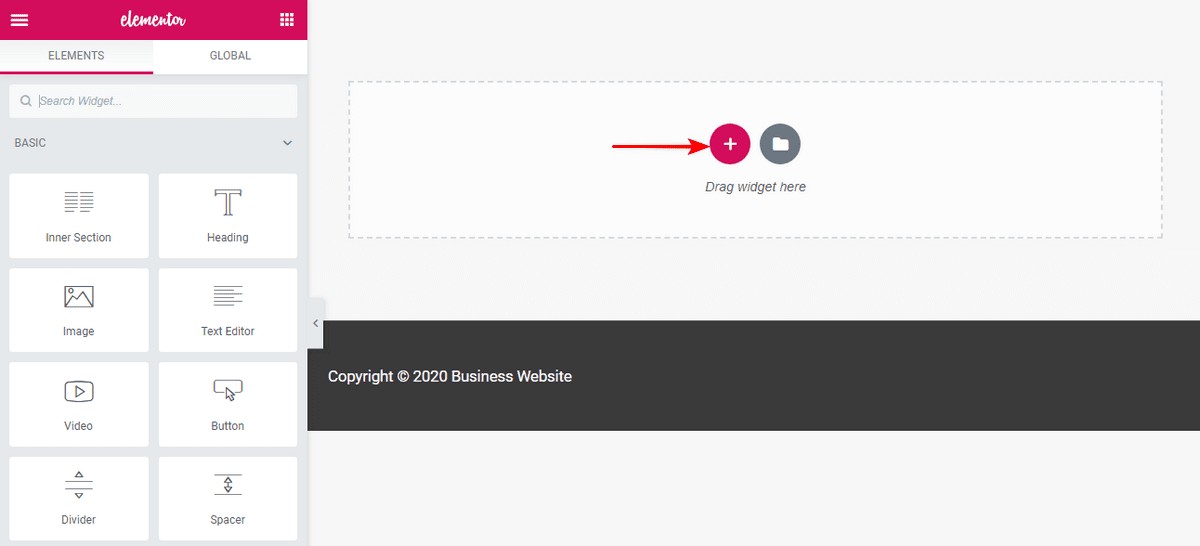
Step 3. Drag Elements to Main Page
This page will be empty initially. Pick and drag elements from the Elementor sidebar.
Let’s create a new heading for the page. All you have to do is click on the box that says “Heading” then hold down the mouse button, and drag it to the widget area on the page (where it says “Drag widget here”).
If you don’t want this element to take up the full width of your page (which it does by default), you can click the little “plus – +” button to customize the structure of that section of your page.
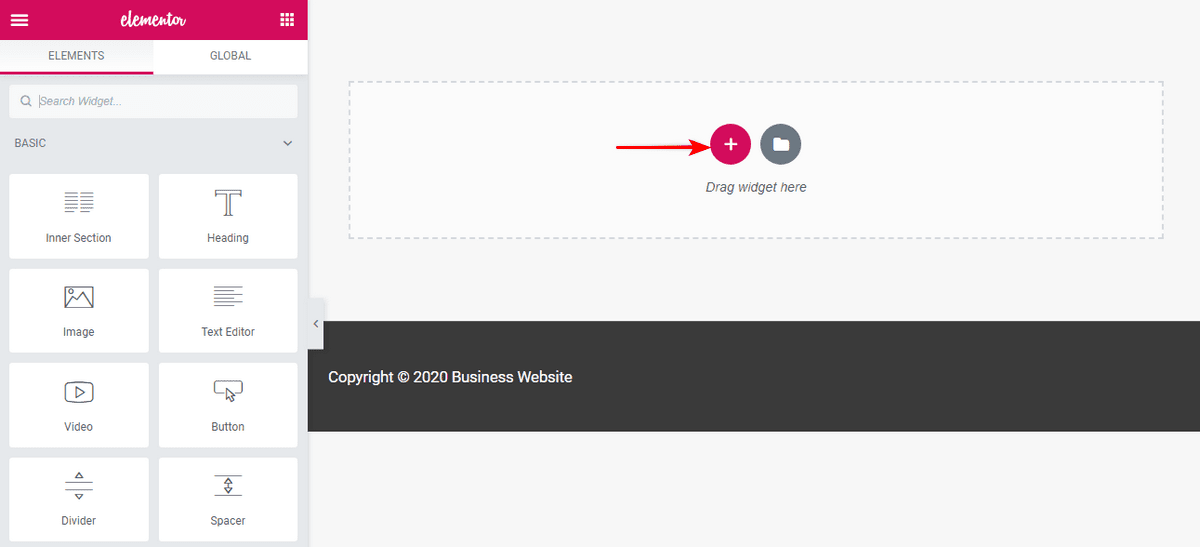
After you’ve clicked the plus button, you’ll see an option to “Select Your Structure”. Let’s go with three equal columns.
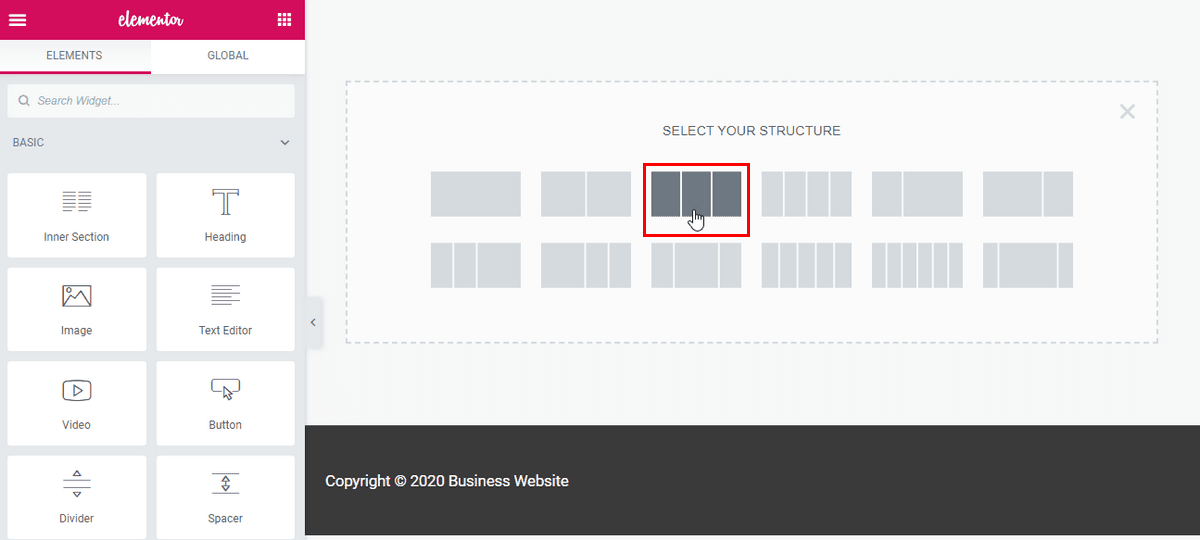
After we click that icon with the three columns, we now see a brand-new section on the page with three columns, each with a plus button.
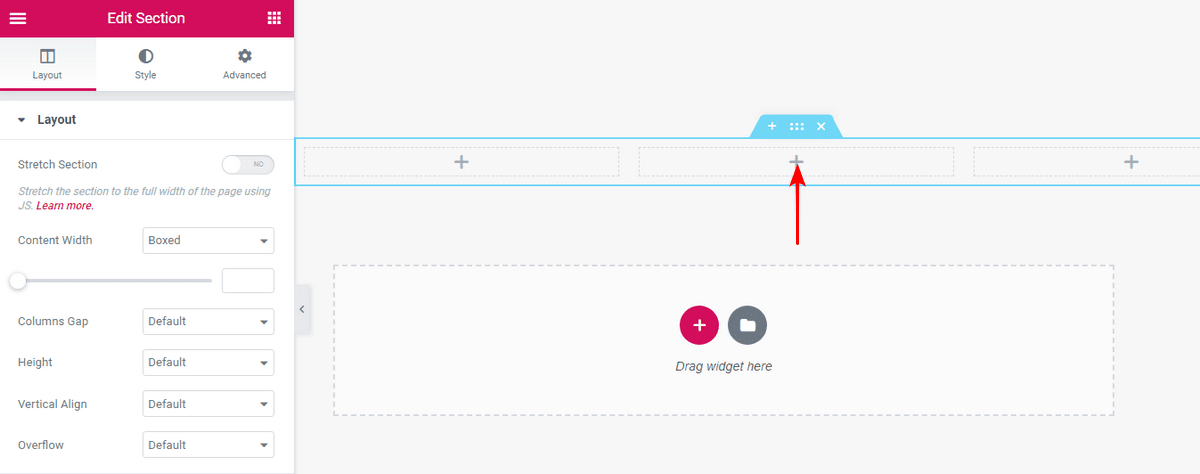
And if we want to customize what we see in this section? You guessed it, we drag a widget there.
We dragged a video element to the middle column, which is preloaded with an Elementor video playlist by default.
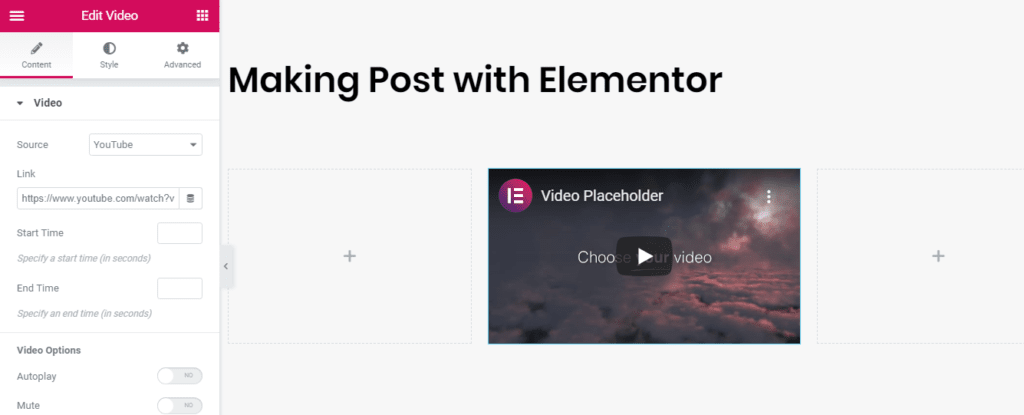
Step 4. Edit Settings
For every section or element you place on the page, you have options to customize it further. Just look for the six dots.
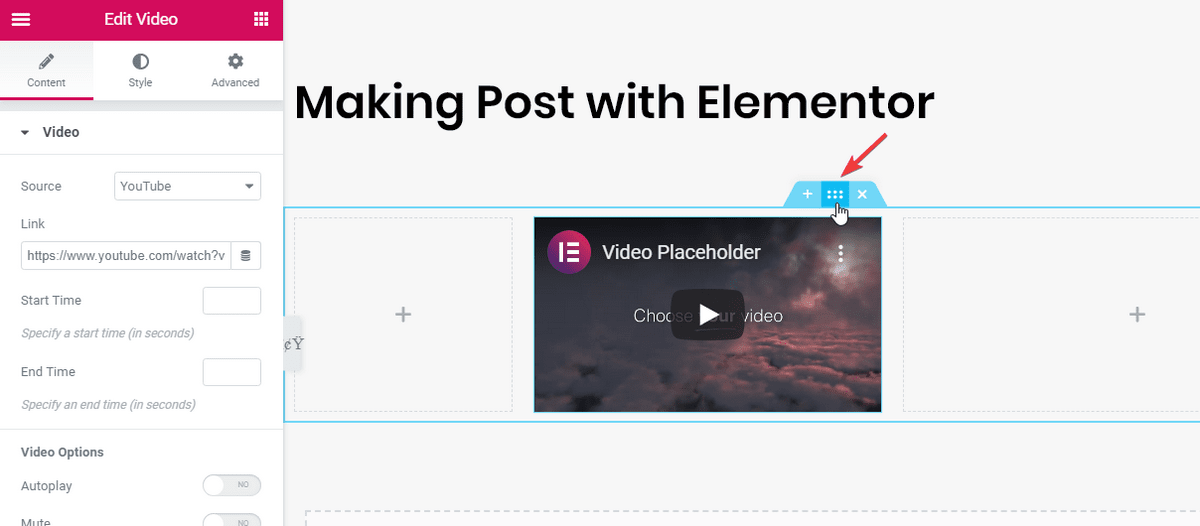
If we select the heading, for example, we can change its content, style, or advanced features like margins and padding, responsiveness, and so on.
Step 5. Publish Your Page
Once you’re happy with the settings, it’s time to check out the finished product.
We’ve seen what this page looks like in the editor, but if we take a peek at the preview of the actual page, we see that it’s the same!
That’s a very good thing. It means that once the page you’re working on is live, you can be confident that it looks exactly like it did while you were editing it. That’s one of the most important features of Elementor.
Page Builder Summary
This was obviously a quick example, but it shows you how easy it is to place elements and make a working website!
The bottom line is, you don’t have to be an expert to build a website with Elementor. With tons of templates to choose from, you never have to start from scratch unless you want to.
We highly recommend you look at Astra Theme, it has tons of included Elementor templates called Starter Templates that you can use.
There’s one more huge point we want to emphasize here:
Whether you choose Elementor Free or Elementor Pro, the nuts and bolts of Elementor’s page builder are identical. Pro just offers more advanced functionality through premium widgets to help you right out of the box with marketing, eCommerce, design, and integrations with other common tools like MailChimp and Adobe TypeKit.
It was a great decision to set up Elementor this way because you aren’t having to relearn anything once you’re ready to make the leap from Elementor Free to Elementor Pro.
5. How to Use The Elementor Theme Builder
Usually, when something gets easier to use, it has to drop useful features. Fortunately, Elementor is a special case that’s both easy to use and incredibly versatile, thanks in large part to its theme builder.
Available in Elementor’s Pro version, the theme builder is a game-changer for anyone familiar with page builders, because it allows you to create custom headers, footers, and other dynamic content for your website.
It even allows you to override aspects of your WordPress theme, so you can keep what’s working and just make the changes you want!
Why would you need dynamic content? Well, sometimes you may want to host a sales page that doesn’t have a traditional header and sidebar or you may want to save a custom blog post layout that you can use every time you add a new post.
The possibilities are endless.
Build a Header/Footer With Elementor
Ready to build a customized header or footer with Elementor using the theme builder? Here’s how it’s done!
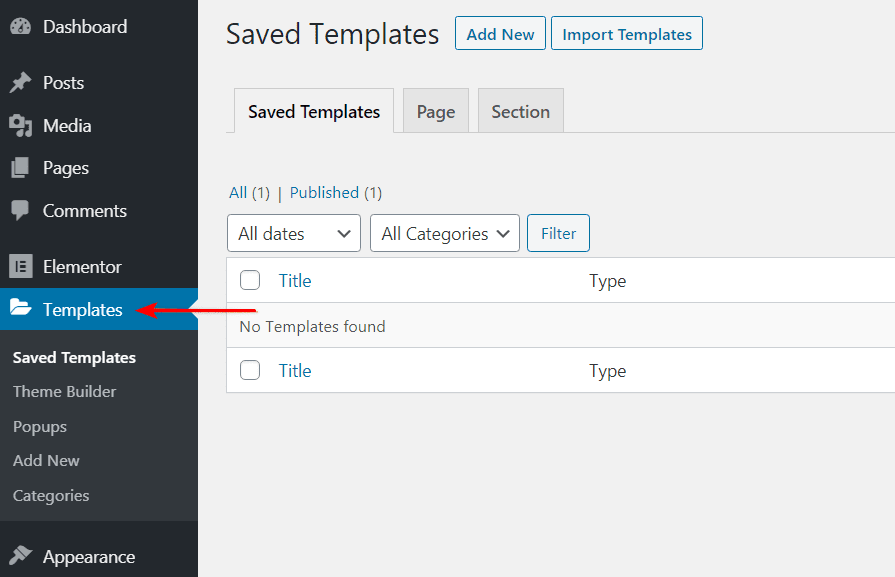
Step 1. Click on “Templates” in the WordPress Dashboard
After logging into your WordPress dashboard, go to “Templates” under Elementor in the side menu.
Step 2. Add New or Import Template
This is where you create a new template for your header.
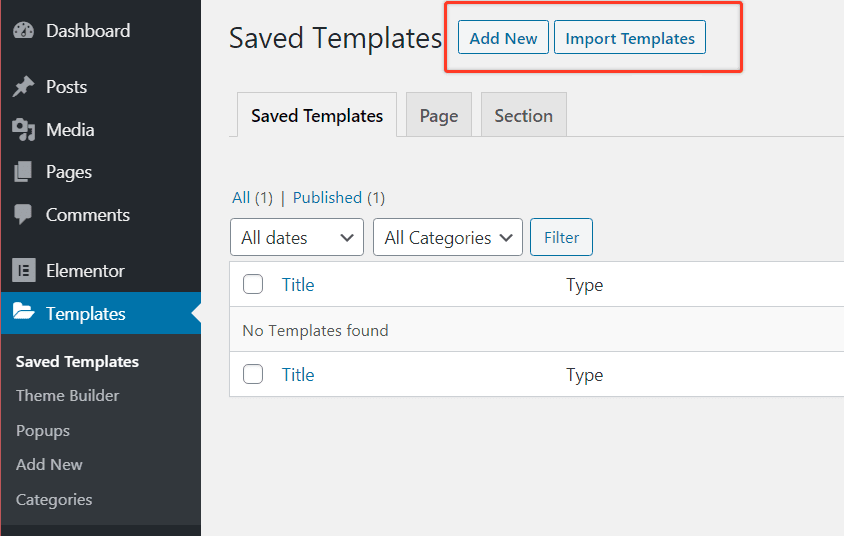
If you saw a header already that you liked the look of, you can import it to use as a starting point. Otherwise, click “Add New”.
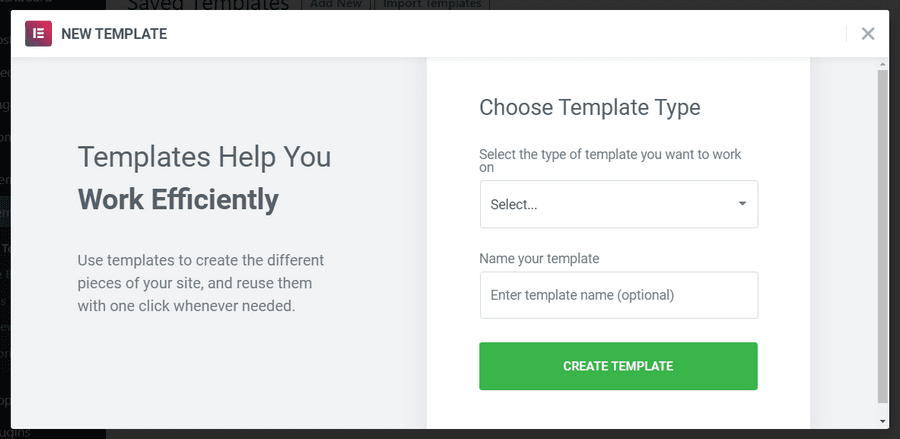
This will pop up a dialog box allowing you to choose the template type, header in this case, along with the name of your template.
Note:
Elementor Free only includes section and page templates. The Pro version includes several additional template categories, including global widget, header, footer, single, and archive.
There are many alternative ways to edit the WordPress website header and footer for free. Check the below guides to learn more.
Step 3. Edit Your New Template
If this step looks familiar, that’s because it’s the same exact editor we used to make a full page earlier. Now, it’s applied to making a custom header.
You can go through the process to create your layout with different widgets, and even specific images or other content. Once you’ve saved your new header, it’s easily accessible from a new page.
For more detailed info, check out our detailed guide on customizing the website header with Elementor.
Build WooCommerce Pages With Elementor
The process for creating a custom WooCommerce product page is similar to any other page or section you can build. Sensing a pattern here?
With its WooCommerce Builder, Elementor supports the ability to create a template for a single product page. Once you create a new template, you’ll see a template library full of blocks or full pages that you can use for your WooCommerce product page.
Keep in mind that this WooCommerce template will have a number of dynamic product widgets, including product title, product image, and product price.
You can set the details of the products with WooCommerce, and use Elementor to display up-to-date product information on the front end.
It’s that simple!
What Elementor is Missing
In spite of all this flexibility, there are still some things that Elementor can’t do. Remember, Elementor isn’t a theme — it just uses its theme builder to override certain theme features.
To get full control over your theme, we highly recommend going with Astra Pro and Elementor. Astra gives you built-in header and footer options, mega menus, and a lot more!
Starter Templates for Elementor
Another huge benefit of Astra is its collection of Starter Templates that are ready to import into Elementor, including both free and paid options.
For example, if you were setting up a website for a fitness trainer, you could use the fitness trainer website template from Astra as a solid foundation and customize it from there.
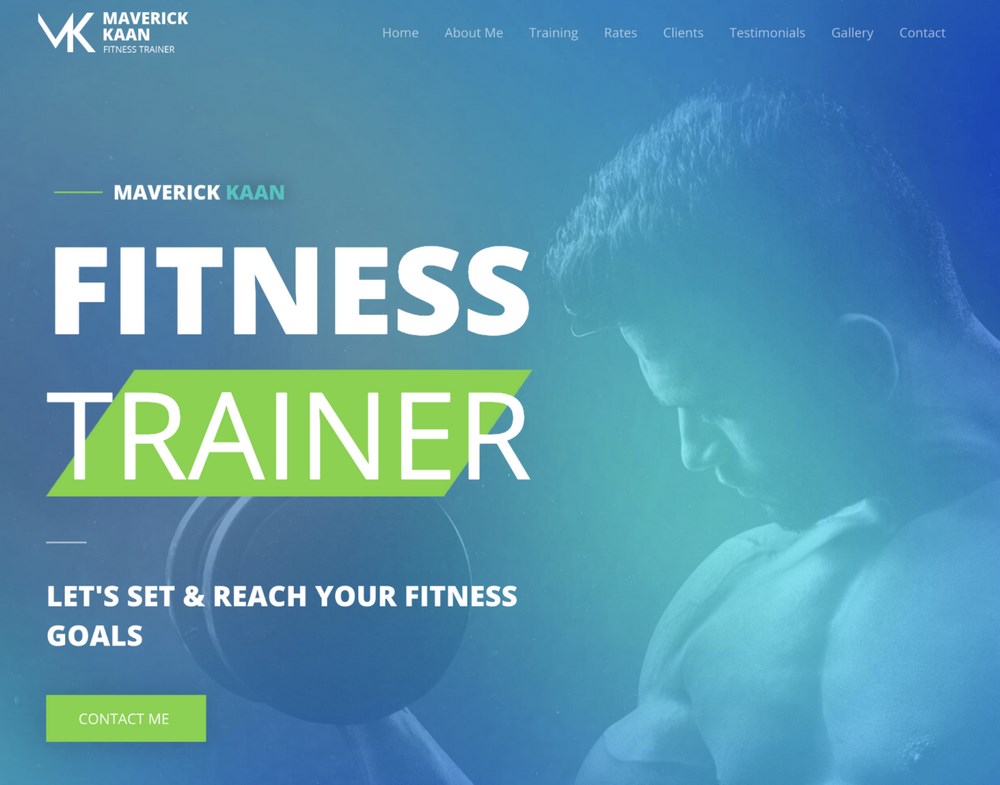
Importing an Astra Starter Template is easy to do!
You just need the free or paid version of Astra Theme installed, plus the free Starter Templates plugin.
Once you have both of them set up, you can log into your WordPress dashboard, navigate to Appearance > Starter Templates, and select the website you want to import.
Then, you’ll be able to make changes to the starter site right in Elementor!
For more information, check out this detailed tutorial for importing Astra starter templates.
Ultimate Addons for Elementor
In addition to these templates, we have a plugin called Ultimate Addons for Elementor that offers additional functionality not found in Elementor.
This goes even further than Elementor Pro in offering advanced widgets, such as the content toggle, modal popup, content timeline, and table of contents.
For maximum control and flexibility, it’s definitely worth checking out Ultimate Addons for Elementor!
6. How to Build Templates With Elementor
You can create templates for all kinds of sections and pages, including:
- Page
- Header
- Footer
- Single post
- Blog archive
- Product pages
For this example, let’s work with the post/page template.
Build a Page Template With Elementor
In Elementor, both the page and post are covered by the “page template.” This is a saved template you can use for any new page or blog post, allowing you to maintain consistency, even with multiple team members doing the posting.
Even better, this one is available for all Elementor users, including with Elementor Free.
Step 1. Click on “Templates” in the WordPress Dashboard
After logging into your WordPress dashboard, go to “Templates” under Elementor in the side menu.

Step 2. Add New or Import Template
This is where you create a new template for your header.
In the dialog box, choose the Page template type and give your new template a name.
Then, click “Create Template” to get started!
Step 3. Edit the Page Template
Just like earlier when we made our own page, you’ll use the same editor here. It’s as simple as creating new sections, changing the columns, and dragging different widgets to the page.
Once you’ve designed a page that you like, you can save it as a template so that it’s accessible for any of your other pages going forward.
7. How to Create Popup in Elementor
Want to create a popup in Elementor? Maybe to offer a free lead magnet, make an announcement, capture leads or something else?
Creating a popup in Elementor is rather simple. You will need to upgrade to the pro version to create popups though.
You’ve got some really cool features with the pro version, such as welcome back popup, product upsells, exit-intent popups, and more, so we’ll go ahead and create a simple popup.
Simply follow these steps to create a popup that gets triggered when you click on a button.
1. Head over to Dashboard > Templates > Popups > Add New.
2. Name your template and then click ‘Create Template’.

3. You can choose to create a template of your own or select one from the template library.
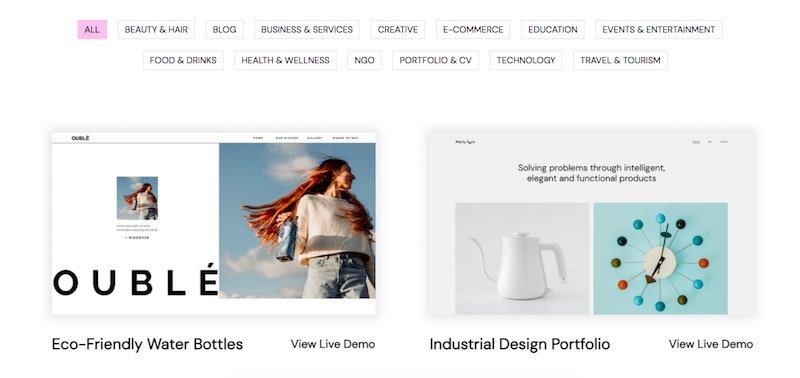
4. Click ‘Publish’ once you are done. Then save and close.
5. Now, create a new page in Elementor. And drag a button widget.
6. Under Layout, select Link > Dynamic > Actions > Popup.
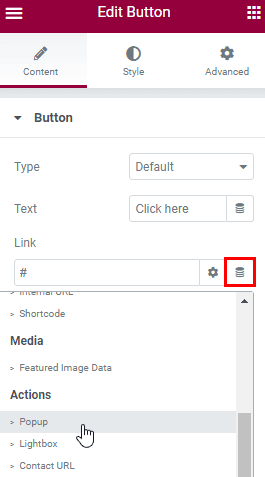
7. Browse to Popup > Open Popup > and select the popup you just created.
8. Click ‘Publish’ when you are done and check out the live page. Click on the button to view your popup.
And that’s how simple it is to create a popup using Elementor!
8. Create a Mobile Responsive Website With Elementor
With more and more users visiting websites from their mobile devices, it’s crucial to get your website’s mobile view spot on. As indicated earlier, more than 50% of your website traffic is coming from mobile devices.
We’ve listed some steps by which you can ensure that your website is mobile-friendly if you are using the Elementor page builder.
If you prefer seeing how it’s done, check out this video tutorial on Elementor responsiveness.
Elementor makes it super easy when it comes to customizing your website for different devices.
The general rule of thumb is that all editable features have a specific setting for desktop, mobile, and tablet. The most common settings include text size, margin, and padding.
For instance, as shown in the image below, look out for the device icon adjacent to ‘Width’. This is the case with just about any element you wish to customize.
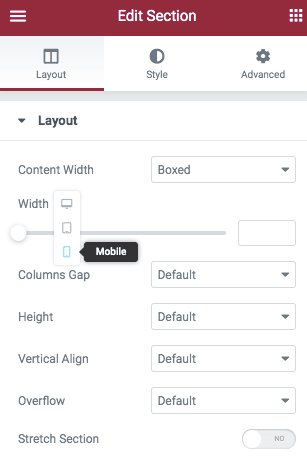
Click on the device for which you want to carry out the customization. Once selected, go ahead and play around with the settings based on your preference.
By default, the background images are automatically responsive. You have complete control over further customizing the images to suit your device, even to the extent of having different images for different screen sizes.
Did you know that you can choose to show or hide a section based on the device? For instance, if there’s a row of images or text that you’d like to hide in mobile devices, you could do so rather easily.
Simply head over to the Edit Section > Advanced > Responsive tab.
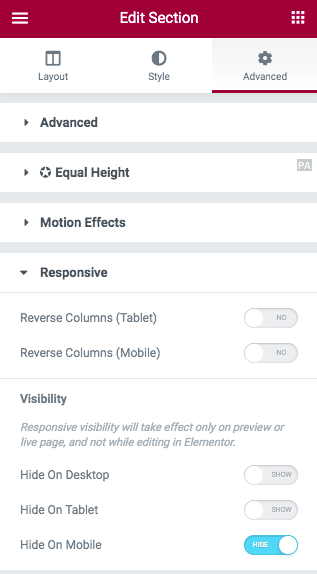
Do you notice a set of options under ‘Visibility’? By default, the section is set to be shown across all devices. If you’d like to hide it, well, just toggle the button based on your device.
While you may still get to see the section while editing the page, it will not be visible on the front end, once you publish the page.
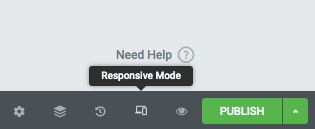
To switch the view of the entire web page, all you have to do is click on the responsive mode icon at the bottom of your Elementor dashboard.
By default, you’ll notice the mobile view.
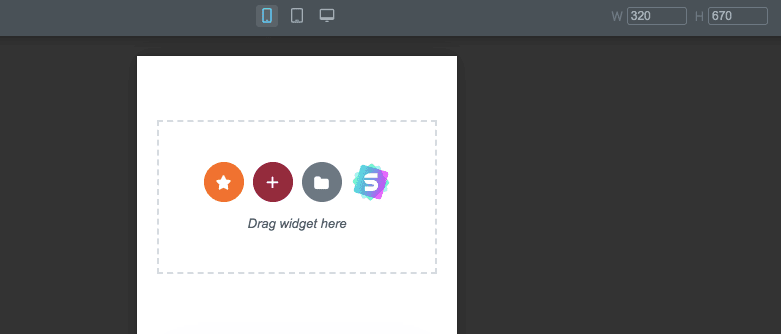
To switch between devices, simply click on the respective device icon on the top. And to exit from the responsive view, simply click the ‘X’ on the top right-hand corner.
How easy was it to create a mobile responsive view? Easy right?
9. Why You Should Use Elementor
Now that we know how to use Elementor, let’s cover a rather out of context, yet frequently asked question. Why should we use Elementor in the first place?
Before getting in more details, let’s take a look at this helpful infographic that explains some of its benefits
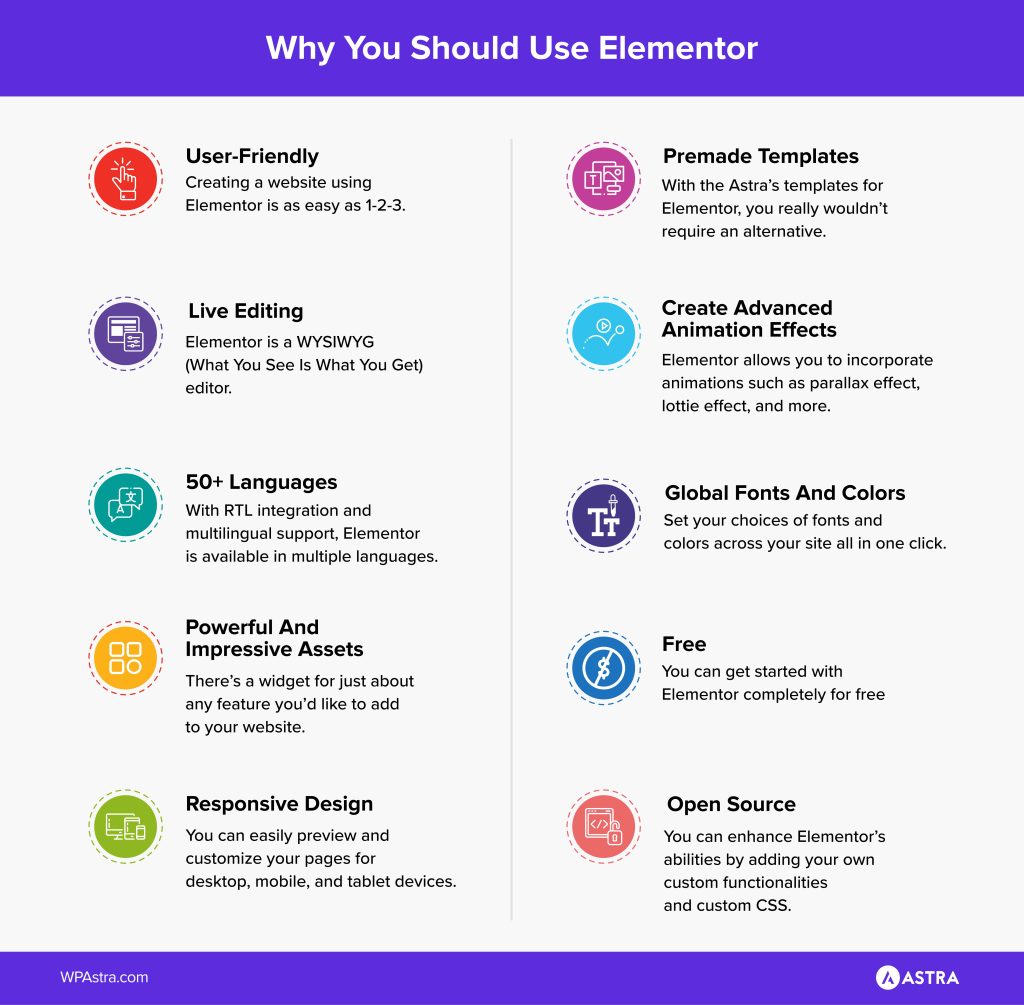
However experienced you are, creating a website can be challenging. From getting the navigation spot on to maintaining the overall aesthetics of the website, it does take time and effort.
If you are a freelancer or a website designer, you’ll be well aware that with every new client comes new challenges and specific requirements.
Indeed, platforms such as WordPress make the entire website development process a whole lot easier. That being said, you’re always left wanting more.
Fortunately, you have drag-and-drop page builders such as Elementor that take the entire web development process to a whole new level.
From using a range of widgets and elements to build your web page to the impressive blocks and templates, there’s a lot you can do with Elementor.
Let’s delve deeper into why you should use the Elementor page builder plugin.
1. User-friendly
Creating a website using Elementor is as easy as 1-2-3. Using the drag and drop feature, simply add a widget or element of your choice, customize it the way you want, and publish the page. It’s as simple as it gets. You needn’t know how to code or have any programming knowledge.
2. Live Editing
Elementor is a WYSIWYG (What You See Is What You Get) editor. With the real-time preview, you get to see exactly how your page looks after an update, rather than publishing it and then having to redo if it didn’t turn out the way you wanted it to.
3. Powerful and Impressive Assets
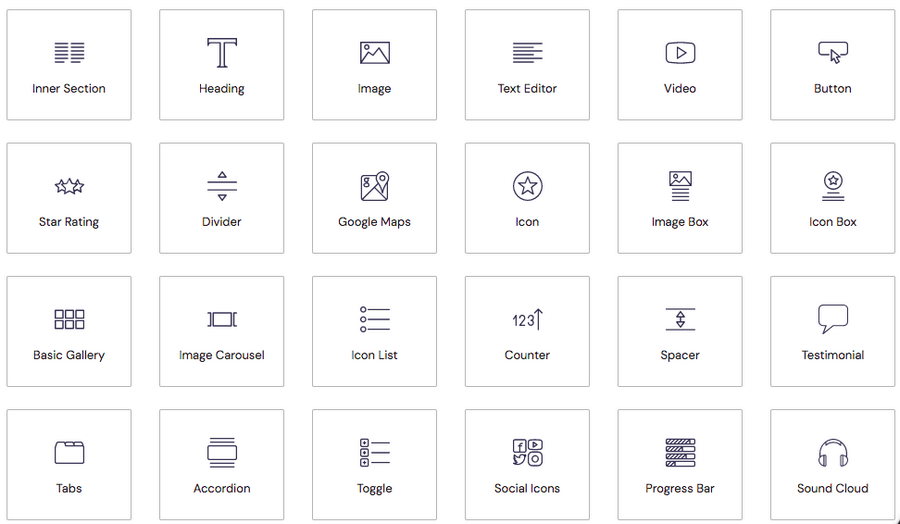
With 90+ incredible widgets (also referred to as blocks) and more than 300 designer templates, you can set your imagination wild while creating your web pages, landing pages, pop-ups, and more. From headlines to buttons, social media icons to galleries and carousels, there’s a widget for just about any feature you’d like to add to your website.
4. Responsive Design
With more than 50% of website traffic coming from mobile devices, it’s imperative that you get the mobile view of your website spot on.
With Elementor, you can easily preview and customize your pages for desktop, mobile, and tablet devices. Simply switch the view and tweak every element to look perfect on any device.
5. Global Fonts and Colors
Set your choices of fonts and colors across your site all in one click. From the titles, paragraphs, and even the button text, define your branding once and have them applied to every element on your site.
6. Premade Templates
With the Astra’s website templates , you really wouldn’t require an alternative. There’s a readymade template irrespective of the niche you are in.
If you are looking for more options, you could consider the impressive array of templates that Elementor boasts of. So even if you are a newbie starting with website designing, Astra and Elementor have got you covered.
7. Create Advanced Animation Effects
Do you love incorporating animations into your website? You know, those parallax effects, get texts to stand out by creating a 3D effect, or even a lottie effect? Elementor allows you to do just that rather easily.
8. Highly Secure
With regular updates, Elementor ensures your website is in safe hands. They are fully compliant with WordPress’s security standards and remove any malicious content when required.
9. 50+ Languages
With RTL integration and multilingual support, Elementor is available in multiple languages. Use the platform in your preferred language.
10. Seamless Integration With WordPress Plugins
Be it WooCommerce, LearnDash, Yoast SEO, MemberPress, and many more, Elementor is compatible with popular WordPress plugins.
11. Open Source
While this will require some bit of coding from your end, you have complete access to the Elementor source code. You can enhance Elementor’s abilities by adding your own custom functionalities and custom CSS.
12. Revision History
If you’ve been coding for a while now or for that matter, even using Google Docs, you’d agree that the undo and redo feature is a huge blessing. Whether you’ve deleted a single line of code or an entire block of code, a simple undo can get back to where you started.
With Elementor’s revision history, your entire page creation process can be easily retraced.
13. No Shortcodes
While we do not see a reason for you to abandon Elementor, just in case you wish to shift to an alternative, your website will still run. As is the case with some page builders, you aren’t locked in by shortcodes when you use Elementor.
14. Active Community
With Elementor, you are not alone. Owing to the huge popularity of the Elementor plugin, there’s a growing community that you can connect to.
You get to constantly learn and get exposed to new tools, design ideas, and so much more. Not to mention, the community is there to back you up if you need any help, suggestions, and ideas to build an awesome website.
15. Free
Last but not least, you can get started with Elementor completely for free. While there is a pro version, as mentioned earlier in the article, the free version should do just fine.
10. Pros and Cons of Using Elementor Page Builder
Just like everything else, Elementor has its pros and cons. While the pros outweigh the cons, we’ve listed them both here for you.
| Pros of Elementor Page Builder | Cons of Elementor Page Builder |
| Simple and intuitive interface | You need to upgrade to the Pro version for support |
| Drag and drop page builder | No lifetime pricing option |
| Easily customize pages for various devices (desktop, mobile, tablets) | Cases of slow page loads |
| Live, real-time previews while editing | |
| 90+ widgets, more than 300+ templates, and several blocks to choose from | |
| Seamless integration with third-party tools | |
| Secure with regularly updates | |
| Create custom themes, attractive pop-ups, and animations | |
| Compatible with all themes | |
| Integrates perfectly well with WooCommerce | |
| The free version works great |
Final Thoughts
Whew, we covered a lot of ground with this WordPress Elementor tutorial!
In terms of primary takeaways, I hope you can see why Elementor is a fantastic page builder that takes a lot of the guesswork out of web design. It strikes an ideal balance between ease of use and deep functionality, making it one of the most accessible page builders available for WordPress.
I also hope you’ll remember to give Astra a look as your WordPress theme to pair with Elementor. Astra is lightweight, fast, and incredibly flexible, adding complementary features to Elementor so that you can create anything your mind dreams up!
Thanks for reading! Hopefully, this post has given you a great starting point for success with Elementor. If you have any questions or comments, please share them with us below!
Disclosure: This blog may contain affiliate links. If you make a purchase through one of these links, we may receive a small commission. Read disclosure. Rest assured that we only recommend products that we have personally used and believe will add value to our readers. Thanks for your support!



Hi, newbie to WP question. I am using Astra and Elementor. When I’m at my dashboard and click customize your site it opens up the site in Astra without giving me the option to use Elementor. I noticed in some YT videos that some people have a “Customize with Elementor” at the top of their dashboard. Is there somewhere you have to select that in the dashboard to have that become visable? Right now the way I’m opening up Elementor is by scrolling down on my dash to the Elementor Overview and clicking on my latest version that was saved. Thanks for any suggestions.
Hello Celeste,
Probably this issue might be due to the pages post-type not enabled from the Elementor settings.
Do check this Support Topic or this article from Elementor.
I hope that helps. Feel free to reach out to the Elementor team if you have any specific concerns while using Elementor. 🙂
I am building my first website with free versions of Astra (using a template) and Elementor. I keep having issues with fonts that change in the middle of a paragraph, for instance if I try to change the size then only a portion will change. Then I’m unable to change it back to make the paragraph uniform.
Could there be a conflict between the template (Online Coach) and Elementor? Thank you.
I unknowingly imported the same design twice. Now in my header section I have everything doubled. Don’t know how to remove the extra things and bring it back to normal!!!! Really puzzled…..!
Hello Gopika, if it is a new installation do reset WordPress and try again. Or you can manage the Menus from the Appearance section of the WordPress Dashboard.
Thank you so much for sharing all this wonderful info. It is so appreciated!!