In this article, we will walk you through step-by-step how to create a website.
We’ll cover everything, starting from choosing a domain name and hosting plan to designing your site and adding content.
We will also highlight creating different websites such as eCommerce websites, business websites, or blog websites.
We have meticulously crafted this guide with beginners in mind. So, even if you have never built a website before, you can do so today!
By the way, if you are interested in a video tutorial on how to create a website. We have covered you for that as well.
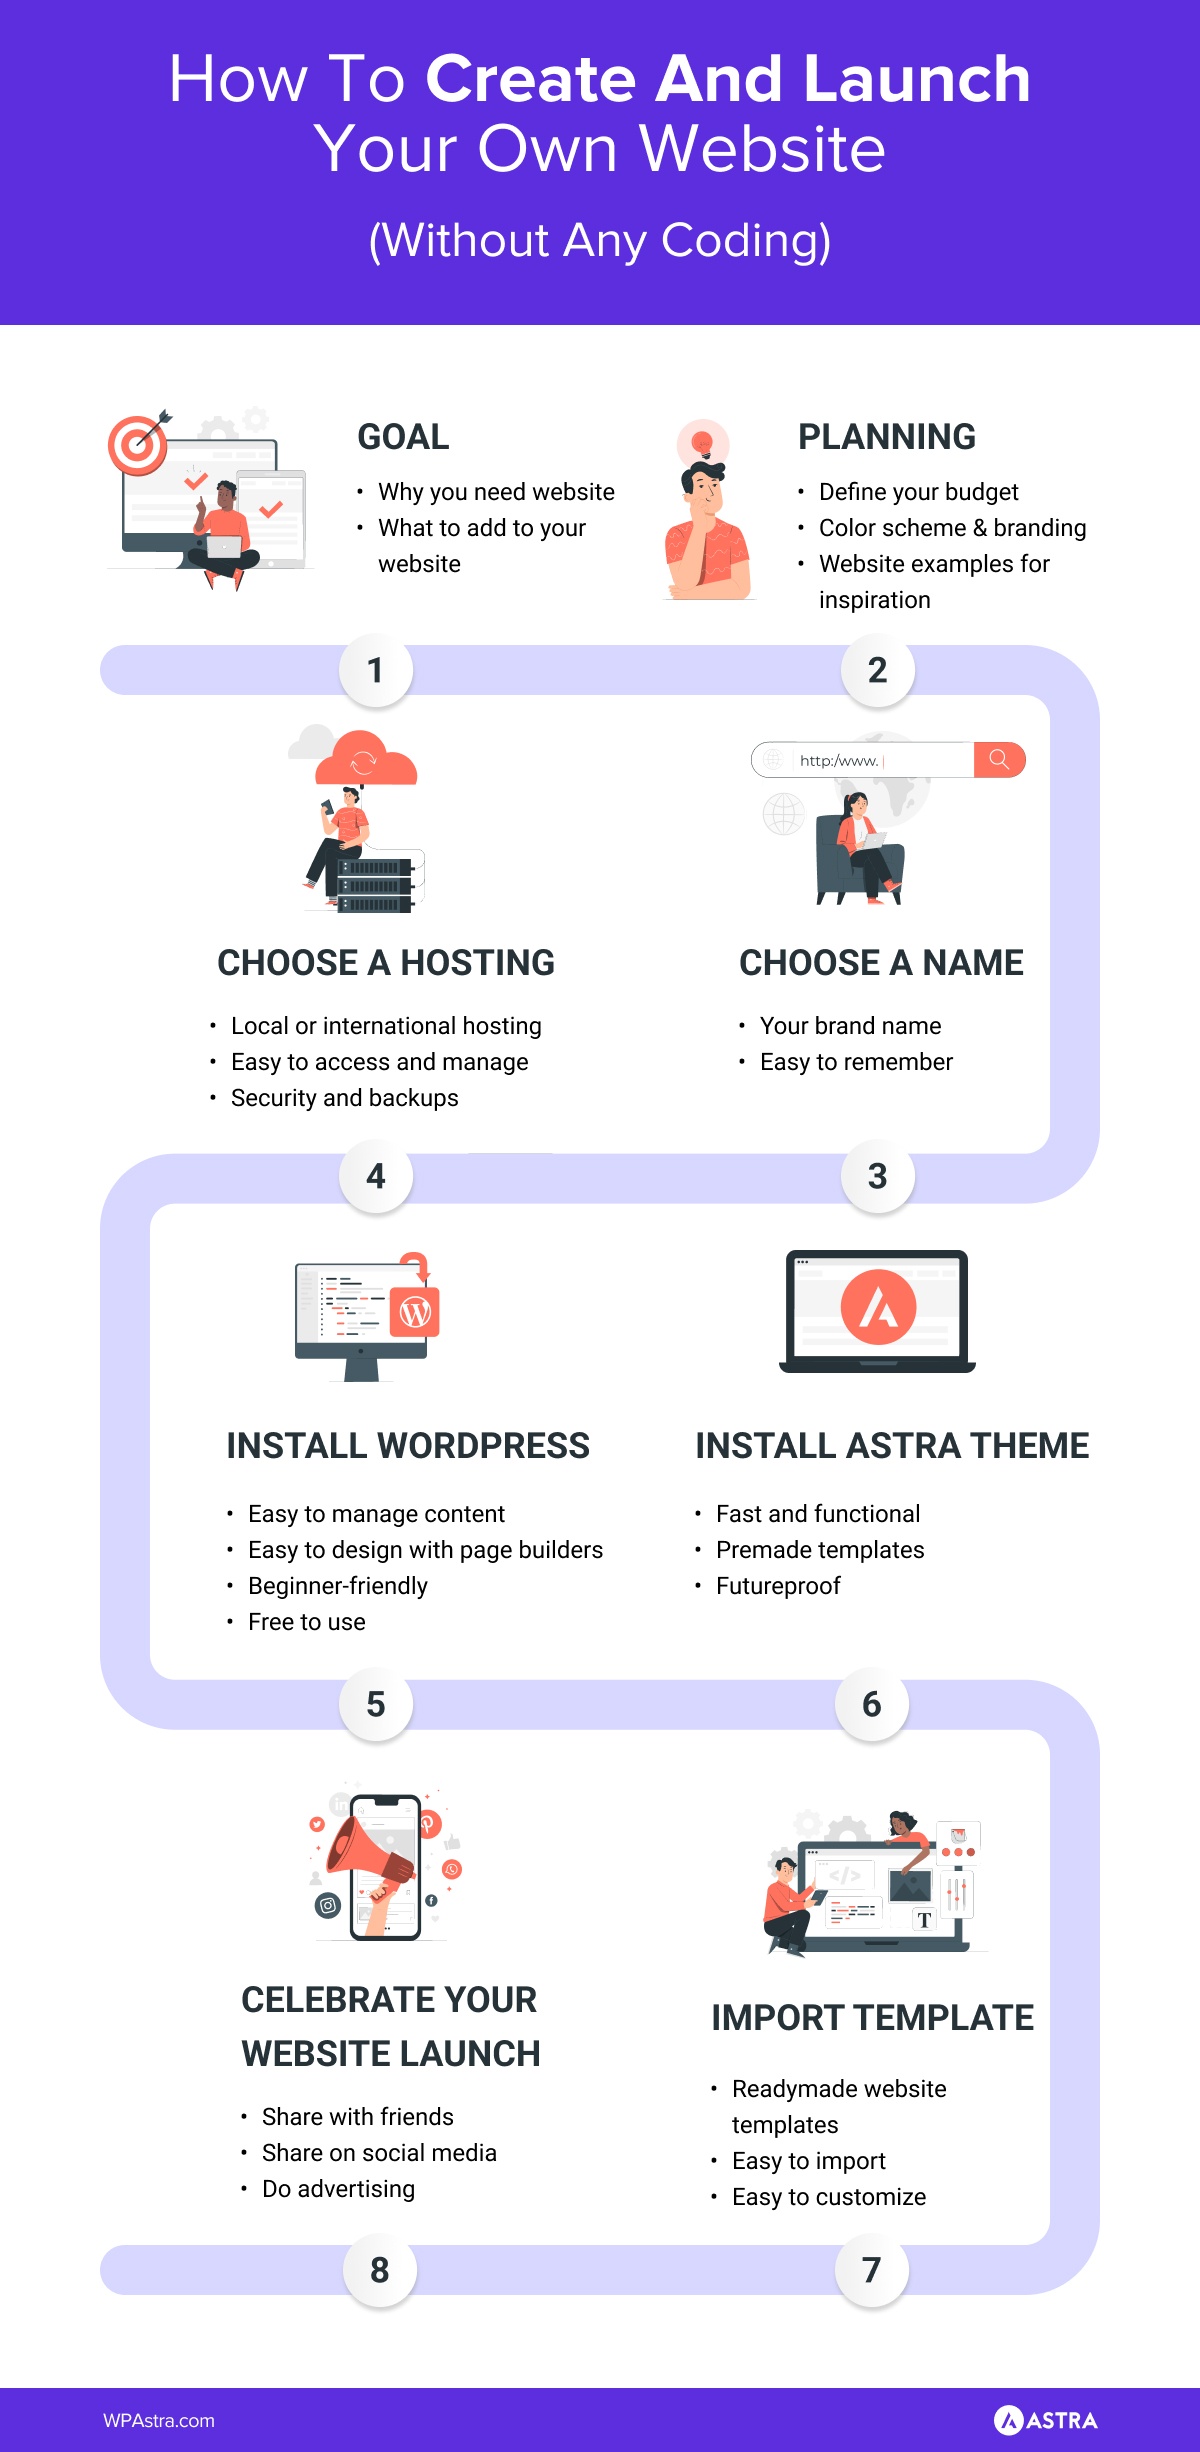
Quick infographic on how website creation works.
Chapter 1
Why Does Your Business Need a Website?
A website is one of the most important tools a business can have and is the cornerstone of all marketing efforts.
It’s a way to connect with customers and sell your products or services online. It’s also where people can discover who you are and what you do
In this section, we’ll discuss the importance of having a website and some of the benefits it can provide.
- Download Website Launch Checklist
- Why Does Your Business Need a Website?
- Fundamentals of Creating a Website
- Things To Do Before You Create a Website
- How To Create a Website (Step-By-Step Guide)
- Creating Different Types of Websites in WordPress
- How To Add Schema to Your Website
- Create Your Website Today!
- How to Create a Website FAQs
Credibility
Having a website for your business gives you immense credibility and makes you appear more legitimate.
If you do not have a website, customers will think you are behind the times, which isn’t what any business wants potential customers to think!
Reach
A website allows you to reach more customers. You are no longer limited to your brick-and-mortar location or traditional marketing by having a website.
97% of people look for a local business online before anywhere else (Source) and around 28% of people purchase after looking up a business online.
That’s 9.51 million businesses in the United States alone!
You can now reach people worldwide with just a few clicks. You can promote your business on social media or drive people from search results.
No matter what you do, with a website, your business is open to a global audience.
You’re also open 24/7. No matter what time of day or night, people can find you online, check you out, buy from your store or send you a message.
Insights
A website provides valuable insights into your business. In a brick-and-mortar store, you hardly have any data on where your customers are coming from, why they buy from you, or what offers do they respond to the most.
By analyzing your website’s traffic data using Google Analytics, you can learn about your customers, what they like, and how to better serve them.
Once you know who your target market is and where they live, you can tune your marketing and even your products to better serve them.
Marketing
Online marketing is more cost-efficient than offline marketing. Compared to traditional marketing channels such as TV or print ads, promoting your website online is relatively inexpensive.
Moreover, you have fewer targeting options when it comes to traditional marketing. At most, you can target which news media to run ads in or which billboard to place your banner on.
With digital marketing, you can not only display your advertisements to a particular demographic but also target your ads to their personal interests.
This hyper-targeting gives you more control over your marketing.
But you’ll need a website in order to utilize most forms of online marketing as you need somewhere to convert them into customers.
The best part is that building a website is really simple. Let’s see how to do it.
Chapter 2
Fundamentals of Creating a Website
This section is a high level overview of website creation.
We’re going to walk you through key considerations for web hosting, domain names, content management systems and everything you need to build a website.
We’ll cover them all in more depth later in our guide, but it’s important to understand the theory before you begin building.
1. Define Your Objectives
Do you want to build a website for your service business? Looking to create a personal blog or portfolio? Want to sell products on your website?
Before you start building, it’s essential to take a step back and think about your objectives.
By objective, we mean understanding:
- What you are going to deliver with the website
- Who is going to consume your product, service, or content?
- Why would they prefer your website
When you answer these questions, you will know exactly what kind of website you need to build and what it should include.
2. Get Web Hosting
Once you have decided what type of website you want to build, it’s time to take action.
You can start by selecting a reliable web host.
A web host is a service that allows you to publish your website to the internet for the world to see. It’s like renting space on the internet where you can publish content.
In this section, we will discuss the main types of hosting so you can make an informed decision about which one is best for you.
We have also extensively talked about the best web hosting companies out there. Feel free to check them out.
Shared Hosting
Shared hosting is the most affordable type of web hosting. It is perfect for small businesses and individuals on a budget.
Shared hosts provide a shared server, which means that your website will be hosted on the same server as other websites. This can be a good or bad thing, depending on your needs.
The good thing about shared hosting is that it’s cheap. The downside is that shared hosting is usually the slowest form of hosting.
Shared hosting is okay for small websites or for when you’re just starting out.
VPS Hosting
VPS hosting is ideal for businesses that have outgrown shared hosting but don’t need a dedicated server.
With VPS hosting, you get your own virtual server, which is a portion of a physical server. This means that you have more control over your website and can customize it to meet your specific needs.
VPS is faster and offers more control than shared hosting but is more expensive. It would be ideal for more established websites with a growing audience.
Dedicated Hosting
If you have a large website or need complete control over your server, then dedicated hosting is the way to go.
Dedicated hosts provide your own physical server, which means that you don’t have to share it with anyone else.
It offers full control over your web server and a lot of freedom. It is also the most expensive type of web hosting.
Dedicated hosting would be ideal for large business or eCommerce websites that have outgrown VPS or another type of hosting.
Which Web Hosting Should You Choose?
So, which type of web hosting is right for you? It all depends on your needs and budget.
If you’re just starting out, shared hosting is a good option. If you have outgrown shared hosting or need more control over your website, then VPS or dedicated hosting may be a better option.
Best Web Hosting for Creating Websites
Now that you know the different types of web hosting, it’s time to select a host.
We already mentioned the fastest WordPress hosting companies but if we had to pick one, we would recommend Hostinger because it offers great features at an affordable price.
Plus, they make it easy to set up your website with WordPress (more on that later).
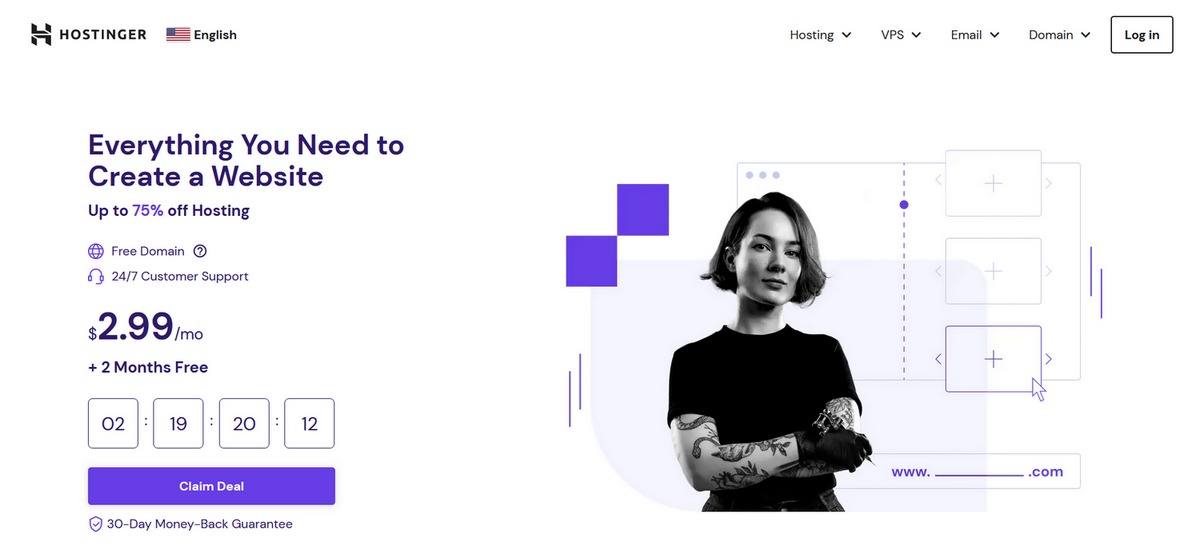
Here are the key features of Hostinger:
- Offers excellent value for money for beginners
- Host up to 100 websites with the cheapest plan. Plan starts from $2.99 / month
- Include free domain and SSL with a yearly subscription
- 24/7 customer support
- Rated over 4.5 on different platforms, including Trustpilot and Google
3. Get a Domain Name
Domain names are the addresses of websites, just like how your home address is used to identify your house.
When someone wants to visit your website, they type in your domain name into their web browser and land on your website.
The ‘wpastra.com’ you see in your browser bar? That’s our domain name.
How To Choose a Domain Name
The important factor to consider when choosing a domain name is what your customers will remember.
It has to be memorable and easy to suggest to anyone without spelling it out.
When choosing a domain name, you’ll need to consider the following factors:
- Length: Shorter domain names are easier to remember than longer ones.
- Domain name extension (.com, .net, .org): The .com domain type is more common, as you would have noticed by now. Most popular websites like FaceBook, Youtube, Google have a .com extension.
However, the domain extension depends on availability, situation, requirement, industry, and price. There are well over 500 domain extensions in the market, so you are free to choose.
We cover domain names in a lot more detail here.
4. Install the Right CMS
Now you have your hosting and domain, it’s time to create the website. For that, you need a Content Management System (CMS).
A CMS is a software application that helps you create and manage your website without needing any coding or technical knowledge.
We would recommend WordPress because it’s easy to learn, has a ton of features and plugins, and is free to use.
Plus, it powers over 40% of all websites on the internet, so you’re in good company!
You can set up your website with just a few clicks with WordPress.
5. Choose Best Page Builder
The arrival of the page builder has transformed how we build websites. They are no longer the preserve of developers or designers. Anyone, anywhere can create an amazing website thanks to page builders.
A page builder makes web design accessible. Rather than having to learn how to code or create a page, you can use a page builder to drag blocks into place and configure them as you like.
Combined with a well-designed WordPress theme, page builders make it easy to design websites.
So, which are the best page builders?
There are dozens to choose from, but we think these are the 5 best page builders:
- Elementor
- Beaver Builder
- Spectra
- Gutenberg
- Brizy
Each has strengths and weaknesses but we consider each of these to be powerful, yet easy to use.
Check out our in-depth guide to the 8 best WordPress page builders for more information.
Which Is the Ideal Page Builder to Create a Website?
There is no ‘ideal’ page builder to create a website. There is just the best page builder for your particular preferences or needs.
Elementor is an excellent option thanks to its ease of use, powerful free version and popularity. It’s the most popular page builder compatible with the majority of leading WordPress themes, including Astra.
Beaver Builder has lots of options and has recently been redesigned to make it very easy to use. It isn’t quite as popular as Elementor, but isn’t far behind.
Gutenberg isn’t technically a page builder but a block editor but it performs similar tasks. It’s the default editor that comes with WordPress so is a logical choice for minor changes.
Brizy is also a very competent page builder but doesn’t yet have the depth or breadth of Elementor. It’s less popular than Elementor or Beaver Builder but is catching up fast.
Spectra is a free page builder plugin that’s perfect for customizing Gutenberg templates. It works seamlessly with WordPress and is an easy way to expand the default options within Gutenberg.
6. Build Your Website
Now that you have your hosting space and name, it’s time to design and build your website.
This is where the real fun begins!
The best thing about WordPress is that it handles all the heavy lifting without you having to code.
There are hundreds of themes and plugins that WordPress has in its repository that allow you to customize the look and feel as well as the functionality of your website.
Let’s understand what these themes and plugins are.
WordPress Themes
A WordPress theme is a group of files that controls the overall appearance of your website. It includes graphics, style sheets, and several other types of file.
Themes control many things, starting with fonts, layouts, and overall color scheme.
All you need is an idea and some creativity, and these themes will help you create a website in minutes.
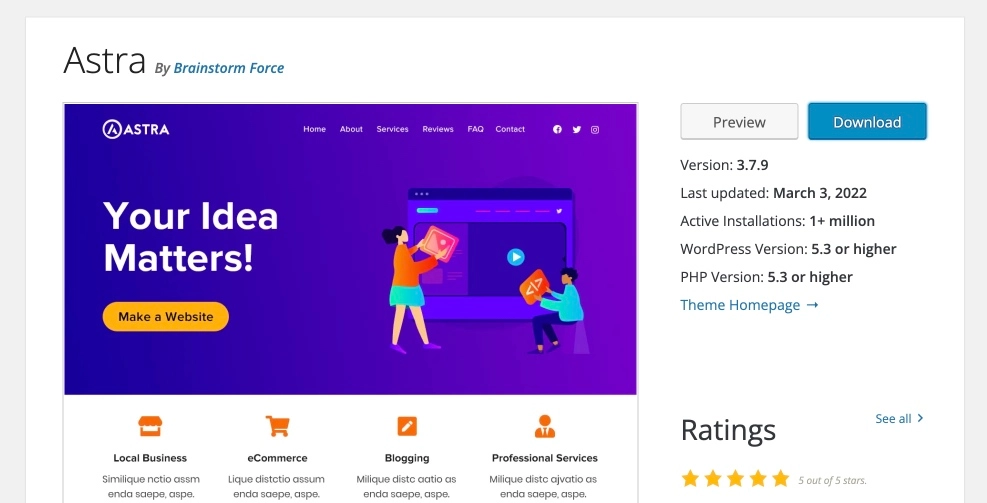
We recommend installing the Astra Theme.
It is built to deliver high performance and functionality and is very easy to use. It also comes with hundreds of website templates that help you create your website in minutes.
Whether you want to start a blog, a portfolio website, an eCommerce store, a business website, online learning portal, or a restaurant website, you can do it with the Astra theme!
It’s cost-effective, installs fast, and is entirely customizable.
We are a bit biased because it’s our theme. But more importantly, we suggest Astra based on the combined experience of over 1.6 million users.
We have active users worldwide who have blessed us with perfect 5-star ratings and incredibly positive reviews.
WordPress Plugins
A WordPress plugin is a piece of software that is an addon to your WordPress website. It extends the functionality of your website by adding features or improving features that are already there.
Think of a phone app you load onto your phone. It adds features like games or tools in the same way a WordPress plugin does.
For example, WordPress websites, by default, are not equipped with eCommerce functionality. But by installing the WooCommerce plugin, you can turn your website into an eCommerce website.
Read more: Check out the best eCommerce platforms for building an eCommerce store.
Whether you want to build a personal blog or a website for your restaurant, a simple contact form for customers to contact you, or a rich portfolio, there are contact form plugins, portfolio plugins and a plugin for everything you need.
It is estimated there are over 55,000 plugins to choose from the WordPress library.
You can use these themes and plugins to customize your website any way you want.
7. Prepare Your Content
Now that your website is set up, it’s time to create some content!
Content is what makes a website unique, interesting, and valuable.
You can talk about your business, highlight your customer stories or showcase your best products for visitors to see.
You can also create articles, blog posts, videos, images, or anything else you think would be helpful or interesting. Just make sure it’s high quality and relevant to your website’s topic.
The sky’s the limit for website content and design, so be creative!
8. Publish Your Website
Now that your website is ready, it’s time to publish it for the world to see!
Once your website is live, you can start promoting it on social media, through email marketing, or by advertising.
You can also create a blog and write articles about your website to generate traffic. The important thing is to get started and be consistent with your promotions.
Over time, you will start seeing results, and your website will begin to grow.
Chapter 3
Things To Do Before You Create a Website
Designing a website can be a fun process but it’s essential to do some preparatory work before you begin.
In this section, we’ll discuss some of the things you should do before designing your website.
We’ll identify your target audience, define your goals and create your website architecture.
By the end of this chapter, you’ll be able to build a website that is both beautiful and effective!
Define Your Target Audience
The very first step is to identify your target audience. You need to figure out who you are making the website for.
Ask yourself the following questions before you start building:
- Who is your target audience?
- Are they children, teenagers, or adults? What is the broad age group?
- Are they men or women?
- What is their income level?
- What is their education level?
- What language do they speak?
- What problems do you intend to solve with your website?
- Where do they hang out online? Is it on Facebook, YouTube, or another platform?
- What type of keywords might they be searching for in Google?
When you find answers to these questions, you will have clarity on what your ideal customers want.
This process takes time but makes creating a website much easier.
Define Your Goals
Now that you know who you’re making the website for, it’s time to figure out what you want the website to achieve.
- Do you want it to be a place where people can learn about your business?
- Do you want your website to generate leads?
- Do you want an online store where people can buy your products?
- Do you want a space where people can interact with each other?
- Do you want a platform where people can consume your content?
Your website’s purpose will determine its design, so you must take some time to think about what you want your website to achieve.
We have seen that most websites serve one of the following purposes:
Increasing Sales
If you want to increase sales, your website will need to be designed in a way that encourages people to buy your products or services.
You might need a website with eCommerce functionality — for example, shopping cart, checkout process, and payment gateway.
Attracting New Prospects
If you’re looking to attract new customers, you’ll need a website that’s optimized for search engines and contains relevant keywords.
This way, your website appears on particular search terms relevant to your industry and attracts interested prospects.
You’ll also need to include website content to explain what you do, why you do it, and what you can do for that new prospect.
Generating Leads
If you’re looking to generate leads, you’ll need a website that’s designed for lead capture.
This means content to explain what you offer and convince the reader to take action.
You’ll also need forms and opt-in boxes on your website so people can provide their contact information in exchange for something of value.
Once you are clear on what your website needs to do for you, you can decide the type of website you want to make.
7 Main Types of Websites You Might Be Building
If you have worked through the above exercises, you will have enough information and clarity on the type of website you want to build.
Here are seven broad types of websites you can choose from:
Business Website
A business website is built to promote a business and its products or services. You can add specific functions depending upon the type of business website you make.
For example, a restaurant website will require a table reservation feature, while a hotel booking website will require the option to book rooms.
Personal or Portfolio Website
A website to showcase your work, skills, or interests is called a portfolio website.
If you are an artist, freelancer, or have a personal brand of your own, then a personal or portfolio website is what you need.
Blog Website
A website where you regularly publish articles or write-ups on a particular topic is called a blog.
If you love to write and want to share your knowledge on a particular topic, a blog website will deliver.
eCommerce Website
A website that sells products and services online is called an eCommerce website.
If you want to sell physical or digital products, an eCommerce website is the best way to go.
Forum Website
If you want to build an online community or create support systems for your products and services, you could create a forum website.
Learning Management System
A website that allows you to create and manage online courses is called a Learning Management System (LMS).
If you want to create and sell online courses, an LMS is a perfect solution for you.
Multimedia Website
A website that hosts multimedia content is called a multimedia website. Some very good examples of this website are YouTube, Netflix and Spotify.
If you want to create a website where people can watch, listen, or read your content, you need a multimedia website.
Sure there are more than seven types of websites out there. But pretty much every website falls in one of these categories.
You can also combine these categories.
For example, you can build a business website with a portfolio or an eCommerce element.
You could also build a blog with a forum or a business website with an LMS.
One of the great things about WordPress is that you can build anything you like, in any form you like!
Create a Website Architecture
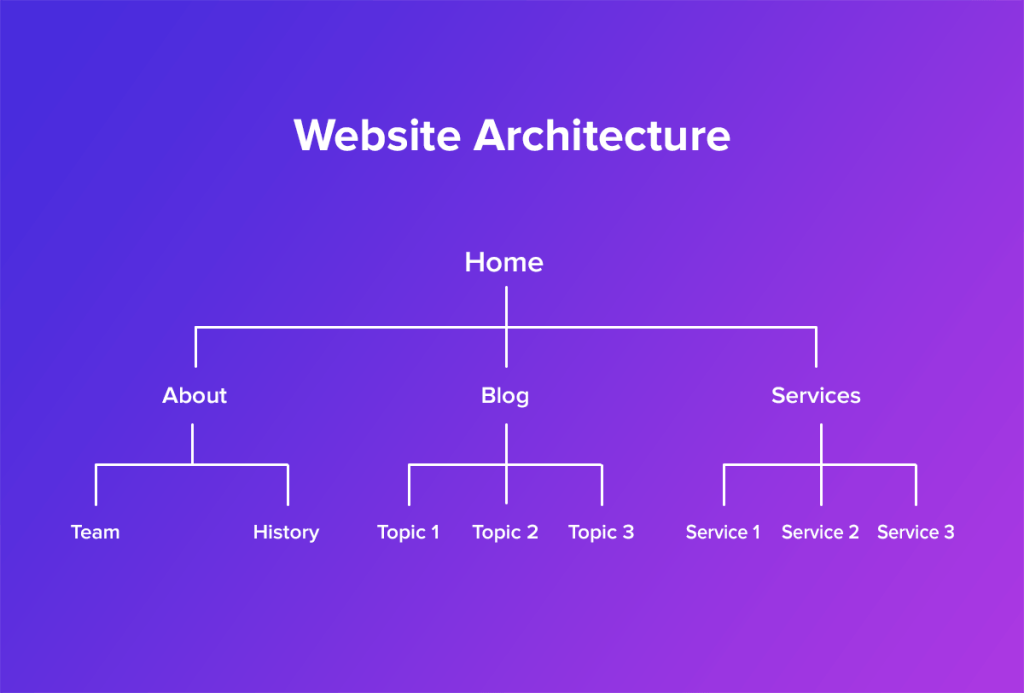
Your website architecture is the structure of your website. It defines the hierarchy, or how your web pages are organized.
You’ll see website architecture in action when you look at the navigation, typically at the top of the page.
Every menu item is a category that may have sub-categories underneath.
Navigation should be designed so it’s clear to anyone who lands on your website where everything is.
If you look up at our own navigation, you’ll see Starter Templates, Pro, Features, WooCommerce, Testimonials, and Pricing.
You’ll also see Blog, Docs, Log in to Account, Contact & Support and We’re Hiring menus.
All these labels should tell you exactly what to expect from each page so you know exactly where to go to find what you’re looking for.
There is no rule for hierarchy except simple is best.
This image shows a typical website architecture plan.
When creating your website, it’s essential to understand the basics of website architecture and design.
This way, you can create an easy site for users to navigate and find what they are looking for.
Having a well-designed website is essential for usability.
You need every user, of every ability to be able to instantly recognize where they are and where they need to go next.
Chapter 4
How To Create a Website (Step-By-Step Guide)
Now you have an idea of the theory, let’s start building a website!
In this section, we walk you through the process of creating a website from beginning to end.
We provide step-by-step instructions on how to choose a domain name and hosting plan, design your website, and more.
By the end, you’ll have a fully working website that has been customized to fit your brand and be ready to greet its first visitors.
Whether you are a beginner or an experienced web developer, this guide has something for you!
Step 1: Select Web Hosting and Domain Name
As mentioned previously, our recommended hosting is Hostinger so we’ll use it for this tutorial.
It offers very affordable hosting plans.
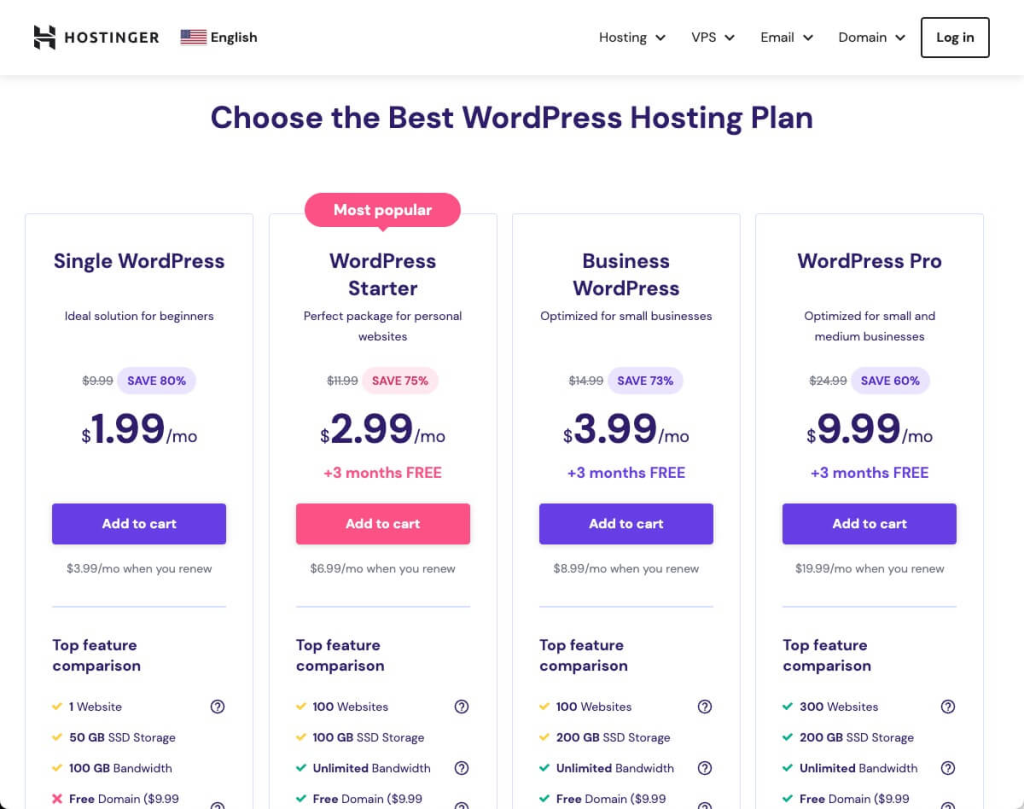
You can start using Hostinger for less than $2 a month if you pick the Single WordPress plan. That should be more than enough for a new or small website.
However, the WordPress Starter package is much more suitable if you’re starting out.
Why?
Because you’ll need a domain for your site.
And if you noticed, it’s included for free within the starter package.
This will save you the extra steps of buying the domain with another company and then having to connect the two elements.
This simplicity alone is worth it.
Plus this plan allows you to create up to 100 websites. Building websites is like getting a tattoo. Once you get one, it won’t be your last!
So head off to the WordPress hosting page, pick your desired package and add it to the cart.
There you’ll be able to choose a longer renewal period if you’re plenty confident that your website will come to fruition!
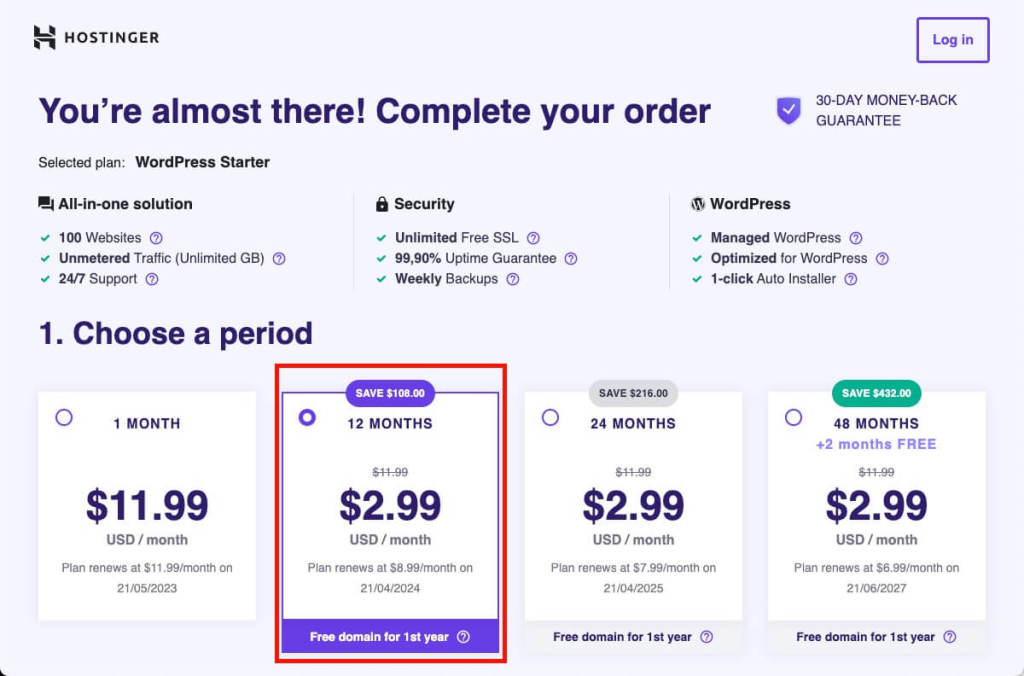
Scroll down a bit and you’ll find the form to create your account and make the payment.
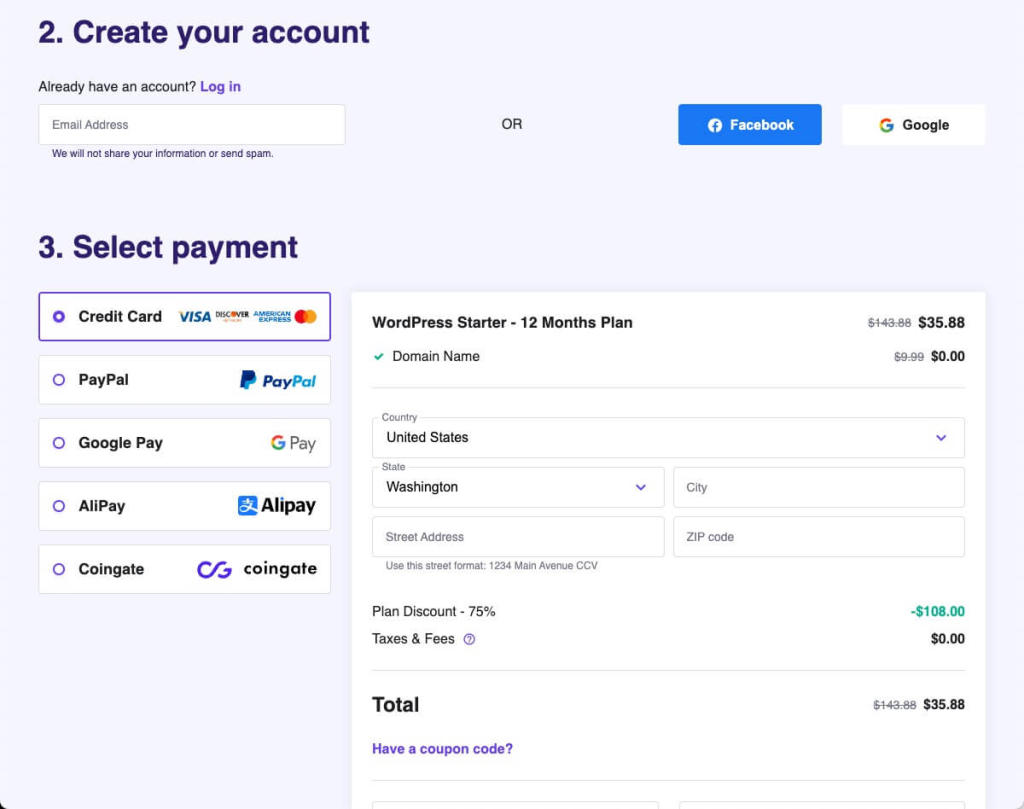
Once you have done this you’ll be able to log in to your personal dashboard.
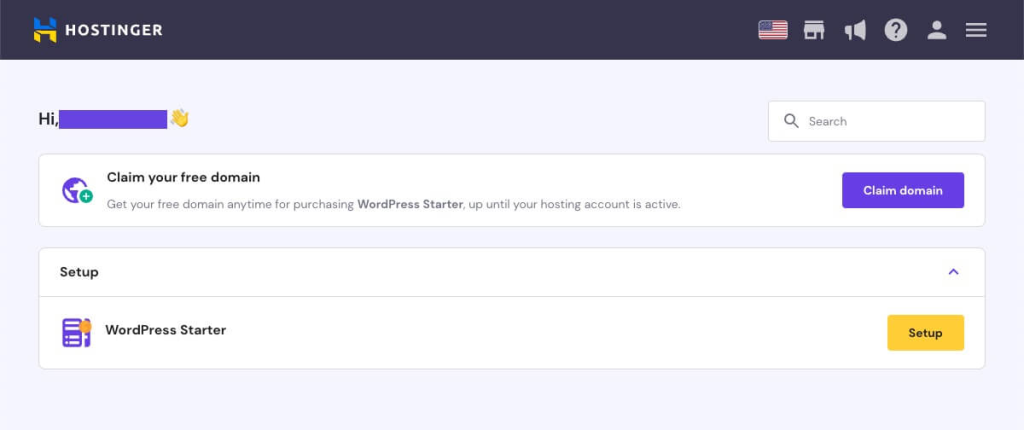
The first thing you need to do is claim the domain you’ve just got for free!
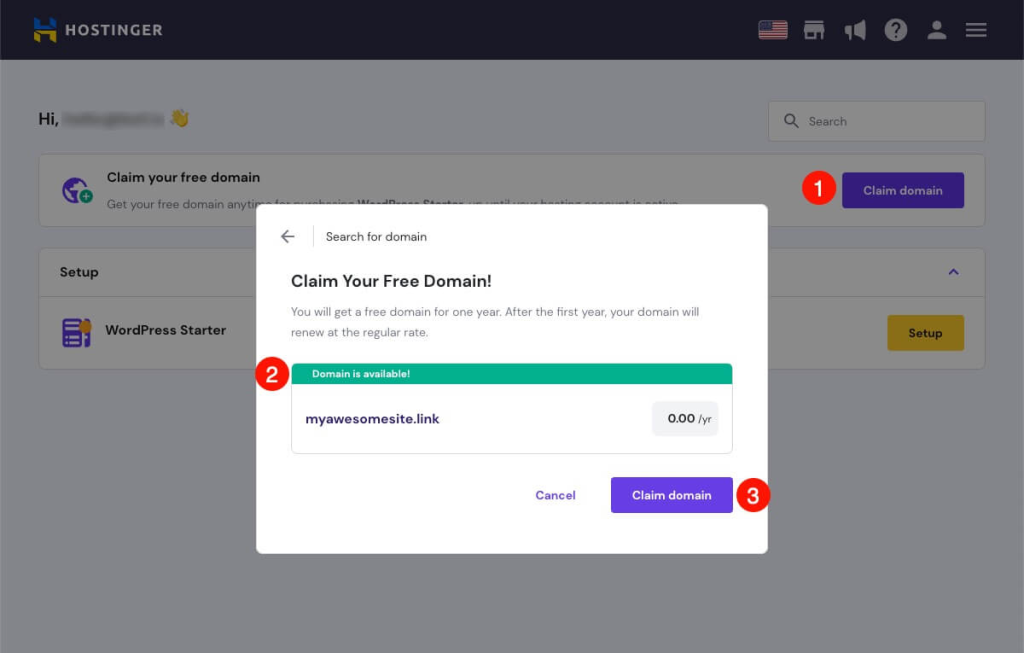
- Claim domain.
- Check availability.
- Done…
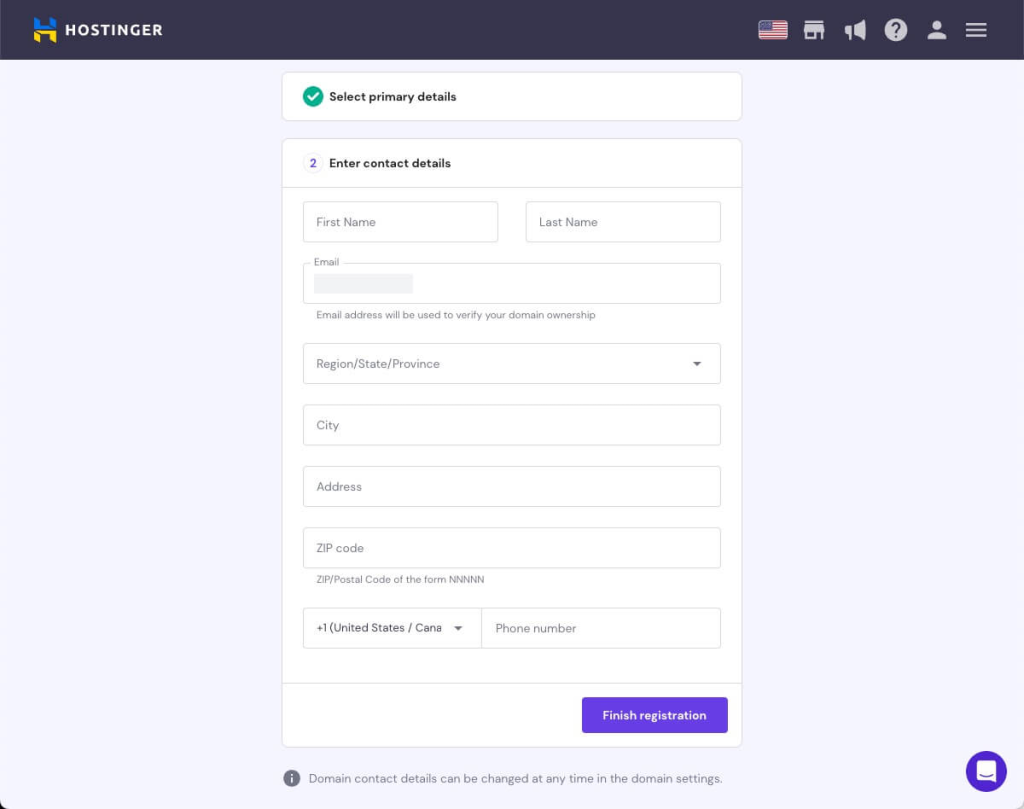
…Almost!
You’ll also need to add your contact details. This is a mandatory step for security reasons.
Step 2: Install WordPress
Once you’ve done that you can start installing and setting up WordPress.

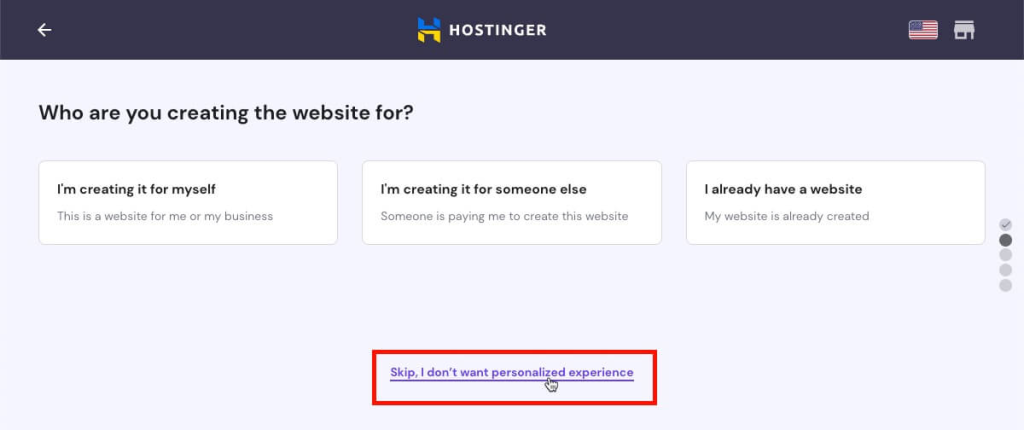
Hostinger offers a personalized set up experience depending on your profile.
You can skip this step and go directly to your WordPress account settings if you prefer.
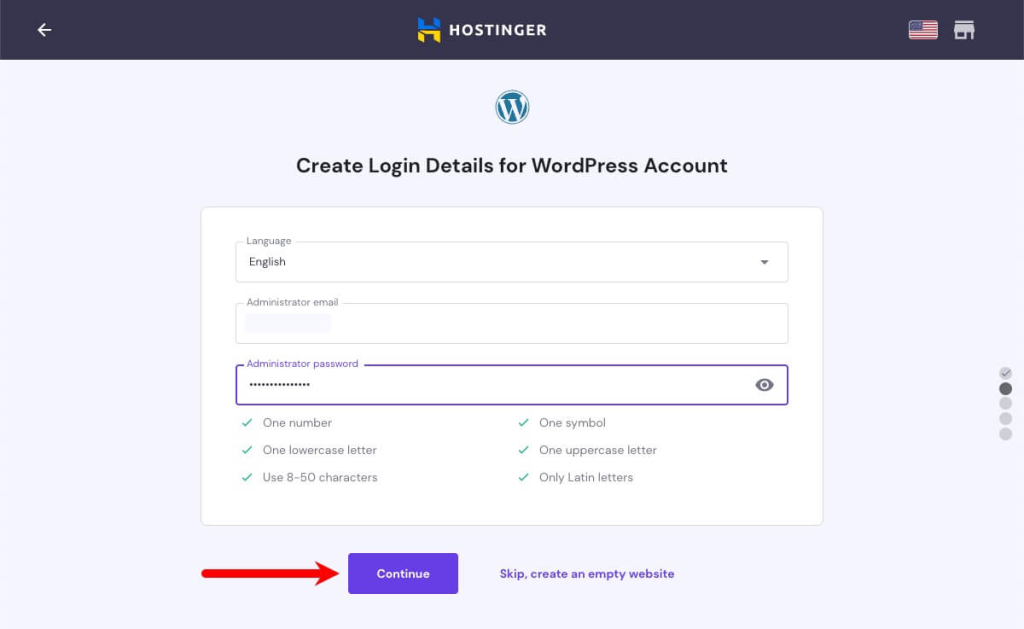
Creating a WordPress account at Hostinger is as simple as signing up with a username and password and clicking continue.
During setup, the wizard will let you install additional plugins.
You can do this later, so the easiest thing to do is to click on “Skip, I’ll manage plugins later”.
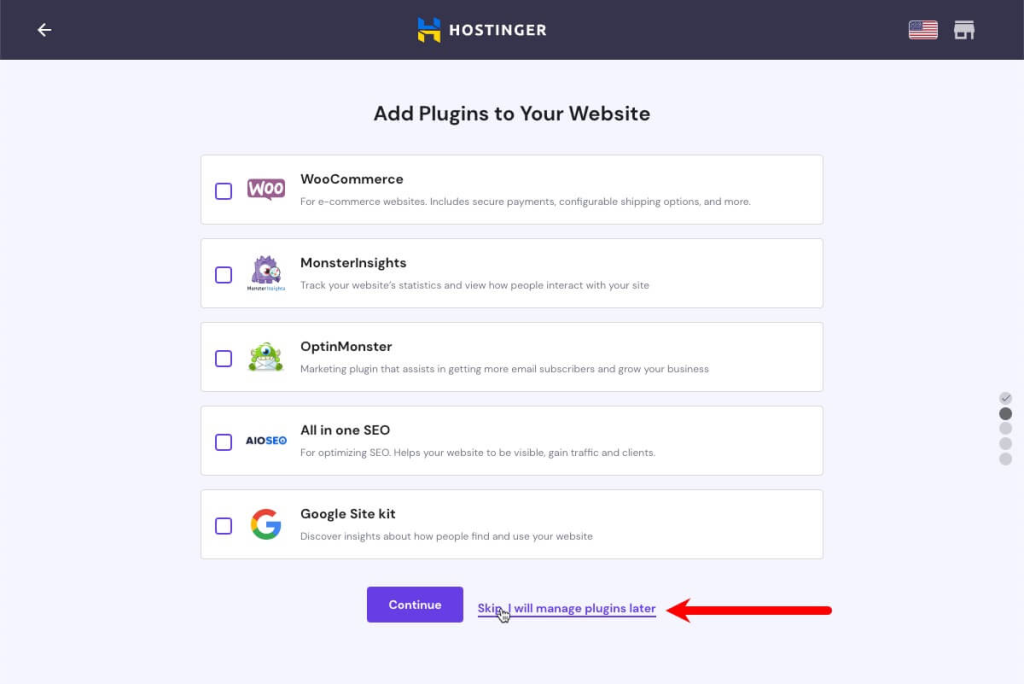
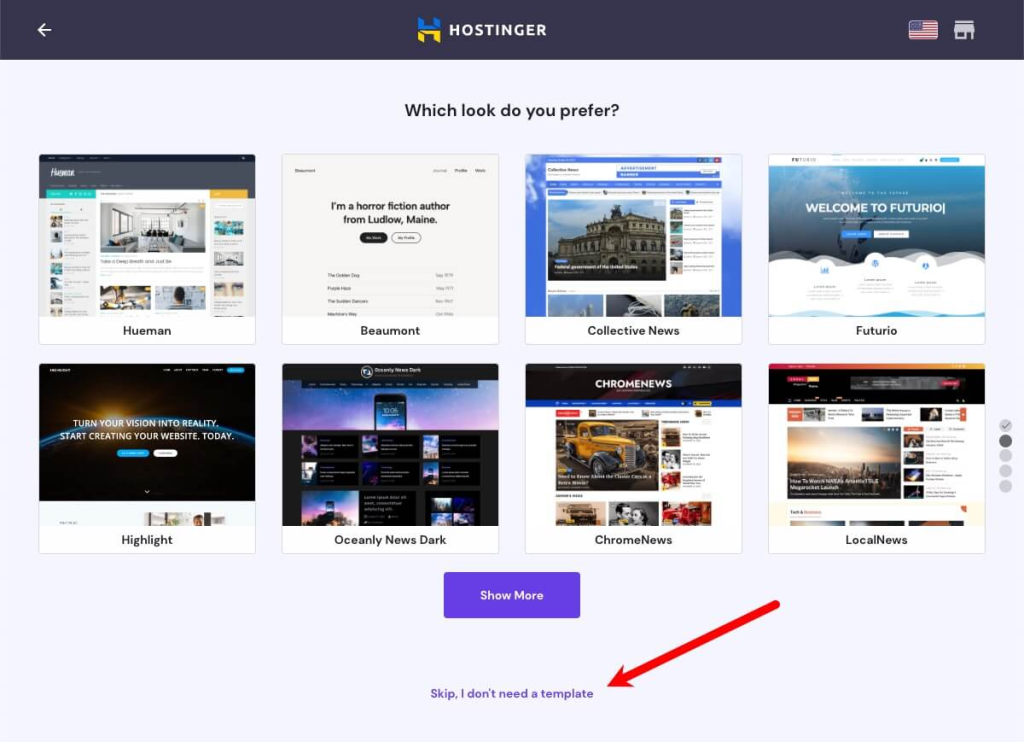
Something similar happens with the theme.
Skip it for now, our step 3 in this guide explains this in more detail so you can learn how to do it on your own.
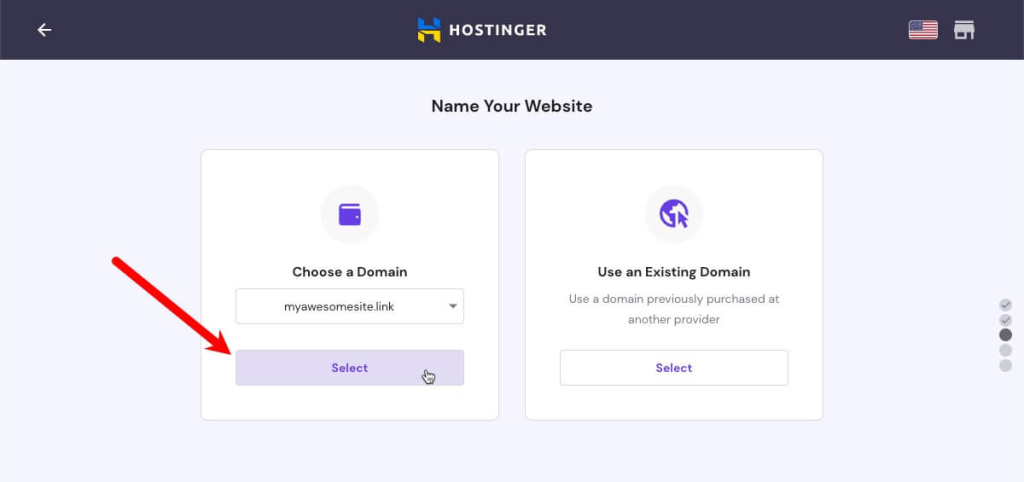
Now it’s time to connect the WordPress installation and the domain.
If you have followed our recommendation and purchased everything together on Hostinger this will only take you a click.
In this last step you should check that everything is in order. This includes the location of the servers where your website will be hosted.
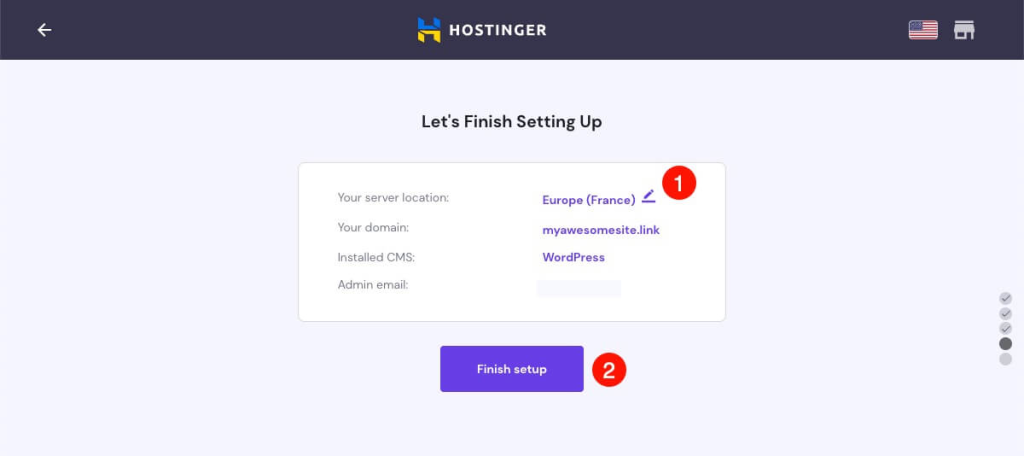
For example, if you expect that most of your visitors will come from the United States and not from Europe, choose that location to gain a small speed boost.
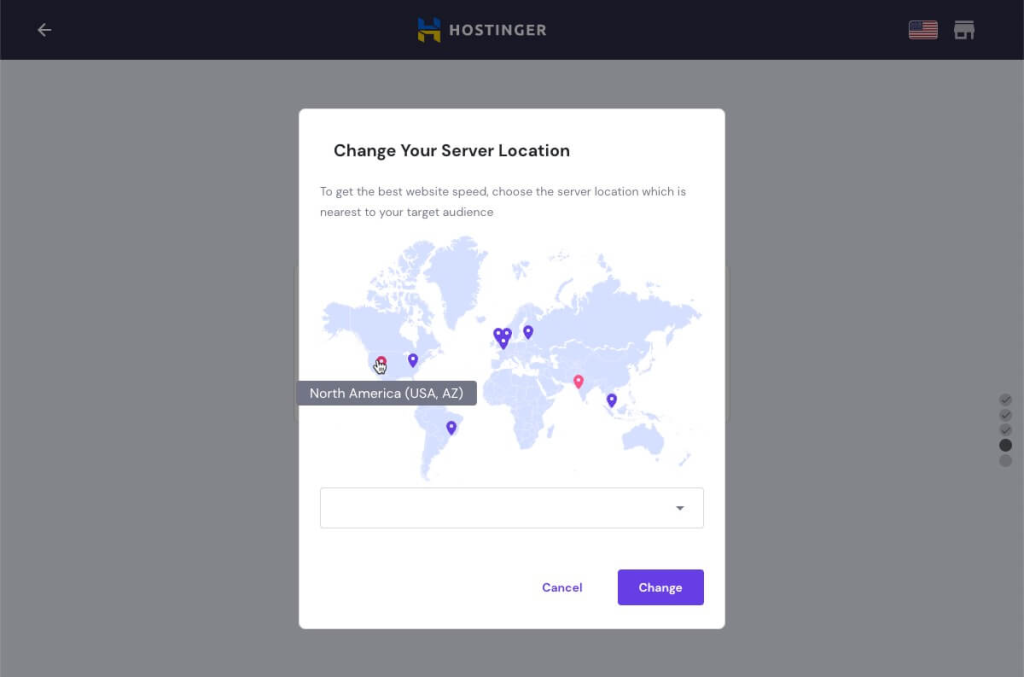
Don’t worry, it’s a more advanced concept that is not relevant right now.
So just click on “Finish Setup” and let Hostinger work its magic!
After a moment everything will be ready!
Hostinger’s control panel is very useful. You’ll soon appreciate the time they invested designing it!
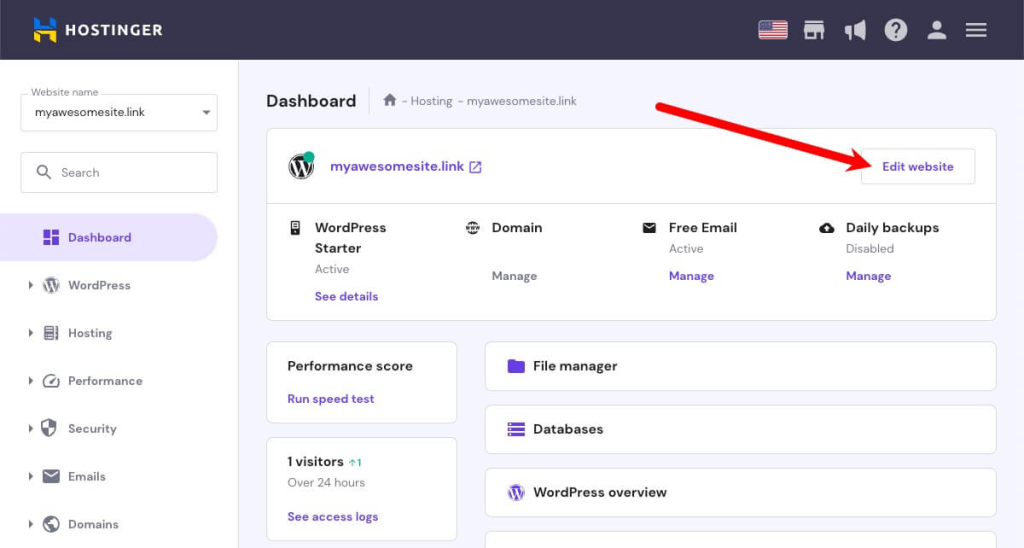
For now just click Edit Website to open the WordPress admin panel.
Using the credentials you defined in one of the previous steps, you can log into your WordPress site and continue with the guide.
Step 3: Install a WordPress Theme
Congratulations, now you finally have your own website!
However, it’s not ready for your business yet. It looks like this 👇🏼
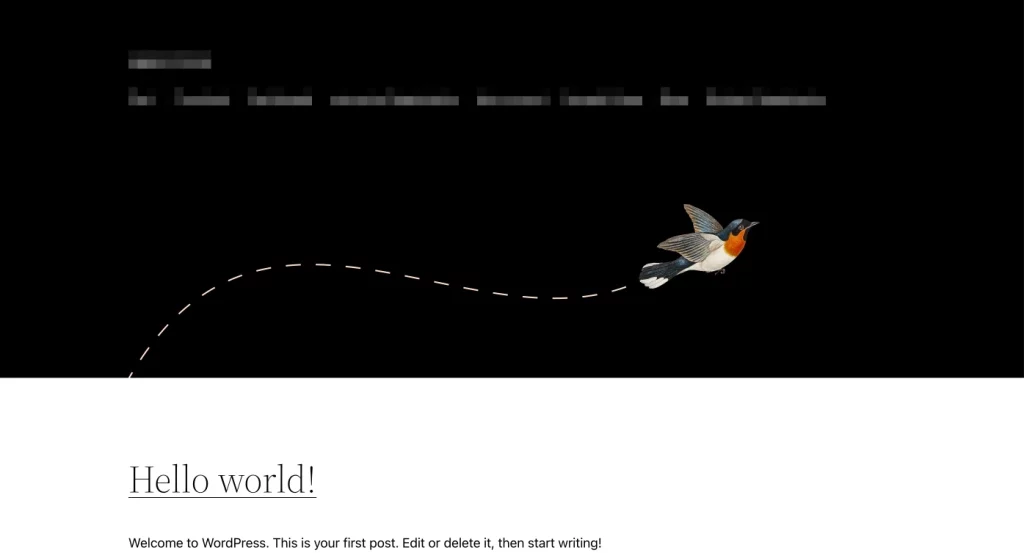
This is the default theme added by WordPress.
Now, it’s time to customize it.
The first step is to find and install a theme.
From your WordPress dashboard, navigate to Appearance > Themes.
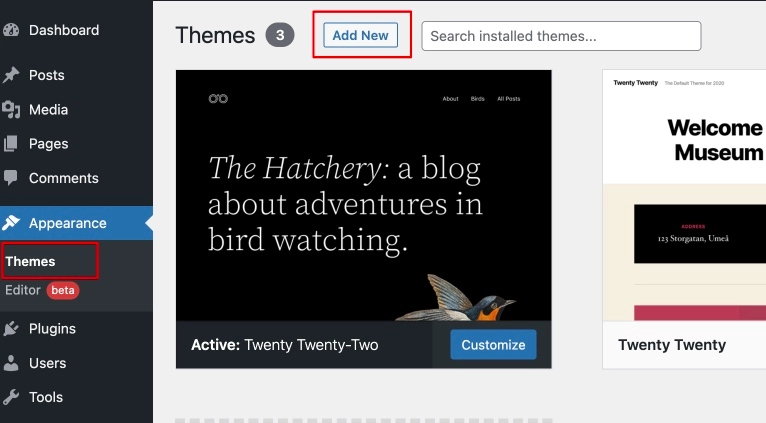
You will see the default WordPress themes there. Now, click on the Add New button from the top left to add a new theme.
You can choose to upload a premium theme you purchased or search for a free theme inside WordPress Dashboard.
We recommend going with the free Astra theme and getting started right away.
Search for Astra in the search bar. You will see the Astra theme appear as the first search result.
Here, click the Install button.
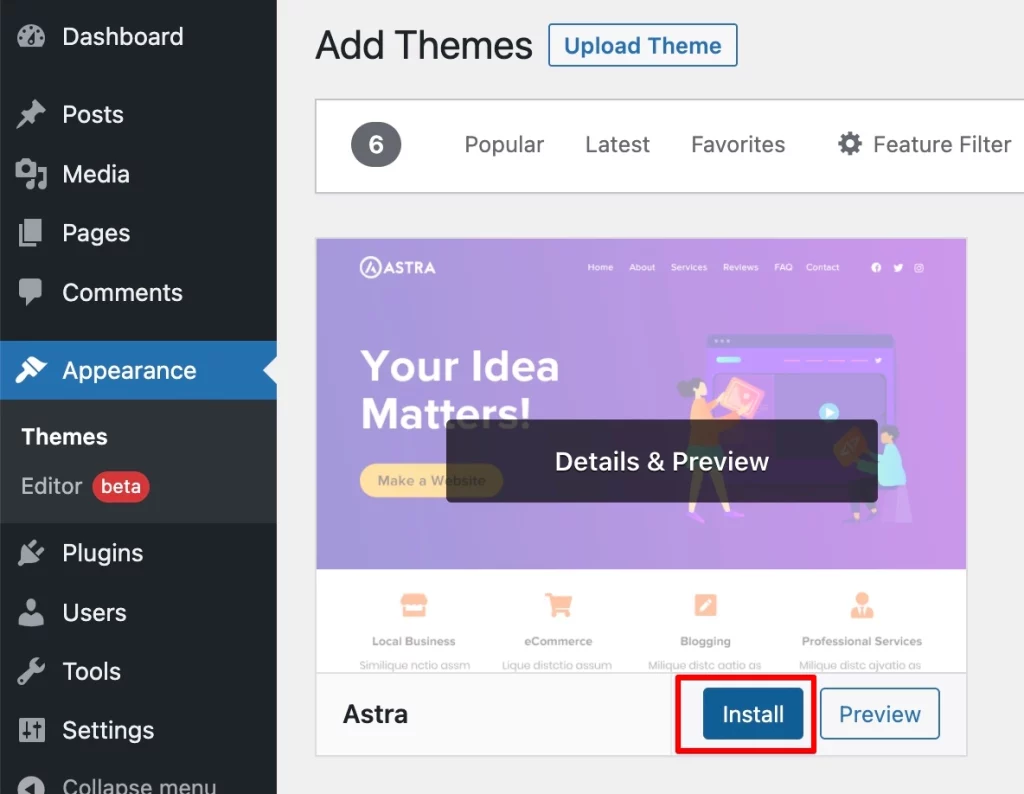
In less than a minute, the Astra WordPress theme will be installed.
Once it gets installed, the Install button will be replaced with Activate. Click on it to activate the theme.
Step 4: Import a Readymade Template
The best part about using Astra is that you can import ready-made websites with the Starter Template plugin.
To do this, go to Astra Options in the Appearance tab and select Install Importer Plugin from the right.
You can also install Starter Template by searching for it in the WordPress repository.
To do so, go to Plugins > Add New and search for Starter Templates by Astra.
Next, install and activate the plugin just like you did with the theme.
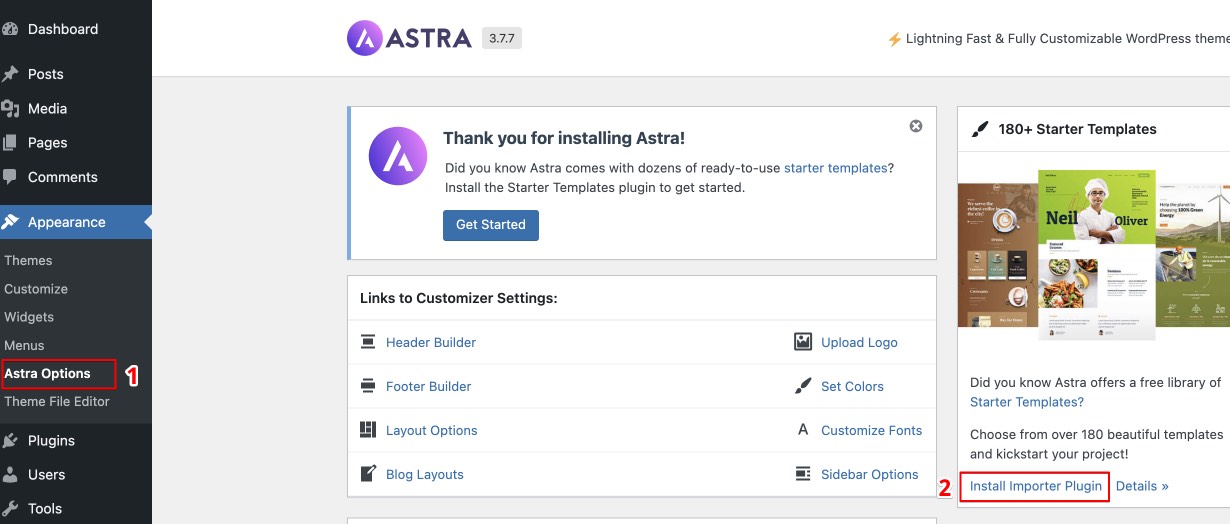
This will open up the site installation wizard to start importing a readymade site.
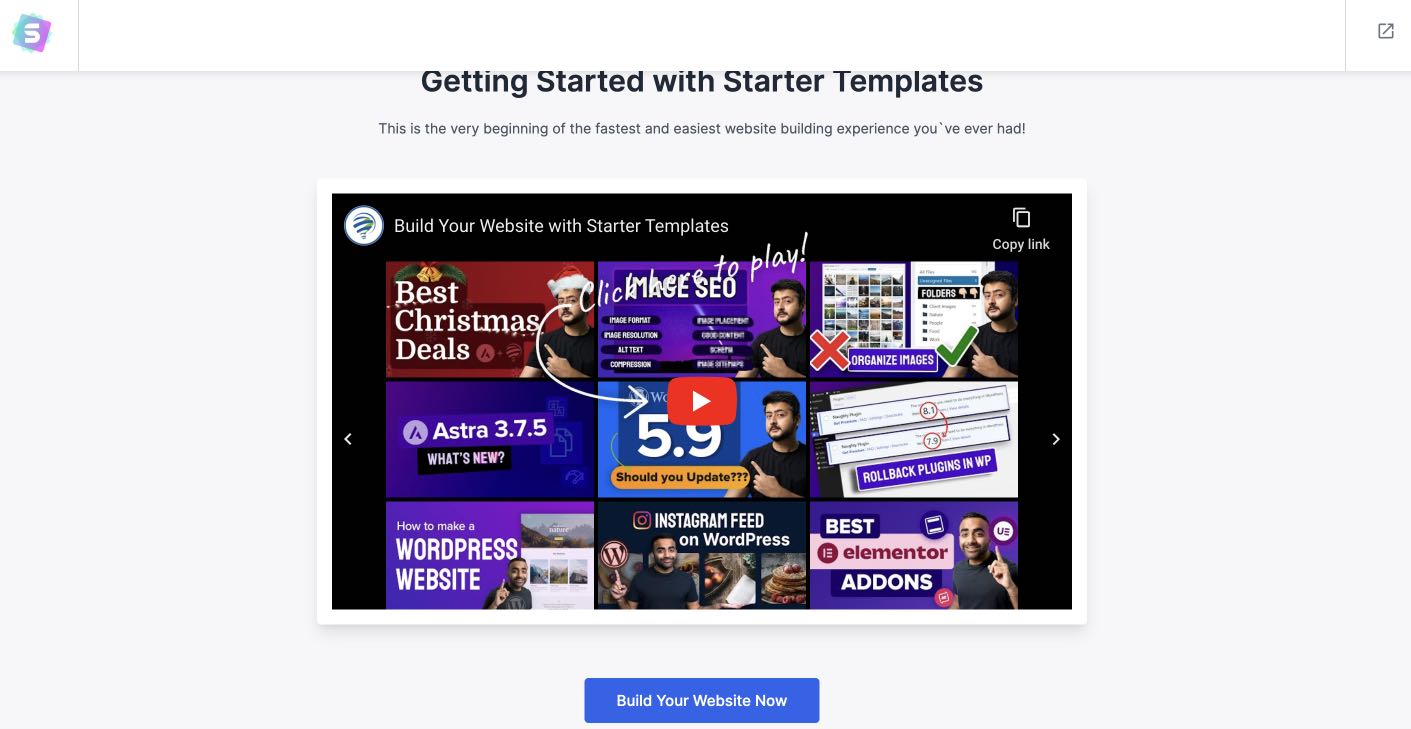
Click Build Your Website Now.
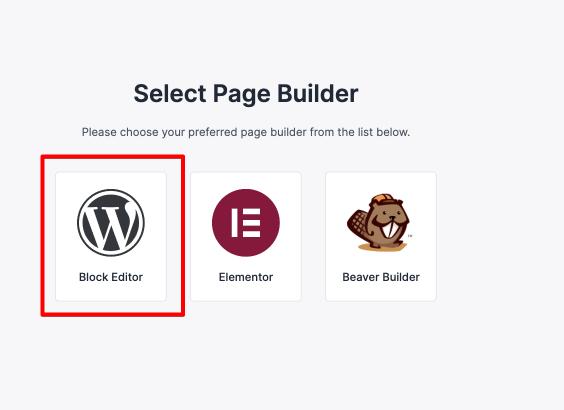
Next, select the page builder you want to build it with. In this case, let’s go with Block Editor.
The Block Editor, also known as the Gutenberg editor, is WordPress’s own product that helps you build websites.
It is lightweight and delivers the highest performance compared to other page builders.
In the next tab, you will have many pre-built templates ready to be installed on your website.
From here, you can select any template you deem fit to be similar to your website.
For this example, let’s select the Portfolio & CV option from the list.
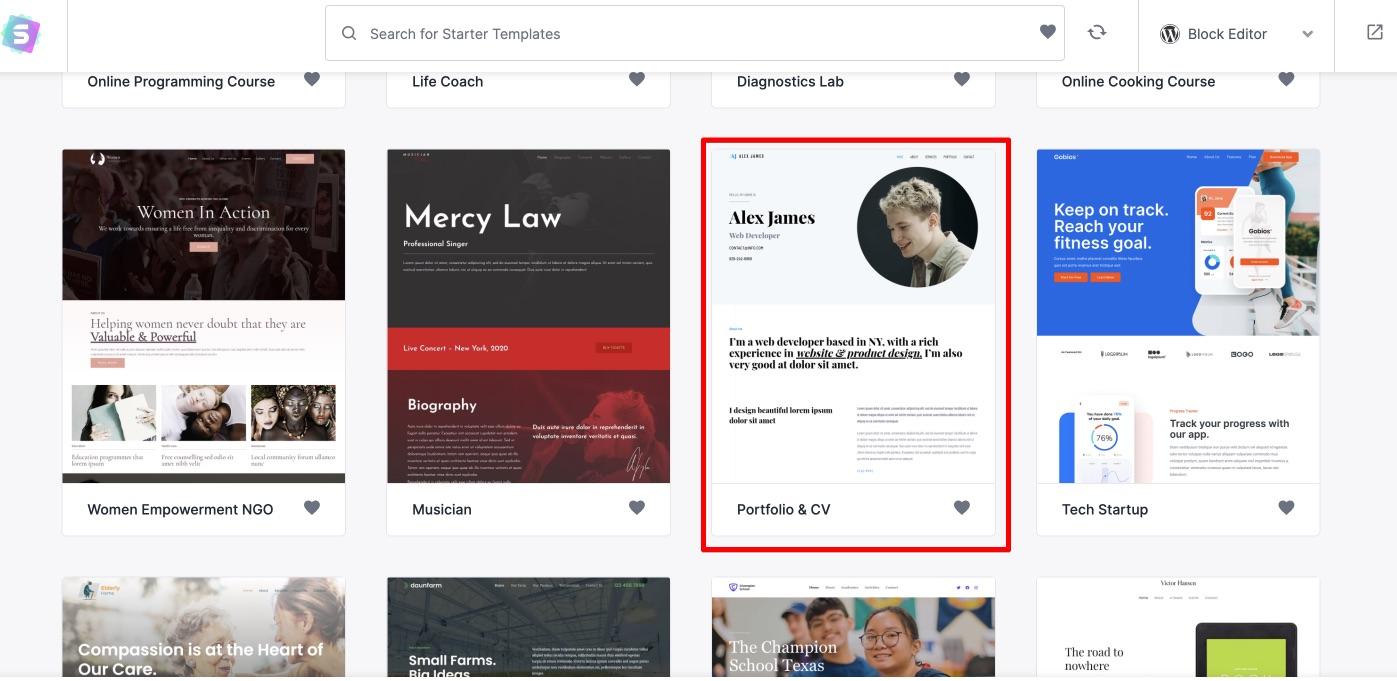
Similarly, you can select the template you want to install and select to preview it.
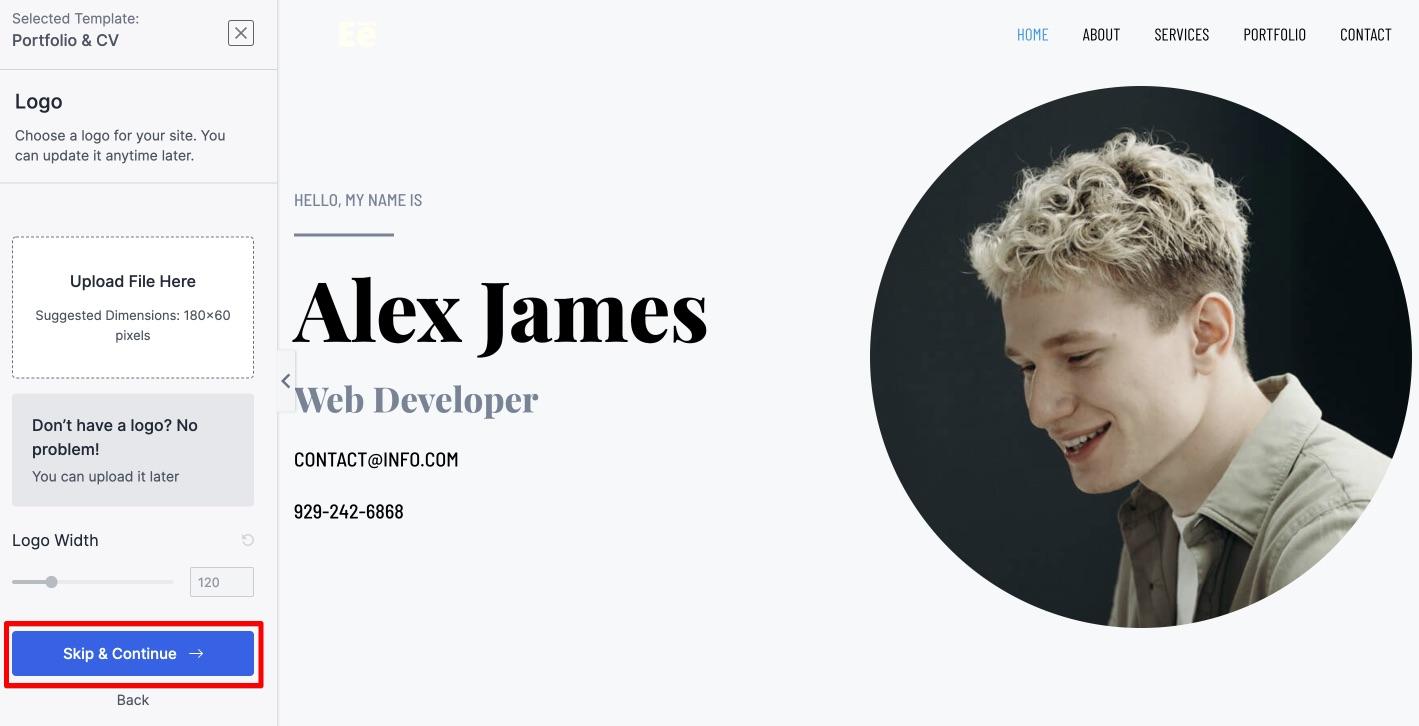
Make sure it works for your needs and install it when you’re ready.
Add a logo if you have one, otherwise, click Skip and Continue.
In the next step, you can edit the color scheme and typography of your website.
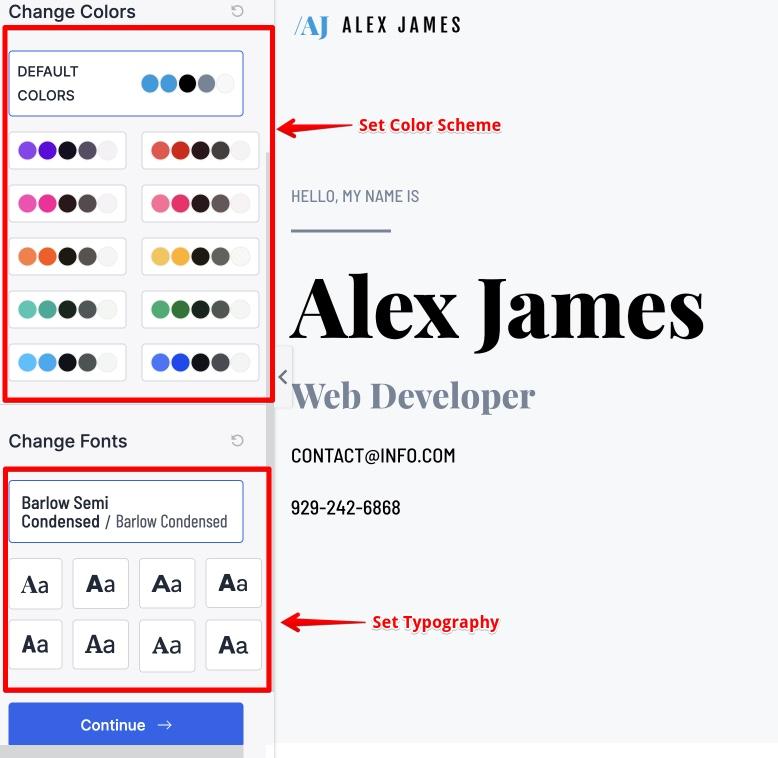
You can play around to see which one works best for you. You can change all of these later as well. Click continue to move to the final step.
Next, just fill in a few details and click on Submit & Build My Website.
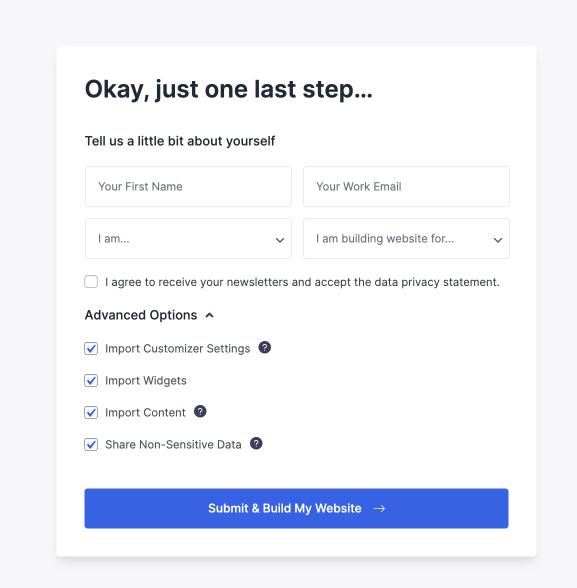
Starter Templates will start importing the website.
Now, you’re ready to make small changes to call it your own!
Step 5: Install Essential Plugins
Once you have imported the website, its time to install essential WordPress plugins to have more functionality in your website.
For example, if you want to build a restaurant website, you cannot always do that with default WordPress functions.
You will need additional functionality such as booking dates or tables, a contact form, a menu, a map to show the restaurant location, and other essential features.
To install a plugin, go to Dashboard → Plugins.
You’ll see that the starter template has already been imported some of the plugins that your website needs.
The Starter Templates plugin as you must know by now. helps you import ready-made website templates.
Spectra plugins adds more functionality to your WordPress block editor.
To add a new plugin, click on the Add New button on the top.
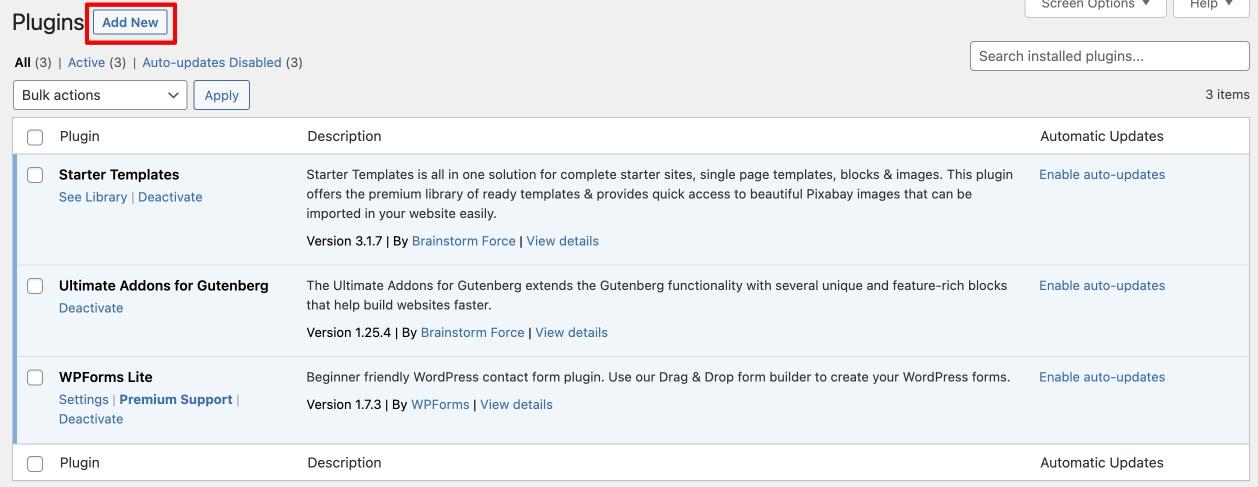
Next, you’ll land in the WordPress repository. You can search for any plugin you need and install them from here.
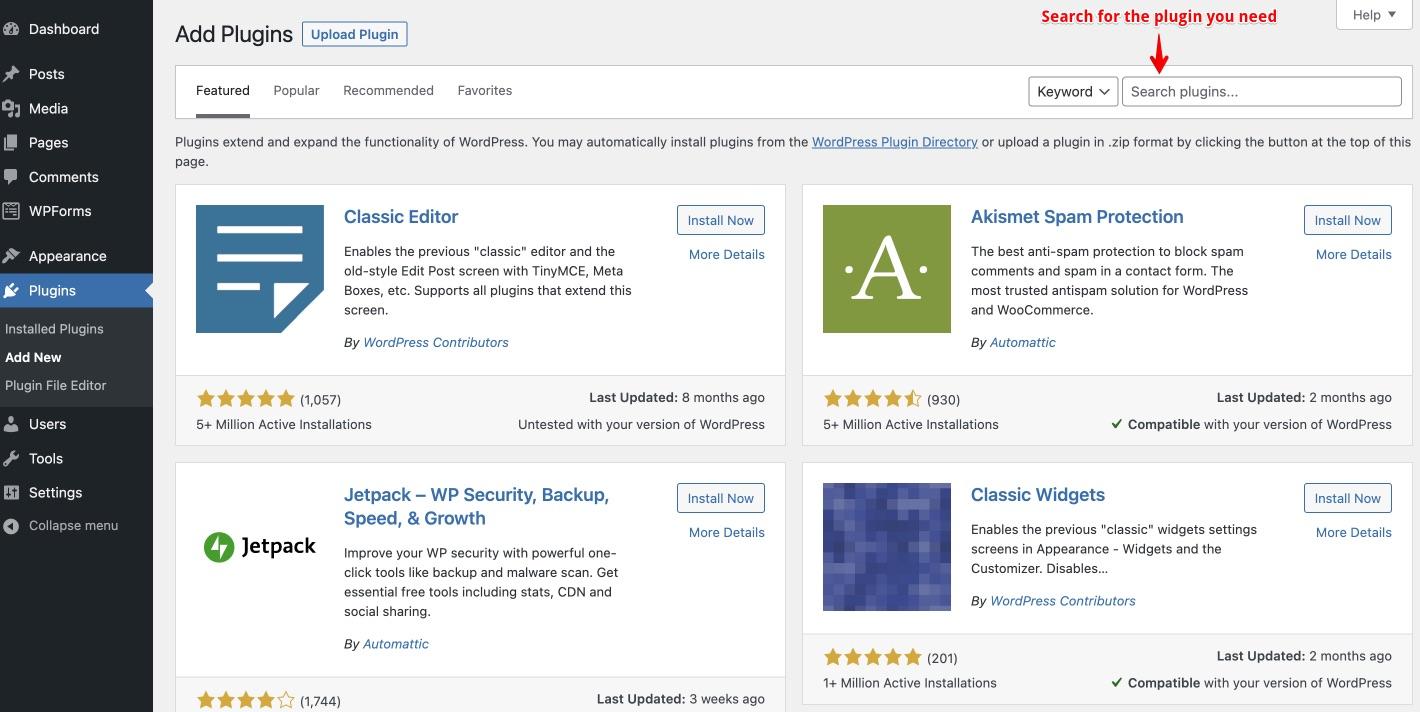
Once you find the plugin that you need, click on Install and then Activate to add it to your website
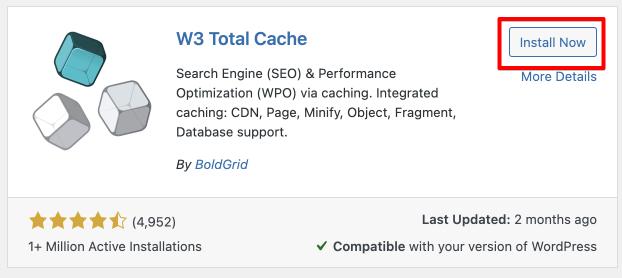
We recommend installing five different types of plugins to help improve the performance and security of your website.
- Caching Plugins: Caching plugins help you optimize the speed of your website.
- Image Optimization Plugins: These plugins help you compress the images on your website, helping you increase the site speed and reduce the load on your hosting.
- Security Plugins: Security plugins help keep your website secure against cyber-attacks and malware.
- Search Engine Optimization (SEO) Plugins: SEO plugins help your website rank higher in search results and help bring in more traffic to your website.
- Back up Plugins: Back up plugins keep your website backed up in case something goes wrong.
You can also install the plugins we recommend to have the best performance using the same steps.
Step 6: Customize Your Website
Let us see how you can customize your WordPress website consistent with your branding (all without ever writing a single line of code).
Head over to your WordPress Dashboard and click Astra
You will see the following page where you can pick and choose what to customize.
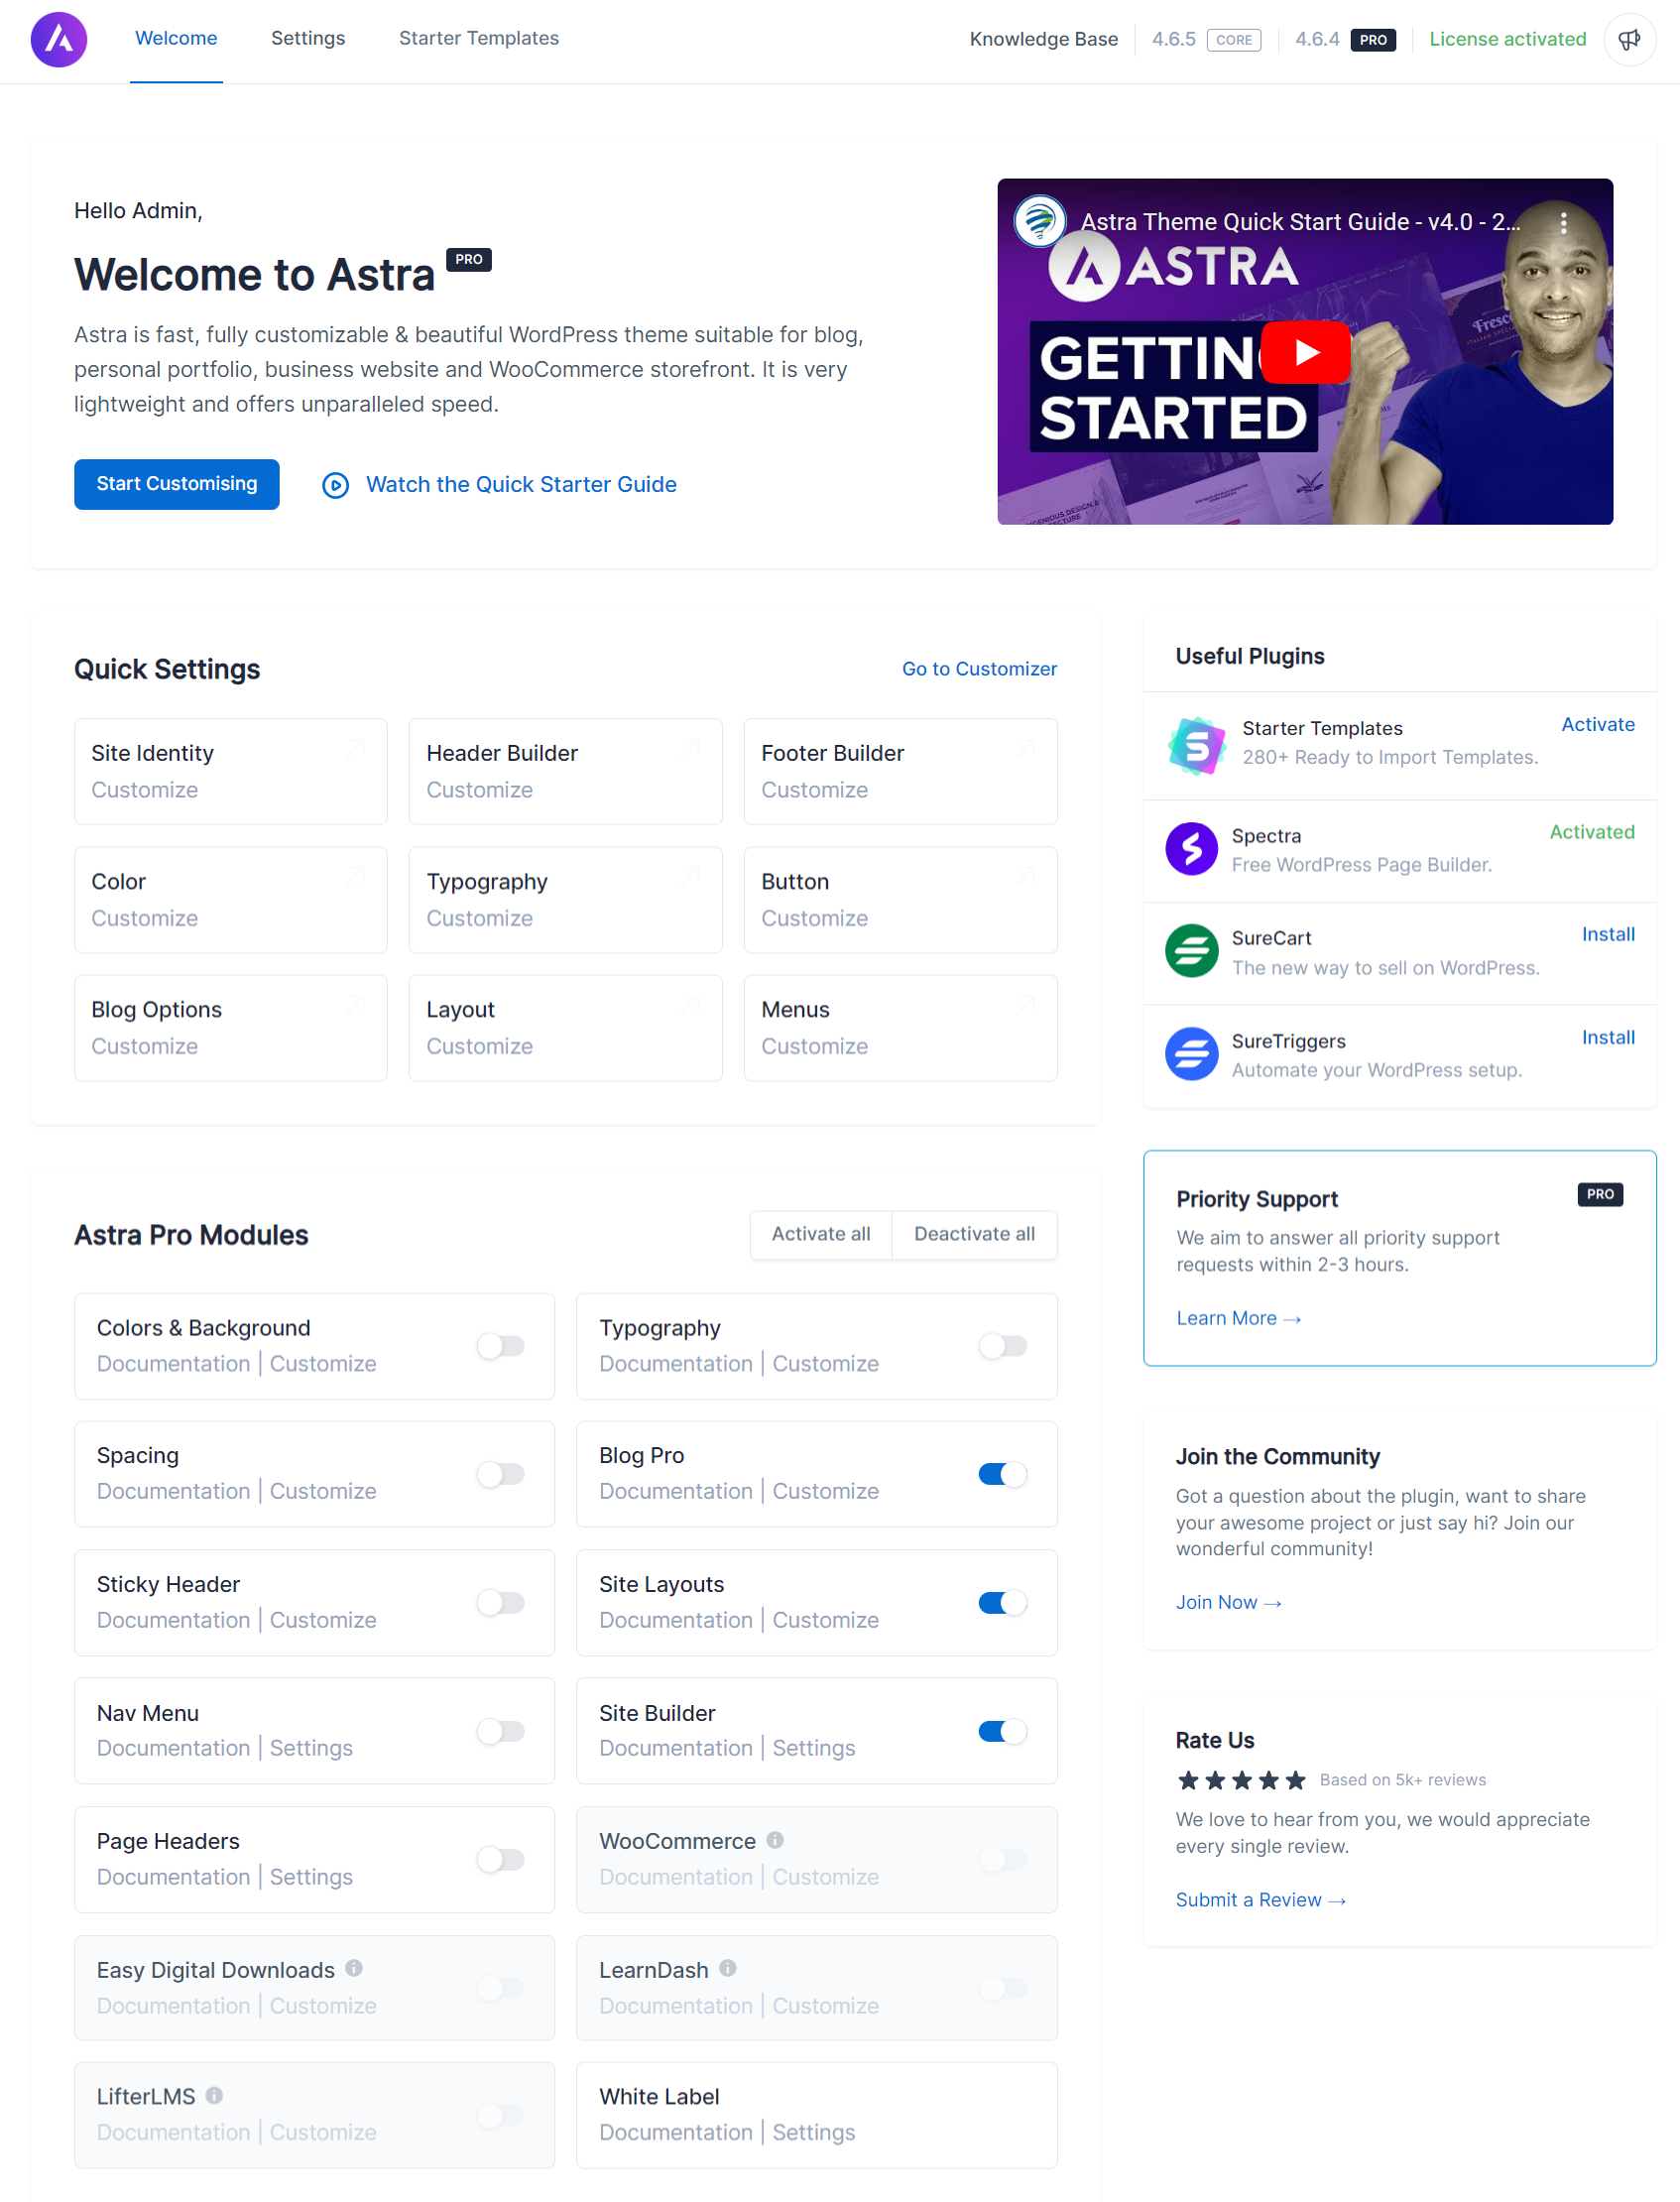
Here you can customize all the basic elements of your website under Quick Settings.
- Site Identity
- Header Builder
- Footer Builder
- Color
- Typography
- Button
- Blog Options
- Layouts
- Menus
Site Identity
If you didn’t want to upload a logo during Starter Template installation, you should do so now. After all, your logo is the identity of your brand and therefore, your website.
If you don’t need a logo, skip this step.
If you don’t have a logo, you can easily create one for your website by using FreeLogoDesign or Canva.
If you don’t have an eye for design, you can hire a professional from Upwork or Fiverr.
Once it is ready, you can upload the logo to your website.
To do so, navigate to Astra. Under Quick Settings, click on Site Identity. This will take you to the customizer where you can upload the site icon, logo, and add site title.

You can change the logo position, width, and appearance as well.
Once you are happy with the settings, hit the blue Publish button on top to make the changes live.
Update Website Colors
You might already have brand guidelines for your business, and you want to make sure that your website is consistent with those brand colors.
Or you may have a specific design in mind. Now let’s bring it to life.
To do so, navigate to Astra. Under Quick Settings, click on Color link.
From here, you can set the colors you want to have on your website.
The Global Color Palette is useful because you don’t have to set the colors again and again.

Take a look at this video which shows all the color changes you are able to make on your website.
You can also see the changes visible on your website through the Live Preview.
Once you are happy with the changes, click the Publish button to make the changes live.
Update Typography
If you have a specific font in mind, you can add that to your website as well.
With the help of the Astra options, you can add fonts and control the font sizes of every element on your website.
Even if you don’t have style guidelines, you can always find the fonts we have added through the Starter Templates plugin.
To do so, navigate to Astra. Under Quick Settings, click on Typography.

You will land in the Typography Customizer section, just like this.
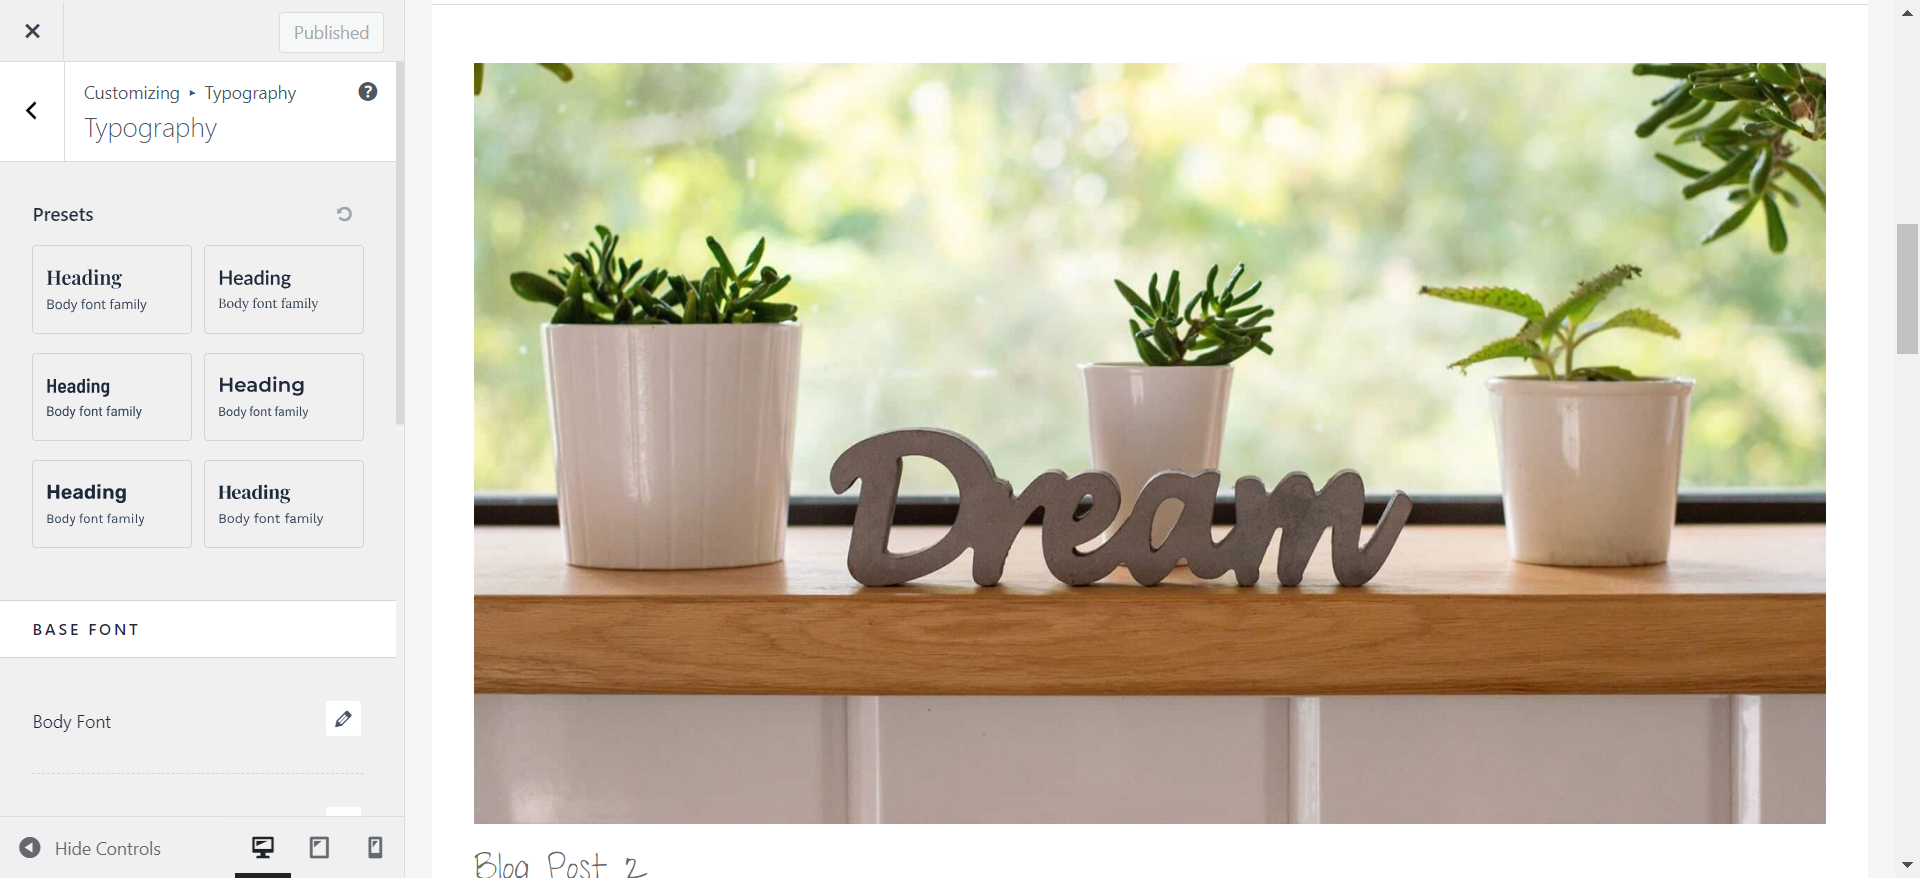
Global Typography makes it easy to create a consistent look for your website.
You can edit the preset font, change sizes based on heading and body text styles with ease or add different fonts that you like – all in one place!
Take a look at this video – we show you some of the typography changes you can make using our customizer.
Once you like the changes in the typography, hit Publish to make the changes live.
Updating Layouts
Page layouts are pre-designed sections or pages with content that you can replace, edit and customize in your website.
Basically page layout is how you want your page to look, to your visitor.
To set the layout of your pages, navigate to Astra. Under Quick Settings, click on Layout.

Here you can see all the available layout settings.
You can increase or decrease column width and pick the type of layout you want for your blog posts.

You can also see all the available options to update the look and feel of your WordPress website.
See the changes taking place in the preview and make sure to hit the blue Publish button to make the changes live.
Step 7: Create a Web Page
It’s really easy to build a page using WordPress. In this step, we will show you how to build one from scratch.
Create a Page and Give It a Name
- Navigate to Pages > Add New.
- Add the page title that you want on the top of the page (where we have written “Your WebPage Title.”)
You can add or disable any of your page elements and customize them as well. Just click on the Astra button on the top right corner, and you’ll see the options.
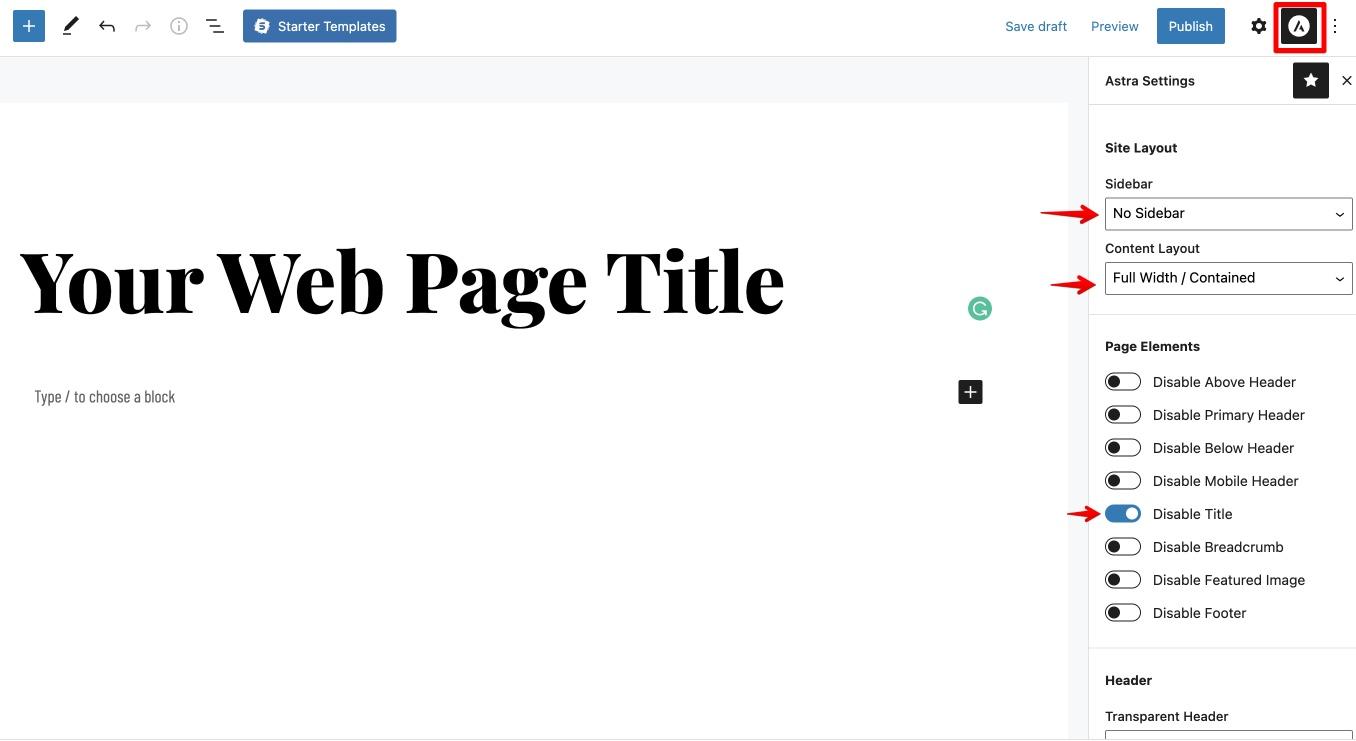
For this tutorial, here are the settings that we will be using the following settings.
- Title: Disabled
- No Sidebar
- Full Width, Contained content layout
You can play around with these settings and see which one works best for you.
Add a Page Banner
Here’s how to create a beautiful page banner with texts and buttons.
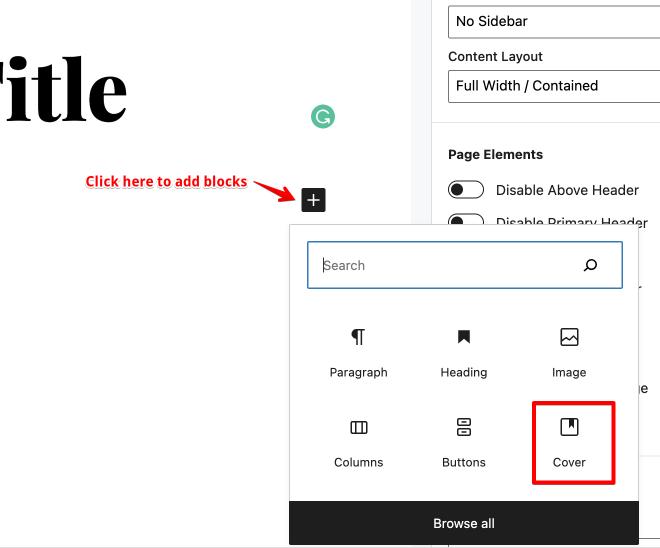
1. Click on the “+” button to add blocks.
2. Search for the Cover block and add it to the page.
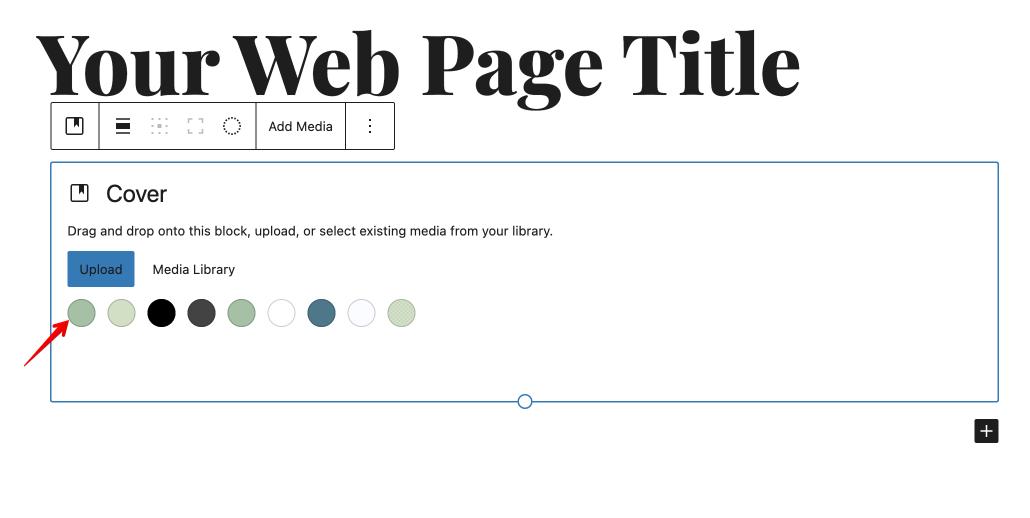
3. You can choose to upload an image as a banner or add a background color. For this example, let’s just pick a color.
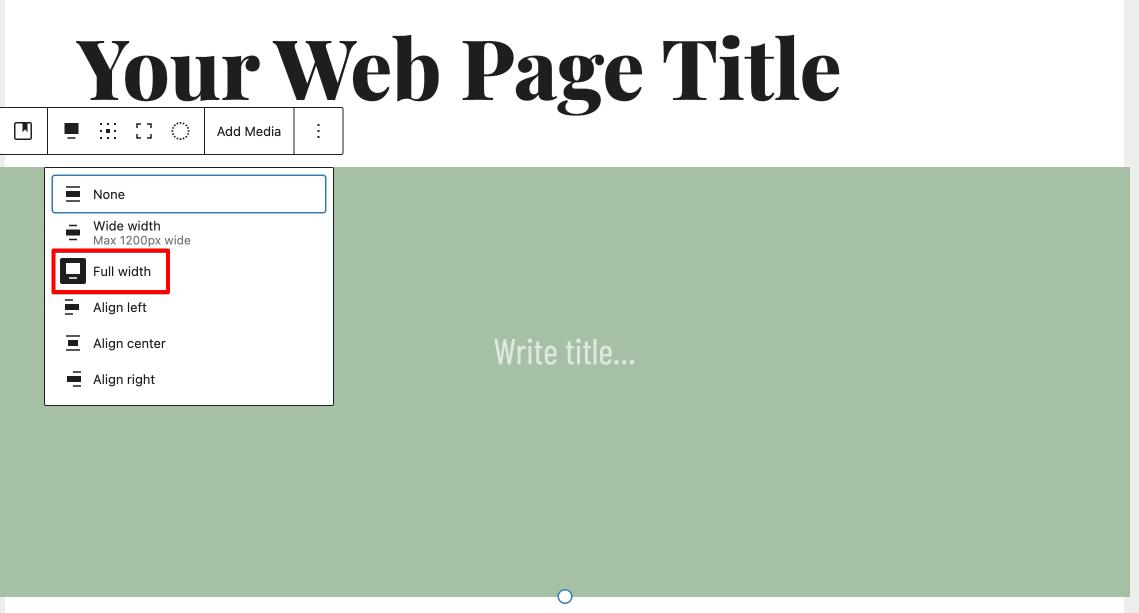
4. Click on the alignment button to make it full-width.
5. You can add a headline for the page by editing the part where it says Write title…
6. To add another block inside the cover, hit Enter on your keyboard. Here you can add any element that you want.
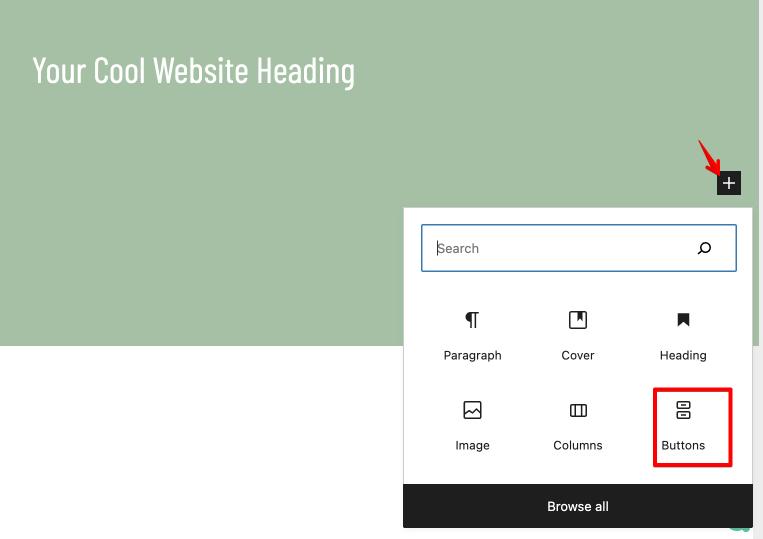
Let’s go with a button.
7. Choose Buttons to add a button below your page headline.
8. Don’t worry if it seems like the button is not at the center. Click on the button and choose the Align Center option from the alignment icon.
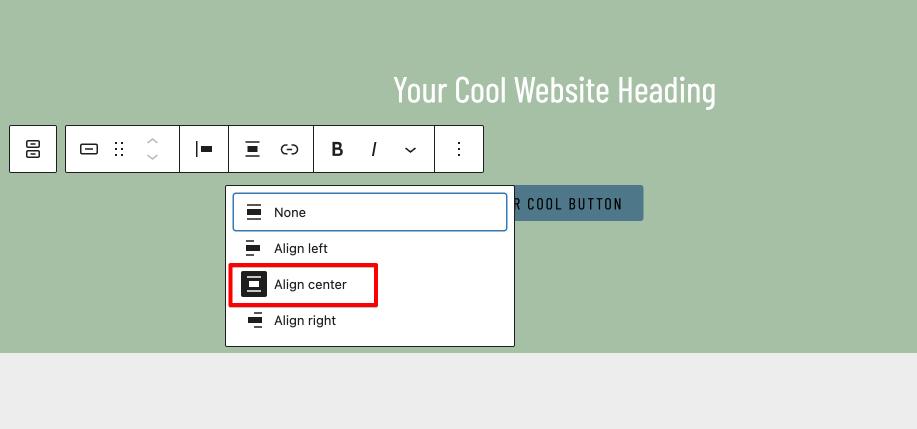
9. You can add an action to the button by clicking on the link icon. You can add a link to another page or form.
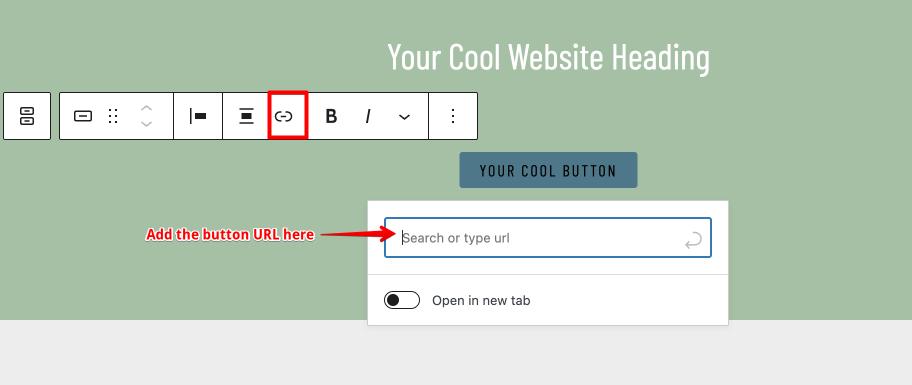
10. Hit Preview to see what your website looks like.

Looks cool, right?
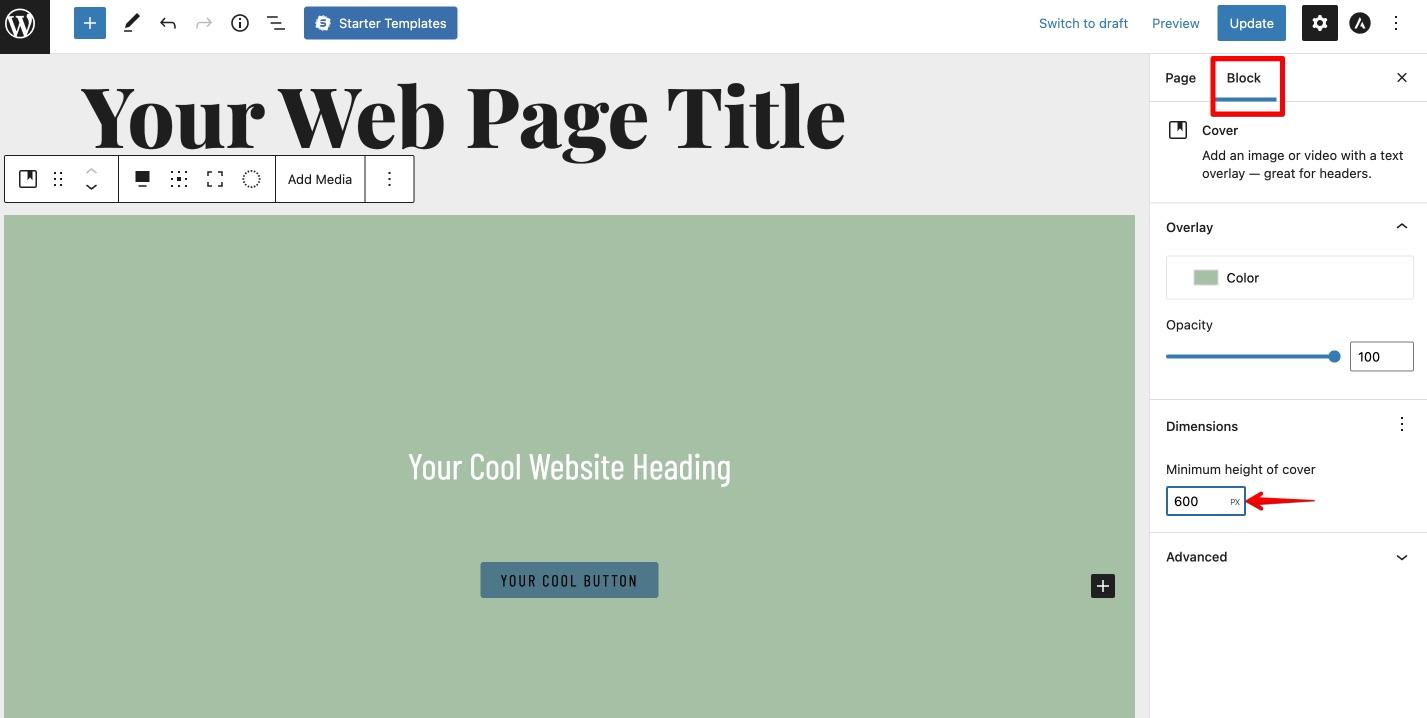
11. To change the height of the header, click on the cover, go to the page settings and change your cover height.
In this case, we are making it 600 px.
Add Multiple Columns
Here’s how to design the rest of the web page.
1. Click on the “+” icon below the cover and select the columns block.
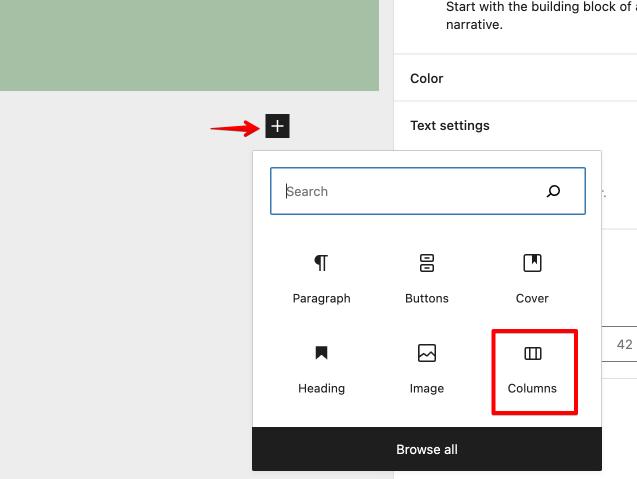
2. You can select any column width you want.

3. In this case, we are adding two columns with equal width. Select the 50/50 column to do so.
Add Image and Text to Columns
Now you know how to add columns, it’s time to add images and text.
1. Click on the “+” button to add the image block in each column.
2. Add images as required.
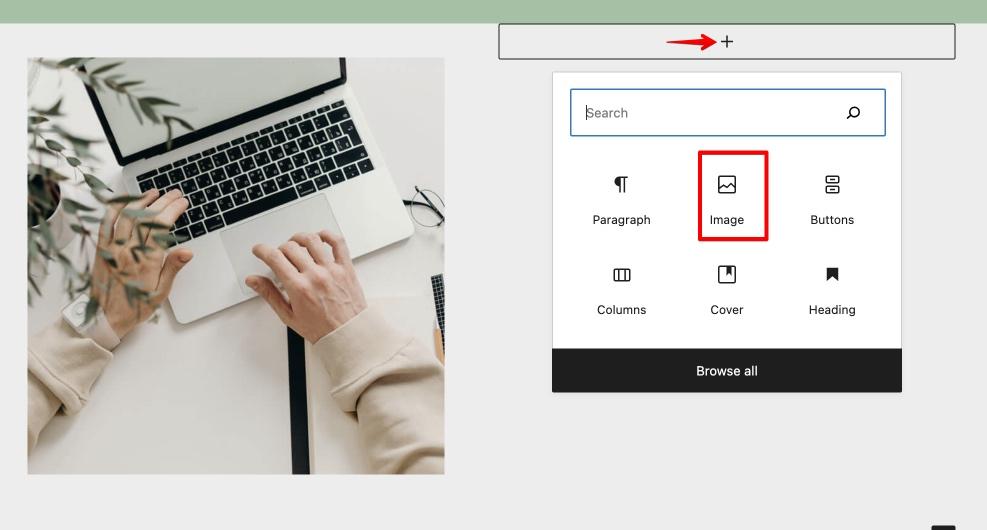
3. Add headings and text by using the “+” button and adding heading and text blocks.
You can also customize the column width.
1. Select the column you want to change the width of.
2. Add the width that you want from the sidebar under block settings.
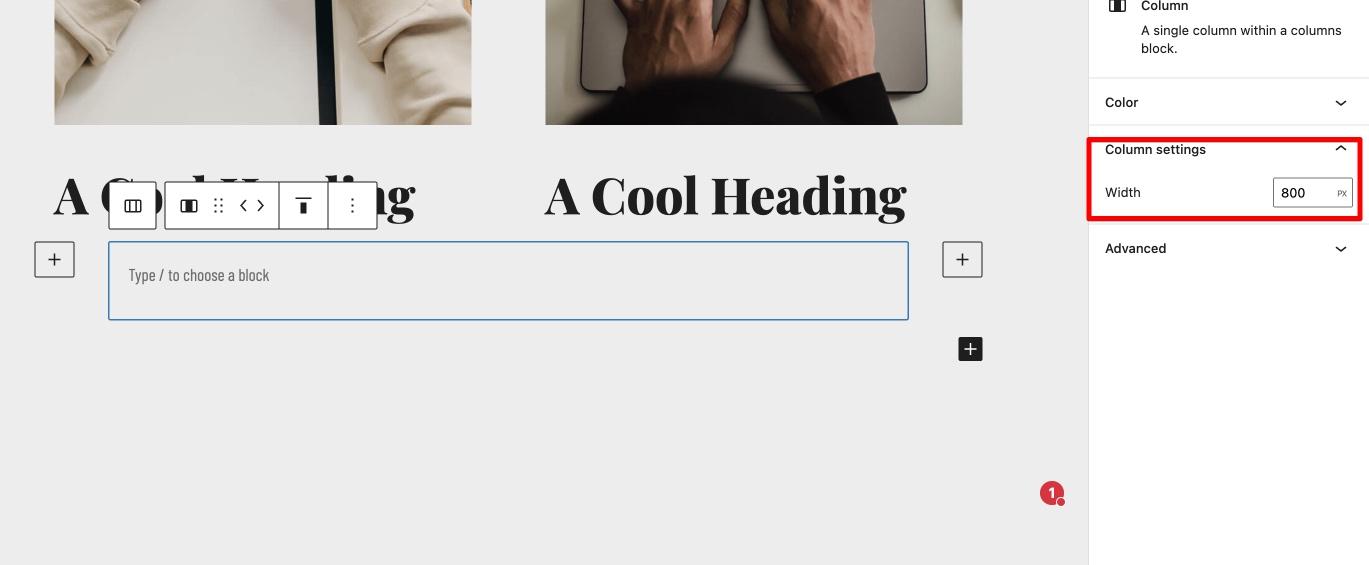
This shows up as a beautiful paragraph.

Publishing Your Web Page
Once you are happy with the design, hit Publish at the top right corner to make the page live.
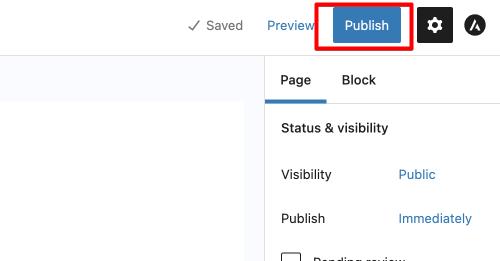
See, it’s simple!
With just a few clicks, we have now designed a beautiful page!
You can do a lot more if you want. You can embed videos and add audio players as well.
Step 8: Customize Individual Pages in WordPress
This section will give you an overview of customizing and editing pages on your website.
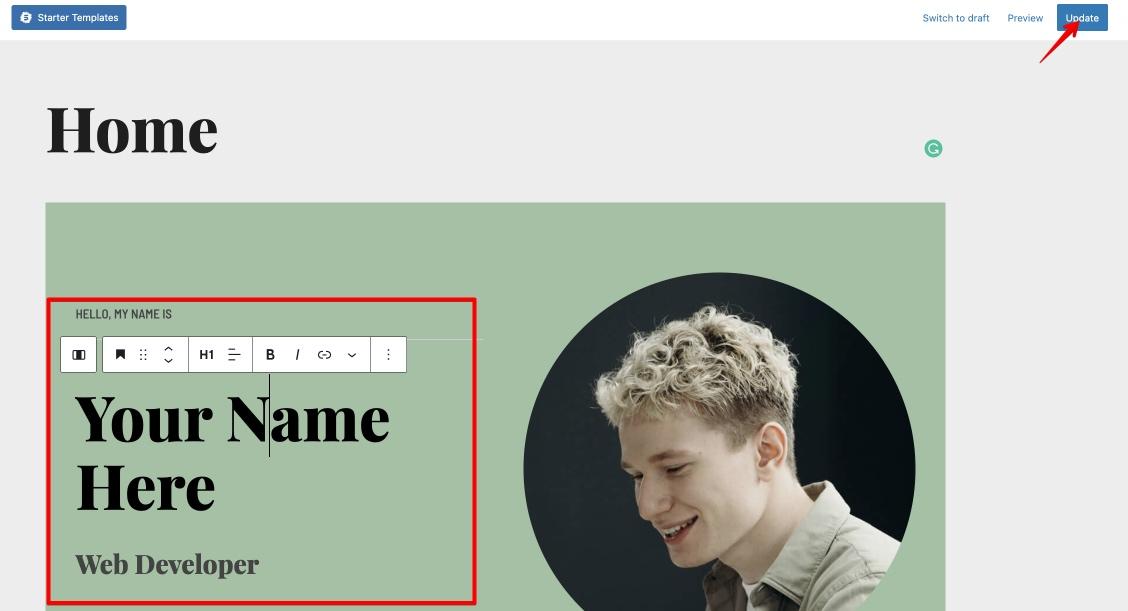
1. Navigate to Pages from the WordPress dashboard.
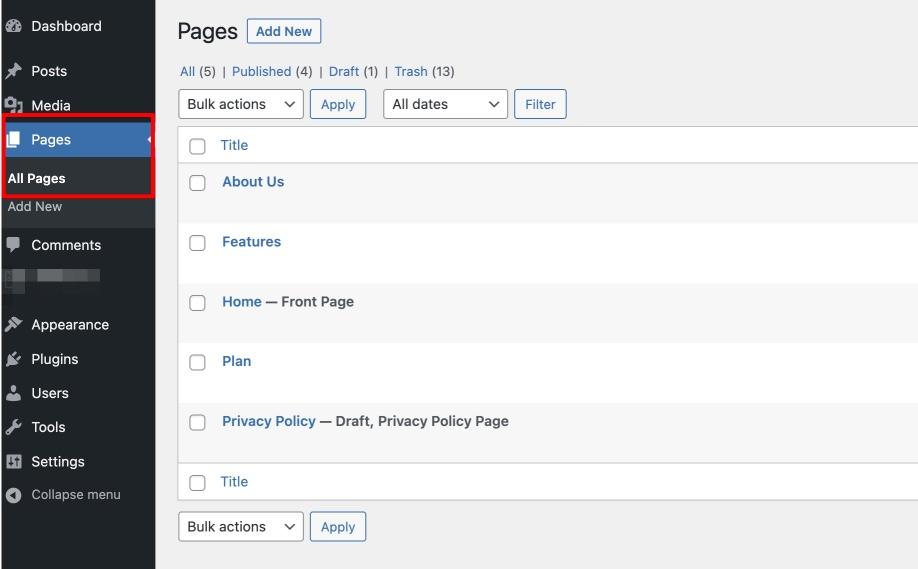
2. Here you will see the pages added by Astra Starter Templates.
3. Click on the page you want to edit.
4. Here you can add, delete or change any element you want. Just click on the element and start editing.
5. Once you’re done, click Update to save your changes.
Step 9: Update Your WordPress Settings
Once you have added the required pages or edited the ones you need, let’s look at some settings you should make to have the best user experience possible.
You have a few settings you can update:
- General Settings
- Writing
- Reading
- Discussion
- Permalinks
- Privacy
Let’s quickly go through them and learn how to make the necessary changes.
General Settings
Go to Settings > General Settings.
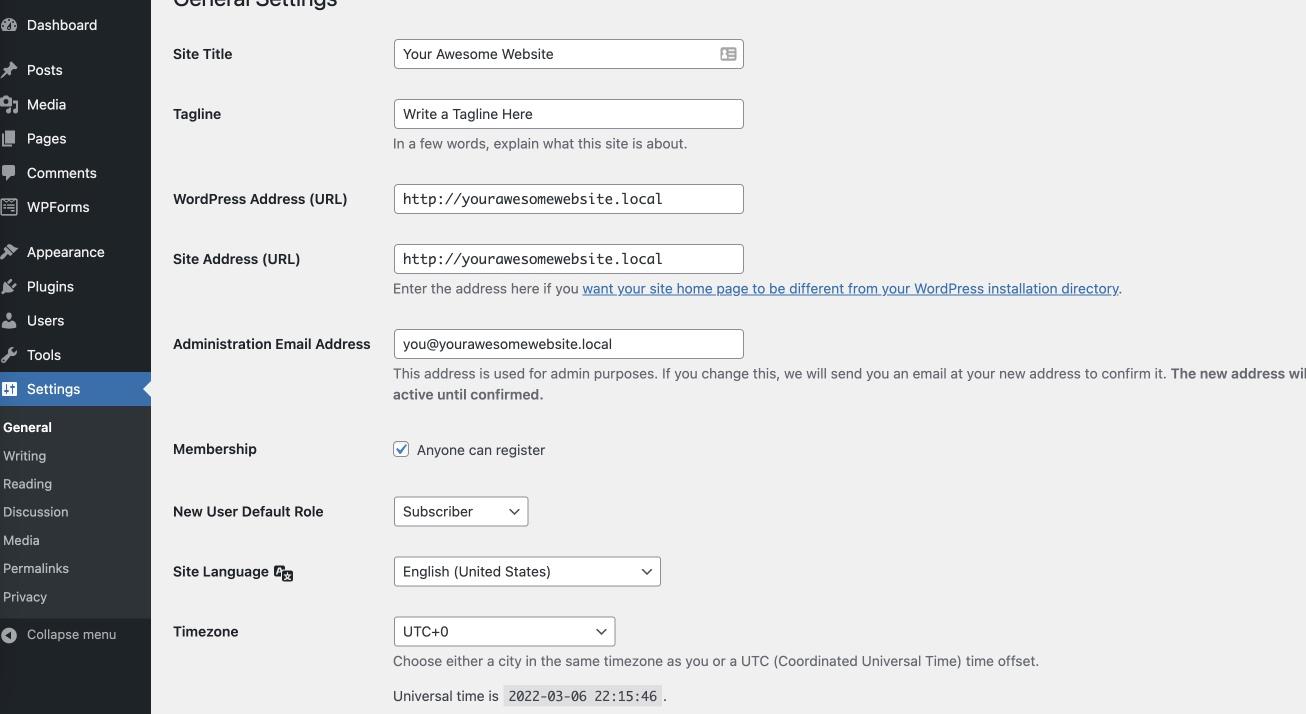
You can set the Site Title, Tagline, WordPress Address, Site Address, Admin Email, Timezone, and more here.
Writing Settings
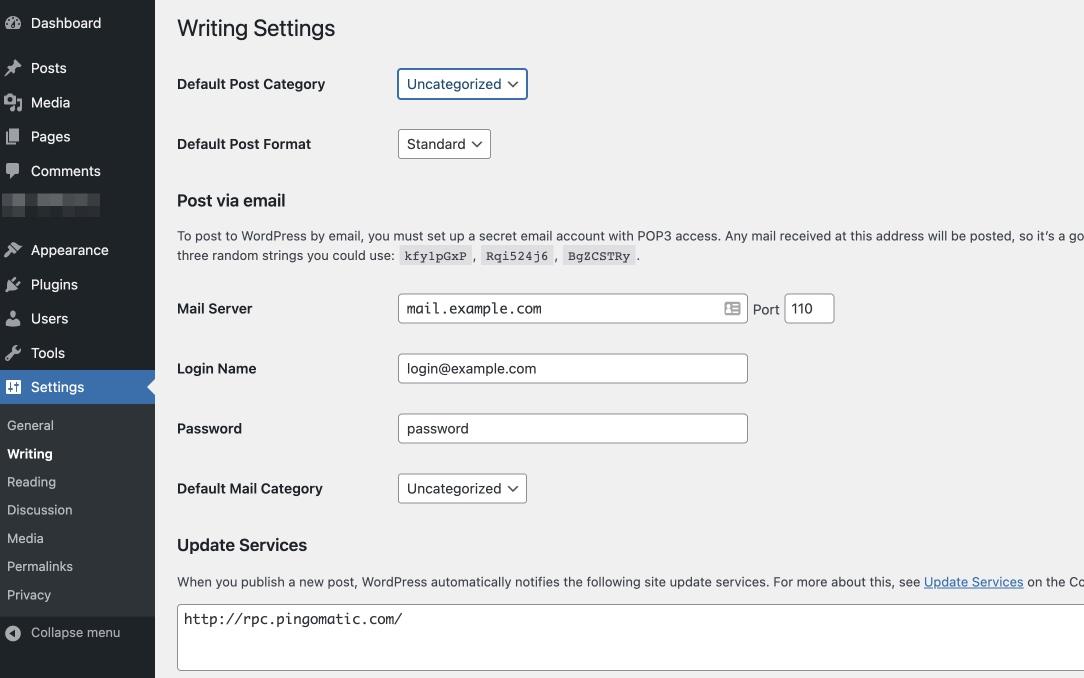
Writing settings help you control the writing experience of your WordPress website.
You can set the default settings for your posts, such as default category, post format, and also set up remote publishing options.
To update the writing settings, head over to Settings > Writing.
If you are writing in multiple categories, you can set it up here. We recommend leaving everything else as it is.
Reading Settings
Reading settings let you control how your posts will appear to your visitors.
Here you can choose to display your blog posts instead of your homepage or have a dedicated home page for your website.
Go to Settings > Reading to change these settings.
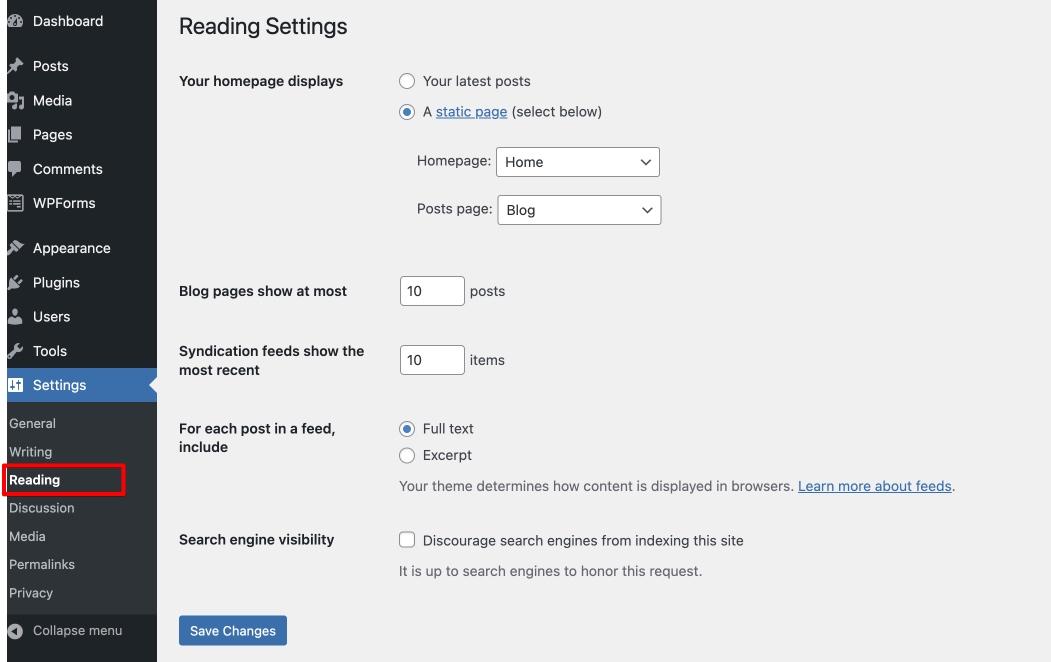
If you want to show a certain number of blogs to display on your archive page at a time, then input the number there.
If you want to display full-length blog posts in your archives, select Full text, else select Excerpt under the “For each post in a feed, include” option.
Permalink Settings
Permalink settings let you control the URL structure of your posts and pages.
This is the format of the URL bar that shows up when someone visits a post or a page.
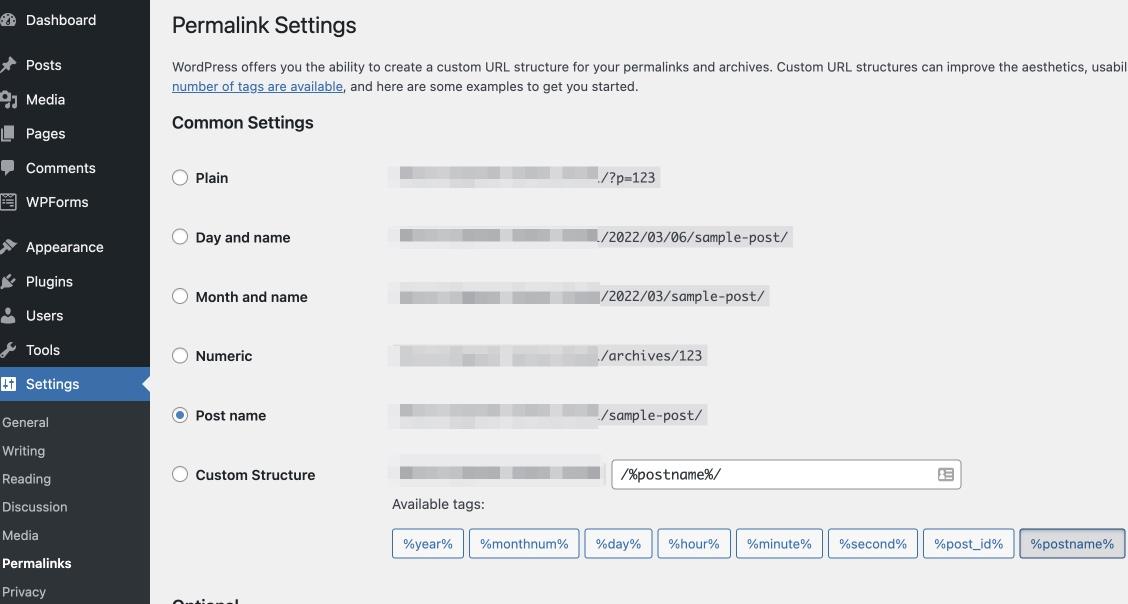
If you do not rely on timely content, then we recommend using the Post name option. This is because it is easy to remember and helps with the user experience.
Discussion Settings
Under Discussions Settings, you can moderate a visitor’s comments on your posts and pages.
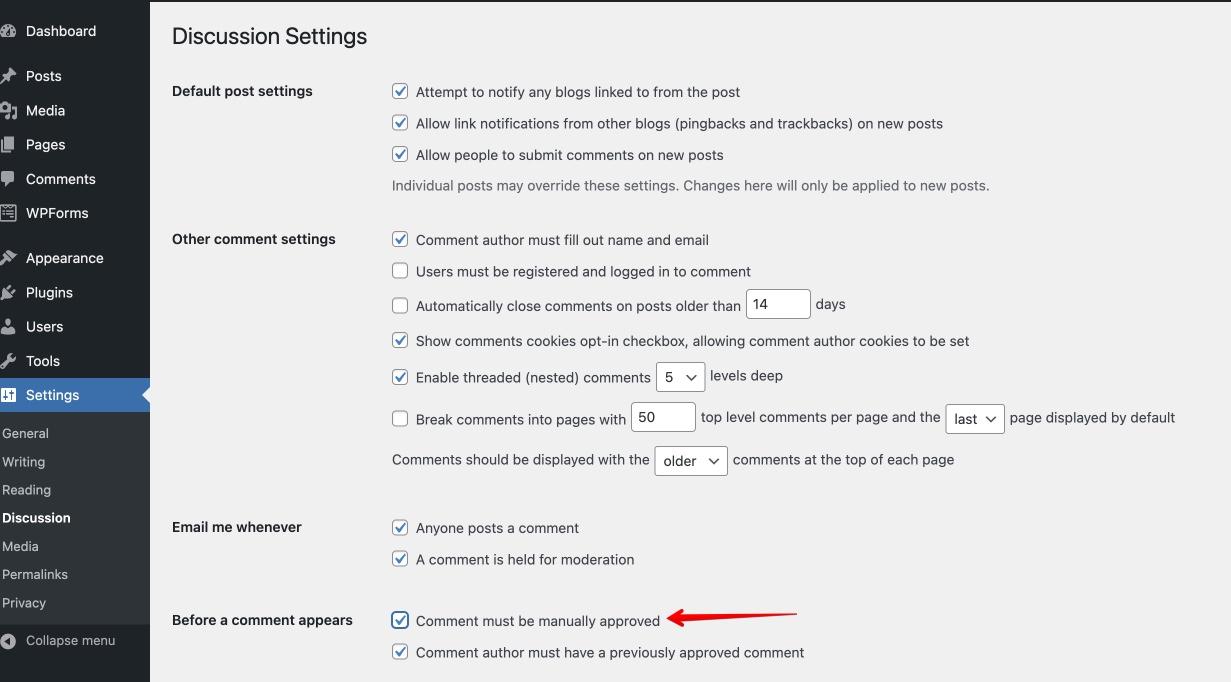
In this section, just check the Comment must be manually approved option.
This helps you check and delete spammy comments.You can keep the other options as they are.
You can always come back and change them in the future if you need to.
Privacy Settings
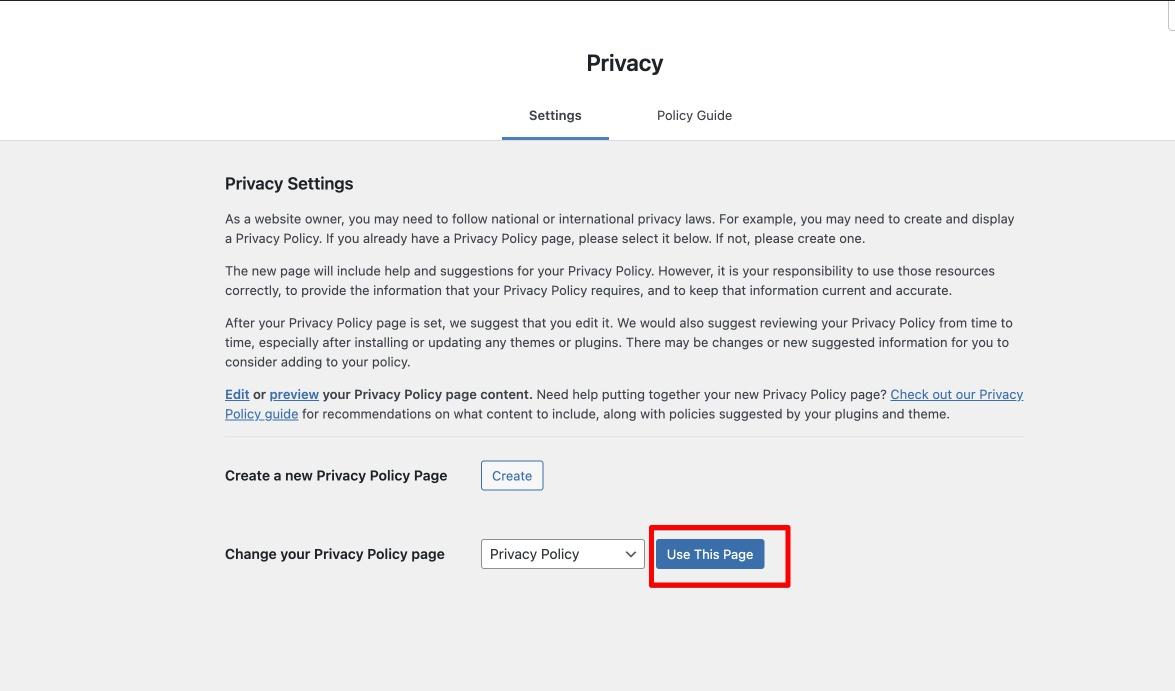
Privacy settings lets you select the privacy policy of your website.
WordPress comes with a default privacy policy page. You have the flexibility to make changes to the privacy policy page depending on your business.
Step 10: Update Your Menus and Widgets
A menu is the list of links usually displayed at the top of a website.

Menus make it easier for visitors to navigate through your website. In most cases, you’ll see menus at the top of your website in the header.
You can also see some menus at the footer, featuring essential links such as a privacy policy, disclaimer pages, or other legal pages that you display on the website.
By default, the Astra theme comes with default menus.
You just need to edit them.
To do so, head over to Appearance > Customize > Menus.
Here, you’ll see all the available menus and their locations.
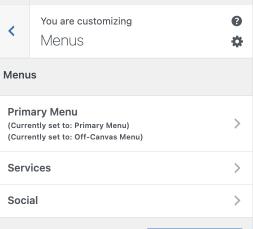
When you click on any one of them, it displays all the items in the current menu. You can make changes right on the same screen.
You can drag options around to reorder the menus as you like.
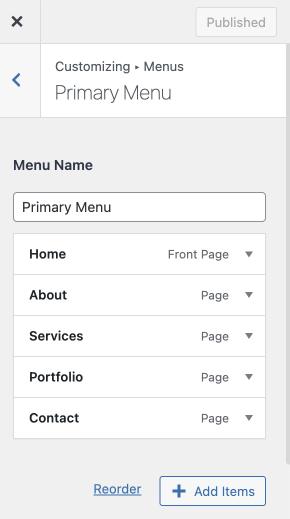
You can add more pages or widgets to these menus.
Widgets are modular elements that display a certain feature on your website.
This feature can be:
- A search bar
- A specific button
- Social media buttons
- A list of recent posts
You can add widgets to pretty much any part of your website, including the header, sidebar, footer, and in the body of the website.
To customize widgets, go to Appearance > Widgets.
You will see the places where your website has widgets.
Just click on any one of them and you will see the widgets that the place contains.
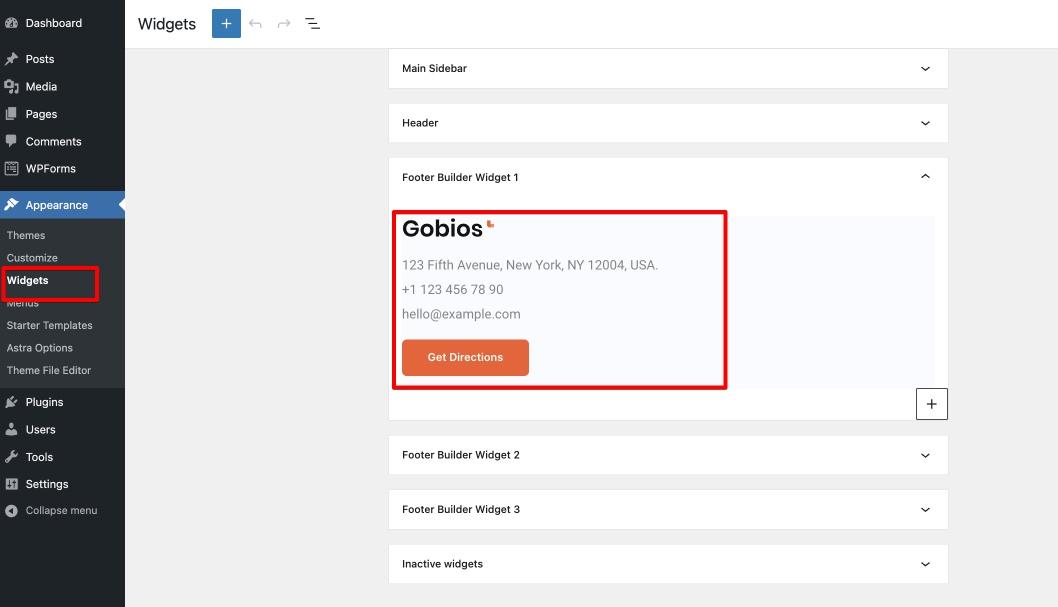
Click on any of the widgets and edit as required. It is very similar to the way you build web pages.
What More Can You Do?
In this section, we will discuss a few additional steps that you can take for the best functionality, performance, and visibility.
Publishing Blog Posts
A blog post is a piece of content you create on your website that is aimed to deliver information, entertainment, or inspiration.
Blogs help you attract the attention of your target audience and keep them engaged.
Blogs are timely content that has an author and date associated with them.
It is different from a typical WordPress page. A page is often timeless. It doesn’t display a public author or an associated date.
Here’s how to write and publish blog posts on your website.
- Go to Dashboard > Posts.
You will see a default blog post named “Hello World”. You can choose to delete it if you like.
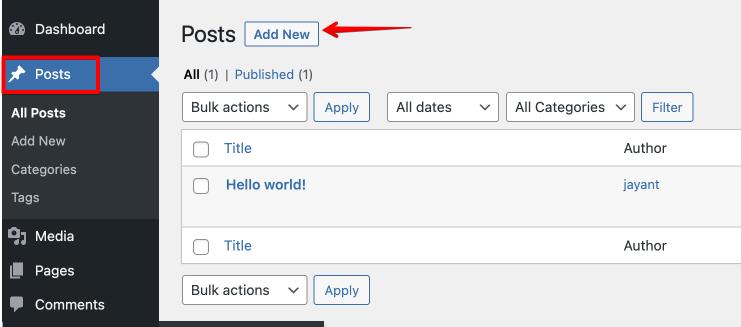
- Click on the Add New button to add a blog post.
- Add a title, and create content, just like you did while creating a page.
- Once you are happy with the content, click Publish to make your blog post live.
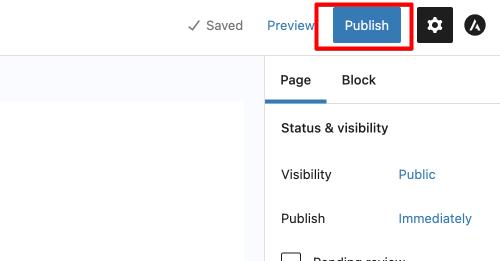
There’s a lot more to blogging than this, though.
Here’s a complete guide on writing blog posts for your website.
Index Your Website on Search Engines
We’re sure you love some free traffic, right?
When you write helpful content, you attract people searching for them on search engines like Google.
But before that, you need Google to find, crawl and index your website.
Search engines use software bots to scour the internet looking for new websites, pages and posts. This is called crawling.
When a bot finds a page, it ‘reads’ the page to understand what it’s about and will then categorize it. This is indexing.
Once indexed, your page will eventually appear in the search engines results.
This takes time and a lot of effort, but the reward will be well worth it!
You can install plugins like Google Site Kit to help index your website.
Here’s a great resource we created on the website Search Engine Optimization (SEO).
SEO is the process of optimizing your website and its content to appeal to search engines in the hope of getting it indexed and ranked.
Optimize Your Website Security
As the exposure of your website grows, you will find yourself facing multiple security challenges.
Therefore, it is essential to optimize your website security to the best settings possible. After all, website security is essential for protecting both your data and your customers’ information.
Thankfully, many WordPress security plugins help you make your website secure. You can install any one of them to help you fortify your website.
We have created a complete guide to website security to help with that.
Customize More With Astra Pro
The free Astra theme is perfect for getting you started. If you want to really amp up your website, we recommend going with Astra Pro.
With Astra Pro, you can get more done with your website without any limitations. All while maintaining peak performance and having full control over the customization options.
Here are some of our favorite features of Astra Pro:
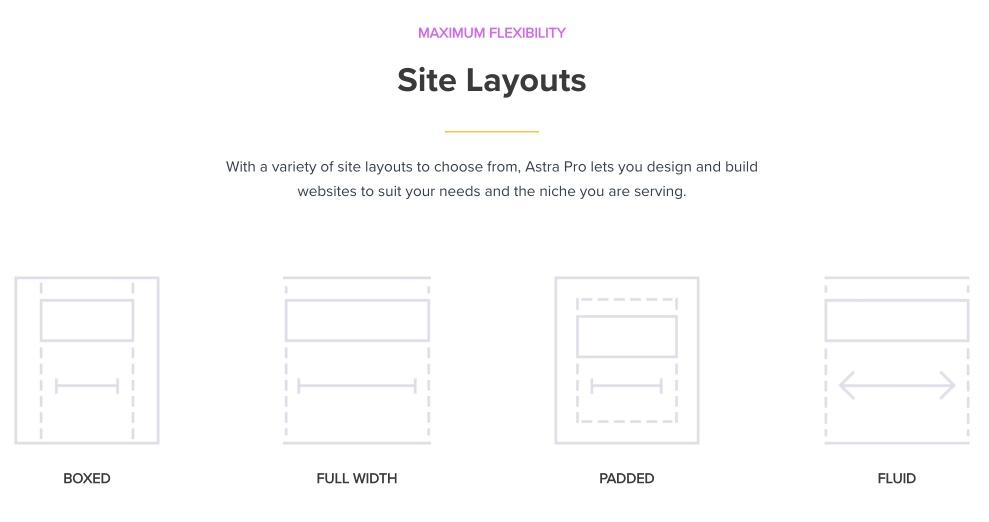
Complete Control Over Site Layouts
Astra Pro has extensive site layouts to help you create websites without any design skills or coding knowledge.
You can choose from many different pages and post templates available. You can also customize your website as you see fit.
More Design Flexibility
Astra Pro gives you more control over your website’s design with options for customizing the color, typography, and spacing. You can also add a background image or video to your site.
You can customize any area of the site with any color or type you choose.
Header and Footer Customization
Astra Pro provides many customizable options to make your website stand out. You can change the header and footer the way you want, add icons, buttons, and other widgets, and design them just the way you want.
Website Launch Checklist
There are certainly a lot of things involved in creating a website. We understand that it is not always possible to remember every step involved.
To help you out, we have created this complete checklist on creating a beautiful website.
Download our free Website Building Checklist Here
Chapter 5
Creating Different Types of Websites in WordPress
WordPress is a very versatile CMS and you can create any type of website you like with it.
Whether you want to create a blog or build a website for your personal brand, WordPress makes it easy.
In this section, we share some of the different types of websites you can build and the plugins you’ll need to make it happen.
We will also cover some basic tips for getting started with WordPress.
How to Create an eCommerce Website
Do you want to sell physical or digital products? If so, WordPress is a great platform to use.
What Does an eCommerce Website Look Like?
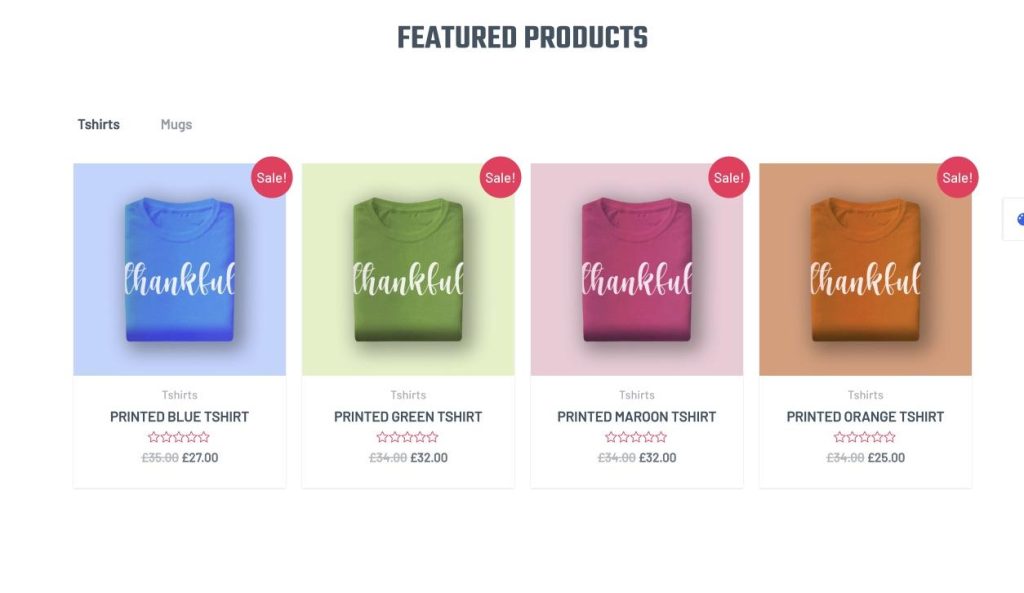
An eCommerce website is a website that allows you to sell products or services online.
Customers can browse products, add them to their shopping cart, and purchase them.
You will need to have a payment gateway set up to accept payments to make an eCommerce website work. You want to get paid after all!
Functionality of an eCommerce website
Some of the essential features that your eCommerce website should have are:
- A shopping cart so customers can add products to their order
- A payment gateway so you can accept payments
- Shipping options so you can ship products to your customers
- Product pages so customers can learn more about your products
Plugins Needed for an eCommerce Website
Fortunately, you don’t need a lot of plugins to add all the functionalities we mentioned above.
You need just one, WooCommerce.
WooCommerce is the most popular plugin for eCommerce stores. It is a free plugin with all the features you need to set up a fully operational online store.
Just install the plugin from the WordPress repository and set it up according to your requirements. Pair it with an Astra theme and use eCommerce website templates to achieve the design that you want.
Check out our guide on building an online store or creating affordable eCommerce website.
How to Create a Business or Personal Website
Do you provide services such as graphic design, photography, marketing, or something else?
Then you need a business website.
WordPress is the perfect solution as you can create one in less than an hour.
What Does a Business Website Look Like?

A business website showcases your business online.
Here are some of the main features of a business website:
- It displays what your company does (what services you deliver and how you deliver them)
- It showcases your previous work and achievements
- It displays information about your products and services
- It gives the option to your visitors to contact you
Functionalities of Business Websites
Now that we know what a business website looks like, let us understand the key functionality it should have.
Your business website needs to have the following basic functions:
- A product, service, or portfolio page
- A contact form
- Lead generation method
Plugins Needed To Create a Business Website
We created a business website earlier in this guide, so you already know what’s involved.
Here are the plugins we used:
- Starter Templates to help you import beautiful business website templates
- WPForms to help you create contact forms
You can make your business even more efficient by using the following plugins:
WP Portfolio is a plugin that helps you showcase your work within the beautiful design. It comes with 48 different layouts, which can be imported to any website.
This plugin also supports web videos including images and displays them in a beautiful lightbox.
Convert Pro is a plugin that helps you turn visitors into subscribers and leads.
It includes features like exit-intent popups, A/B testing cart abandonment prevention, and personalized triggers to ensure your messages are always relevant for each user!
Spectra comes with 28 creative blocks that you can use on your website.
You can add infobox, Lottie animation, content timeline, star ratings, advanced columns, blockquotes, and many more.
How to Create a Blog Website
If you want to start writing on a topic you love, a blog website is what you need. WordPress is one of the best platforms to use to create a blog website.
We have created a very in-depth series on creating a blog and making it successful.
In this section, we will give you an overview of what a blog looks like and what functionality you need.
What Does a Blog Look like?
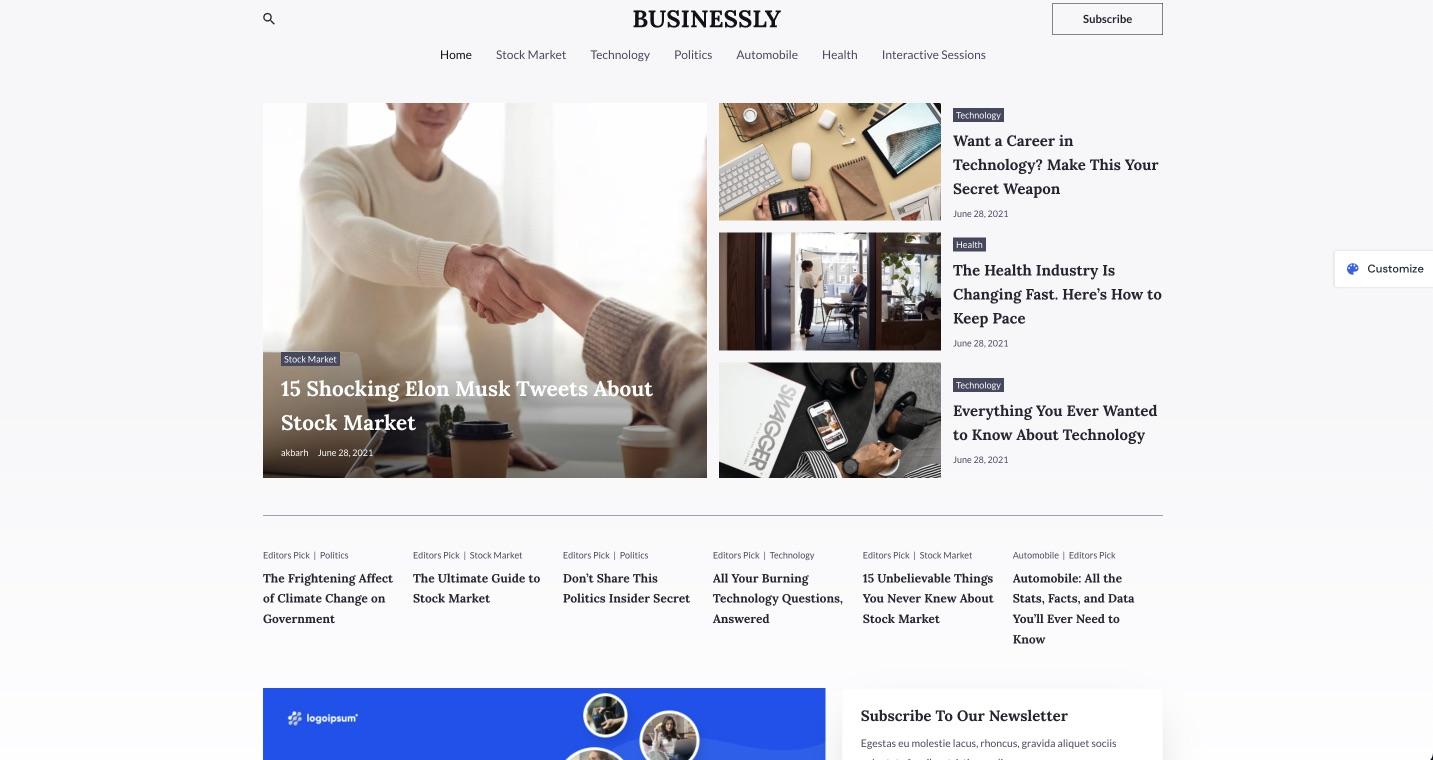
Blogs are developed to deliver information and the design is almost always information-focused.
Most blogs have a similar structure:
- There is a header at the top of the page, followed by the main content area
- The sidebar is usually located on the right-hand side of the page and contains additional information such as links to other pages on the website or social media buttons
- The footer is typically located at the bottom of the page and it usually contains copyright information or links to other websites
The Astra theme, without its Starter Templates, looks like a blog.
Functionality Needed in a Blog Website
The blogs are almost always designed to be minimalistic and performance-focused. Since a lot of blog traffic usually comes from search results, website speed and performance are important.
That’s why doing website speed testing and performance checking periodically should be among your priorities
Here are some features a blog needs:
- Fast loading speed
- Website optimized for SEO
- Email list building systems
- Contact form
Must-Have Plugins For a Blog
The best thing about Astra is that it already does a lot of heavy lifting for you. It is fast-loading and focused on delivering a great performance.
You can also use the plugins we mentioned earlier to set up a great blog:
- Spectra lets you craft great layouts that are easy to read and navigate
- Convert Pro lets you build your email list. You can also use our plugin Schema Pro to boost your website search engine performance even more
Schema Pro adds the schema markup language to your blog. Schema markup is a language that search engines understand while crawling through your content.
The more you make things clear and detailed for the search engines, the better your listing will appear when someone searches for what they are looking for.
Schema markup helps search engines understand all information available in your content and it creates a listing that is most favorable to your audience.
How To Add Schema to Your Website
Schema markup is the latest evolution in SEO. Schema refers to the structured data markup added to a website to help search engines understand its contents.
Markup language is used to provide information to search engines about the content on the page such as the type, its purpose, and its relationships.
This helps search engines better understand the content of your website. The better they understand, the better they can rank it, which should result in improved search engine visibility.
Schema can also provide additional information such as reviews, ratings, and other detailed information that can be used in rich snippets.
A few reasons why you should consider adding schema markup to your websites are:
- Increase in search engine visibility
- Chance to feature in rich snippets
- Increased clickthrough rates
- Enhanced user experience
- Future-proofing
Let’s walk you through adding schema to your website.
Step 1: Install the Schema Pro Plugin
Schema Pro is a premium plugin. Once you purchase it, it’ll be available on your store account.
You can download and install the plugin on your website in just a couple of steps.
- Log in to your store account
- Head to Accounts > Downloads
You will find a zip file containing the Schema Pro plugin.
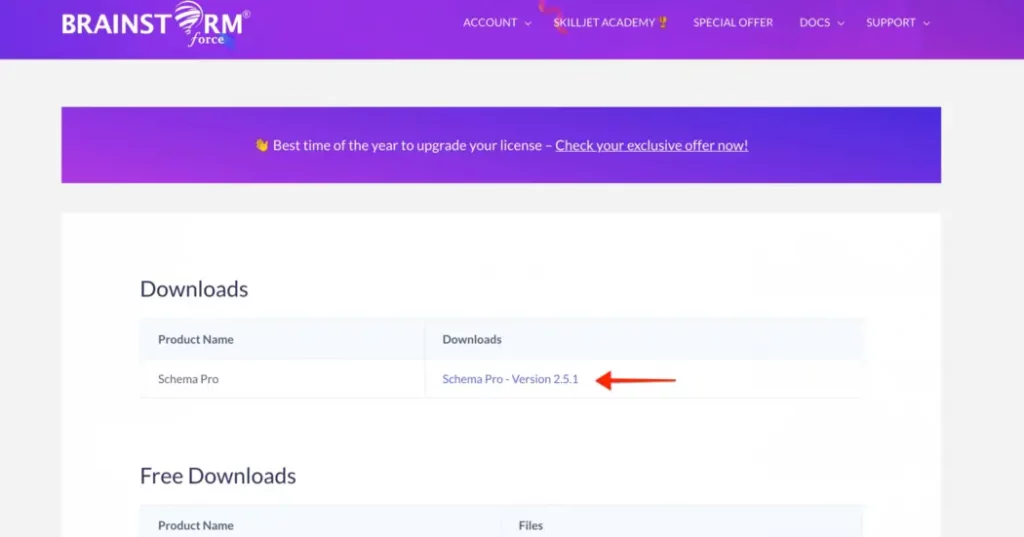
- Download the file to your computer
You’ll need to log into your WordPress website to be able to install the plugin.
Then:
- Navigate to Plugins > Add New > Upload Plugin
- Select the zip file and select Install Now
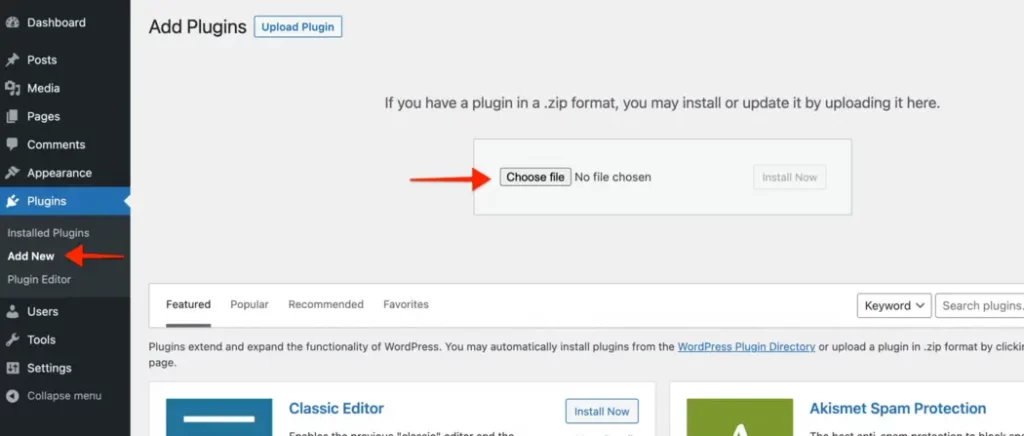
The next step is to activate the plugin.
Step 2: Activate the Plugin
Once the plugin is installed, you’ll need to copy the license code to enable it.
Get the license key by logging in to your store account and heading over to the licenses page
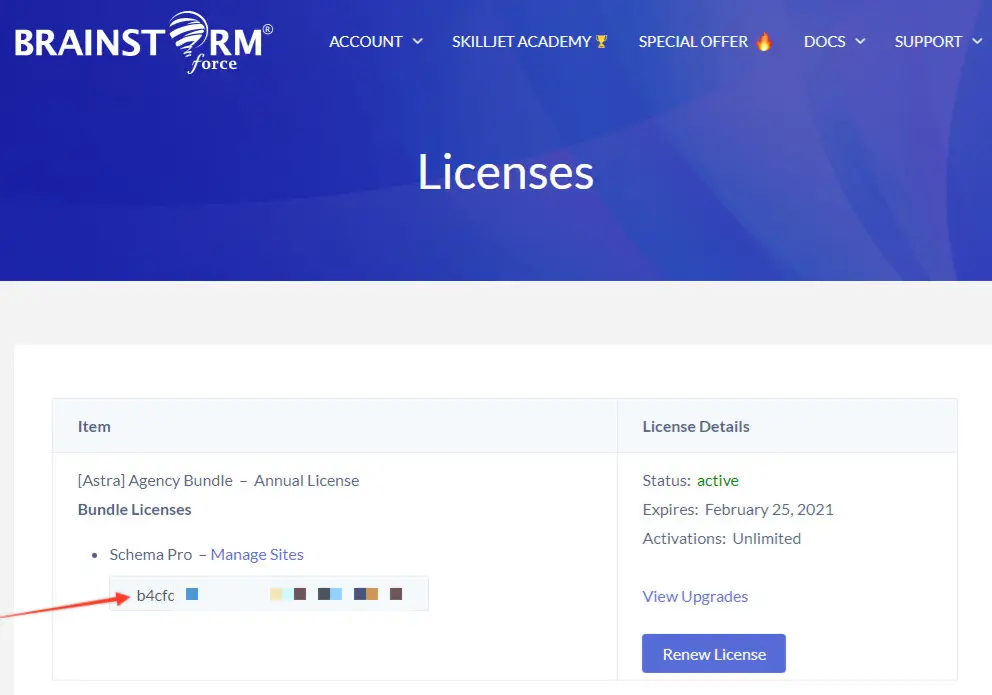
- Copy the license so you can add it to the plugin
- Open the plugins page on your WordPress dashboard and select Activate License
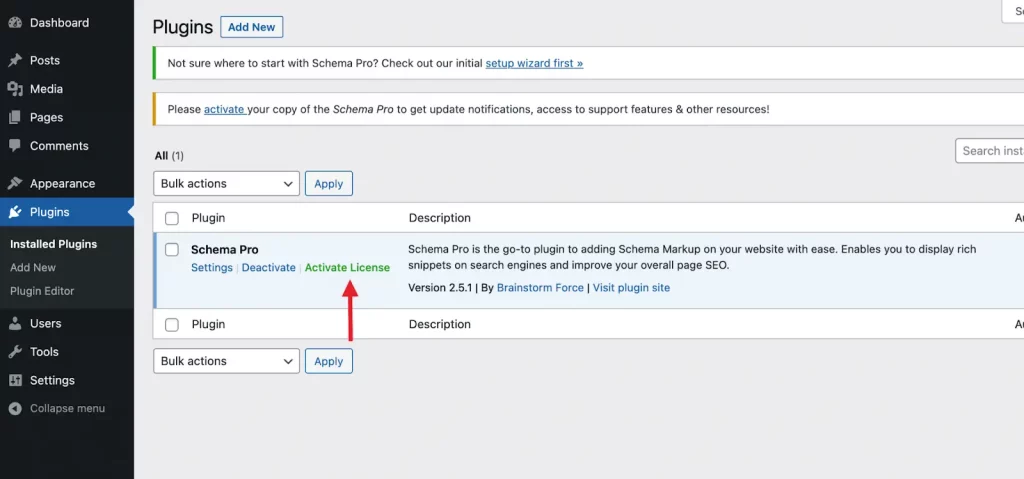
- Enter the purchase key in the input field and select Activate License
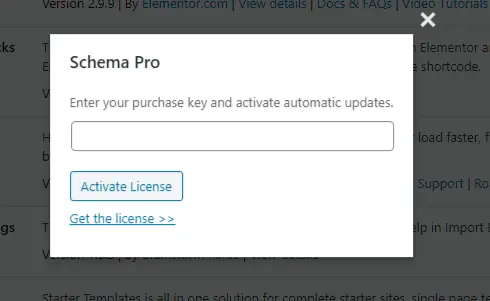
That’s it, you’ve successfully activated the plugin!
Step 3: Set Up the Schema Pro Plugin
Once you activate the plugin you should be taken directly to the setup wizard.
You should see five screens.
Welcome – The initial screen that provides a quick overview of Schema Pro.
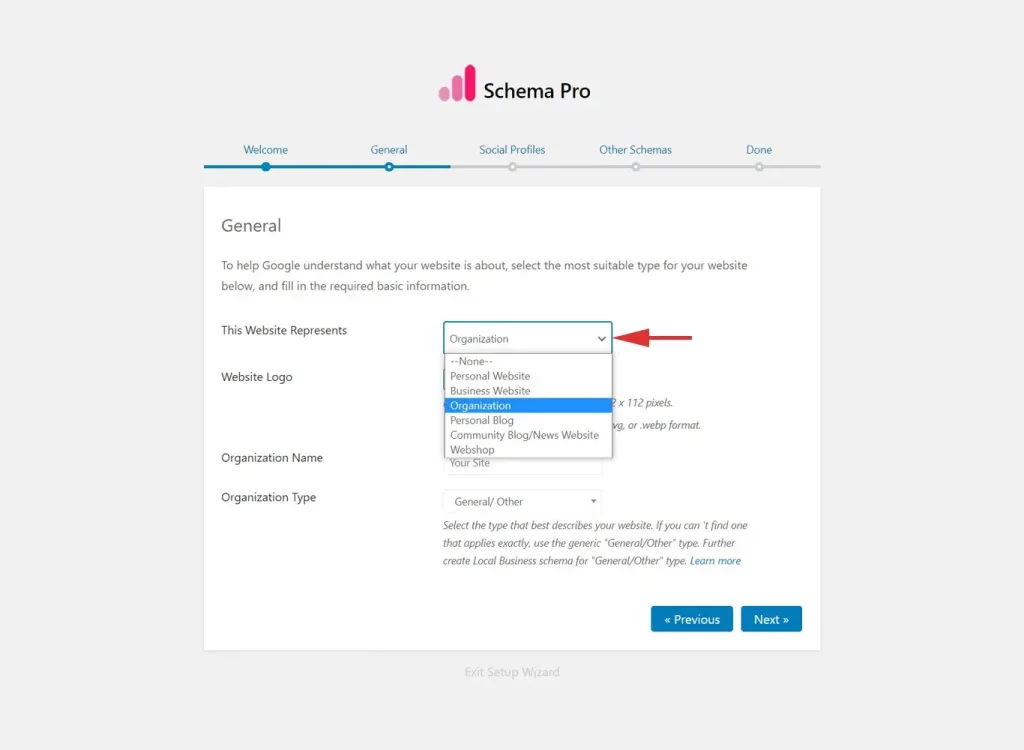
General – Allows you to choose your website type and set the website name and logo.
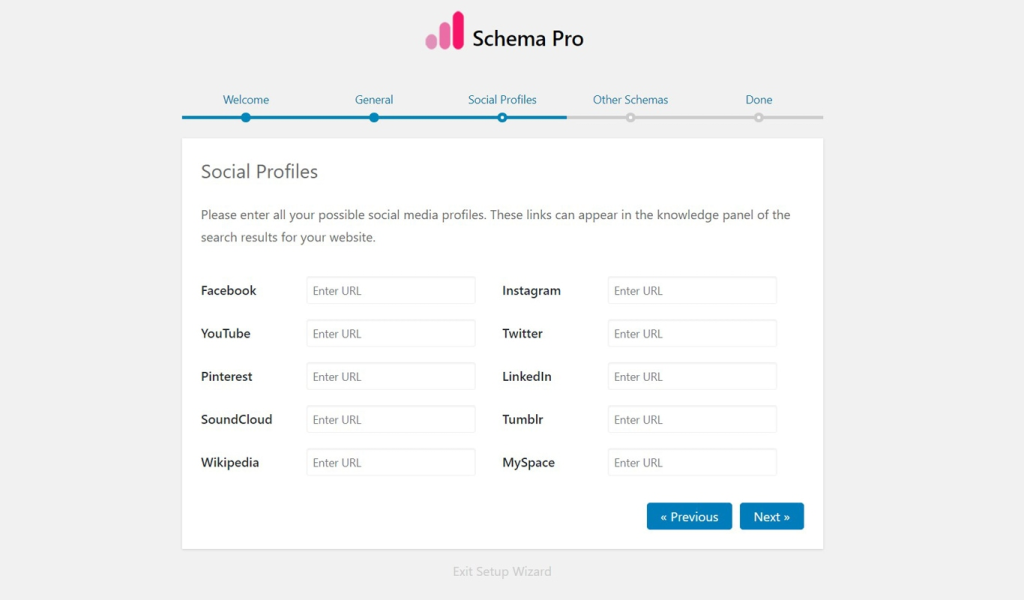
Social Profiles – Gives you the option to enter your business’s social profile links.
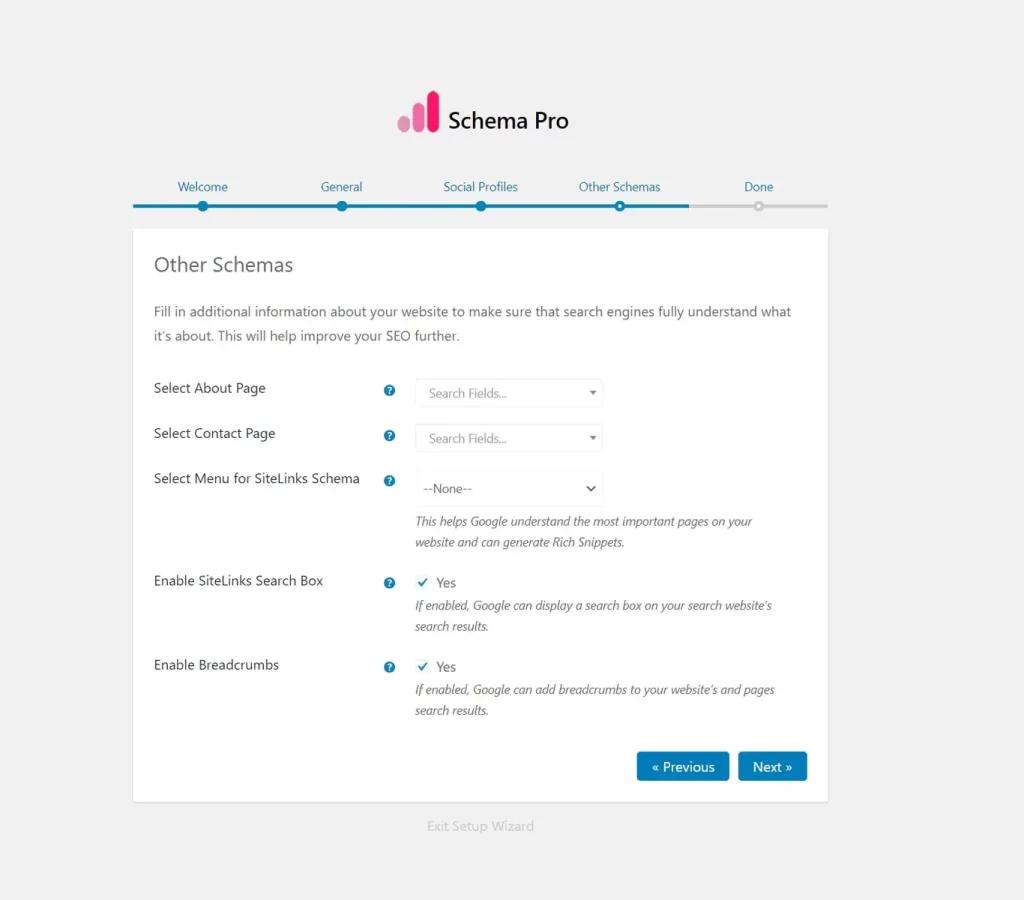
Other Schemas – Advanced options benefiting your website.
Done – You can now create the first schema type or exit the setup wizard to go back to the dashboard.
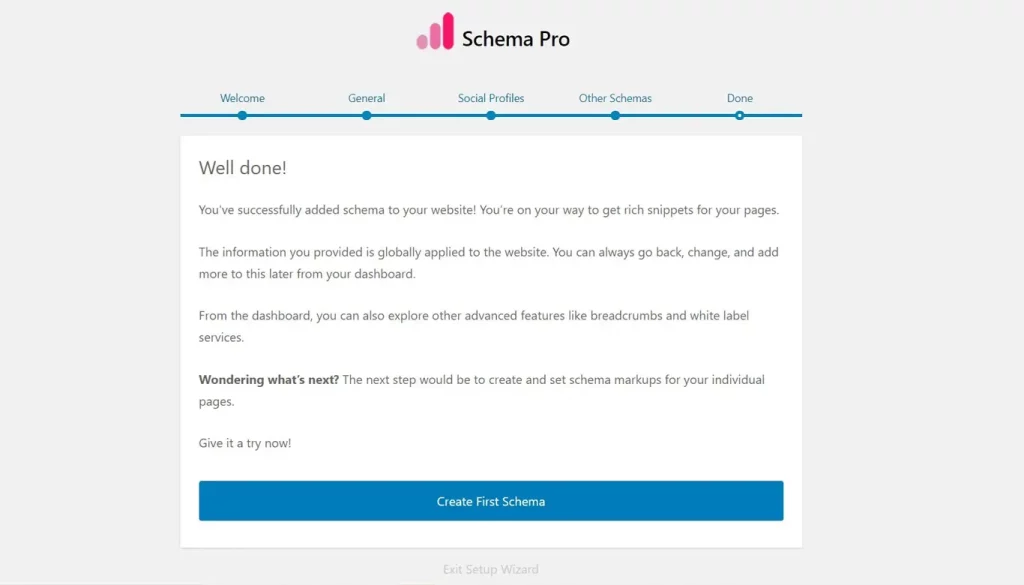
Once you have configured the plugin using the wizard, you’ve successfully set up Schema Pro.
If you don’t see the notice after activating the plugin, there’s an option to initiate the setup wizard from Schema Pro settings.
- Head to Settings > Schema Pro > Website Information
You should see the option to use the setup wizard on the right.
Now we’re all set up, select Create First Schema to get started.
Step 4: Add Schema Markup to Your Posts and Pages
In this step, we will implement schema markup on posts and pages.
For instance, here we’ll be adding schema markup for a How-To article that we have on our website.
- Create a new schema markup by heading to the Schemas tab in the Schema Pro menu
- Click the Add New button
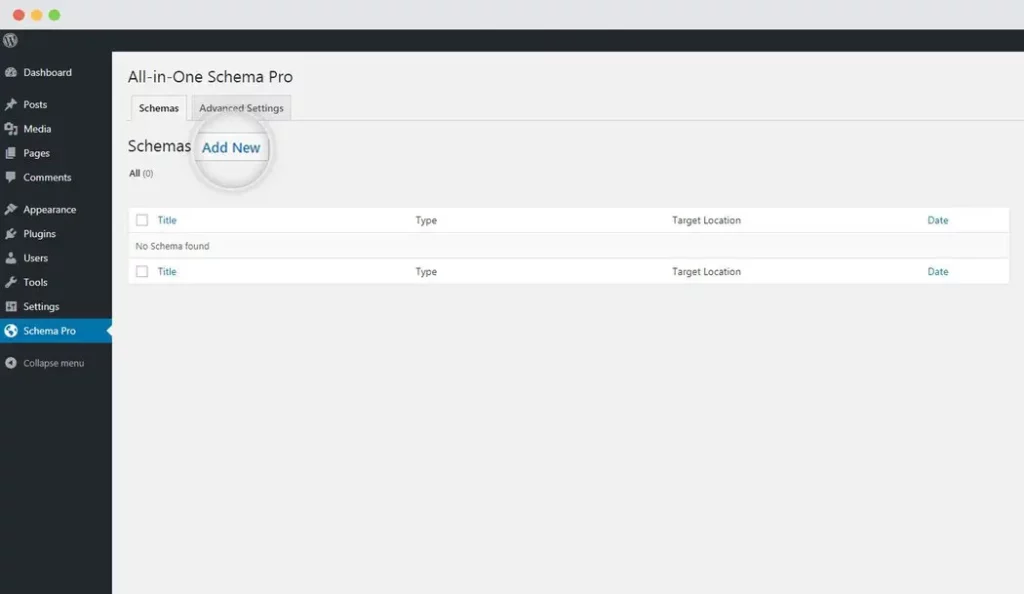
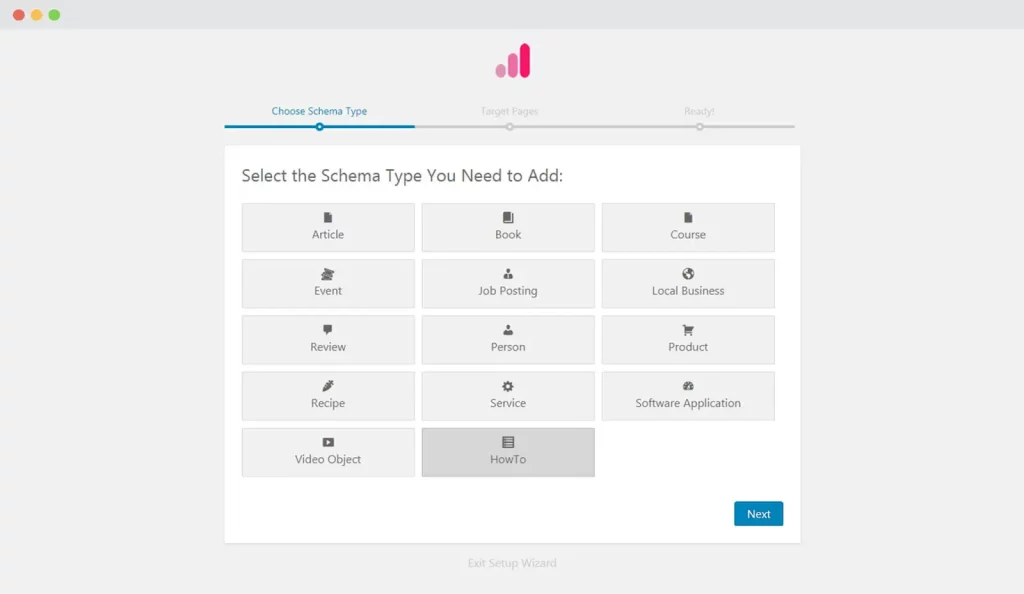
- Select the type of schema (here we’ll be selecting HowTo but you can select any relevant schema)
- Select the pages or posts you wish to use your schema on
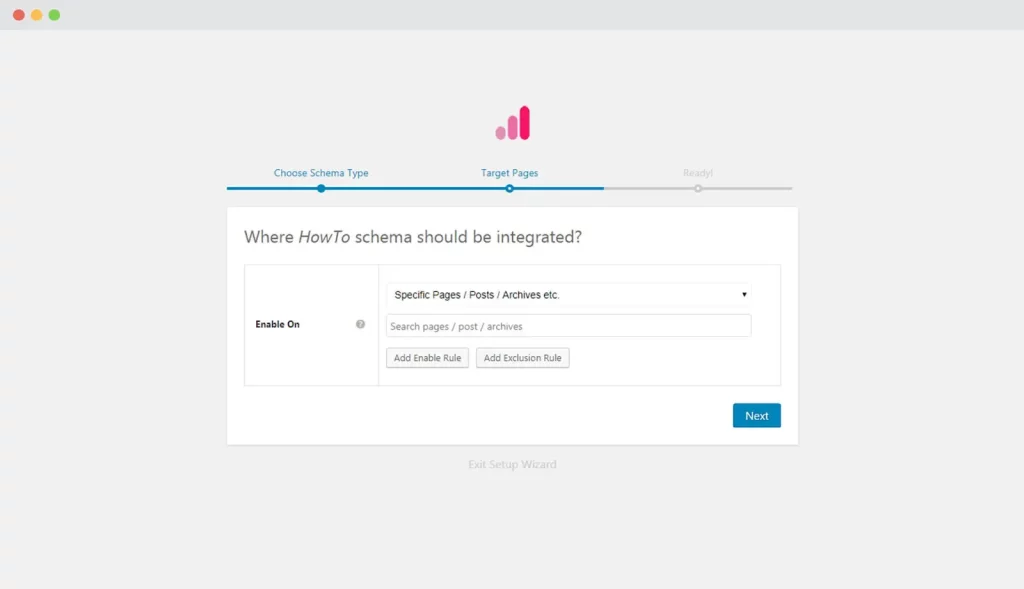
Your schema markup is ready!
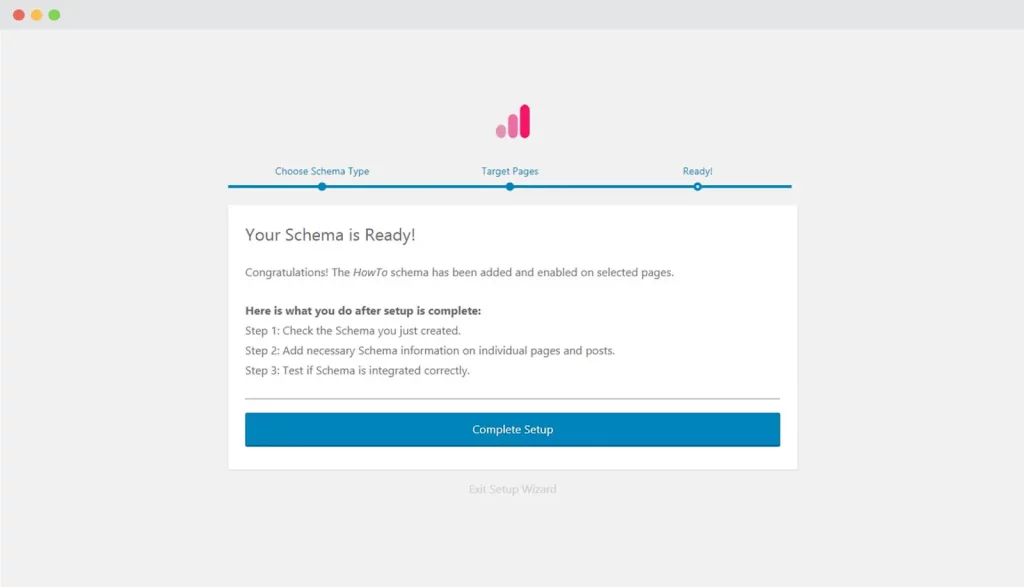
Here’s the list of schema properties you will have to fill in for the HowTo schema markup:
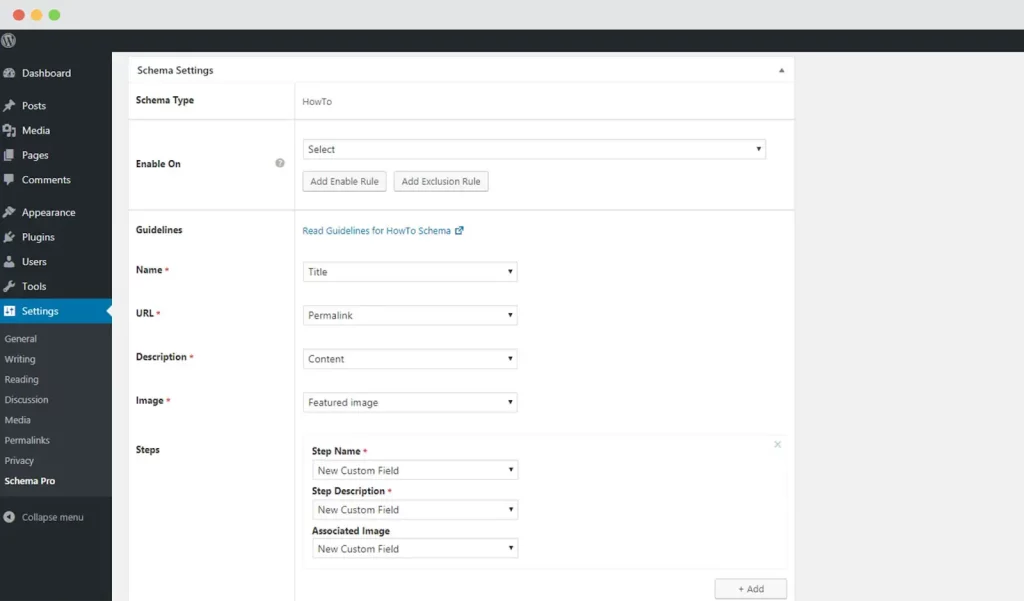
Name – The name of the article. It can be a title or anything you wish.
URL – The URL where the article is published.
Description – You can select what to display as a description of the article.
Image – Pick an image you think should be displayed in the rich snippet.
Steps – There is an option to add multiple steps with a name, description, and image for each.
Once you have added all this information:
- Publish the schema
In a similar way, you can add schema to all the existing and new posts and pages on your website.
Create Your Website Today!
Anyone can create a website. You don’t need to be an expert, you can easily do it using WordPress – it’s easy, fast, and free.
You just need to choose the right theme and plugins to get started and this guide
In this blog post, we’ve outlined what you need to create a successful website. We’ve also recommended some great plugins that will help you get started.
So what are you waiting for? Start building your dream website today!
How to Create a Website FAQs
Can I Make a Website for Free?
Can a Beginner Create a Website?
There are detailed steps on:
1. Goals for building your website
2. Planning
3. Web hosting services
4. Selecting a name
5. Installing WordPress
6. Installing themes and plugins
7. Customizing your website
8. Celebrating the website launch
How Much Does It Cost to Create a Website?
What’s the Easiest Way To Create a Website?
Can Anyone Create a Website?
Creating a website requires some planning, including determining your website’s purpose, audience, and content. You will also need to choose a domain name, web hosting provider, and website builder or content management system. Once you have all the necessary elements in place, you can start building your website.
Disclosure: This blog may contain affiliate links. If you make a purchase through one of these links, we may receive a small commission. Read disclosure. Rest assured that we only recommend products that we have personally used and believe will add value to our readers. Thanks for your support!



Hello, i would like to use your theme for my website bresciapc[dot]com, our company website is a phone, tablet, watch & computer repair center. Is there any way to install your theme without losing any content and pages,
Please let me know
Have a good evening
Hello Ernesto, if you are looking to switch to the Astra theme, here’s an article that can help you. Or if you are looking to import any of our ready-made templates, you would need to import the template on a staging site and redesign them as per your current website. Hope that helps. 🙂
Thank you for that really great article! Everything is thoroughly explained, and it has really useful information! However, can you suggest to me a website builder for car rental businesses? I don’t think that any of these options will work for me. Thanks!
I want to make a website, but I don’t know which platform to choose yet. I think I’ll choose WordPress. Thanks for the tips, it was very helpful for me.
Top quality content thanks for sharing such informative information with us, custom website development company makes finest website as they have proffesional but website builder makes things easier as well
“This is very nice article
“
Great post. I was checking continuously this blog and I am impressed!
Extremely helpful information particularly the last part I care for such info much.
A good article for new things.
Good examples!
thank you, very useful!
Informative blog post!