Do you wish you had more control over your website without having to code?
If you’re familiar with the popular page builder Elementor, then you know that it offers incredible flexibility in building your site — no coding needed!
However, Elementor only takes you so far, because it’s your WordPress theme that controls elements like the header, including the logo and navigation area.
This isn’t a problem if you’re happy with the header options that come with your theme, but every WordPress theme is different, so the built-in options may not be exactly what you’re looking for. Or maybe you like your header, but wish you could easily apply a unique one to a landing page on your site.
Whatever customization you need in your headers, there are a few great ways to use Elementor and enjoy full drag-and-drop control over your website’s header. Here’s what you need to know to build beautiful custom headers with Elementor!
How to Edit Header in Elementor
Clearly, in terms of both aesthetics and functionality, your website’s header is essential for good user experience. After all, this is where your navigation menu, logo, cart, and other important elements are located!
To customize your header for Elementor, you’re going to use a great feature called Theme Builder, which is available in Elementor Pro only.
(Note: This approach requires you to have the paid version of Elementor, but we’ll also explore a free alternative later on.)
Building an Elementor Header with Theme Builder
Here’s how to get started with the Theme Builder.
Step 1: Find the Elementor Tab in the Sidebar
Jump into the backend of your WordPress website, install the Elementor plugin from Plugins > Add New.
Make sure you install the pro version of this page builder. It includes dozens of pre-made header templates, but for full control, you should make your own from scratch!
Navigate to Templates > Theme Builder.
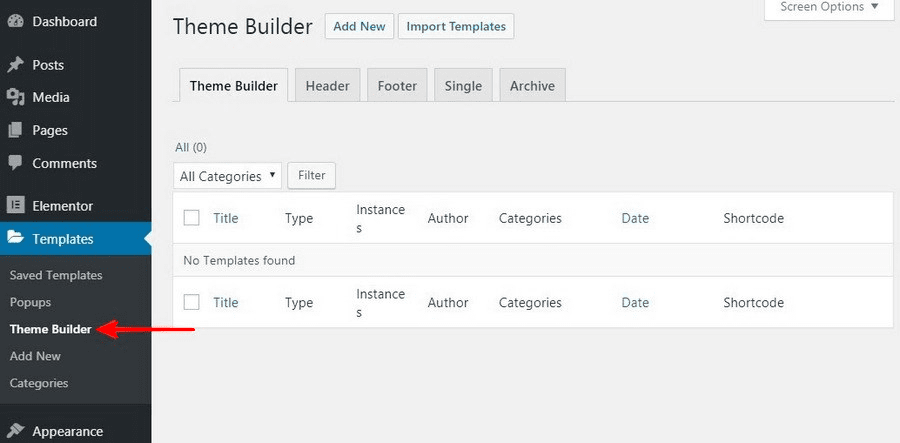
Step 2: Create a New Template in Elementor
Click Add New Template to create a new template in Elementor.
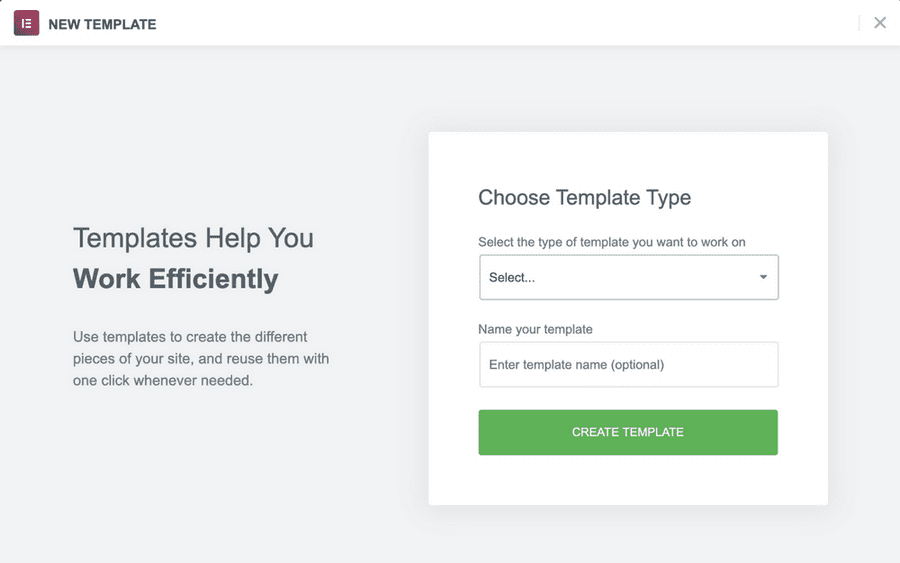
Under this dialog box, you can select the Header option and create a name for your template.
Step 3: Click “Create Template” to Get Started
Once the template is created and published, you can edit the header directly using Elementor!
Elementor Widgets
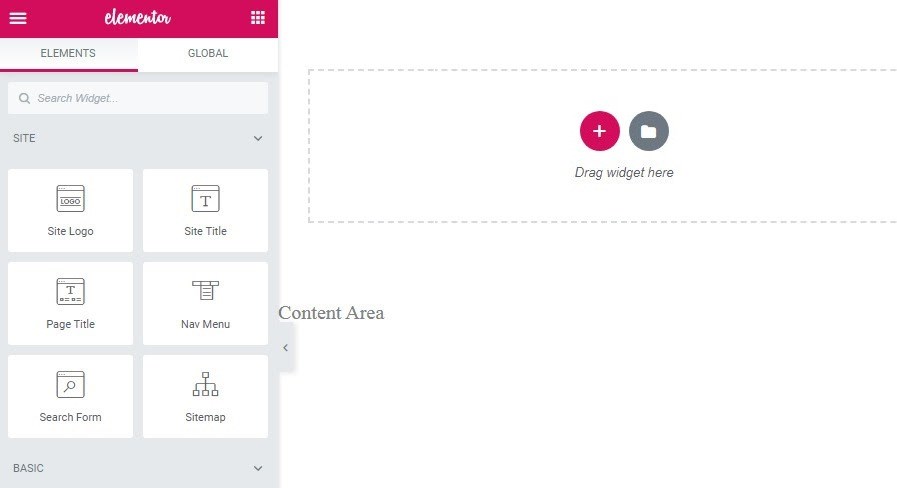
Designing your header works the same as any page or section with Elementor. Simply drag different widgets to the main page to create something amazing.
Speaking of widgets, you’ll find all kinds of handy Elementor widgets for quickly building a custom header in the Elementor Pro sidebar.
Here are a few of the most useful:
- Site Logo
- Site Title
- Page Title
- Nav Menu
- Search Form
- Sitemap
With these widget options in Elementor Pro, you can build a header that has every element you need!
Just remember, if you’re designing a custom header, you want to take advantage of dynamic content so that the website pulls the same element from every page.
For example, to get a consistent logo, you can upload a site logo to your customizer with the Site Logo widget and use it as a dynamic element in your header template, rather than using an Image widget for the logo.
That way, it’ll appear the same on any page that uses this header template – and when it’s time to update your logo, you only have to swap out the logo in one place!
Step 4: Choose Display Conditions
Now you just have one more step to complete and you are ready to rock your new header.
Once you hit ‘Publish’ you will be asked to select the display condition.
Display conditions just mean where in your WordPress website you want to show the header.
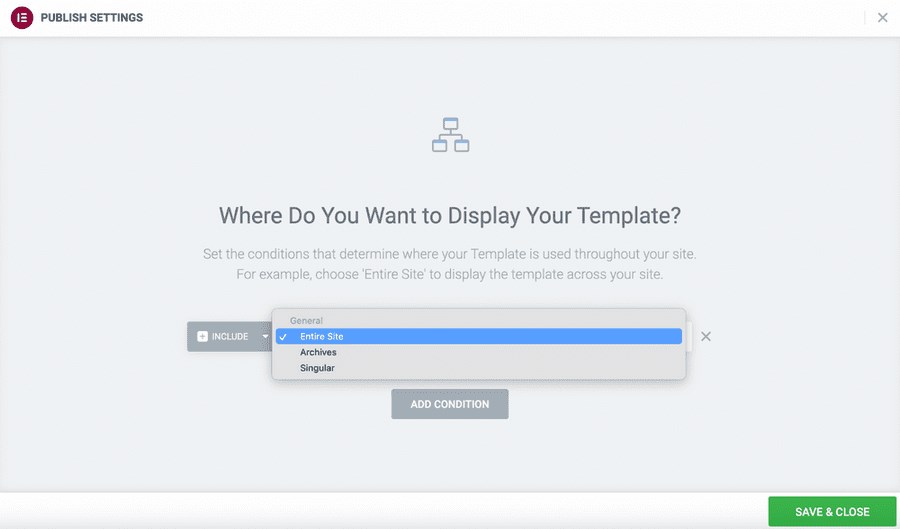
There are three options:
- Entire Site: If selected, the header will show up on all the pages and all the blog posts of your website.
- Archives: If you select this option, you can show the header in a particular archived page or post.
- Singular: If you select this option, you can show the header in a specific page, category or post.
This targeted display is one of the most powerful things about Elementor. You can use this to create custom pages, posts and even landing pages within your WordPress Website.
Did you know Astra’s pre-built templates for Elementor come with fantastic headers?
Elementor Sticky Header
In Elementor Pro, you have the option of creating some interesting header variations. Rather than relying on your theme’s sticky header options or a clunky third-party sticky header plugin, you can use the included Elementor sticky header feature.
To create a sticky header for your header template, all you have to do is go to the panel and select Advanced > Scrolling Effect.
Then, choose “top” or “bottom” to have the header you created “stick” to the top or bottom of the page as the user scrolls.
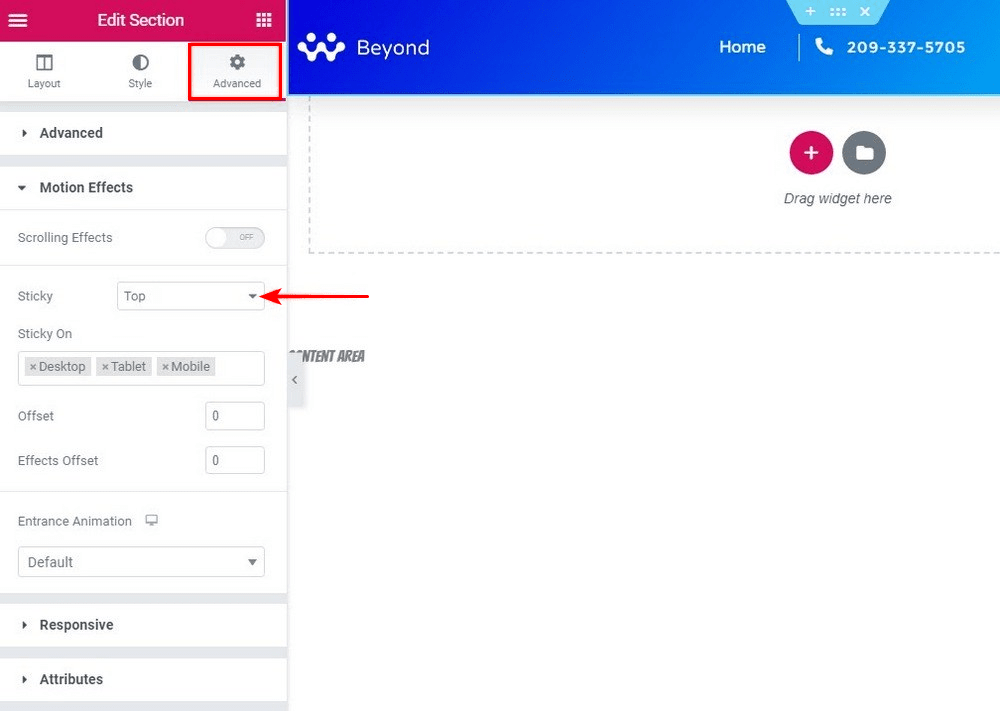
There are additional features to define how the header animates, and you can also select which devices you want this to apply to desktop, mobile, and tablet.
Elementor Transparent Header
If you really want your custom header to impress, you can add transparency to it by changing the opacity to a number like 0.5 with some custom CSS and Elementor’s CSS class.
Then, you can combine it with the sticky header feature, so when the user scrolls, the Elementor transparent header will reveal the page behind it.
This feature requires a little bit of code, but fortunately, it’s as simple as copying and pasting.
Here’s an official Elementor video that shows how it’s done.
Create Mobile Header
Elementor Pro gives you the freedom to completely customize your mobile header just like you customize a page.
You can select the mobile or tablet view by clicking on the responsive mode button on the bottom left of the screen, right below the Elementor widget panel.
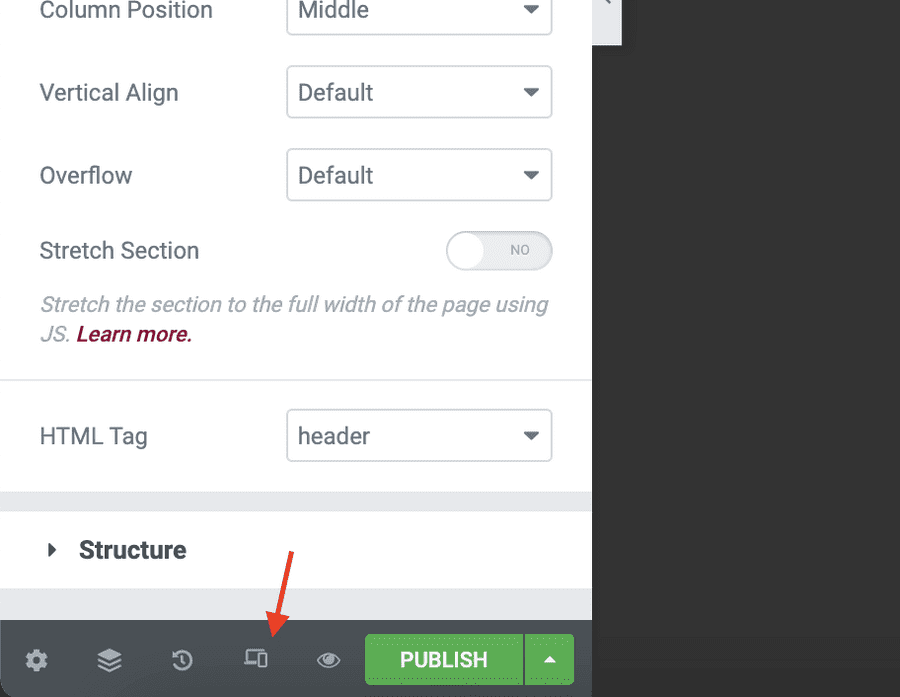
Once selected, you’ll notice a bar appear on top of the editing area. You can select the screen size from here.
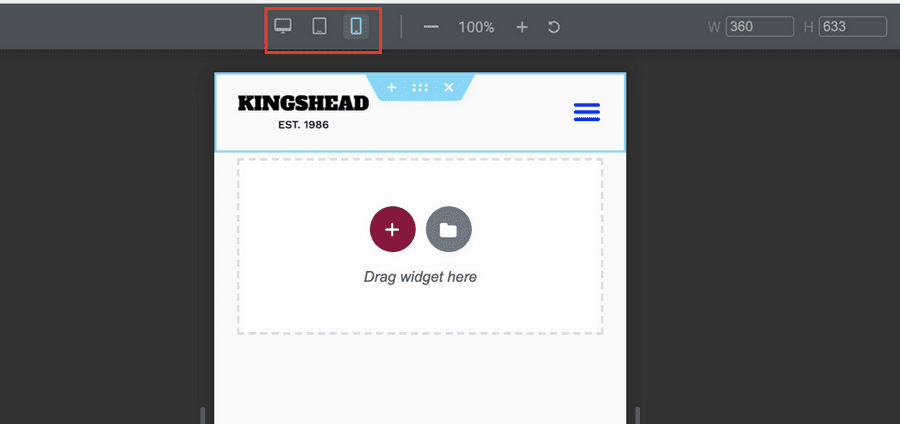
This process is very similar to editing pages with the Elementor free version.
Elementor Theme Builder Wrap-up
That’s a quick overview of how to build custom headers in Elementor. It’s not a perfect solution, but it gives you plenty of flexibility in building the custom header you need for your website.
Using conditions, Theme Builder also allows you to create more than one header and assign them to different areas on your site, which is a huge benefit that you may not have with your current theme.
Want to learn more about the Theme Builder method? Here is the official video walking you through creating your own WordPress header using Elementor’s Theme Builder.
Theme Builder Pros:
- Gives you total customization for your header design
- Uses intuitive Elementor page builder
- Includes a great selection of useful widgets
Theme Builder Cons:
- It doesn’t include schema markup
- No mega menu included
- Requires Elementor Pro (the paid version of Elementor)
Free Alternative to Elementor Pro For Creating Custom Headers
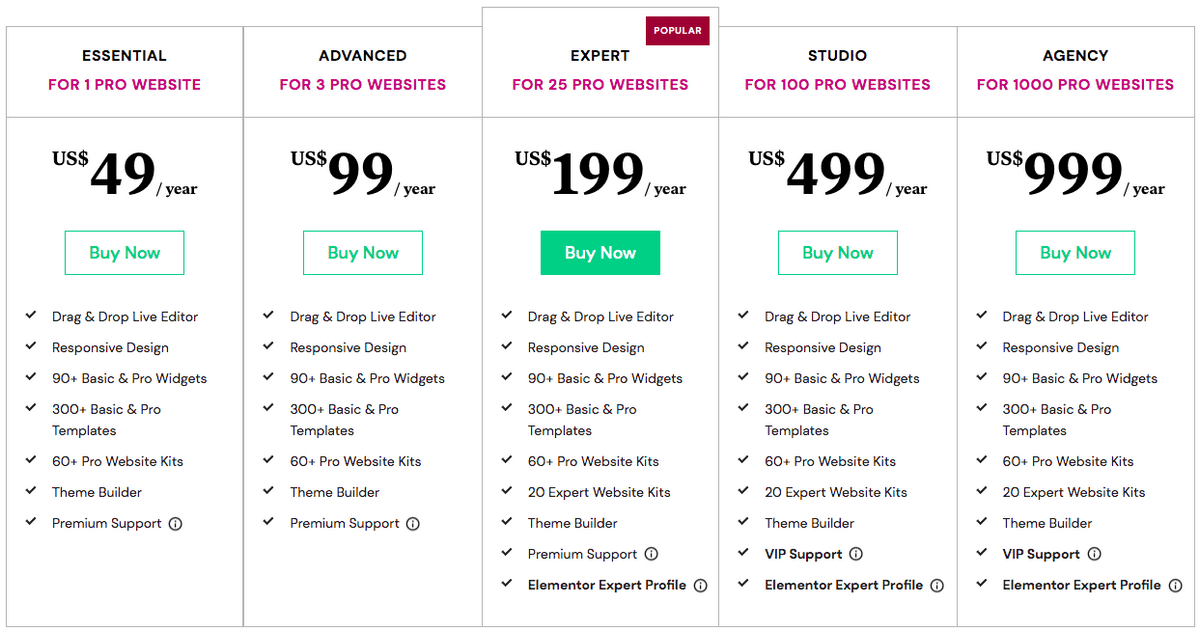
The Theme Builder in Elementor Pro is undoubtedly powerful, but to gain access to it, you have to buy a Personal Elementor subscription, which costs $49/year for one website.
The good news is, if you’re using the free version of Elementor, you have another option.
We’ve created a fantastic free plugin called the Elementor – Header, Footer & Blocks plugin. This is an addon for Elementor that allows you to create a layout and set it as a header or footer on your website.
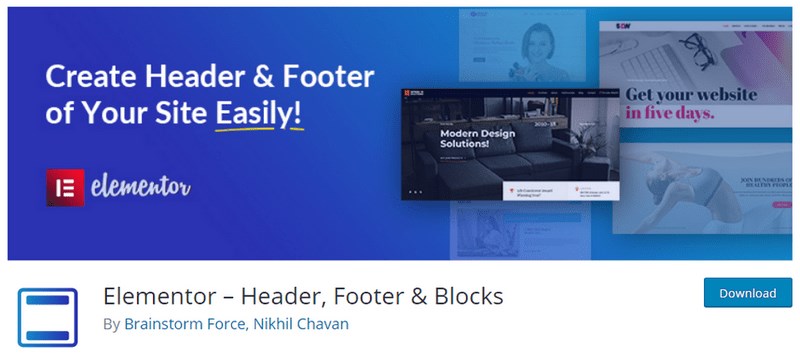
How does it work? It’s as easy as 1-2-3:
- Design a layout in Elementor like you normally would
- Designate it as a header
- The template you built will automatically be applied as a header
Check out this blog post to get a detailed step by step process.
The Elementor – Header, Footer & Blocks plugin gives you a lot of the same functionality as the Theme Builder in Elementor Pro, with the added benefit of schema markup.
Another big benefit of this builder plugin is that you’re able to use it for free indefinitely – you never have to worry about losing access if you don’t maintain a paid subscription.
The plugin comes with built-in widgets that make the header designing process easy.
These widgets offer basic required features so you don’t have to look for extra plugins.
- Site Logo
- Site Title
- Site Tagline
- Navigation Menu
- Page Title
- Retina Image
- Copyright
This plugin works with all themes. Few of the themes have built-in compatibility for this plugin while for a few you would need to choose a compatibility method.
In case after activating the plugin, you see a notice to check available compatibility methods.
Navigate to Appearance > Header Footer Builder > Theme Support, and select a suitable method.
Once you add theme support, just design a layout using Elementor, designate whether it should be applied as a header or footer, and you’re done!
Should You Use an Elementor Header?
So far in this post, we’ve looked at a few ways to make a custom header with Elementor. But with all of that said, is it worth actually ditching your theme’s header options in favor of a custom Elementor header?
Not necessarily.
The biggest benefit of sticking with your theme’s built-in header is that it’s fully supported already.
Here are just a few of the features your theme might include:
- Multiple layout variations
- A sticky header
- Mobile responsiveness
- Mobile header options
- Custom styling options
In other words,
Ultimately, what it comes down to is this: Does your current theme allow you to create a header that does what you need it to do?
With the Astra theme, you get the advanced Header and footer builder, which will do the job just fine. You can check out more about it in this video.
Don’t sacrifice functionality or branding with your header, but don’t create more work for yourself than necessary either! Only you can decide if you need a fully custom header.
Conclusion
It’s easier than ever to create great-looking websites using the drag-and-drop features of the most popular WordPress page builder. No matter which approach you take, your website is sure to look and run great with Elementor! Not only this, but you can also design your blog using Elementor.
If you want to edit your website footer as well, here is a quick guide.
Now, we want to hear from you! Have you had success using the Theme Builder in Elementor Pro for your header? Have you been able to create a custom header using the free Header Builder plugin?
Disclosure: This blog may contain affiliate links. If you make a purchase through one of these links, we may receive a small commission. Read disclosure. Rest assured that we only recommend products that we have personally used and believe will add value to our readers. Thanks for your support!




It’s not working! How can I make it appear?
Hello Jen, can you elaborate further on what is not working? It would need some troubleshooting. Please reach out to us through our Support Portal and mention the product and issue you are facing in brief. Looking forward to helping you out.