Interested in making money online without any investment? Would you like to sell products from Amazon and earn a commission? Well then my friend, here’s a detailed article on how to build an Amazon Affiliate storefront in WordPress.
Ok, I know I mentioned making money online without any investment. But hey, we are going to build an Amazon Affiliate Store in WordPress. And if it’s WordPress, well then, you will require a domain and hosting. After all, we do want to install the WooCommerce plugin too.
So, the only investment you would require is in buying a domain name and a hosting service.
Now that I’ve made myself clear, let’s begin.
- What Is Affiliate Marketing? and What Is an Amazon Affiliate Store?
- How Does Affiliate Marketing Work?
- Why Register for the Amazon Affiliate Program?
- How Much Can You Earn as an Amazon Affiliate?
- Setting up Your Amazon Affiliate Storefront Using WooCommerce
- How to Add Amazon Affiliate Products in WooCommerce
- Tips to Succeed as an Affiliate Marketer
- Frequently asked question
- Conclusion
What Is Affiliate Marketing? and What Is an Amazon Affiliate Store?
If there’s a topic on online marketing that I could go on about, it is Affiliate Marketing. And what’s the best bit of Affiliate Marketing?
Well, it’s easy to start, no investment (ahem… apart from the domain and hosting), no shipping, no inventory handling, no customer support, no product development, well, you get the drift. And most importantly, it’s passive income.
Now, before you get me wrong. Yes, it is passive income, but it doesn’t mean you just sit and watch the cash registers ringing in. Nope. There is a lot of work to be done for ‘passive income’ too, my friend.
So to start with the basics. What is Affiliate Marketing?
Well, plain and simple. You promote someone else’s product and earn a commission for it. That’s it! Now you see why I love talking about Affiliate Marketing.

Ok, on a more serious note.
When it comes to Affiliate Marketing, I would like you to understand the 3 Ps of marketing. Product, Platform, and Promotion.
You need to start with a product. Well, after all, you do need a product to promote. And while there are several product options (physical or digital products) that you can promote, you succeed in Affiliate Marketing when you identify a product of your interest. That is, identify your niche, your passion, your area of interest.
I suppose you would appreciate the fact that you are willing to go the extra mile if you are working on a project of your interest viz-a-viz a project that has been dumped on you. It only ends up as a 9 to 5 job, if you have no interest or passion in it.
And that is why it is so important to identify a product or rather a niche that you are interested in.
Because (here’s a big tip for you… drumrolls please), the secret to succeeding as an Affiliate Marketer is when you create content of immense value to help your audience solve their problem. And you can create content, be it articles, images, videos, etc., only when you love what you are doing.
So when it comes to selecting a product, Amazon is a great place for a newbie (and expert) Affiliate Marketer to begin. And the reason being, Amazon has a variety of products and categories (niches) to select from. And if you are confused and unsure of your niche, Amazon is a great starting point.
How Does Affiliate Marketing Work?
Before we get into the Amazon affiliate program, let’s take a step back and understand how Affiliate Marketing works.
In a typical Affiliate Marketing model, you have a Merchant (the product owner), the Affiliate (assuming it’s you), and the Customer (our audience).
To begin with, you need to register yourself as an affiliate.
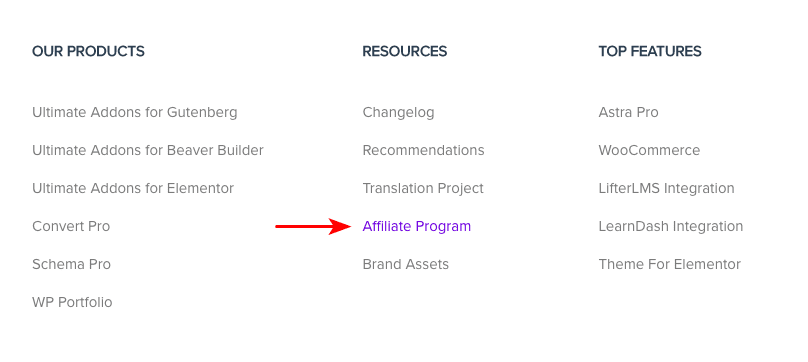
Typically, most merchants have a ‘Partner Program’ or an ‘Affiliate Program’ mentioned on their website. Take our WP Astra website for example. If you check out our footer, you will notice the ‘Affiliate Program’ link.
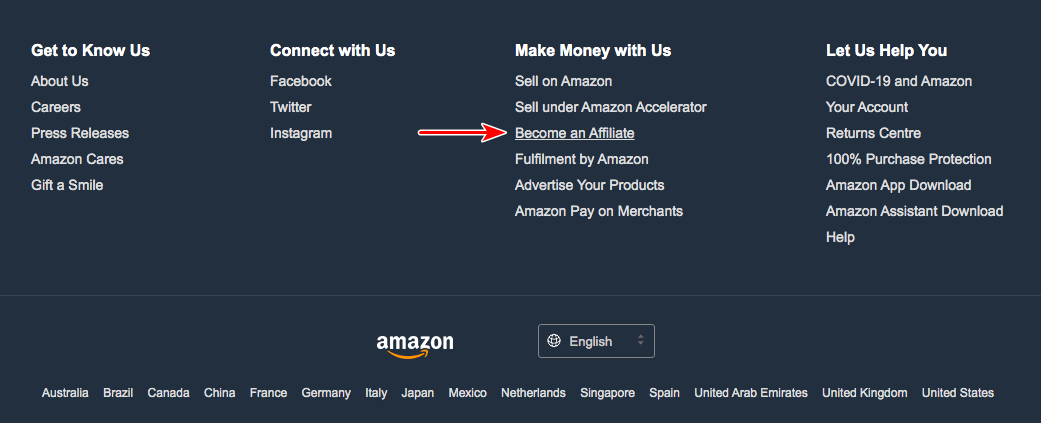
Much on similar lines, Amazon has their Affiliate Program too, which is referred to as the ‘Amazon Associates Program’. You will notice the ‘Become an Affiliate’ link in their footer too.
So, as a first step, you need to register as an affiliate with the merchant.
One prerequisite while registering as an affiliate, is to have your own platform. And this is the second P, as far as my 3 Ps of marketing is concerned. Your platform can be your website, your social media accounts, your youtube channel, etc.
While it is not mandatory for some merchants, having your platform, especially having a website will really boost your chances of getting approved as an affiliate.
Once you are approved as an affiliate, you will get your unique affiliate link(s). This affiliate link is what you will end up promoting. Be it in your articles, blog posts, reviews, videos, etc.
When your audience clicks on your affiliate link through your various promotions (this is my third P in the 3 Ps of marketing) and makes a purchase, you end up receiving a commission.
And how exactly does the merchant know the transaction has happened through your links, you may ask? Well, that’s where the concept of cookies come in.
Without getting too technical here, a cookie is a small piece of data (code) that is stored in the user’s computer. This happens through the web browser while browsing a website. Cookies were designed to record the user’s browsing activity.
E.g., let’s say you created an article on the best laptops to buy. When your audience reads this article and finds a product of their interest, they click on the link (i.e., your affiliate link). One guess where this link leads you to. Yes, to the Amazon store.
Now, let’s consider these three scenarios.
Scenario 1
The customer clicks on your affiliate link and lands on the corresponding page on the Amazon store, related to the laptop of their choice. They end up purchasing the product immediately.
Scenario 2
The customer clicks on your affiliate link and lands on the related page on the Amazon store. This time around, they close the browser page. They then go back to the Amazon store directly (not through your affiliate links) within 24 hours and makes the purchase.
Scenario 3
In this case, the customer goes back to the Amazon store directly (again, not through your affiliate links) after 24 hours and makes the purchase.
Now, what if I tell you that from one of the above three scenarios, you will not earn a commission, even if the customer goes ahead and makes a purchase through your Amazon affiliate link. Any guesses which one?
Well, it is scenario #3. And the reason being, Amazon’s cookie period is only for 24 hours.
Merchants typically assign, what is called, a cookie period. What this means is, if a customer goes ahead and makes a purchase, through your affiliate links, within the cookie period, you are entitled to the commissions.
If the cookie period is one month, and even if the customer returns directly to the merchant’s website within a month and makes a purchase, you are entitled to the commissions.
And if the cookie period is 24 hours, as in the case of the Amazon Affiliate Program, and the customer purchases after the 24 hour cookie period, well my friend, you miss out on the commission.
While this is surely a disadvantage of the Amazon Affiliate Program, the flip side is that when a customer visits the Amazon store, there are more chances of them adding additional items to their shopping cart.
So, even if you are promoting, let’s say, only the laptops, you will be entitled to the commissions for all the products that the customer eventually purchases.
Why Register for the Amazon Affiliate Program?
While I did dwell upon this earlier in this article, selecting a niche or rather a product is imperative for you to succeed in Affiliate Marketing.
Let’s say you are into the health and fitness niche. If you were to purchase a product, related to your niche, I’m guessing 8 out of 10 times, you would visit the Amazon store for starters. If you do not find what you are looking for, you may consider visiting some online stores related to the health and fitness niche.
Without a doubt, Amazon is huge. And if we are starting, competing with Amazon is not the right way forward. So, what next?
This is where it makes sense to narrow down on your niche. Be it, home and furnishing, health and fitness, beauty and wellness, etc. Build a niche store for yourself. Create content around your niche.
If you are in the health and fitness niche, create epic pillar articles such as ‘how to lose weight in one month at home naturally’, ‘how to build muscles at home with dumbbells’, etc., and include your affiliate links. Optimize your article for search engines, promote your articles on social media, etc., and become an authority in your niche.
And if you become a powerhouse of information related to your niche, you are going to have way better sales than Amazon very soon. High hopes, but hey, that’s incentive enough to start our new venture on a positive note! What say?!
How Much Can You Earn as an Amazon Affiliate?
Alright! I know you are waiting to kick start the actual work behind creating an Amazon Affiliate store. But, before we get into the WordPress development, let’s understand how much you can earn from the Amazon Affiliate Program.
The commissions you earn from Amazon vary based on the product and the category.
At the time of creating this article, as you can see from the table below, the percentage commission varies from 0.2% for Gold and Silver coins to 10% for furniture, Kindle products such as the Fire TV Stick, and other Amazon devices.
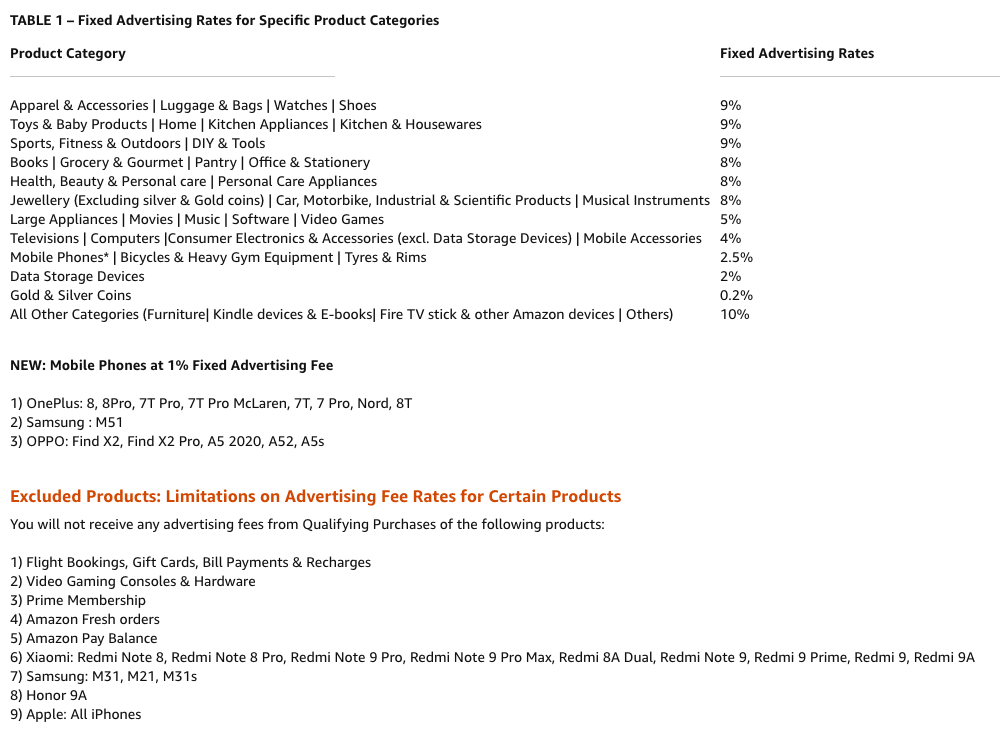
Which would mean, e.g., if you sold a book for USD 8, you will be eligible for 8% of the price as commission, i.e., USD 0.64 per book sold. Increase the quantity sold, well, you earn more.
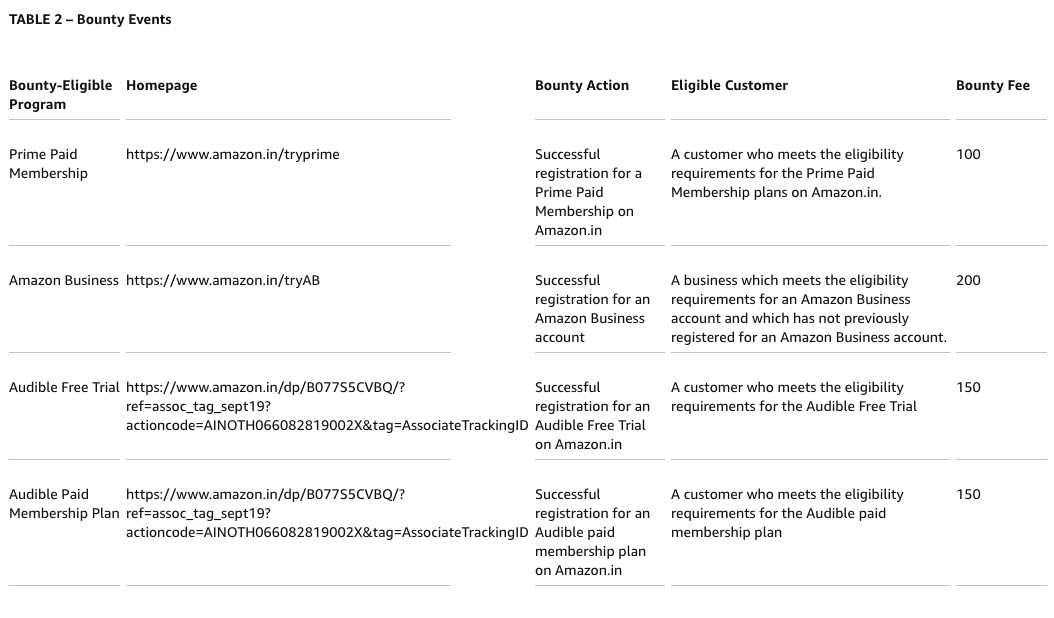
You can also earn commissions ranging from INR 100 up to INR 200 from the Amazon’s Bounty programs, such as the Amazon Prime Paid membership, Amazon Business, Audible Paid Membership, etc.
Alright. Now that we are done with the basics, let’s get into the actual article. Let’s learn how to build Amazon Affiliate Store in WordPress.
Signing up for Amazon’s Affiliate Program
To begin, let’s go ahead and sign up for an Amazon Affiliate account.
Head over to the Amazon website and scroll the bottom of the page. Click on the link ‘Become An Affiliate’
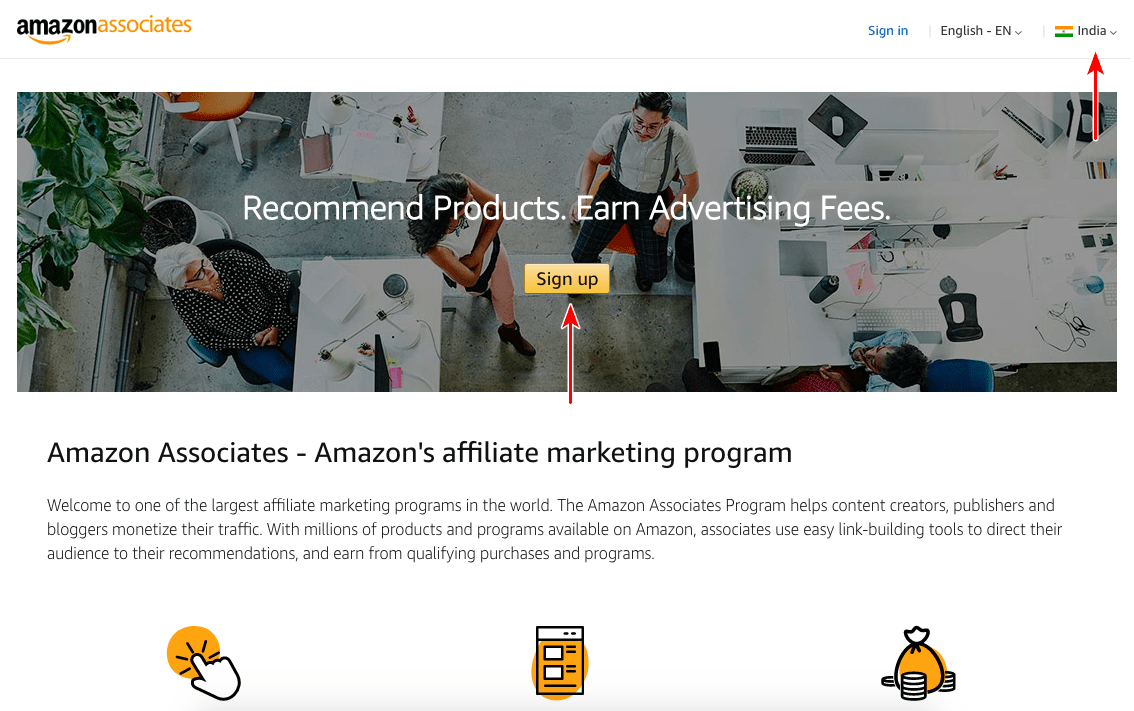
Once you’re on this page, click on ‘Sign up’.
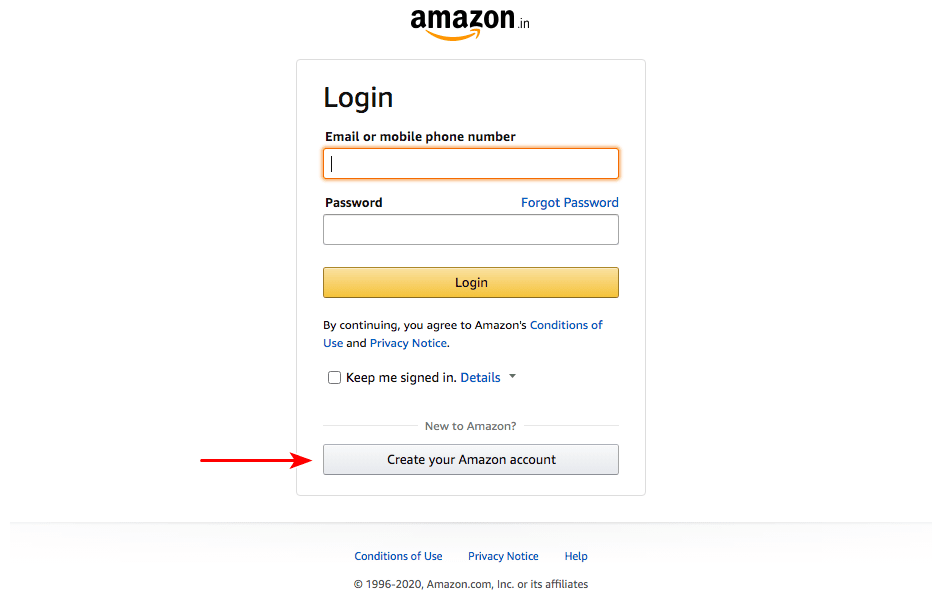
Click on the ‘Create your Amazon account’ button, if you do not already have an Amazon Affiliate account.
Create an account by entering in the details requested, as shown in the series of images below.
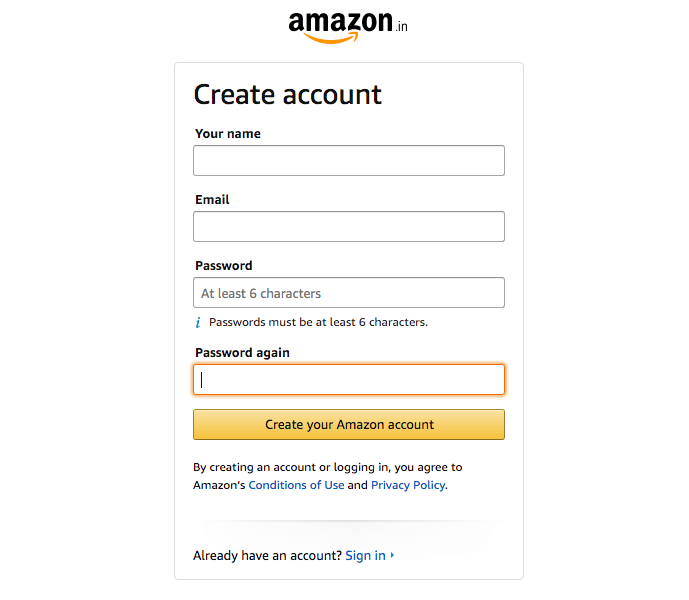
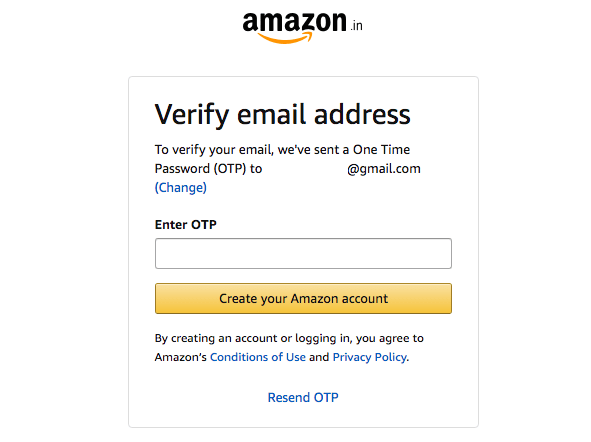
Once you have entered your details and clicked on ‘Create your Amazon account’, an OTP will be sent to your registered email address.
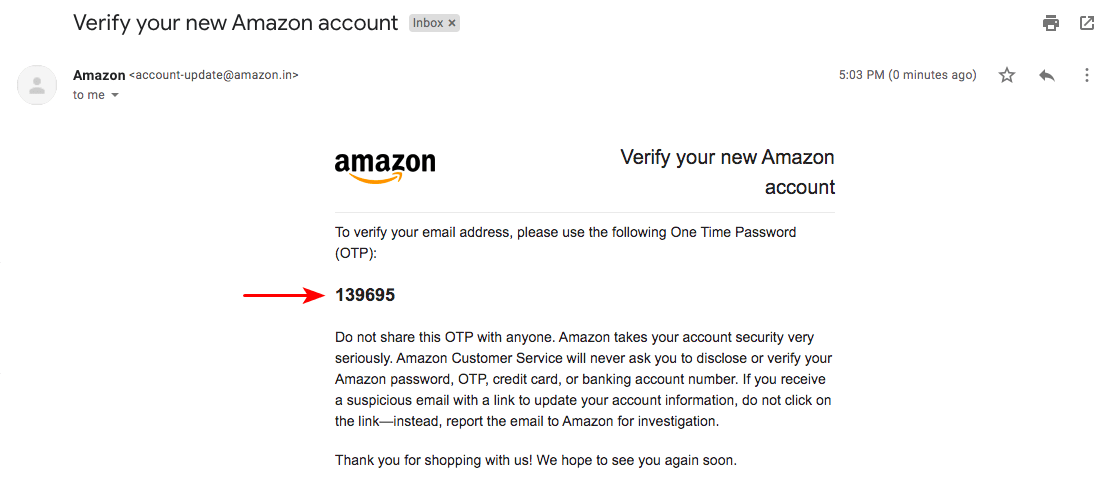
As shown in the image above, enter the OTP provided in the email, and complete the registration process.
Now, as part of the account registration formalities, you will have to complete the next two tabs, i.e., ‘Website and Mobile App List’, and ‘Profile’, before you can ‘Start Using Associates Central’.
The current tab, i.e., ‘Website and Mobile App List’, is where Amazon gathers information about the platform you intend to use to promote the Amazon Affiliate products.
I suppose you’d recollect my mentioning about having a website. Well, there you go.
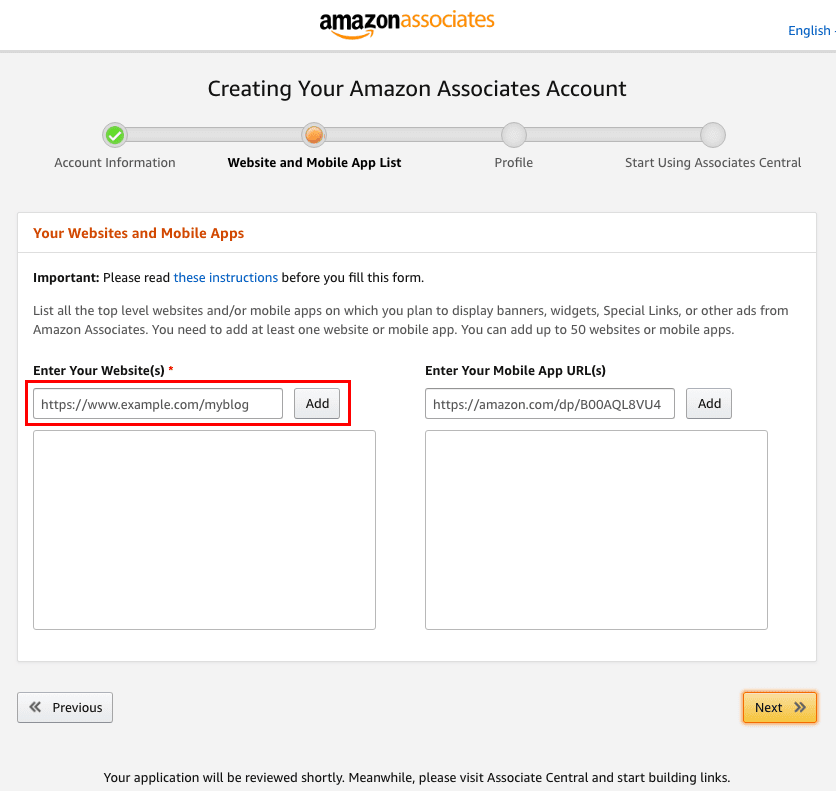
You can enter in your Website or your Mobile App URLs in the respective fields and ‘Add’ them.
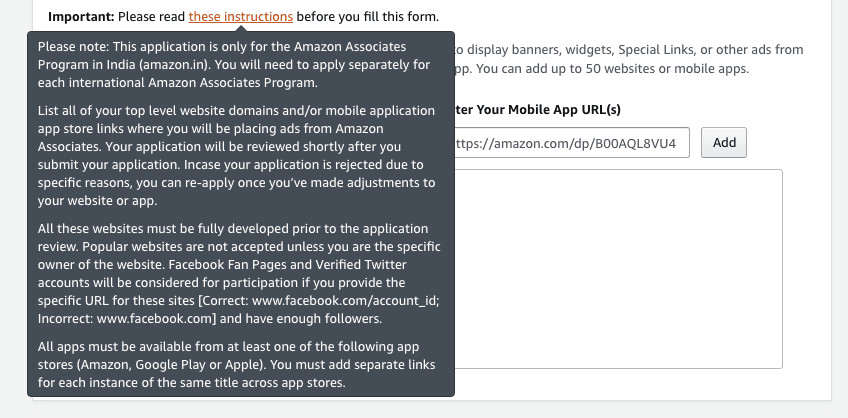
As you can notice, if you hover across the ‘these instructions’ link, as shown above, one of the criteria for your application to be approved is to have a fully developed and functional website. You can also include your Facebook page or your verified Twitter account too.
Once you’ve completed this step, click on ‘Next’.
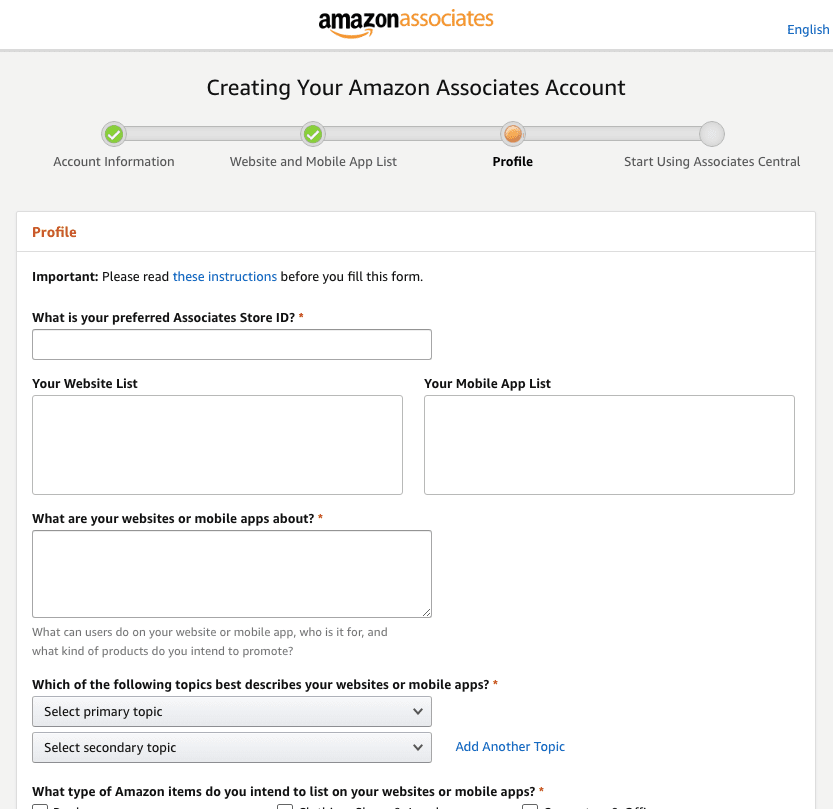
The next step is to enter your profile details.
You will be asked to enter an ‘Associate Store ID’ of your preference. Go ahead and enter an ID of your choice.
The website, social profile, or the mobile app you entered in the previous step, will appear under ‘Your Website List’ or ‘Your Mobile App List’.
Go ahead and fill in the remaining fields by selecting the options closest to your website, niche, and area of expertise.
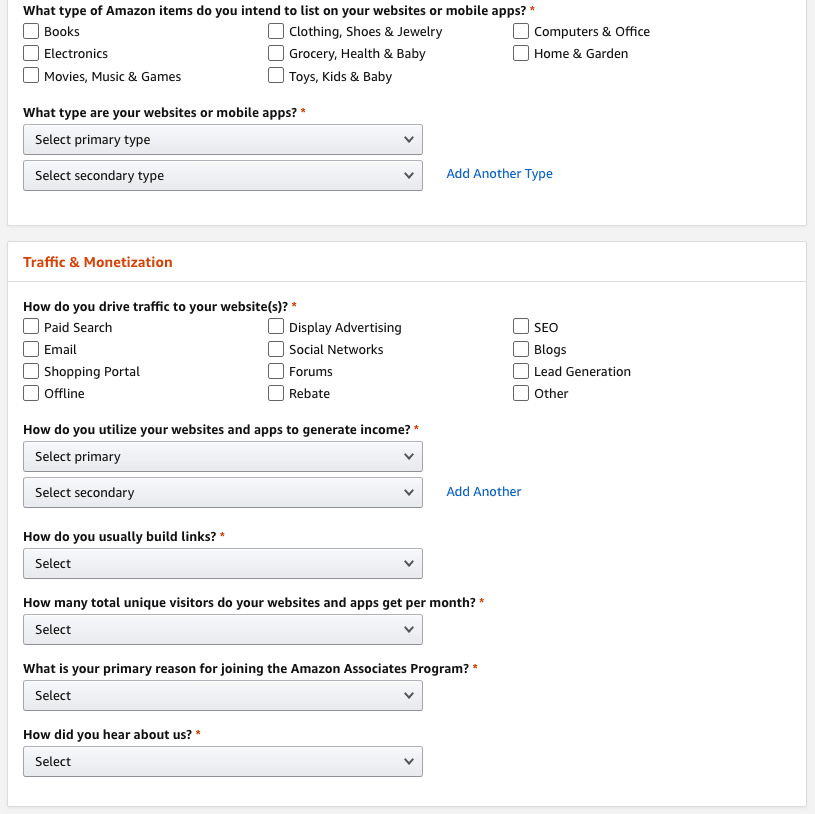
Once you have completed this step, click on ‘Next’.
Your account has now been created.
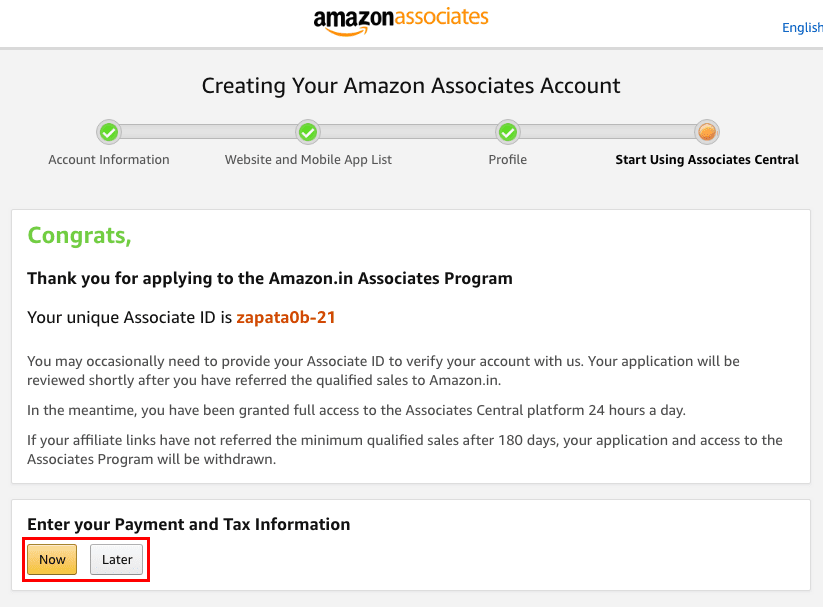
Your unique Amazon Associate ID will be mentioned, as in the image shown above.
You will now be prompted to ‘Enter your Payment and Tax Information’. You can choose to enter them right away or later.
Click on ‘Now’ if you would like to proceed with entering your payment information. You have to mention the bank details where you would like to get paid.
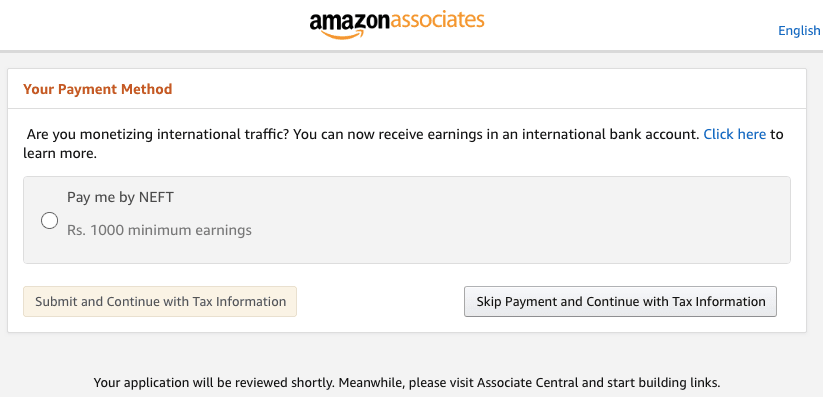
Select how you would like to get paid, enter your bank details, and your tax information. Once you’ve completed all these, you will be directed to your Amazon Affiliate dashboard.
How to Get Your Amazon Affiliate Links?
Great. Now that you have your Amazon Affiliate account ready, it’s time to get your Affiliate links.
Your dashboard gives you a summary of all the clicks you have received and commissions you have earned daily.
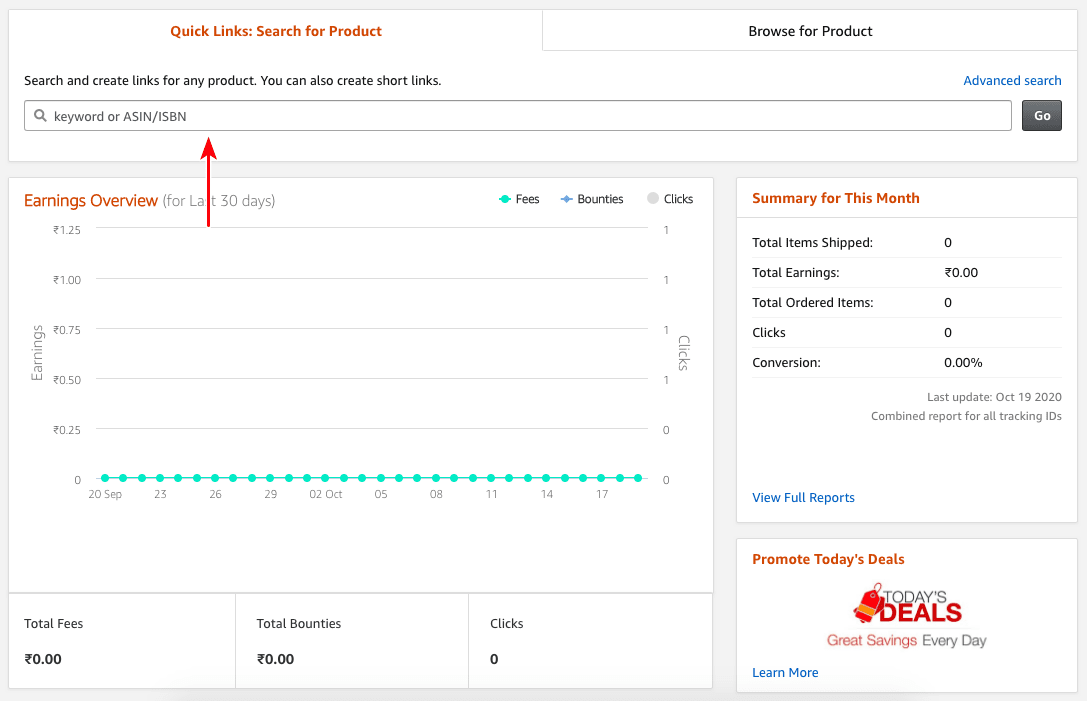
Under ‘Summary for This Month’, you have the option to ‘View Full Reports’ too. This is quite an in-depth dashboard.
Above the ‘Earnings Overview’, you will notice a search field, as is shown below.

This is one method, how you can get your affiliate links.
You can either get your affiliate link for the main Amazon website or you can get the affiliate links for individual categories (e.,g., books, apparels, toys, mobiles, etc.) and individual products too.
You could search for a ‘keyword’ or the product code, i.e., the ‘ASIN/ISBN’ number. The easier option is to click on the ‘Browse for Product’ tab.
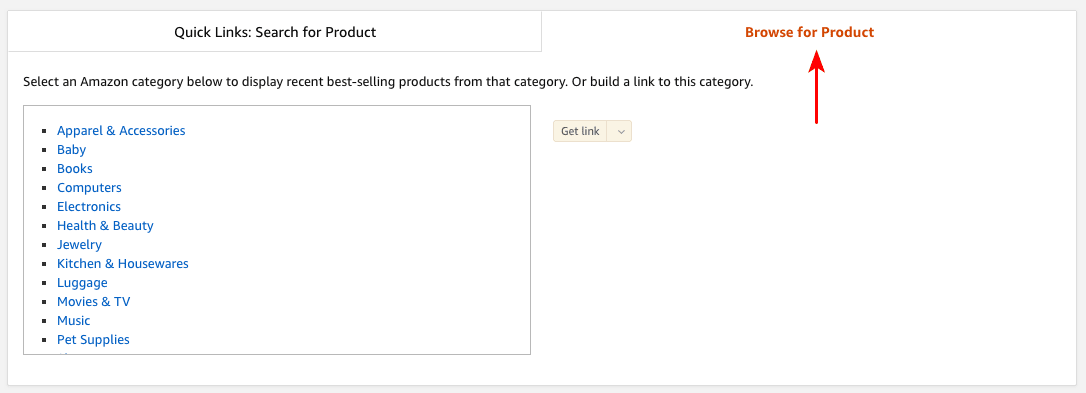
You will find the entire list of categories on the left-hand side (as shown above).
On selecting a particular category, e.g., ‘Apparel & Accessories’, you will notice the Get link’ button on the right getting highlighted. And yes, as you would have guessed by now, click on the Get link’ button and you will be able to get your affiliate link.
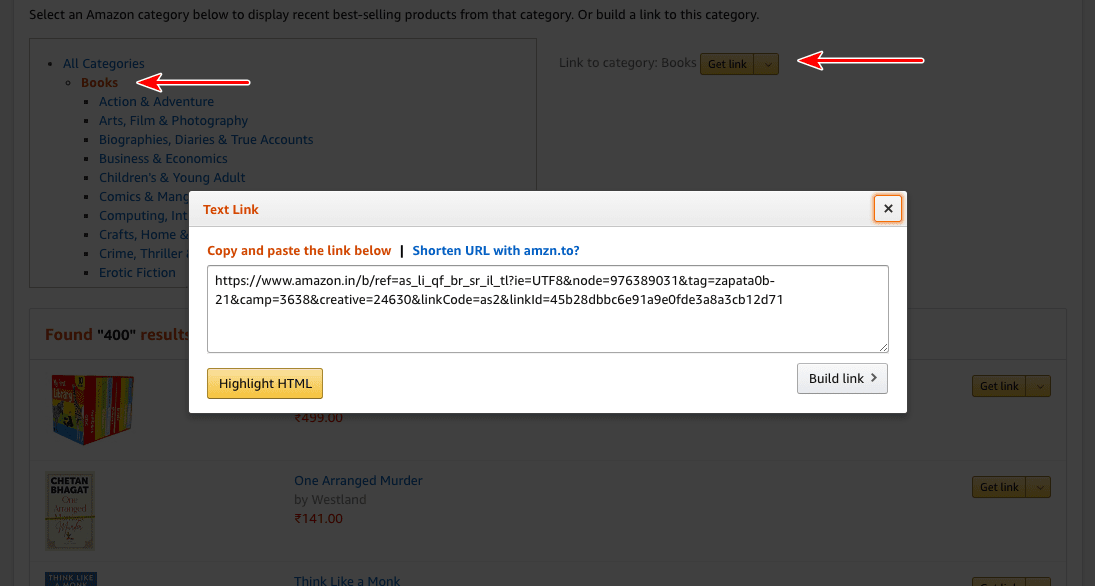
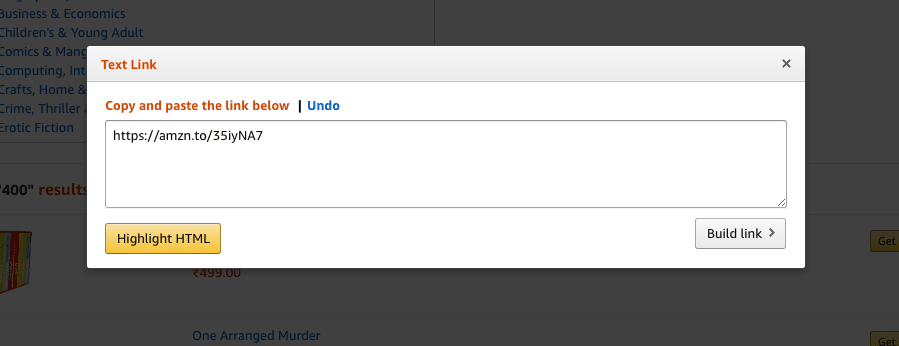
You have the option to either copy a long URL or click on the ‘Shorten URL with amzn.to?’ for a short URL, as shown below.
If you would like to get an affiliate link for a particular product, you could select the category and then the product you would like to promote.
E.g., under the category ‘Books’, you will find a list of options. Click on the ‘Get link’ text (not the arrow).

You will now have the option to customize your links. You have the options to ‘Open link in a new window’, ‘Show border’, customize the background color, title color, price color, and can preview how your links will appear.
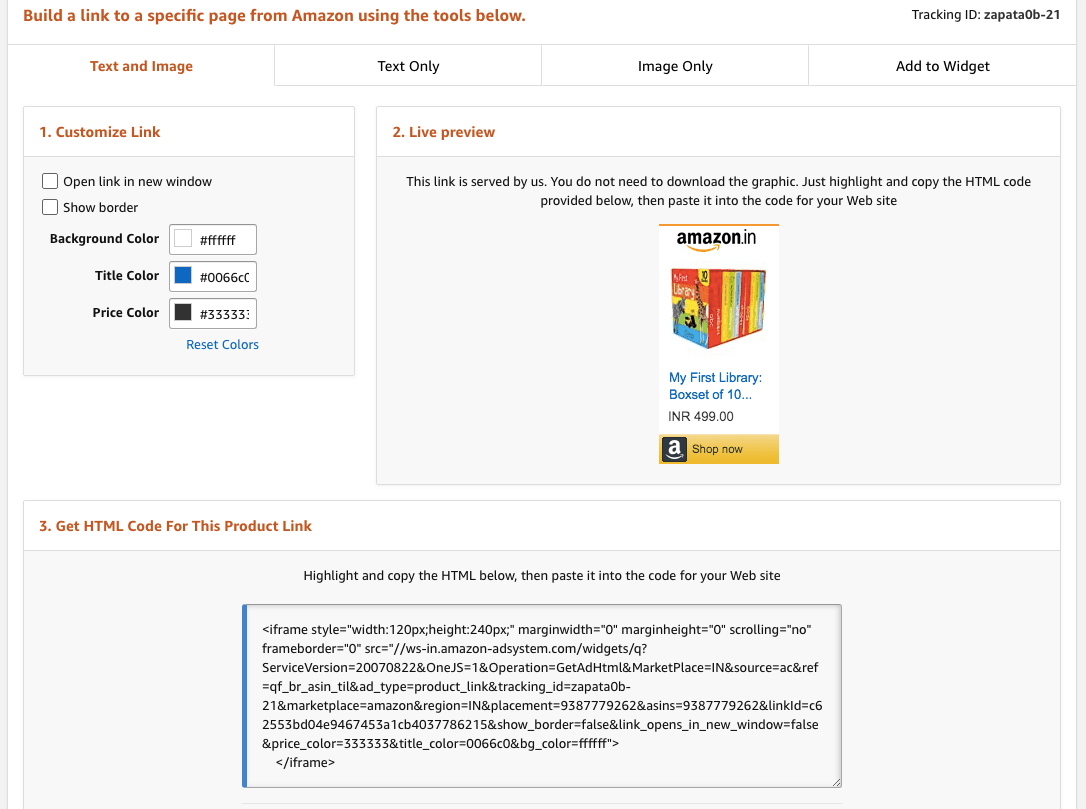
You will also notice you have the option to select the format in which your links should appear. You have options such as ‘Text and Image’, ‘Text Only’, ‘Image Only’, and ‘Add to Widget’.
So your step one would be to select the format of your choice and step two would be to copy the HTML code under the ‘Get HTML Code For This Product Link’ and include it on your web page.
And talking of web page, now that we have our Amazon Affiliate links, it is time to create our WordPress website and include these links.
Setting up Your Amazon Affiliate Storefront Using WooCommerce
The first step to building an Amazon Affiliate Store in WordPress is to have a domain name and hosting. And while there are several options available, we highly recommend considering BlueHost.
We’ve also got a review article created of why BlueHost, that you could consider checking out – Bluehost Review — Is Bluehost a Good Choice for WordPress?
So, head over to the BlueHost website and choose ‘WordPress Hosting’ under WordPress.
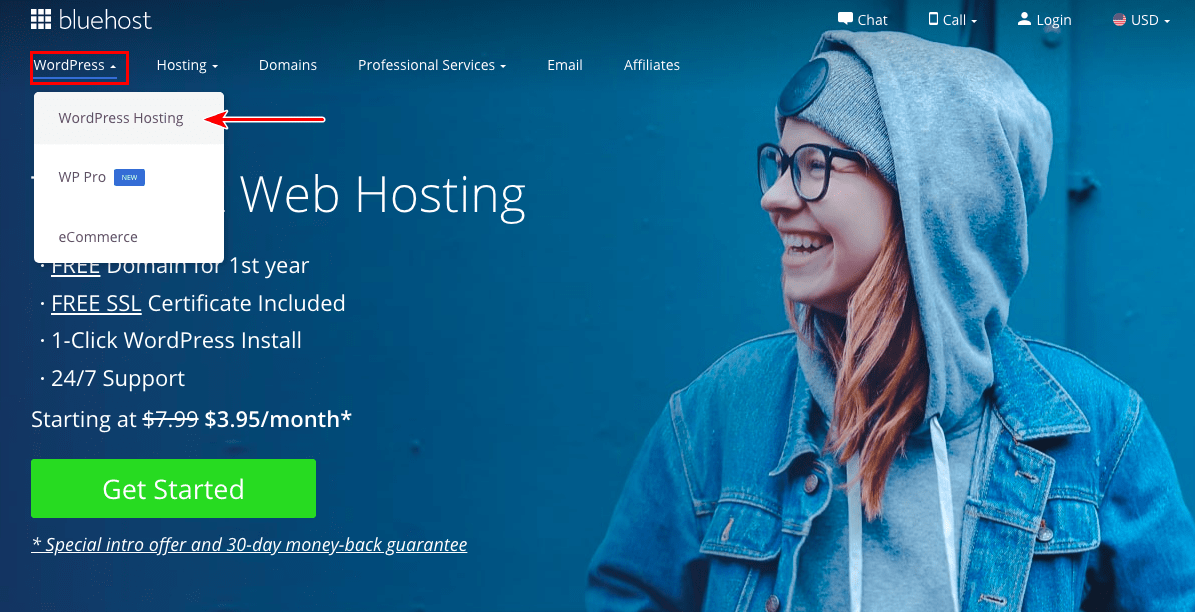
The plans start from USD 3.95 per month. You could select a plan of your choice, depending on the number of websites you would like to host.
If you are planning on hosting only one website, you could go ahead with the ‘Basic’ plan. And if you foresee yourself developing and hosting several websites in the future, you could select, either the ‘Plus’ or the ‘Choice Plus’ plans.
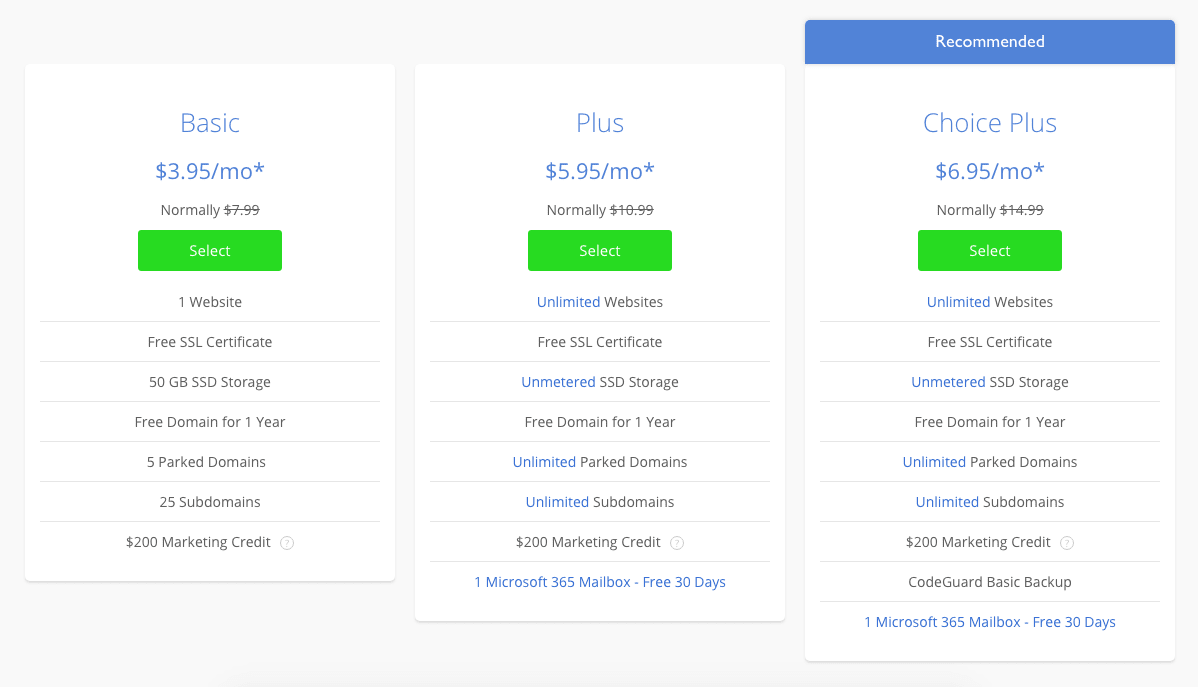
Once you have selected on a plan of your choice, you will be asked to enter in the domain URL.
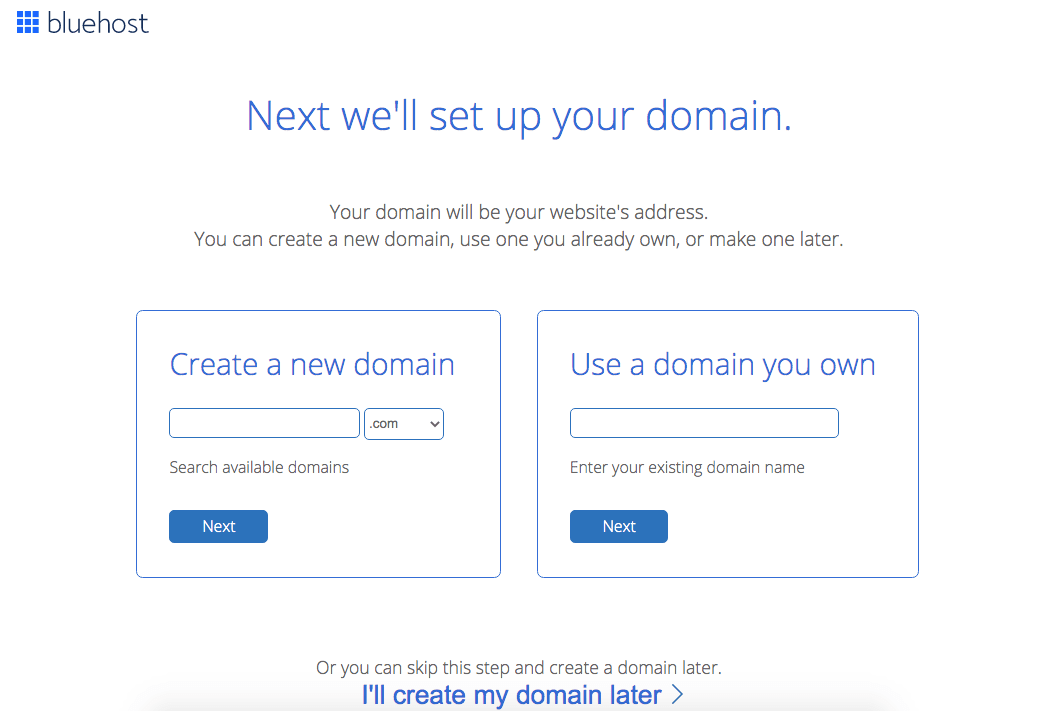
If you already have a domain name purchased, you could enter the same under the ‘Use a domain you own’ tab and click ‘Next’.
If you would like to purchase a domain name, go ahead and check if your domain name is available, under the ‘Create a new domain’ tab, and click ‘Next’.
For the sake of this article, I checked if the domain name ‘myamazonaffiliatestore.com’ is available. And guess what? It is available.
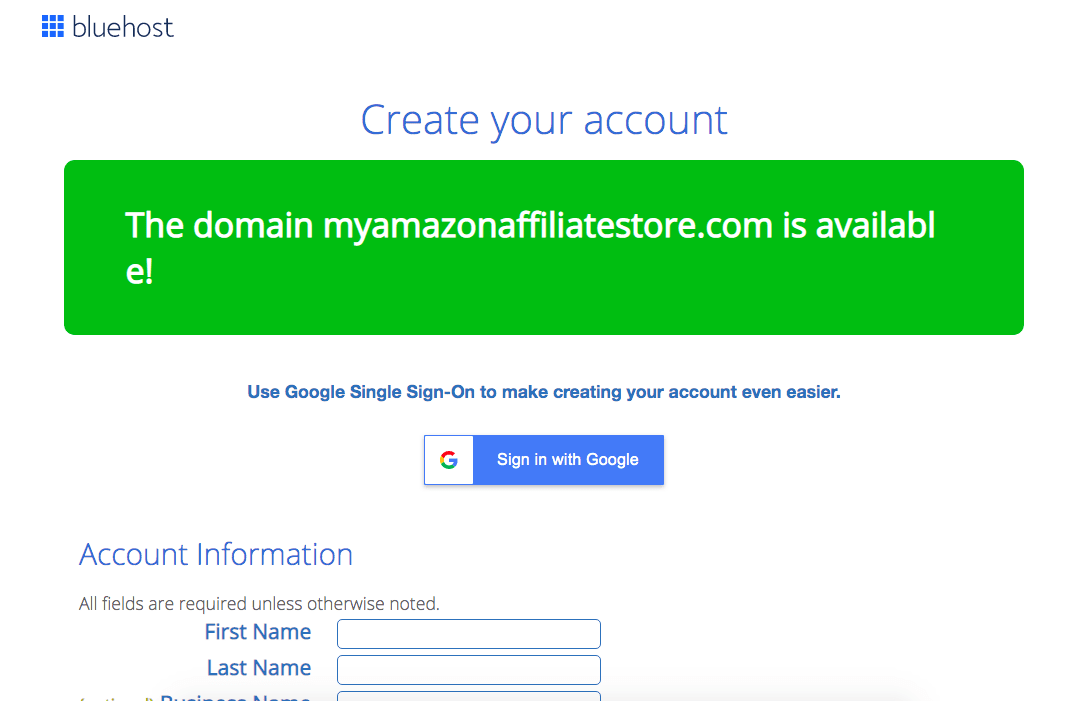
But, here’s a word of caution.
Do not select a domain name using the Amazon brand name, lest you want to deal with copyright and legal issues in the future.
Ok, so moving on, you will be required to fill in all the details on this page.
Under the ‘Package Information’, you could select the tenure under the ‘Account Plan’ of your choice. Yes, if you do select the 36-month option, you do save quite a bit. But, that is a choice you could make.
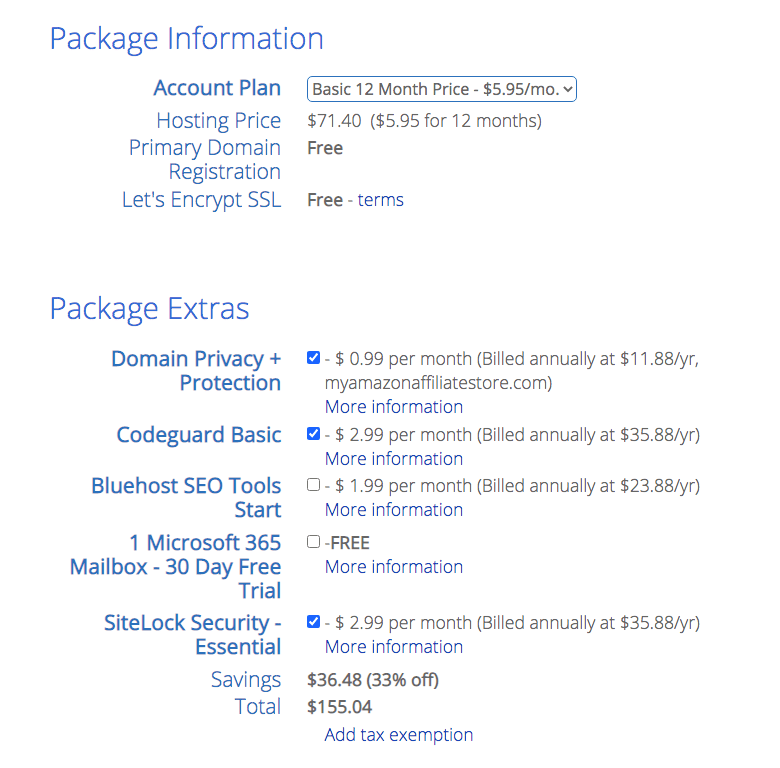
What I would like to draw your attention to are the ‘Package Extras’.
Out of the various options available, the only extra I would recommend is the ‘Domain Privacy + Protection’. Selecting this option helps hide your personal contact information.
Typically, if you were to check the WHOIS record for any domain, you could get the contact details of the domain owner. Using this information, anyone could contact you for, let’s say, pitching website development services, or alternate hosting service providers, etc. In short, use your data for sales and cold calls.
So, if you’d like to avoid such calls and random emails, you could opt-in for this service, i.e., the ‘Domain Privacy + Protection’. Your contact details are hidden from the outside world.
Once you have entered your payment details, complete the transaction and with some very easy to follow steps, your WordPress website will be installed and you will find yourself on the WordPress dashboard.
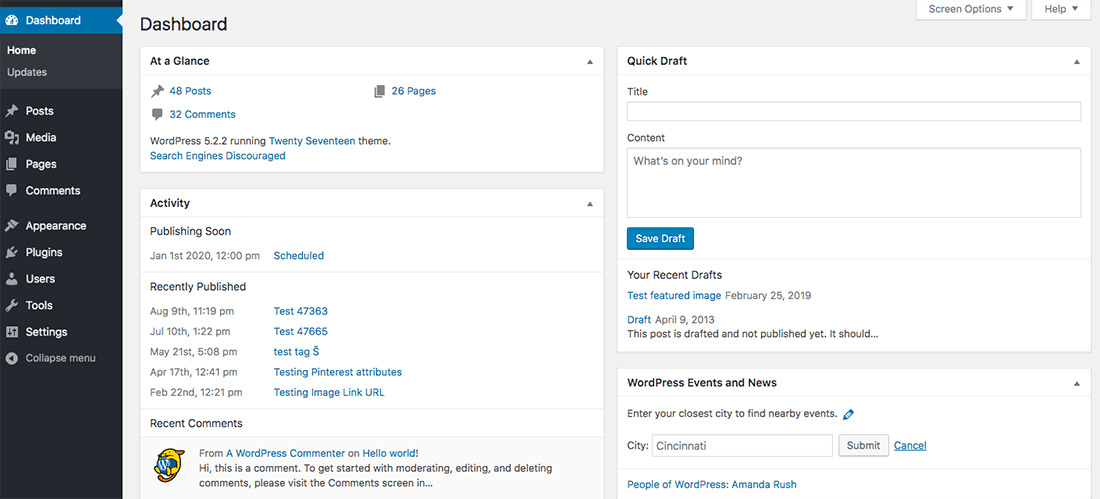
Congratulations!
You’ve now purchased your domain name, the hosting, and installed WordPress.
Install Astra Theme
The next step towards building an Amazon Affiliate store is to select a theme for affiliate marketing. And yes, we will be installing the Astra Theme.
Head over to Appearance > Themes
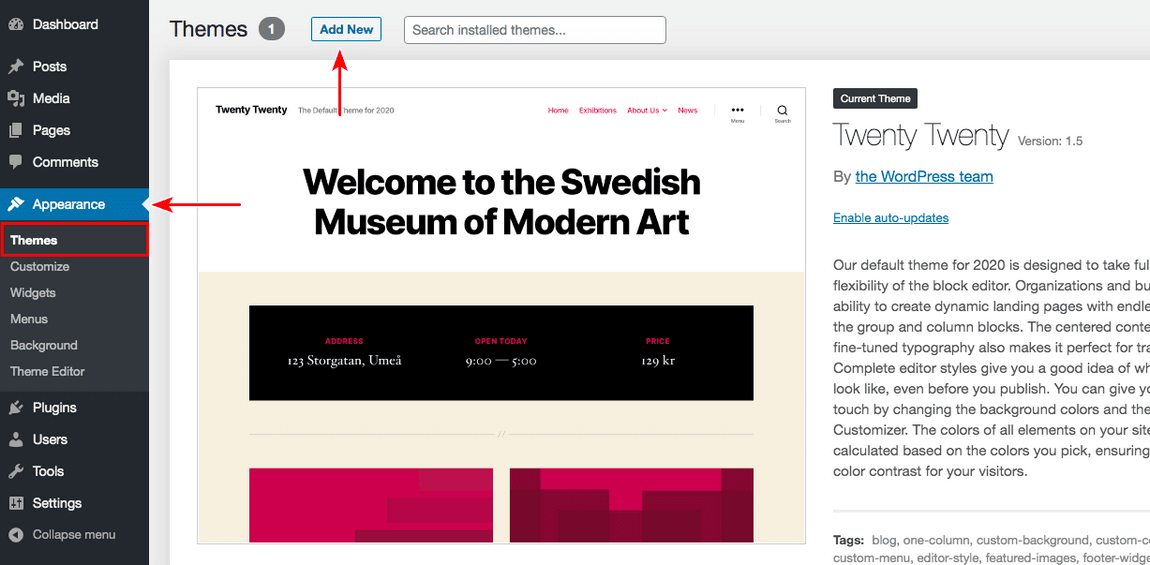
The current theme, ie., ‘Twenty Twenty’ is the default theme.
Click on ‘Add New’, then search for ‘Astra’.

Now click on ‘Install’ and then activate your Astra theme.
Once your theme is activated, you will notice a new link ‘Astra Options’ under Appearance. Yes, please click on that.
As shown in the image below, you will find a link to ‘Install Importer Plugin’, under the ‘Import Starter Template’, on the right-hand side.
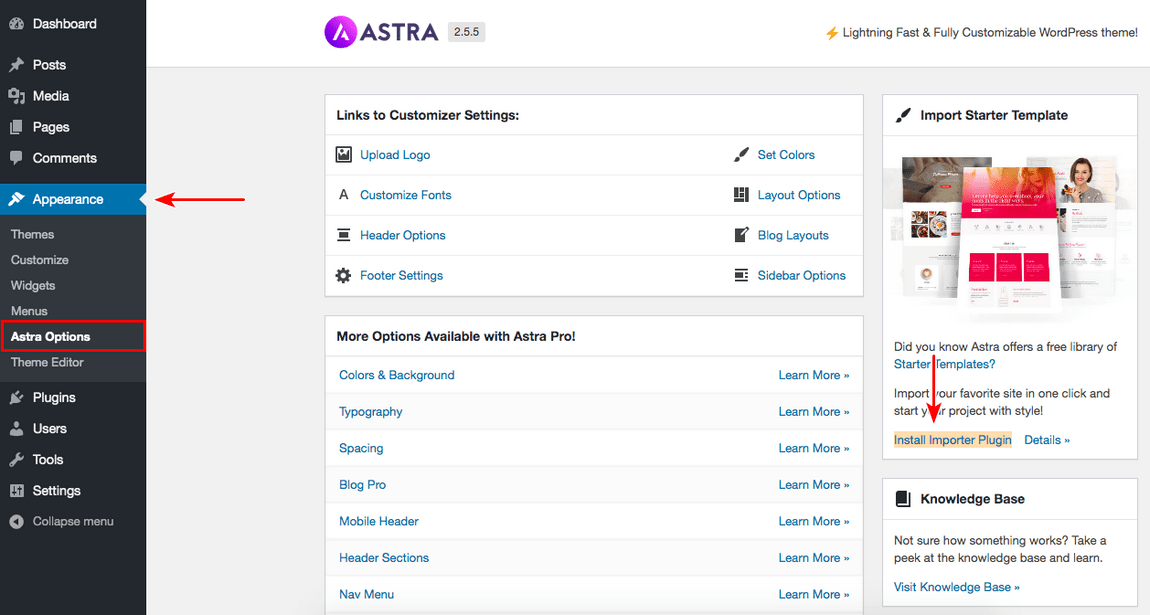
Click on ‘Install Importer Plugin’.
Once this plugin is activated, you will find yourself on the following screen.
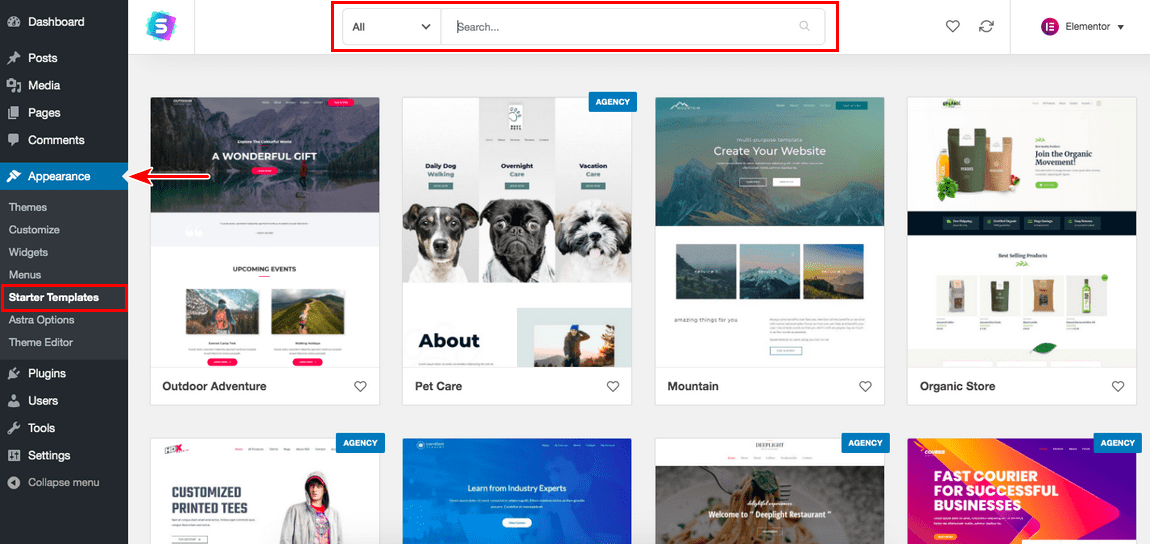
On the top right-hand corner, you will notice the page builder selected is ‘Elementor’. The other options you have are Beaver Builder, Gutenberg, and Brizy. You could choose a page builder of your choice. For this article, we will stick with ‘Elementor’.
You can go ahead and apply a filter, to search from the list of available starter templates.
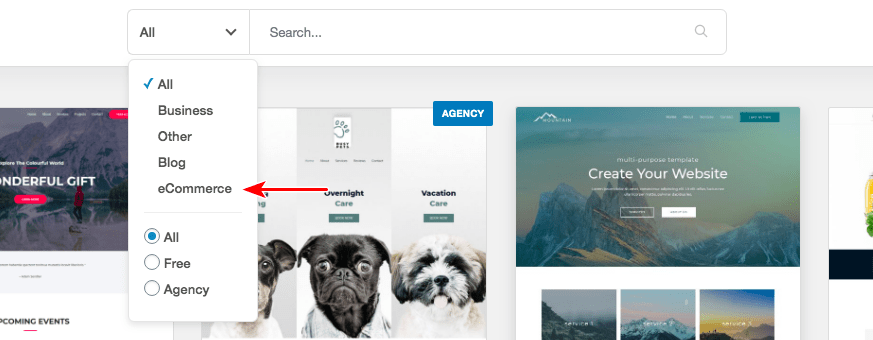
Since we will be building an Amazon Affiliate store in WordPress, we will select the ‘eCommerce’ option. This will give us a list of starter templates suited best for the Amazon Affiliate store.
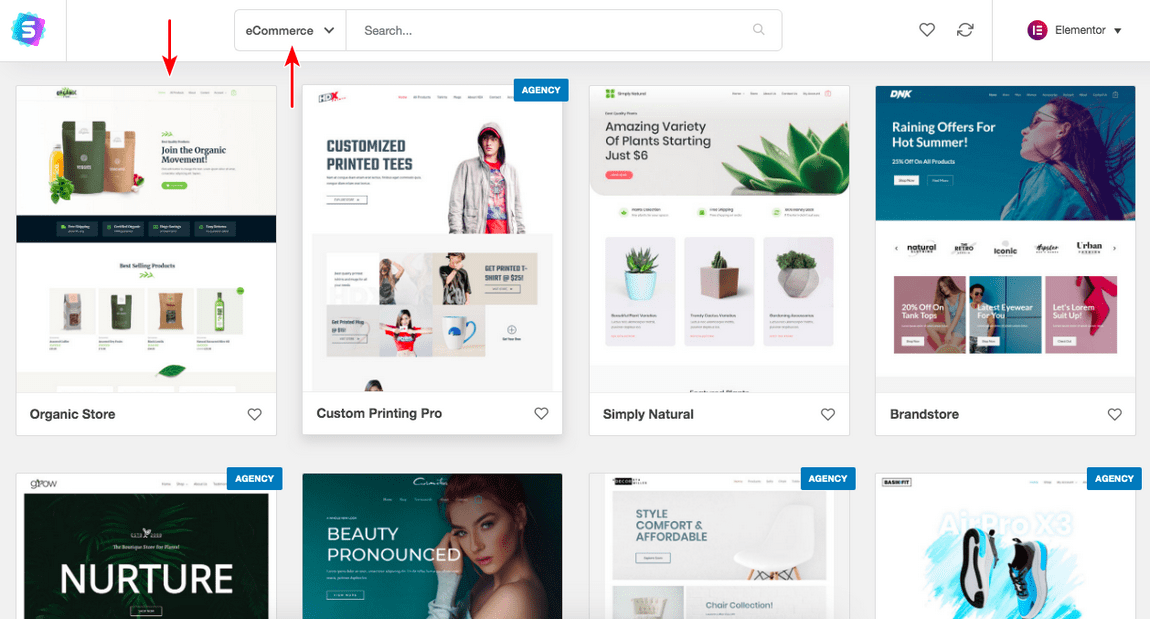
Select a template of your choice from amongst the options available. I will select the ‘Organic Store’ starter template.
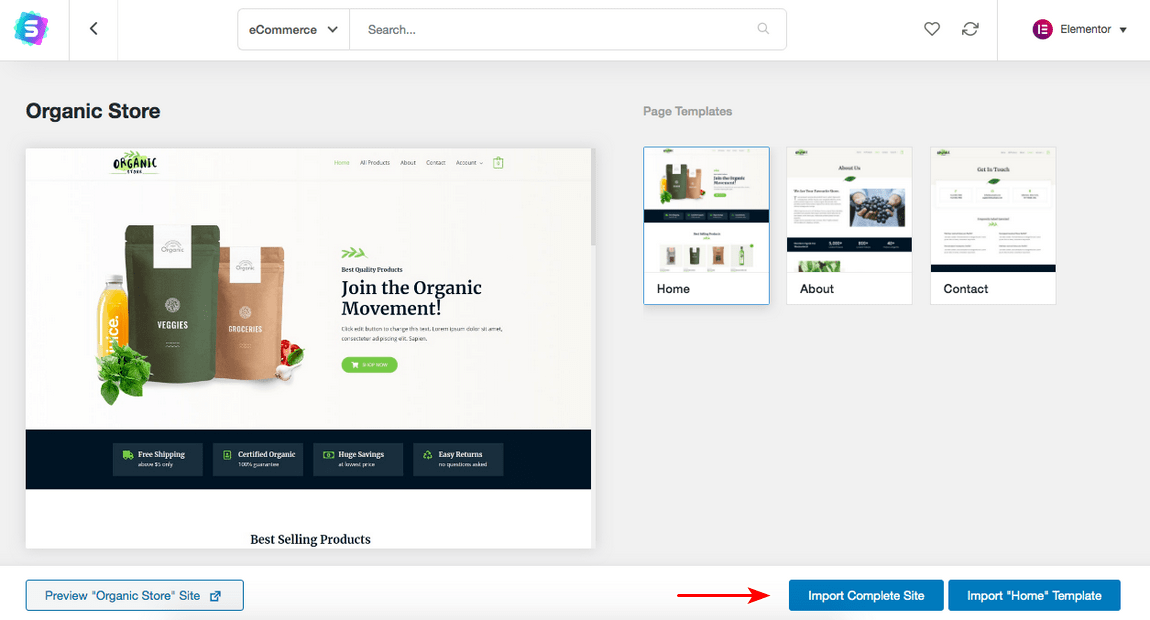
You could preview a working template of the site before installing it. Once you are sure about the theme, go ahead and click on ‘Import Complete Site’, unless of course, you want to import only the home page.
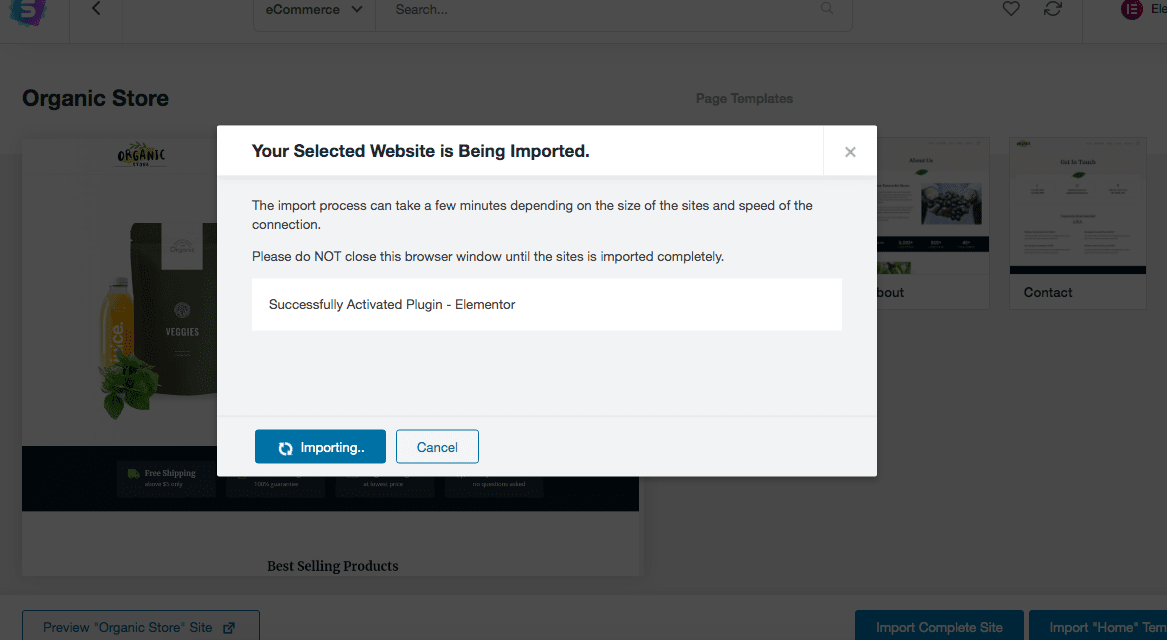
Your import will begin and all the necessary plugins, including WooCommerce, will be installed.
You will be prompted on the completion of the import and your starter template will be applied across the website.
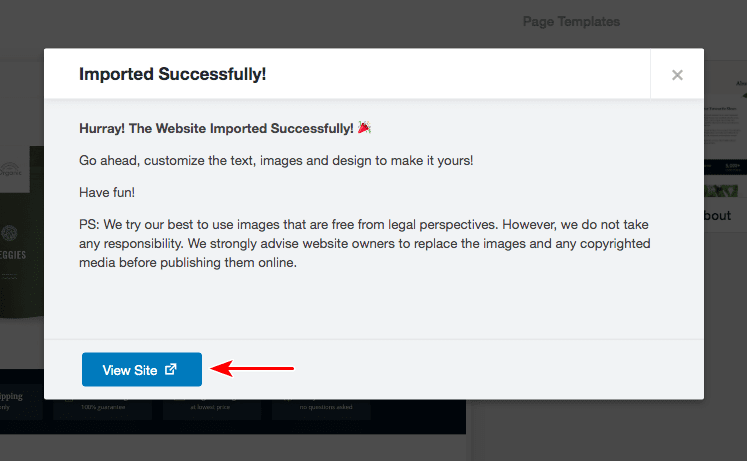
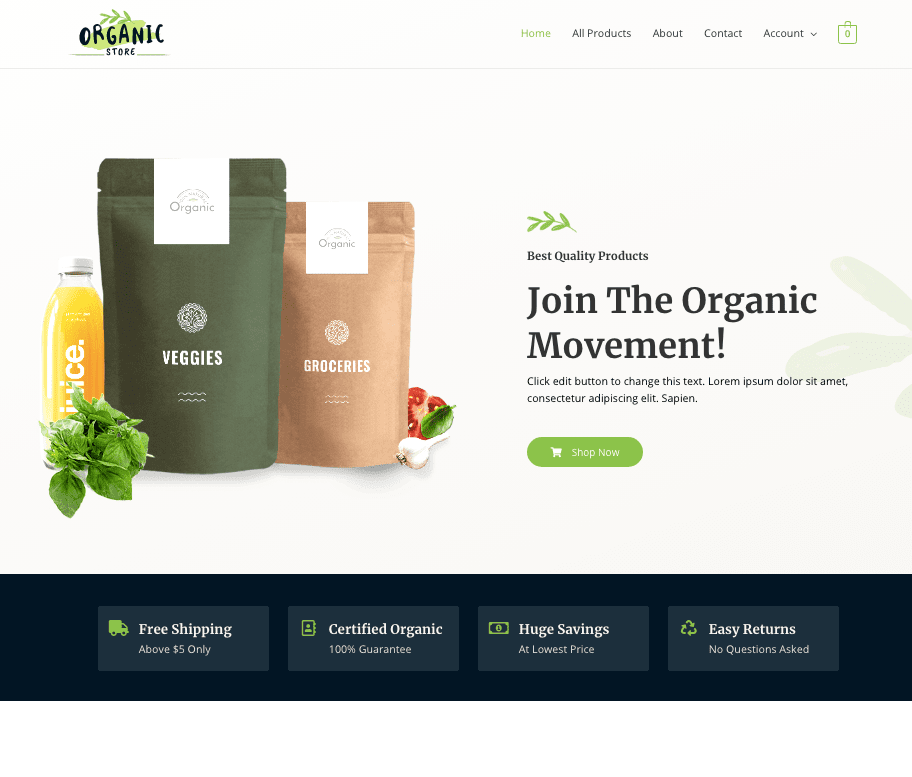
Awesome. We have now completed the installation as well and our Amazon affiliate store with the Astra theme will be live.
Installing the WooCommerce Plugin
A quick mention.
Since we have selected an ‘eCommerce’ theme, the WooCommerce plugin got installed during the theme installation process.
However, if you would like to install the WooCommerce plugin to an existing theme of yours, well, it is pretty simple as well.
Head over to ‘Plugins > Add New’ and search for WooCommerce.
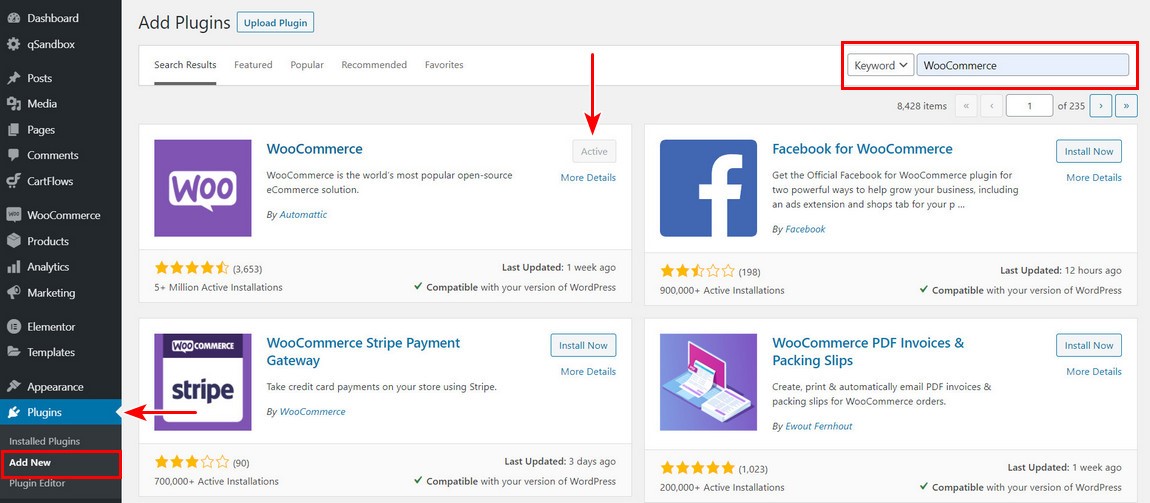
Go ahead and click on ‘Install Now’ and then ‘Activate’ the plugin.
In the above image, ‘WooCommerce’ is already activated, since it was part of the theme installation.
Overview of WooCommerce
Once your WooCommerce theme is installed, and for that matter, when you have installed the ‘WooCommerce’ plugin, you will notice several new links on the left-hand side.
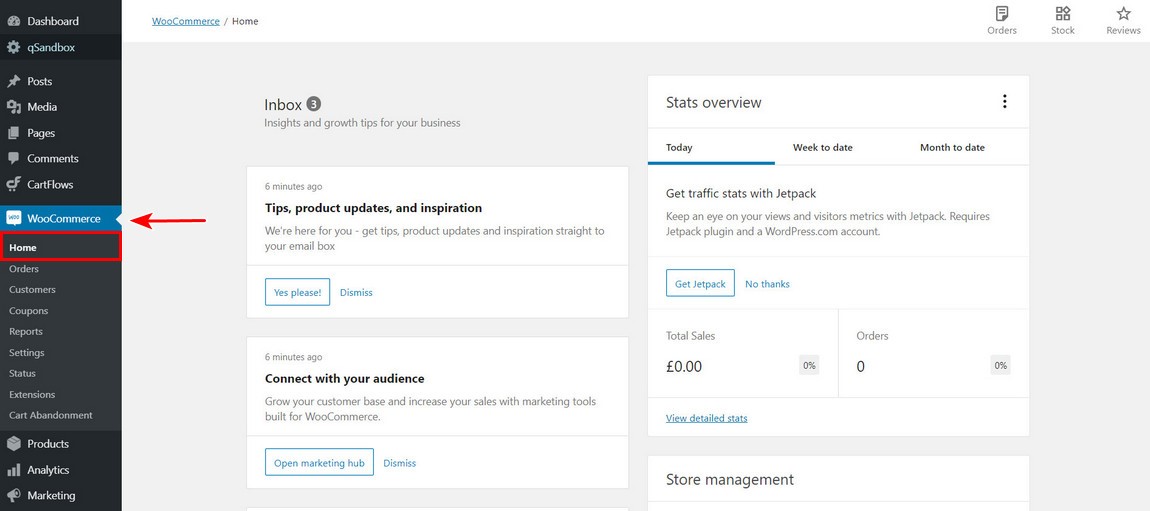
E.g., you will notice CartFlows, WooCommerce, Products, Analytics, and Marketing.
Yes, WooCommerce is a really powerful tool and helps you create a full-fledged online store.
While the features in WooCommerce can be overwhelming, for the sake of this article on how to build Amazon Affiliate Store in WordPress, we will focus on how to add products as an affiliate marketer.
As you know very well by now, the advantage of affiliate marketing is that we do not get into shipping, delivery, customer support, track inventory, manage stock, etc. All we do as an affiliate marketer is promote the product and direct the customer to the merchant’s website, via our affiliate links.
And hence, we will focus more on adding products as an Amazon affiliate.
How to Add Amazon Affiliate Products in WooCommerce
Honestly, adding your Amazon Affiliate products is simple in WooCommerce.
The first step is to identify the logical flow of your website. Or rather, the site structure of your online store. What I mean to say is, identify your categories and products. What are the products you are going to promote on your Amazon affiliate store?
E.g., is it going to be only, let’s say, books, or only women’s clothing, or only laptops, or is it going to a mix of all?
Based on this, you will need to create a Category and then the products will have to be assigned to the corresponding category.
Let’s say, for the sake of this article, we will add a category called ‘Books’. And then, will go ahead and add a book as a product.
Head over to Products > Categories
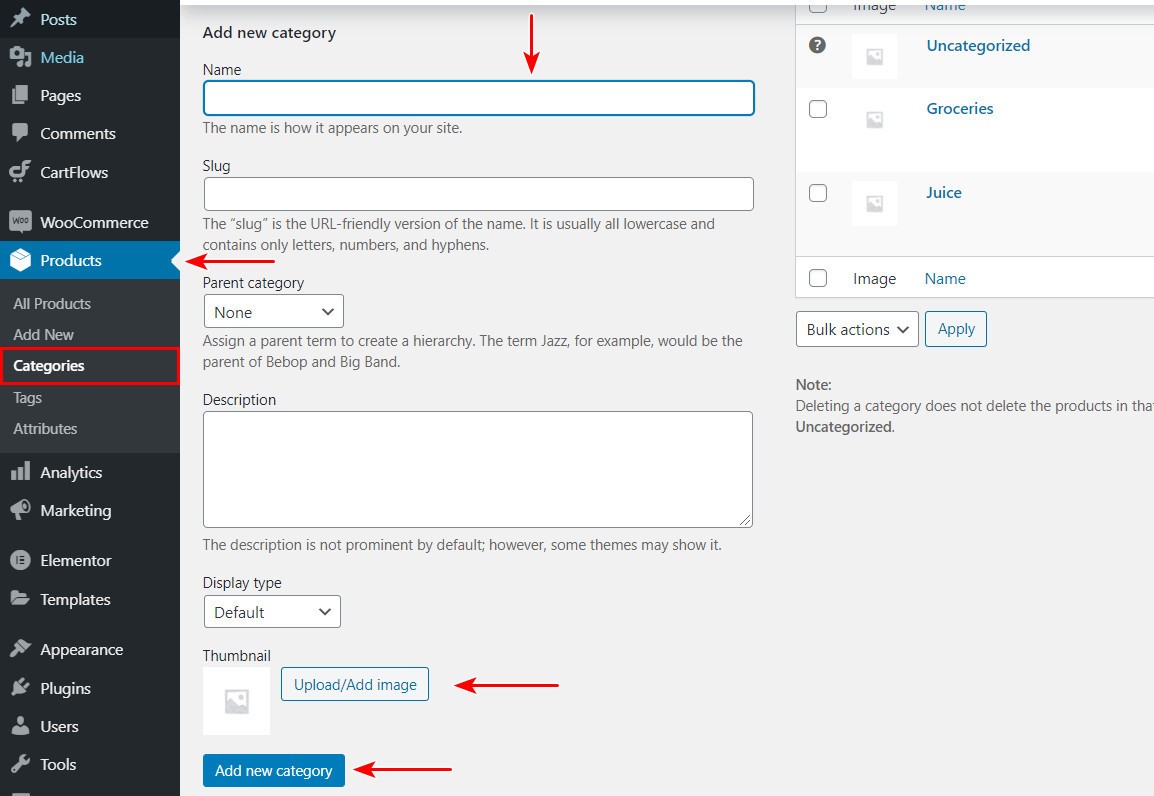
Under Product categories, add a new category. E.g., I will go ahead and add ‘Books’ as a category. Leave the ‘Slug’ (URL) empty. And since ‘Book’ is the top-level category, leave the ‘Parent category’ as ‘None’.
You could add a ‘Thumbnail’ image for the category you are creating, i.e., Books.
Once you have completed the above steps, click on the ‘Add new category’.
You will notice the new category (i.e., Books) amongst the list of categories on the right-hand side (as shown in the image below).
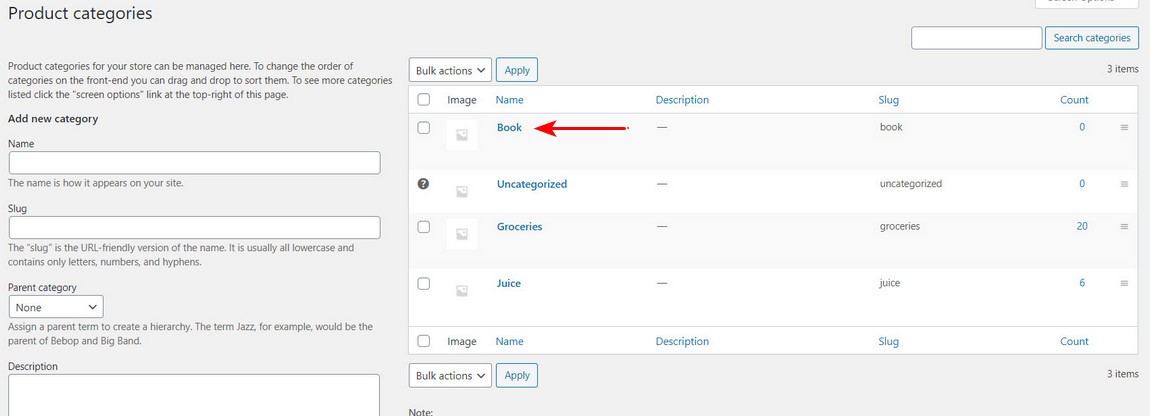
Now that you have added your category, let us add a new product, under books.
Head over to Products > Add New
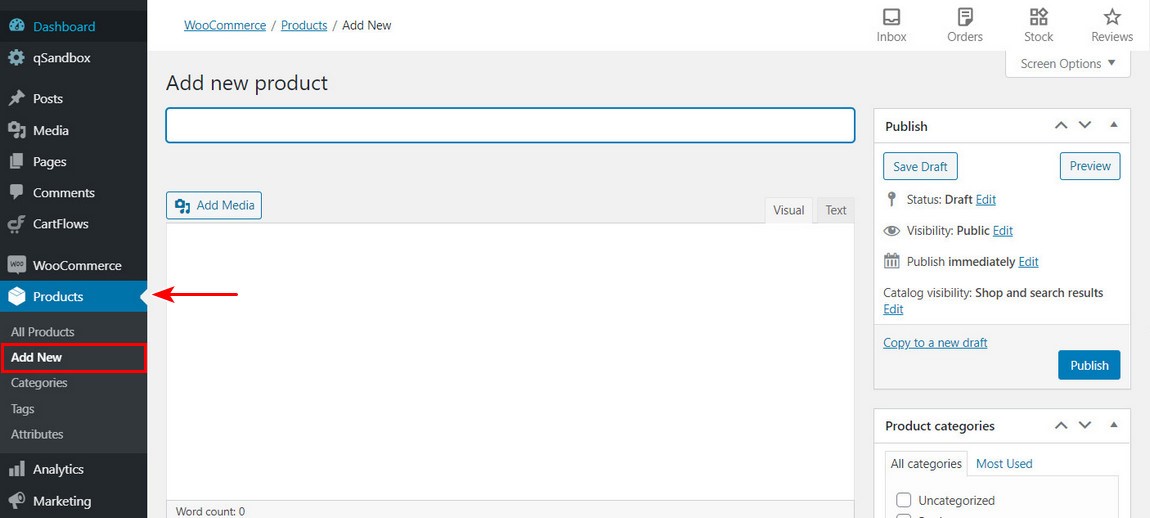
To begin, we need a product, the images, and the affiliate link.
So, head back to the Amazon website. And identify a product you would like to promote. If you are logged in to your Amazon affiliate account, you will notice an ‘Amazon Associates SiteStripe’ bar at the top of the page.
And this, my friend, is an alternate method to obtain your Amazon affiliate links.
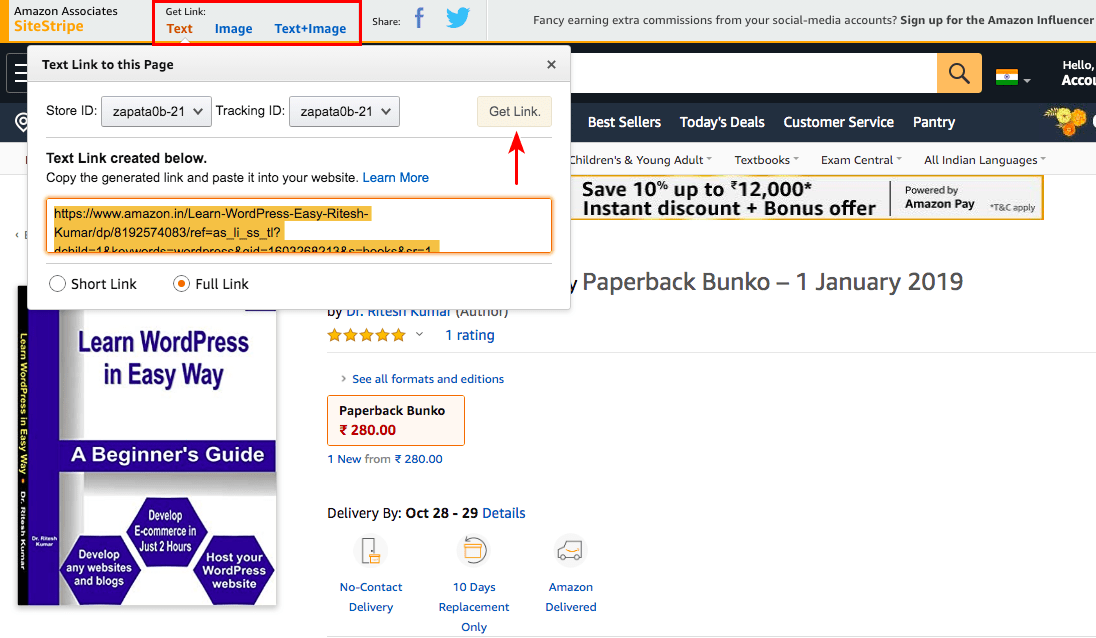
From the options above, i.e., Text, Image, or Text+image, select the type of link you would like to include on your website.
For our example, and to add only the product affiliate link, we will select the ‘Text’ option and copy the link code.
Go ahead and add the product title and the images from the Amazon product page.
As you scroll below the page, you will notice the ‘Product Data’ section.
Under which, you can select the ‘Product Type’. The product type options are ‘Simple product’, ‘Grouped product’, ‘External/Affiliate Product’, and ‘Variable product’.
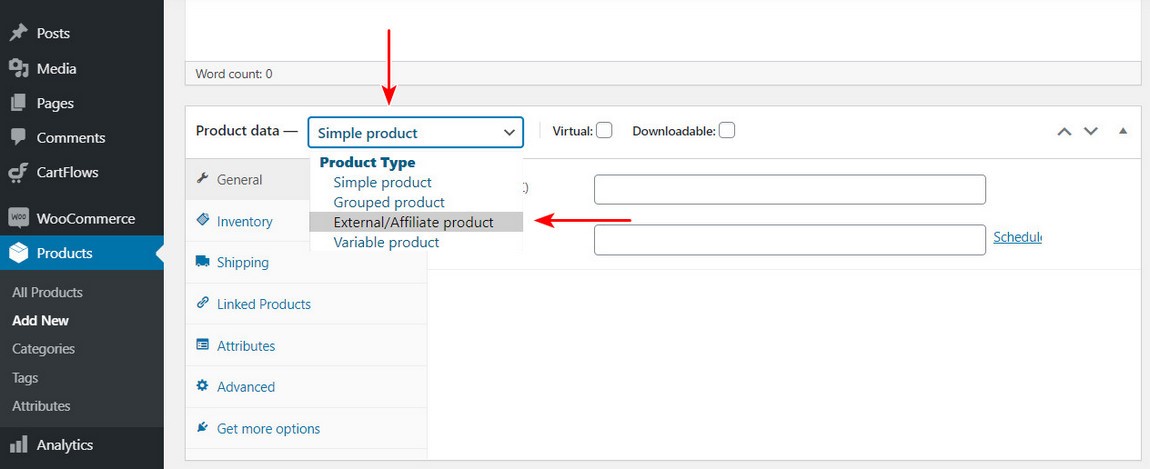
Well, I did mention earlier, the options in WooCommerce are overwhelming. And for the sake of this article, we will only be considering the ‘External/Affiliate product’ type.
Go ahead and select the ‘External/Affiliate product’ option and you will notice the following options.

As you would have figured by now, you have to add the ‘Product URL’, and this is where you have to add your product affiliate link.
The ‘Button text’ can be of your choice. By default, it is mentioned ‘Buy product’. You could also change this to ‘Buy on Amazon’, or ‘View on Amazon’, etc.
Here’s a word of caution. You must avoid copying the same product description, product reviews, and the price from the Amazon store. Amazon’s affiliate program policy is very strict and you can get your account banned if you mention the price and other details mentioned above.
Hence, leave the price field blank.
Upload the relevant product image by going over to the ‘Product image’ tab on the right-hand side. You could add multiple images too by clicking on the ‘Product gallery’ tab. Also, select the category under which this product falls, under the ‘Product categories’ tab.
Once you have completed all the above-mentioned steps, you can either ‘Preview’ or ‘Publish’.
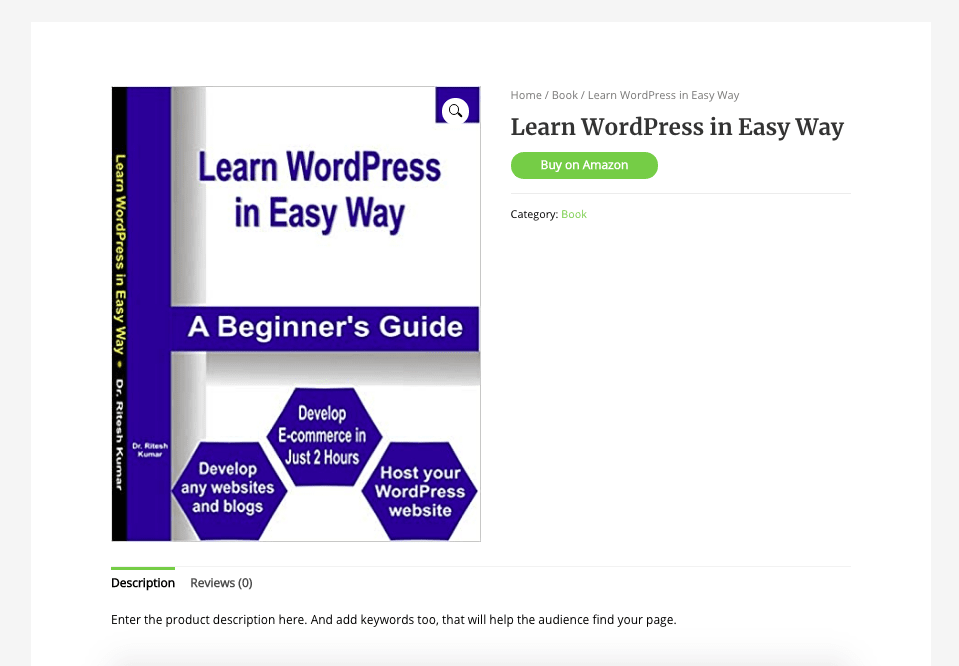
And voila, your product is live in your Amazon affiliate store.
Similarly, you can add multiple products and categories to your Amazon affiliate store in WordPress.
Tips to Succeed as an Affiliate Marketer
Now that you have embarked on this journey of Affiliate Marketing and learned how to build Amazon Affiliate Store in WordPress, you would like to see the sales coming in, and with it, earn some worthwhile commissions. While each to their own, here are some tips you could consider to help you succeed in Affiliate Marketing.
Tip 1. Audience First Approach, Always!
It is so easy to dream about the commissions and foresee the bank balance, the fancy cars, the mansions, etc., and neglect the primary goal. And that is, help solve the problem for your audience.
The secret to succeeding in Affiliate Marketing is to always put your audience first. What does your audience want? What are they looking for? What problem can you solve? Is there are a product or service that could help solve the problem for your audience?
Identify the problem areas by carrying out surveys, feedbacks, asking questions, etc. Collate the response and identify products and services to assist your audience.
Once you adopt this method, you will see faster results.
Tip 2. Build Your Platform
Can you be an affiliate marketer without a website? The simple answer is yes.
You can go ahead and post your links on various social media sites, groups, Q&A forums, etc. But hey, what if these platforms stop you from posting links? Especially your affiliate links.
And that is precisely why you must consider building your platform – your website.
The various platforms mentioned can change their algorithms at any point in time. And this shouldn’t put you in a spot of bother, or rather, put you out of business. The traffic coming in from your various social media platforms, Q&A forums, youtube, etc., must all be directed to your hub, i.e., the website.
Your website must be loaded with a lot of content related to your niche and above all, lead magnets to capture your audience’s email address. Which takes us to the next tip.
Tip 3. Build an Email List
I cannot but emphasize the importance of building an email list. And if you were to ask me, is there any way to operate without a website. Well, my answer would be, via your email list. However, I’d still stick to having a website.
And based on a report by HubSpot, email generates $38 for every $1 spent, which is an astounding 3,800% ROI, making it one of the most effective options available.
Even if all your social media channels were to close down, and your website is not operational, by having an email list, you can still operate a successful affiliate marketing business.
Create a lead magnet, e.g., an ebook on a niche that you are promoting on your Amazon affiliate store. E.g., if you are promoting the home & kitchenware category on Amazon as an affiliate, you could create an ebook on the ‘Top 50 Salad Dressing Recipes for Weight Loss’.
Now, in the ebook, have detailed salad dressing recipes. Also, mention the benefits of using the kitchenware, that you are promoting as an affiliate. And yes, link to the affiliate products.
But, more than the affiliate links, create a landing page and offer this ebook for free. And in lieu of the ebook, you collect the customer’s email address. The customer downloaded the ebook because they have an interest in your niche. Hence, this is your target audience.
Similarly, continue offering lead magnets, content, etc., to build your email list. And continue offering valuable information to your customers. Nurture your audience and the next time you promote a product to your email list, you will see more conversions.
While there are several plugins and tools out in the market, one such plugin you can install, and one that I highly recommend, in your Amazon Affiliate WordPress store is the Convert Pro plugin. It is an ideal plugin to install for your email opt-in and lead generation. Helps you increase subscribers, and with it, your conversions too.
Tip 4. Work on SEO
Email and SEO is the backbone of your Affiliate Marketing business.
Needless to mention, the quality of leads and customers coming in from your organic traffic, i.e., through search engines, is way better than even paid ads.
Hence, work on optimizing your blog content. Identify keywords with low search difficulty, yet high on search volume. Also, look out for medium-tail and long-tail keywords to target. These are keywords with three to four words and above.
E.g., in my previous example, ‘Salad Dressing Recipes for Weight Loss’ is an example of a long-tail keyword, ‘Salad Dressing Recipes’ is an example of a medium-tail keyword, and ‘Salad Dressing’ is an example of a short-tail keyword.
So, when you are starting, target the medium-tail, and even better would be the long-tail keywords.
Again, a WordPress plugin I would highly recommend is the very popular Yoast SEO plugin. Have this installed and activated in your Amazon Affiliate WordPress store and optimize your content for On-Page and Off-Page SEO factors.
Psst… here’s a pro tip.
Do you want to rank your FAQ page within a day on the search engines? Yes, it is possible.
While there are some prerequisites, such as having a DA (Domain Authority) score of above 20, having at least 40 to 50 quality backlinks, meeting all the On-Page, Off-Page, and Technical SEO factors, etc.
Once you have all the prerequisites fulfilled, install any schema plugin, and create an FAQ schema for your, yes, FAQ page. And check out how soon your page can get listed on the search engines.
Again, while there are several schema plugins available, one that I would highly recommend is the Schema Pro plugin.
Install the plugin, activate it, and start creating schemas for your various pages, posts, articles, products, FAQs, etc.
Tip 5: How to Find the Best Products to Sell on Amazon Affiliate Store
As an Amazon affiliate, you should carefully select the products you promote. The products you select will determine how much traffic and sales your store generates.
Here are some tips on how to find the best products to sell on your Amazon affiliate store:
1. Research popular keywords and product categories
Use keyword research tools, Like Helium 10 & Jungle Scout, to find out what people are searching for on Amazon.
You can then use this information to select products that are popular and in demand.
2. Look at the Amazon Bestsellers list
This list includes the most popular items sold on Amazon. You can use this list to see what items are currently in demand and generate a lot of sales.
3. Check out Amazon’s Movers & Shakers list
The Movers & Shakers List is a compilation of the items on Amazon that are selling the most on a given day. This can be helpful if you’re looking for hot new products or if you want to see what’s trending.
4. Products with Good Margin
If you’re looking to set up an Amazon affiliate store, the most important thing is to choose products that will be profitable. That means finding products with a good margin – you don’t want to be selling items that only make a few cents per sale.
5. Find Products that Complement Your Existing Inventory
When you’re running an online business, it’s important to have a wide range of products that complement your existing inventory. This not only gives your customers more options to choose from, but help maintain a coherent feel across your store.
Frequently asked question
Are Amazon affiliate sites profitable?
Can I be an affiliate without a website?
First, you’ll need to find other ways to promote your affiliate links. This could mean using social media, or even creating YouTube videos.
Second, you’ll need to be extra careful about complying with Amazon’s terms of service.
Since you don’t have a website, it will be harder to show that you’re a legitimate affiliate. Make sure you read the terms of service carefully and make sure you understand everything before promoting any links.
Is it free to be an Amazon affiliate?
Of course, you will need to invest some time and effort into promoting products as an Amazon affiliate. But there are no fees or costs associated with being an affiliate. So you can start earning commission on sales of products you recommend, without spending any money.
How do I get traffic to my affiliate links?
Share your links on Twitter, Facebook, and other social media platforms.
Write blog posts or create videos about the products you’re promoting. Be sure to include your affiliate links in your blog posts or videos.
Run ads on Google or other search engines. You can target keywords related to the products you’re promoting, and people who click on your ads will be taken to your affiliate link.
Tell your friends and family about the products you’re promoting and ask them to check out your affiliate link.
Promote your affiliate link in any other way you can think of! The more exposure it gets, the more likely people are to click on it.
Conclusion
Quite an article this has turned out to be. I truly hope this article has helped you learn how to build an Amazon Affiliate Store in WordPress.
We started by understanding how to register as an Amazon Affiliate to completing the Amazon Associates registration formalities. We went through the formalities of buying a domain and hosting using BlueHost.
After installing WordPress for our Amazon Affiliate store, we installed the Astra theme, the WooCommerce plugin, and added our Amazon Affiliate links and products.
We shared tips on becoming a successful affiliate marketer too and shared some pro-tips and plugins such as Convert Pro, Yoast SEO, and the Schema Pro.
Do share your feedback in the comments below. We’d love to hear from you. And in advance, wish you the best with your Amazon Affiliate store built using WordPress and happy earning!
Disclosure: This blog may contain affiliate links. If you make a purchase through one of these links, we may receive a small commission. Read disclosure. Rest assured that we only recommend products that we have personally used and believe will add value to our readers. Thanks for your support!




The guide was so simple to follow and I learned great deal of information about managing affiliate store.
Looking forward to see more WooCommerce articles.
Hello Iris,
Glad you found it useful! Made a note for the team. 🙂
Affiliate marketing is the best way to earn money from your blog.
Instead of posting product, I will suggest to review them and share it.
Hello Lorrie,
Thanks for sharing your thoughts! 🙂
I know many things about blogging, but every time I found something new to learn and want to test it out.
Got a really nice idea to work on.
Loved the way you explained every details and shared some amazing tips with us.
Thank You
Hello Dean,
Glad you found it useful! 🙂
Newly started amazon affiliate blog, let’s hope everything goes smoothly.
All the best, Elliot! 🙂
When i purchase astra pro, can i create courses ? or i need to purchase learndash also?
Hello Kim,
LearnDash is a plugin developed by another developer, so it would need to be purchased from their website. 🙂
This is a nice writeup here, looking forward for more.
Hello Habila,
Glad you found the article useful! 🙂
Is there a quick way to import the photos from Amazon for affiliate marketing.
Hello, good post but in line with the Amazon rules on uploading pictures…what then do you add to the “product image” because ones you publish your page, the box is empty.
All other information is available using the link just the featured image. What to do?
Hi, really enjoyed your artical and will use your ideas everyday. But, Im starting a tech and gadget style website with one of your themes and would like some input on what would be the best free theme with the pro plug in. I will be for tech and gaming products. Thanks in advance.
HELLO
I’M UNABLE TO IMPORT STARTER TEMPLATE USING ASTRA THEME. HERE IS THE PROBLEM:
[Redacted the long error message]
KINDLY SUGGEST ME THE SOLUTION.
Hello there, sorry to hear that you are seeing an error message during the import process. Can you try reaching out to us through our Support Portal so that we can try to help you out in the best possible manner? Looking forward to hearing from you.
Is there a plugin that automatically displays affiliate link disclosures that is compatible with Astra? I tried WP Affiliate Disclosure and it doesn’t work.