Are you looking for the best ways to drive more sales land new customers? You’ve probably already heard about ‘Buy One Get One’ deals and may be wondering how to add one to your WooCommerce store.
A Buy One Get One (BOGO) deal is a promotional offer in which the buyer is offered one or more items for free or at a discounted price after purchasing other items at regular price.
BOGO deals are one of most effective ways to boost sales and increase customer loyalty. For store owners hosting a considerably large amount of stock on their site, BOGO deals are particularly useful for clearing out inventories.
However, since BOGO deals do not come as a default feature, beginner WooCommerce users often face quite a challenge setting them up.
From finding the right third-party plugins to applying and promoting the deals on your store, there’s quite a learning curve to overcome.
To ease this learning curve, here are some of the pain points this article sets out to solve:
- How and when to use BOGO deals in WooCommerce
- How to create your first WooCommerce BOGO deal
- The best WooCommerce plugins for creating WooCommerce BOGO deals
- How to promote WooCommerce BOGO deals
Once you’re done going through this article, you’ll be ready to implement BOGO deals and enjoy all their many benefits!
Let’s kick things off with a brief introduction to the concept of BOGO deals.
What Is a BOGO Deal (Why and When You Should Use One)?
As an eCommerce store owner, inventory management remains one of the major challenges you’ll face. Attracting new buyers and retaining old ones can sometimes prove to be a difficult task.
For store owners looking to increase cart quantity per order, a BOGO deal is a very effective means of incentivizing purchases.
Contrary to what the name suggests, BOGO deals can come in different formats. They can be “Buy Two Get One free” (2+1=2) or “Buy One Get One 50% off” offers. It’s all up to you to decide the best strategy for your store.
Store owners new to marketing campaigns may consider BOGO deals as merely giving their products away. This is far from true.
The most prevalent use case of a BOGO deal is in a situation where a store owner wants to move old inventory. Just like every other marketing strategy, this type of deal comes in handy when you need to dispose of existing stock.
Additionally, a BOGO deal can be instrumental in acquiring new customers. If your reports reveal a high cart abandonment rate, then it may also be the solution you’ve been searching for.
Even with the biggest advertising budgets, building a loyal customer base is never a walk in the park.
Strategies like the BOGO deal can help you achieve your goals without spending extra on marketing campaigns.
To better understand their role and different benefits, let’s talk a bit more about WooCommerce coupons and how they relate to BOGO offers.
Default WooCommerce Coupon Features
Long before eCommerce and online stores became a thing, coupons were a major component of businesses marketing. Just as they helped to drive sales in physical stores, online stores also benefit a lot from coupon codes.
WooCommerce developers recognize this. As a result, they’ve included powerful coupon features on the platform by default.
We can use this feature for the BOGO offer.
With coupons, you can offer your customers interesting incentives to buy more from your store. From percentage discounts to fixed coupon amounts, WooCommerce lets you utilize flexible rules when applying them.
Setting Up Your First WooCommerce Coupon
To add your first coupon to your WooCommerce store, you need to enable the feature by navigating to WooCommerce > Settings > General.
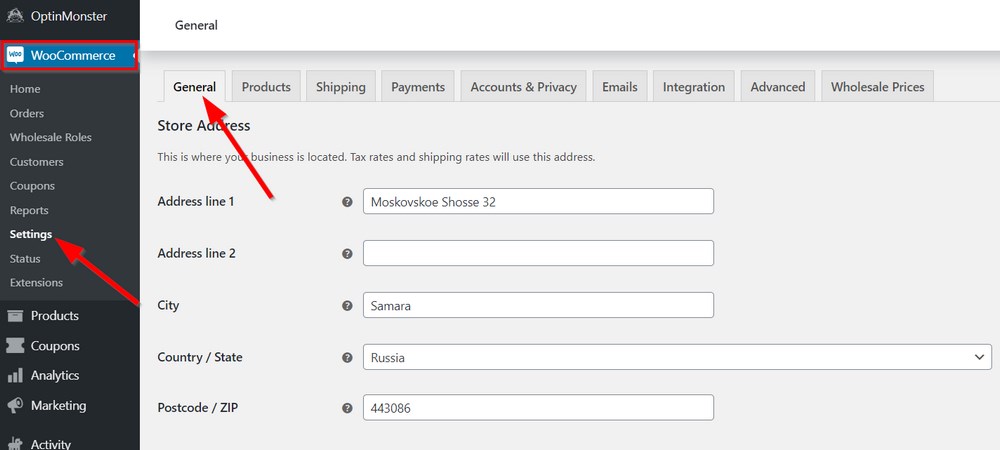
Originally, the coupons feature was located in a separate Checkout tab. However, WooCommerce recently moved it to the default General tab which appears immediately you click Settings.
Now, all you need to do is scroll down till you see the Enable coupons section.
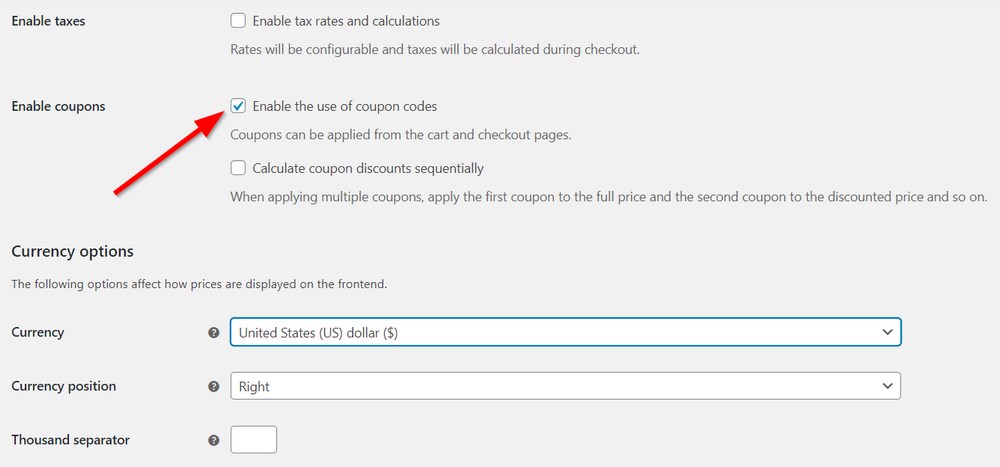
Check the box to enable coupons storewide. You can also check the second box in the section if you choose to offer compound discounts. This will allow buyers to apply a second coupon to the already discounted price after a coupon has been applied.
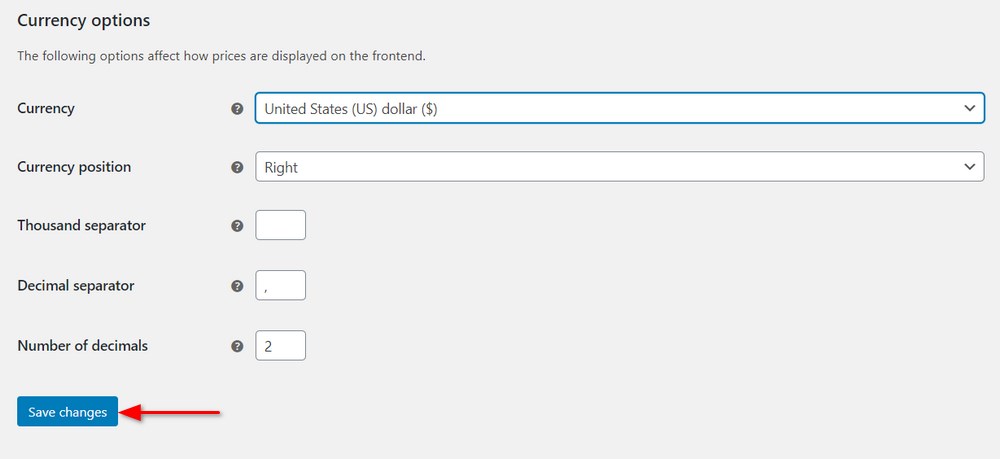
Once you’re done with that, click Save changes below to apply the new changes to your store.
Now, your WooCommerce store is ready for coupon creation. To get started, simply go to Marketing > Coupons.
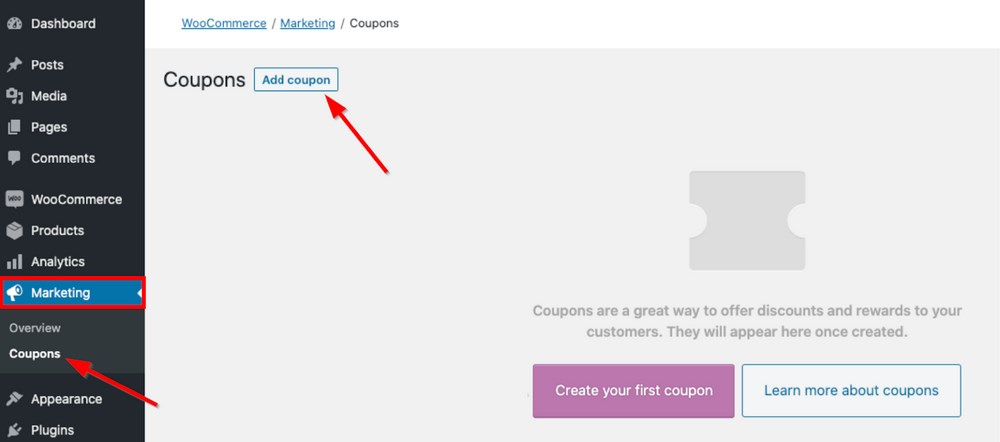
On the Coupons tab, click Add coupon.
Since it’s your first coupon, WooCommerce will show you an initial screen asking you to Create your first coupon. Either button will lead you to the same settings page.
On the settings page, you want to add a coupon code which the buyers can enter. The other tabs let you decide the discount type, coupon amount and even set usage restrictions. The discount types available right out of the box include percentage, fixed cart, and fixed product discounts.
While these features may serve the majority of WooCommerce stores, you’ll need something more to deliver BOGO deals.
This is where plugins come in. There are lots of them in the WordPress directory that deliver this feature and we’ll showcase some of them later in this post.
How to Create WooCommerce BOGO Deals
Though there are a bunch of BOGO deal plugins for WooCommerce sites, the first we can readily recommend is Advanced Coupons. The tool presents the easiest way to get your first BOGO deal up and running.

By introducing loyalty programs, special cart conditions, or coupon scheduling, Advanced Coupons helps you get more people to your store.
Let’s quickly run through the simple steps involved in setting up a BOGO deal.
Step 1: Install and Activate a Coupon Plugin
The first step is to find and install the coupon plugin of your choice. Since we recommend Advanced Coupons, we’ll be demonstrating the process with it. You can easily find the free version of the plugin in the WordPress repository.
You can use the free version for BOGO deals but some of the features we describe require the premium version.
Navigate to the Plugins tab and click Add New. On this page, simply type ‘Advanced coupons’ in the search bar and the plugin will pop up in the search result.
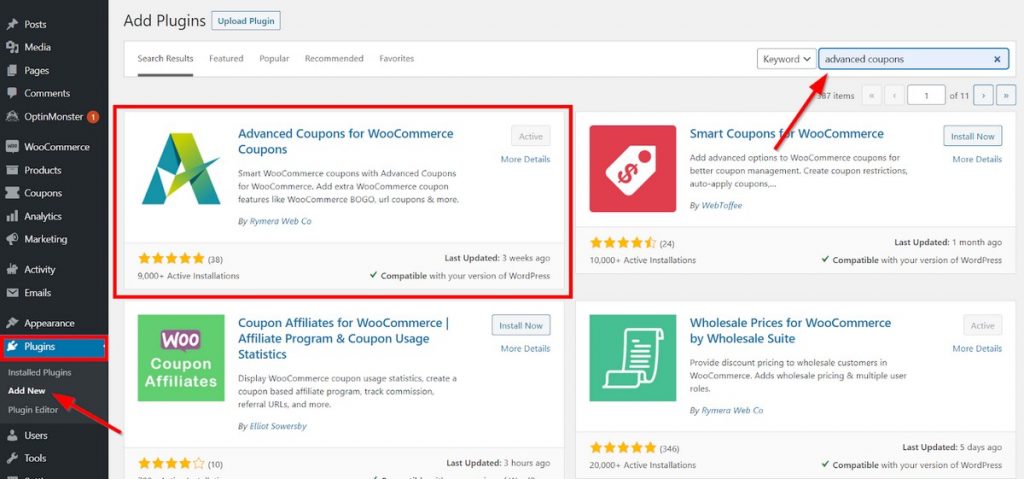
Once you find the plugin, click Install Now and Activate.
In our example, the search result shows the ‘Active’ status because we’ve already activated the plugin.
Step 2: Add a New Coupon
Now the plugin is installed and activated, let’s set up our first BOGO deal.
To do that, you need to create a new coupon in the default WooCommerce way or edit an existing one.
Simply go to WooCommerce > Coupons or Marketing > Coupons. If you want to edit an old coupon, hover over the item area and click Edit.
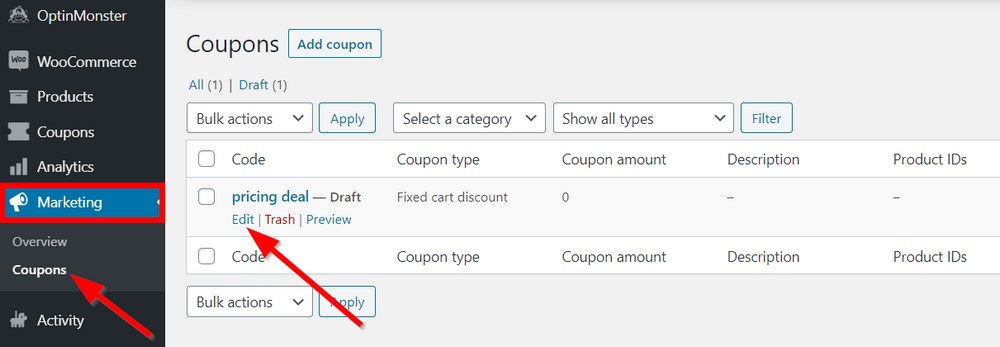
Otherwise, you can simply click Add coupon. On the next page, you need to add a coupon name (for a new coupon).You can also choose to allow the system to generate a coupon code itself.
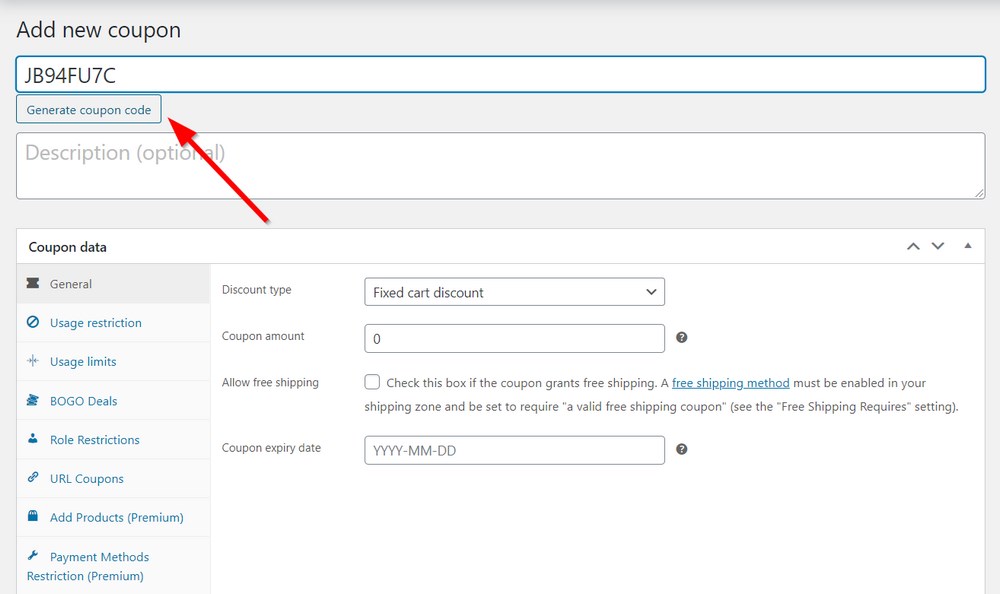
Whichever option you choose, you need to communicate the code to your site visitors. They need to type it during checkout to activate the BOGO deal.
In this case, you may want to type in a code that will be easy for your site visitors to remember.
Step 3: Create BOGO Deals With the Coupon Data
After adding a coupon code, you now need to tweak the coupon data to match your BOGO deal parameters.
When you scroll down to the Coupon data section, you’ll notice that the Advanced Coupons plugin has automatically added new tabs upon activation. These tabs make it possible to add extra features to your coupon while editing it.
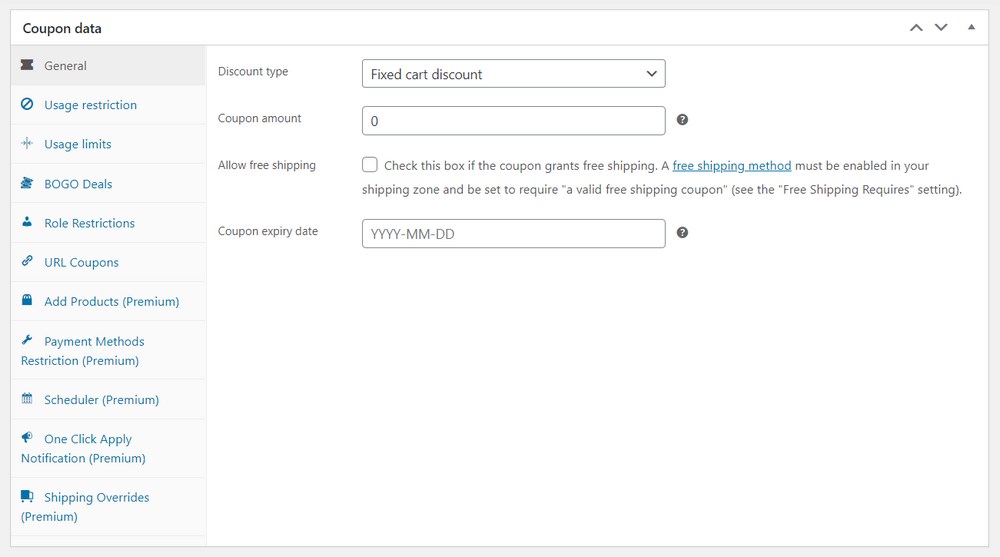
Some of the new tabs added include Add Products, Scheduler and Shipping Overrides. In our example, the tab we need is the BOGO Deals tab.
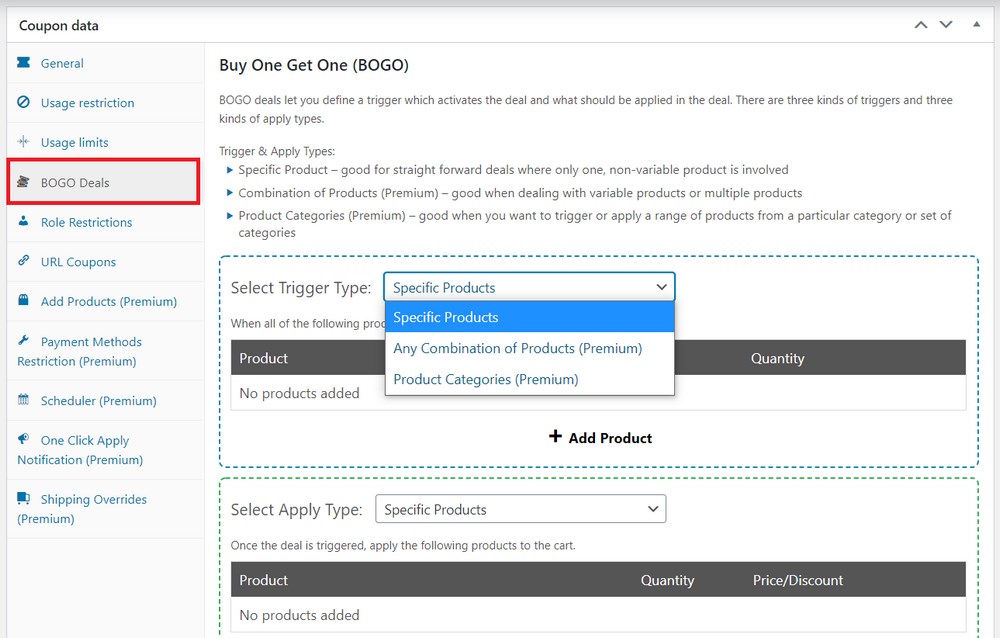
In this tab, you need to first choose the conditions that will determine how the coupon is triggered in the Select Trigger Type field. After the deal is triggered, you can then choose how you want the BOGO deal to be applied.
Here are the three ways the Advanced Coupons can trigger:
- By specific products: This option is the simplest way to apply or trigger a BOGO deal. You can add any non-variable product in either field. Once a buyer includes the ‘trigger’ product in their cart, the system offers them the product in the ‘Apply’ section for free.
- By any combination of products: Here, you can add multiple products or product variations.
- By product categories: You can also trigger and apply the coupon based on a particular set of products in one or more categories.
Only the first option is available in the free version of the plugin. You’ll need to upgrade to the premium addon to enjoy all the advanced features available. Based on an annual payment plan, you can either opt for a single site license or unlimited sites license depending on your needs. They cost $49.50 and $99.50 annually.
After going through the checkout process, download the ZIP file from your account’s dashboard.
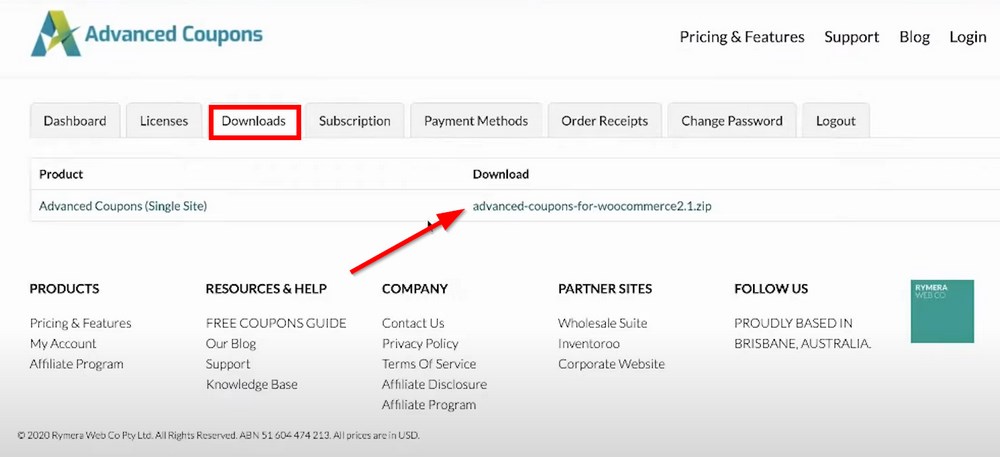
Then, upload this file to WordPress by navigating to Plugins > Add New and click Upload Plugin.
Step 4: Include Some Additional Settings
Beyond setting the ‘trigger’ and ‘apply’ conditions for your BOGO deal, there are several other settings you can apply.
A good place to start is to offer a discount on the product in the ‘Apply’ section. In other words, you don’t have to give out the entire product for free.
For example, if you set a discount on a particular product in the ‘Trigger’ section, adding it to the cart would automatically apply a percentage discount to the product in the ‘Apply’ section.
To offer a percentage or fixed discount, use the dropdown menu under the Price/Discount heading.
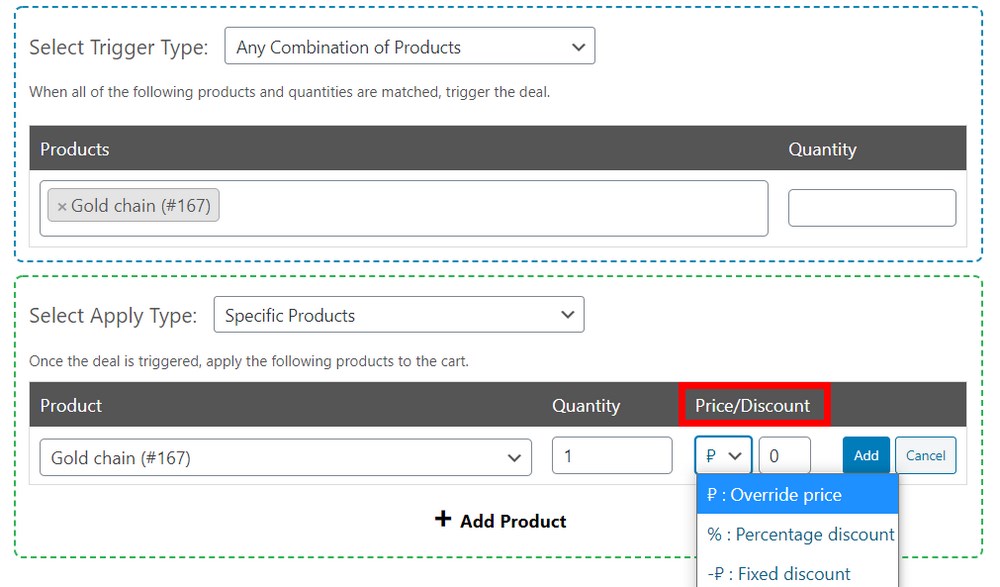
The Override price option lets you set a new selling price for the product. Select whichever option suits your needs, enter the corresponding value in the next field and click Add.
You can decide whether or not you want the BOGO deal to be applied repeatedly when multiple cart entries meet the coupon criteria.
For example, for a ‘Buy Two Get One free’ deal, the customer can also buy six to get three free.
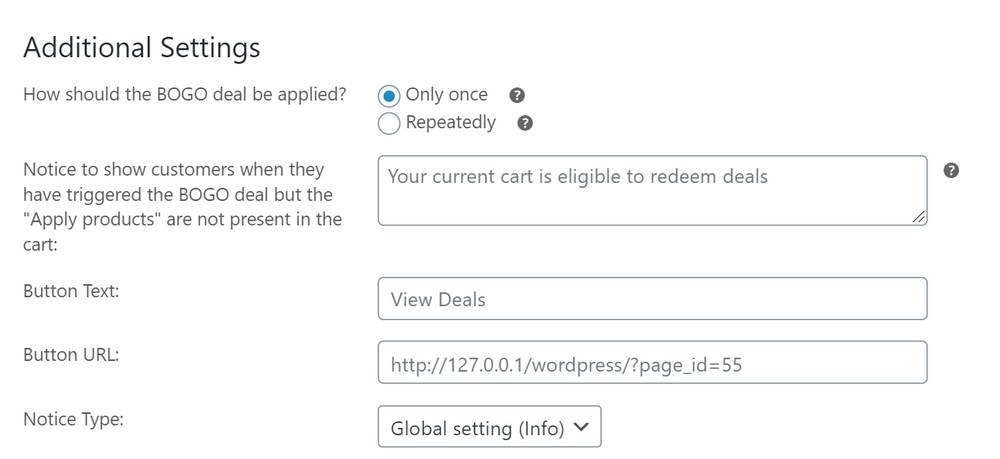
Furthermore, you can add a note which will be displayed to the buyer immediately the deal is triggered. The buyer can then click a button to apply the coupon.
You’ll need to fill the Button Text and Button URL fields in this case.
Alternatively, it makes sense to simply enable the ‘Auto Apply Coupon’ feature which is located in the right panel. This approach often delivers a more seamless shopping experience.

Another interesting set of options is in the Cart Conditions section. Here, you can set the BOGO deal to be triggered based on the number of items in the buyer’s cart, the time of their last visit, etc.
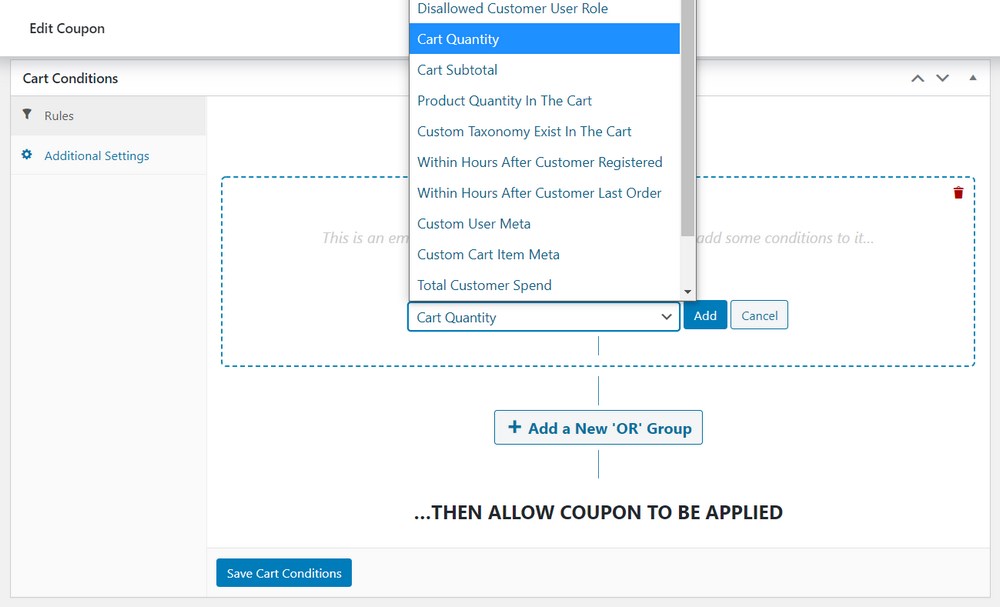
For example, you can set the minimum number of items that must be in the cart before the deal is triggered.
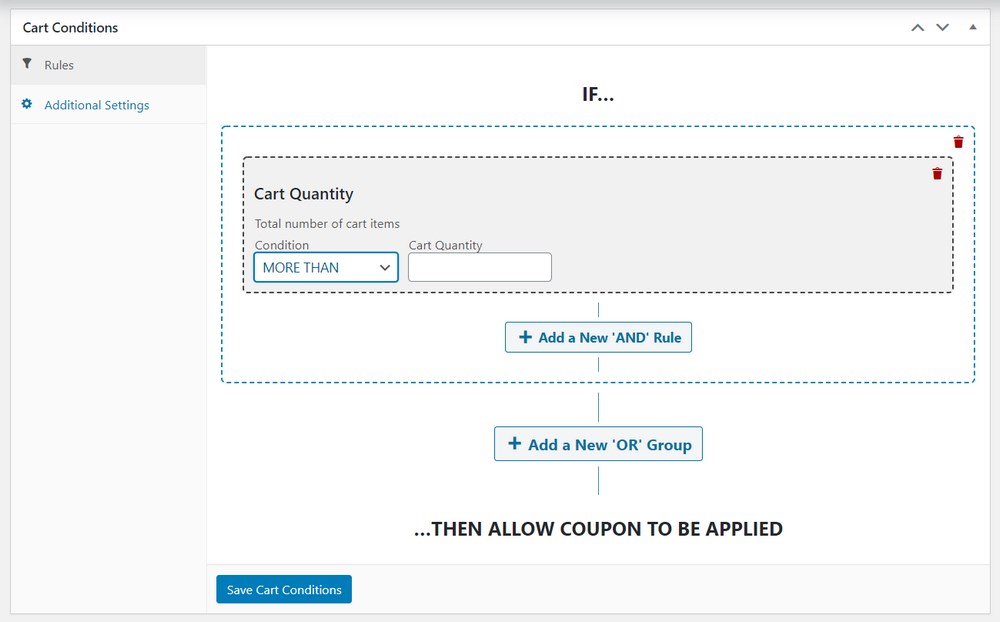
Once you’re done making your choices, click Save Cart Conditions.
Step 5: Publish and Test the Deal on Your Front-end
Your BOGO deal is now ready for use. Before calling it a day, you should test how well your new deal functions.
To do this, you need to publish it first and then navigate to your store’s front end. If you want to avoid getting in the way of your customer’s user experience, consider using a staging site.
On your front-end, you need to satisfy all the deal’s ‘trigger’ conditions by adding the correct products to the cart. After meeting the necessary conditions, you’ll receive a message in your cart informing you that you’re eligible to redeem a deal.
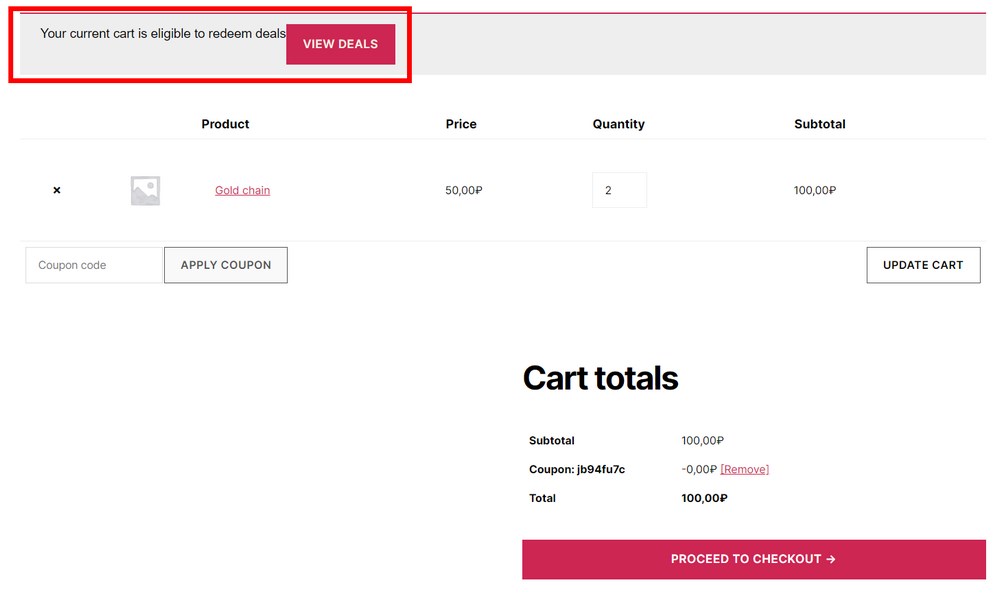
Now, you can easily type in the coupon code and click APPLY COUPON. Provided all the settings were filled correctly, the ‘Apply’ condition will be activated.
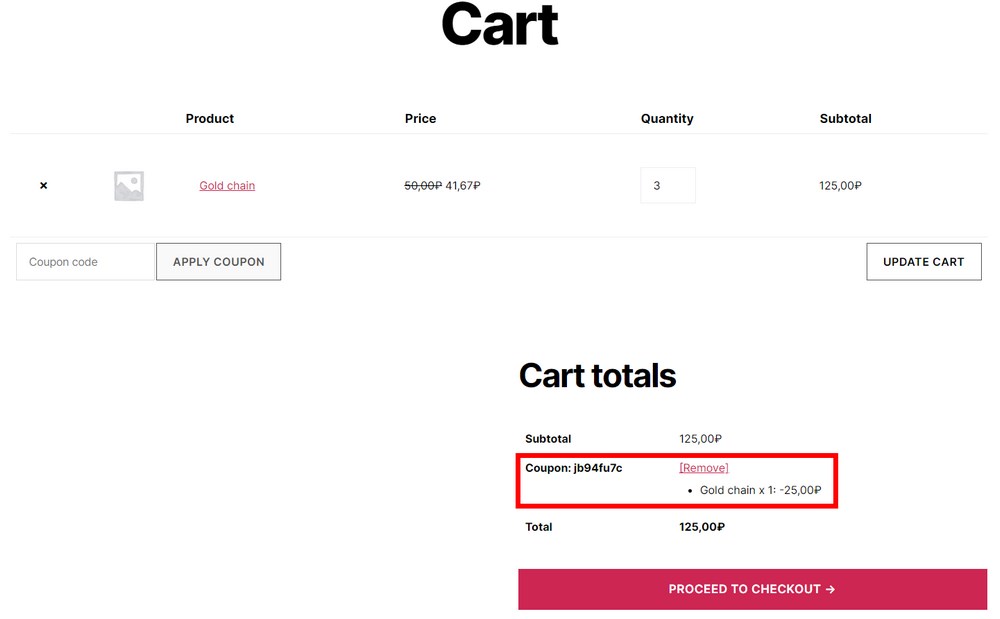
Hooray! Your first BOGO deal has now been successfully created and ready for use!
Bear in mind that this step-by-step guide only reflects the BOGO deal creation process with Advanced Coupons.
Though we highly recommend the tool because of its effectiveness and the number of available options, it’s always great to have more options to choose from.
So, let’s take a look at other plugins you may want to consider.
Best WooCommerce BOGO Deal Plugins
Thanks to the monumental growth the eCommerce industry has enjoyed over the past two decades, there are now lots of vendors offering eCommerce plugins.
Beside our BOGO deal plugin ‘MVP’, Advanced Coupons, there are other alternatives to bear in mind. Some of these plugins offer pricing strategies (such as a one-time fee) that may be more beneficial to your budget and business goals.
1. Discount Rules for WooCommerce
Discount Rules for WooCommerce uses a freemium strategy to let new users gain restricted access to its coupon features. However, with Discount Rules, the BOGO deals are exclusive to the pro version.
The plugin also adds a unique tab to your WordPress dashboard under the WooCommerce section.
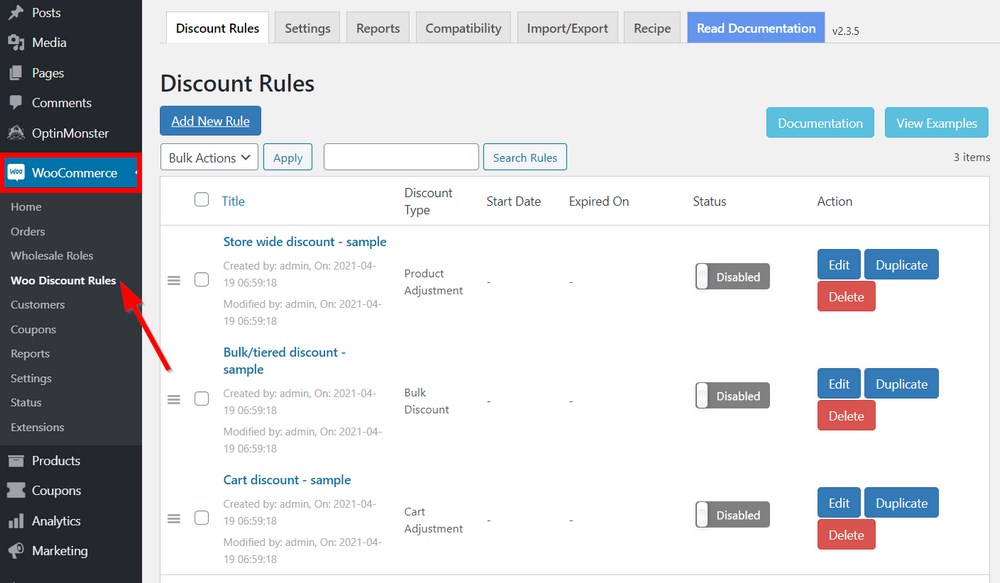
Compared with Advanced Coupons’s native integration, this approach may not be as intuitive and easy-to-use. On the positive side, the plugin ships with a decent number of samples and documentation to help.
To create a BOGO deal, you simply need to click Add New Rule and you can select an option under the BOGO discount section.
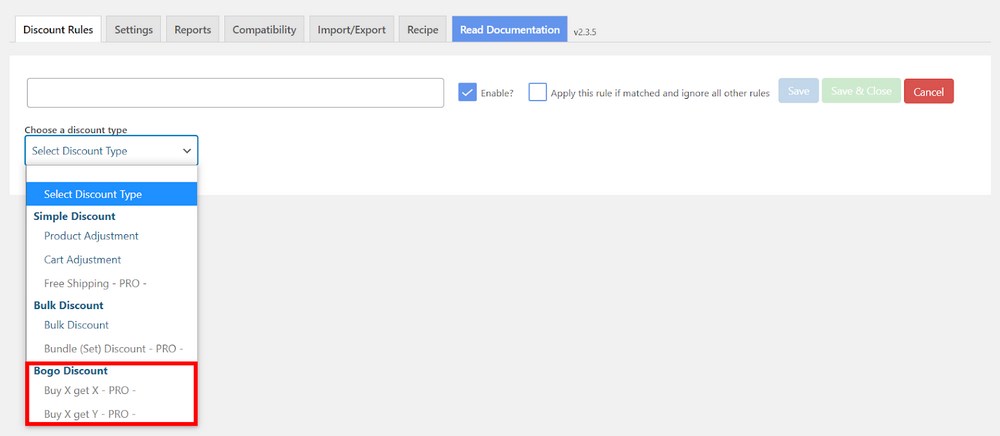
The Buy X Get X deal lets you offer a product for free after the buyer purchases a certain quantity of the same product. On the other hand, Buy X Get Y offers a different product for free. You can also choose to go for a percentage and fixed discount as well.
Using Discount Rules for WooCommerce, BOGO deals can be applied and triggered based on:
- Specific products
- Product categories
- All products (store wide discounting)
The plugin offers several types of bulk discounts, tiered pricing, and other advanced coupon features. This is quite similar to what Advanced Coupons offers. You will miss out on some of the extensive cart conditions though.
To subscribe to the premium version, you can choose from three plans:
- Single site: $49/year
- 5 sites: $79/year
- 25 sites: $129/year
2. YITH WooCommerce Dynamic Pricing and Discounts
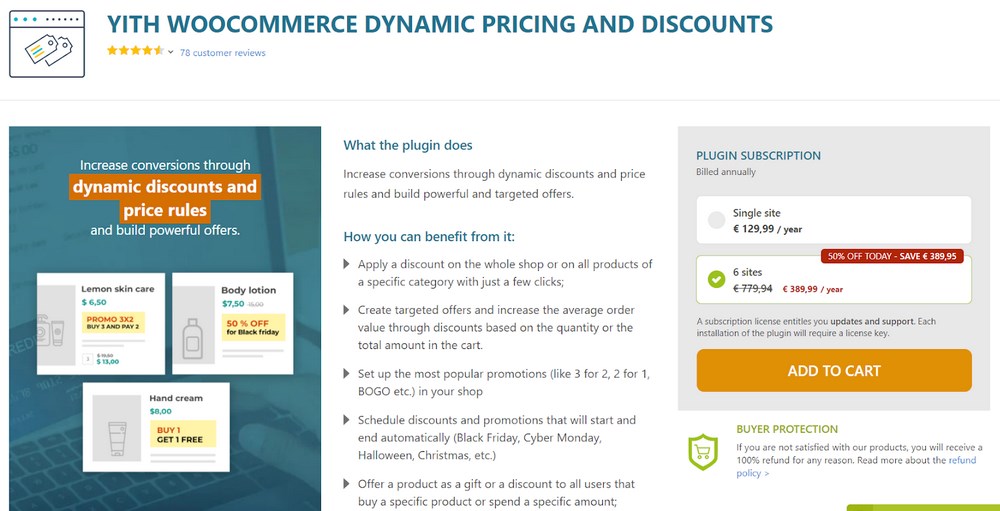
YITH Dynamic Pricing and Discounts is another noteworthy option to consider if you’re looking to add a BOGO deal for your store.
It’s an easy-to-use tool with a modern user interface that helps you get your offers up quickly.
The plugin adds an additional tab to your WordPress dashboard. In this tab, setting up a BOGO deal requires a little different approach.
You need to select Special Offer in the Rule type menu.
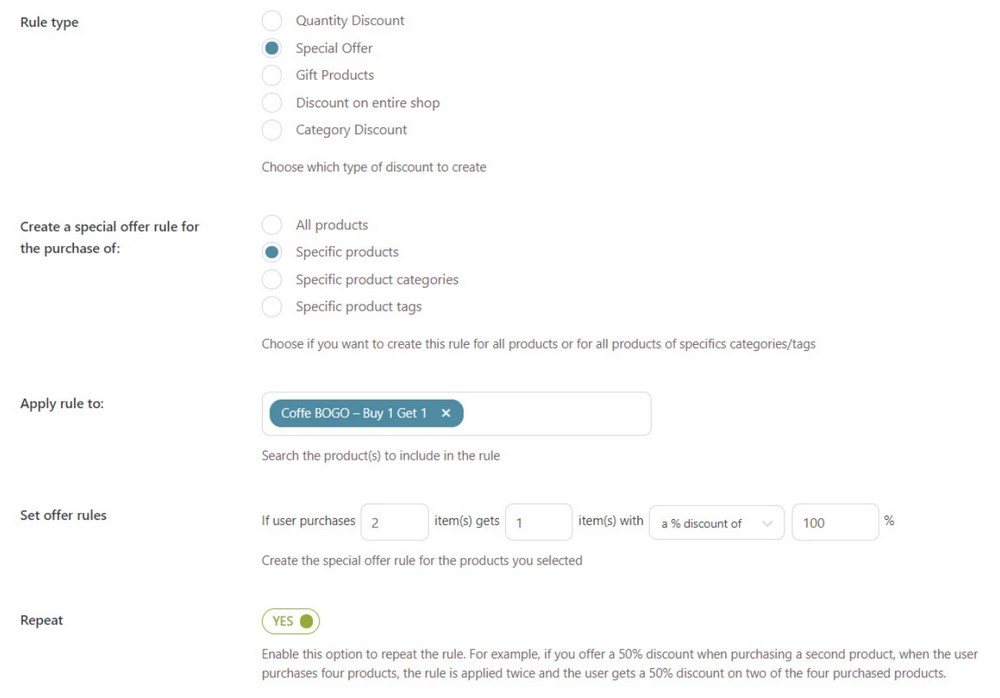
Now, you can decide how you want to apply the offer rule. Besides specific products, all products, and product categories, you can also apply the BOGO deal to product tags.
Once you’ve added the corresponding product, input the offer rules in the Set offer rules section.
Unfortunately, the available cart conditions are limited to the item and product quantity (when dealing with variable products). Also, if you’re looking to apply other conditions such as the time of last site visit, you’ll have to look elsewhere.
Like any other coupon plugin, YITH Dynamic Pricing and Discounts supports a variety of discount rules. The plugin subscription will set you back €129.99 or €389.99 annually for a single site or 6-site license.
3. Smart Offers for WooCommerce

Smart Offers is a powerful plugin that enables you to set up BOGO offers, one-click upsells, cross-sells, order bumps and other offers in the sales funnel.
It’s not just WooCommerce BOGO (buy one get one) offers either. You can also set up buy one get more, buy more get one and buy more get more offers too.
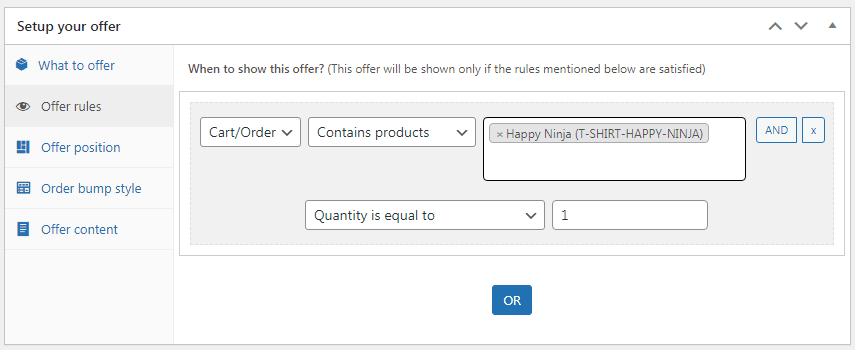
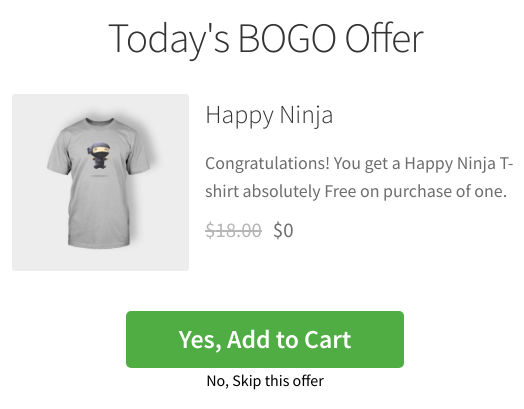
Some noteworthy features of Smart Offers:
- Set up BOGO offers based on rules like cart total, user’s previous orders and existing products in the cart
- Enable direct checkout using Buy Now buttons
- Create more offer designs using Elementor, Visual Composer and other popular page builders
- Works with all WooCommerce product types – simple, variable, subscription, bundles, group and others
Pricing:
- Single site license – $99/year
- Multisite license – $549 (one-time payment)
Smart Offers is the most expensive plugin here, but it definitely gives you a lot of features for your money!
4. ELEX WooCommerce Dynamic Pricing and Discounts

ELEX WooCommerce Dynamic Pricing and Discounts is another plugin that’s great for creating BOGO deals. The vendor may not be as well known, but the plugin gets the job done well enough.
In fact, it offers some of the most comprehensive pricing and discount options at different levels.
You can apply discounts based on specific products, product categories and cart conditions. If you want to combine any of these elements while setting up your discount rule, the plugin lets you achieve that as well.
The BOGO rule function has its unique tab for setting the products that need to be purchased and those to be offered for free.
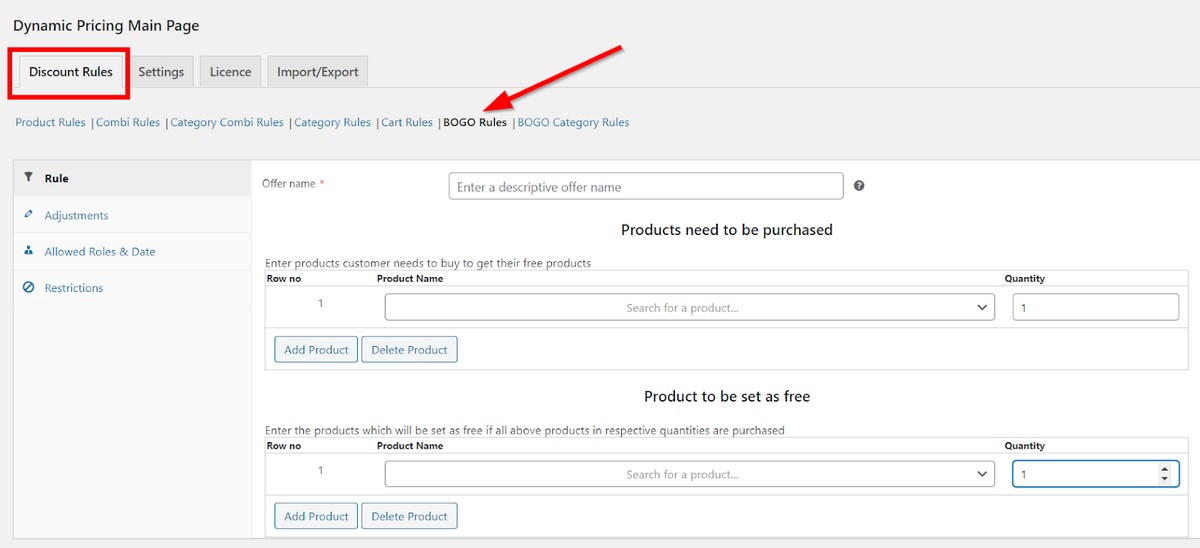
You can add as many products as you like in either column. Unfortunately, there’s only room to set the quantity of items to offer for free. You cannot decide to offer a percentage discount on the second product.
You can still add other interesting settings such as the user roles to restrict the deal to and the minimum total spend. This also applies to the BOGO category rules.
All BOGO deal features are exclusive to the plugin’s premium version. On the positive side, the paid plans require a one-time payment that costs $79, $119, and $199 for a single site, 5 sites, and 25 sites respectively.
However, you only get one year of support and updates.
5. Pricing Deals Pro for WooCommerce
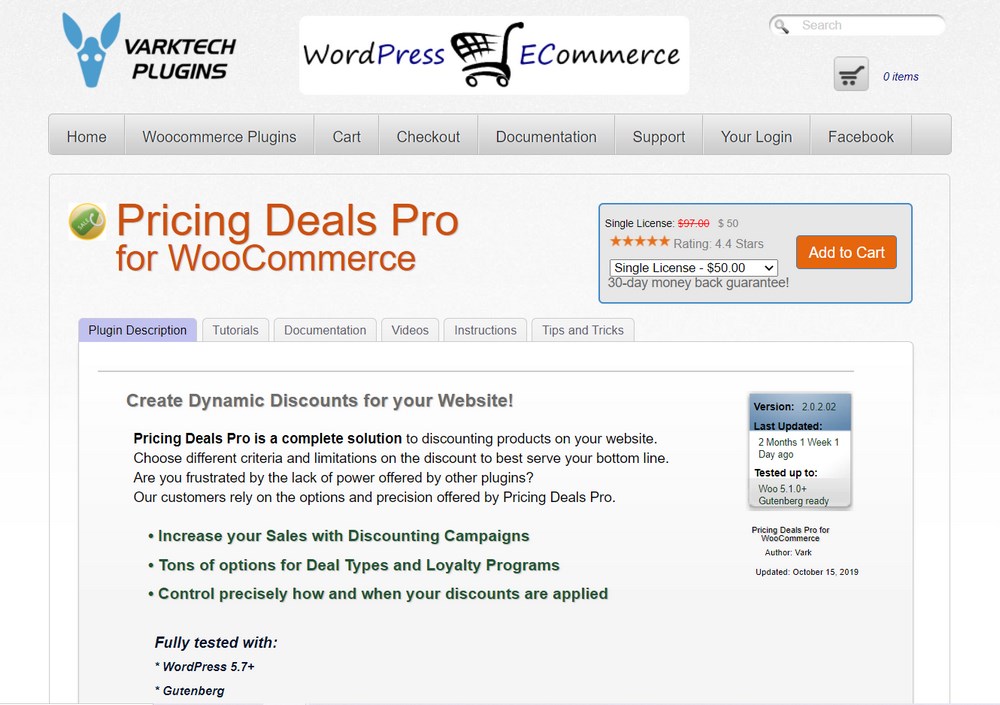
This plugin is a powerful option for using BOGO deals and other discount rules to boost sales.
Varktech’s Pricing Deals Pro for WooCommerce joins Advanced Coupons as one of the few tools that don’t require a paid subscription to implement a BOGO deal.
Pricing Deals for WooCommerce’s interface does not offer the most modern user interface, but it makes up for this by how easy it is to navigate the settings.
There are QUALIFY GROUP and DISCOUNT GROUP sections which represent the products to be bought and those to be offered for free.
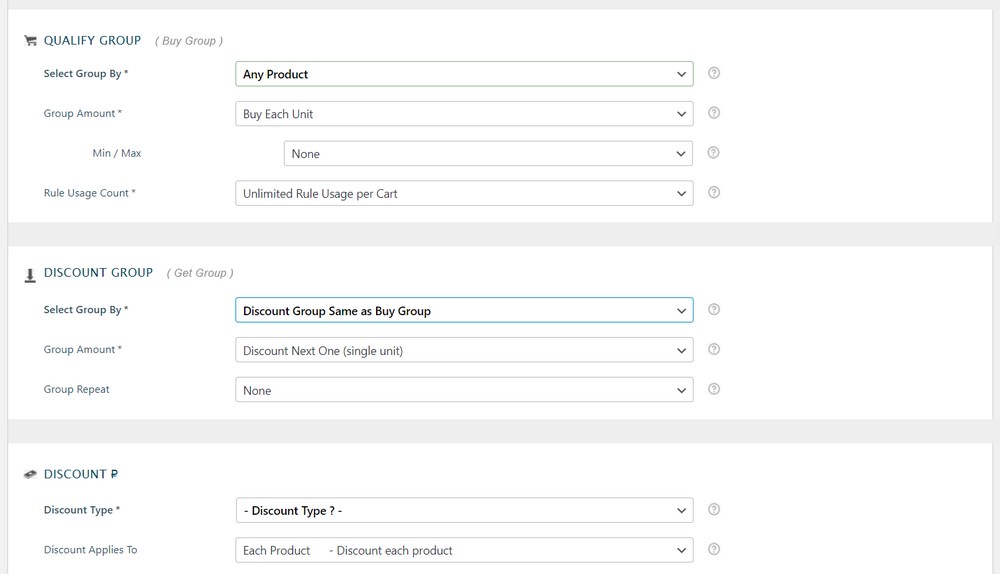
This plugin offers such an extensive bunch of settings that you may easily get overwhelmed. In reality, it adds so much power and flexibility to your store.
Beyond triggering the deal by specific products, you can also choose to add or exclude certain product categories, product variations, and even pricing deal categories.
You can also limit access to the deal for specific user roles (great for wholesalers), email addresses, customer names, or membership groups. The deal usage count per cart can be restricted to any number of your choice.
The available options are probably the most elaborate of the competition. However, all these features come at a price. Here’s what you need to pay for the different license types:
- Single site: $50
- Two sites: $80
- Five sites: $180
- Ten sites: $300
Compared to the other plugins, these prices may appear steep, but considering it’s a one-time deal and the amount of features on offer, it may be a bargain, especially for a single site owner.
6. Conditional Discounts for WooCommerce
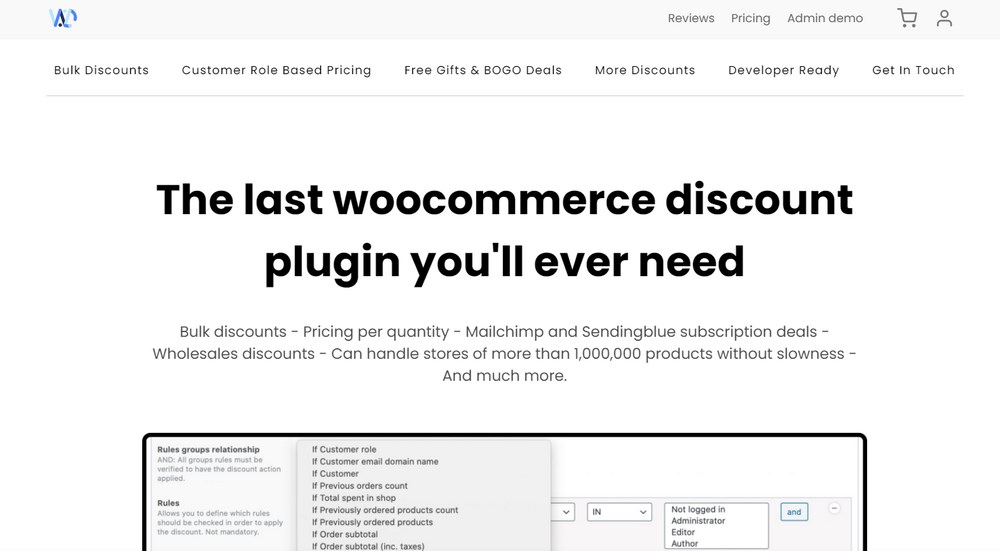
Also known as Discount Suite for WP, our last addition to the plugins we recommend is a tool that is touted as the last WooCommerce discount plugin you’ll ever need.
When it comes to bulk discounting, Conditional Discounts lives up to this claim. The tool is targeted at stores boasting a million products or more and includes the ability to offer BOGO deals.
The vendor performs well with its rather unique discount rules. Here are some of the interesting conditions BOGO deals can be based on:
- Products, cart subtotal or customer role : These are the generic ways BOGO deals can be triggered.
- Client email domain: Additionally, you can offer free products to buyers registered with an email address tied to a particular domain name. This is great for offering employees of a particular company special pricing.
- Order frequency: You may want to offer free products to buyers after ordering from your store a certain number of times.
Conditional Discounts offer the most expensive multiple-site licenses by far. You’ll need a one-time payment of $60 to purchase a single-site license. Other pricing plans require $180 and $600 for five websites and 25 websites respectively.
Promoting Your BOGO Deal in WooCommerce
Once your new BOGO deal is up and running, the next thing you need to do is optimize it for visibility. After all, there’s no point creating a discount offer if the majority of your customers will end up missing out on it.
You need to promote it where buyers can easily find and use it.
The easiest way to go about this is to use the popular all-in-one marketing tool, our very own Convert Pro.
Thanks to its wide array of features, it’s often considered as one of the most effective conversion tools out there. In our case, the tool offers some interesting ways of displaying your BOGO deal to site visitors.
Setting up Your First Convert Pro Campaign
To start promoting your deal using Convert Pro, you need to first create an account on the product website and purchase the plugin.
After completing your purchase, navigate to the Downloads page in the Brainstorm Force store.
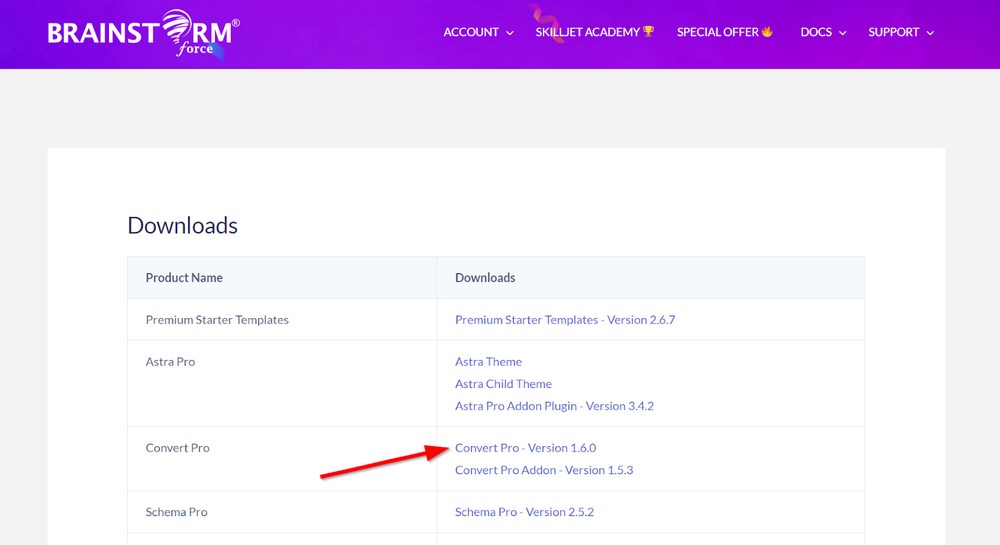
Click on Convert Pro to download the plugin.
Now, go to your WordPress dashboard and click Plugins > Add New > Upload Plugin.
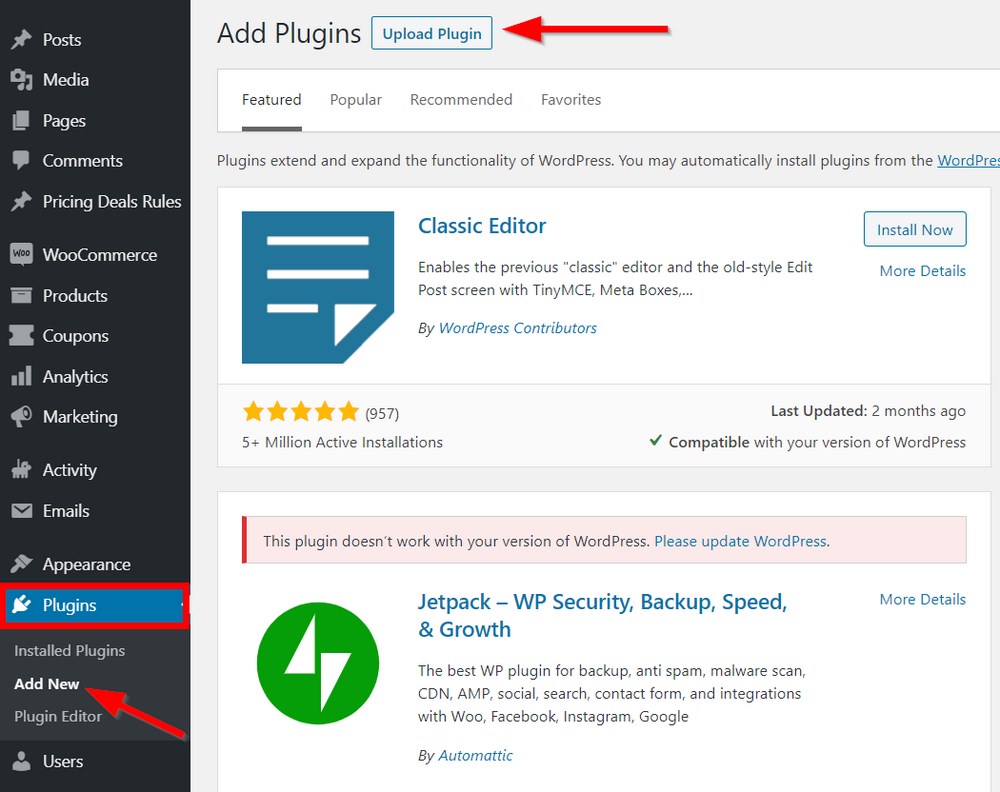
Select the plugin file you just downloaded. Then, install and activate it.
The next thing you need to do is license the plugin. To do this, navigate to Convert Pro > Settings > License.
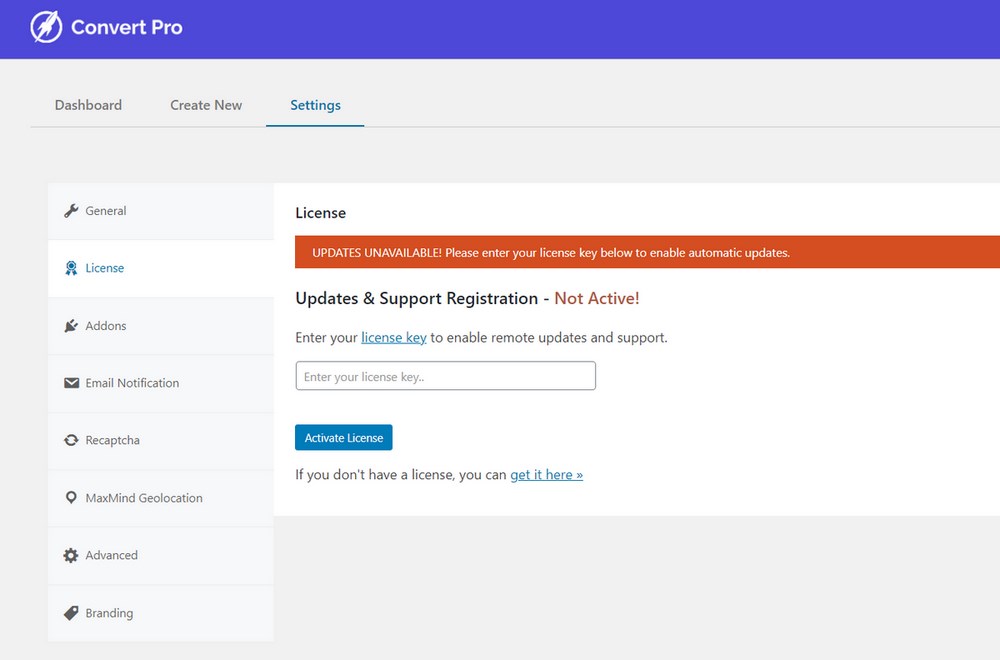
You can find your Convert Pro license on the License page of your Brainstorm Force account.
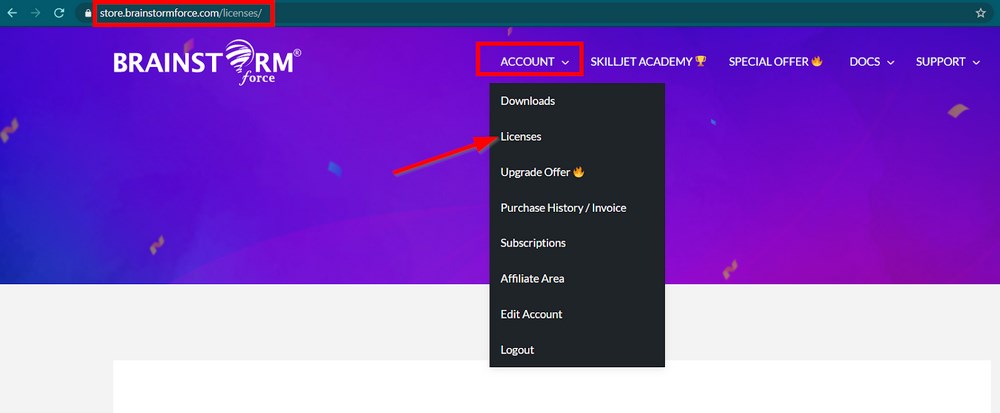
Copy the license and paste into the appropriate field on the Settings page. Then click Activate License.

Now, go to Convert Pro > Create New.
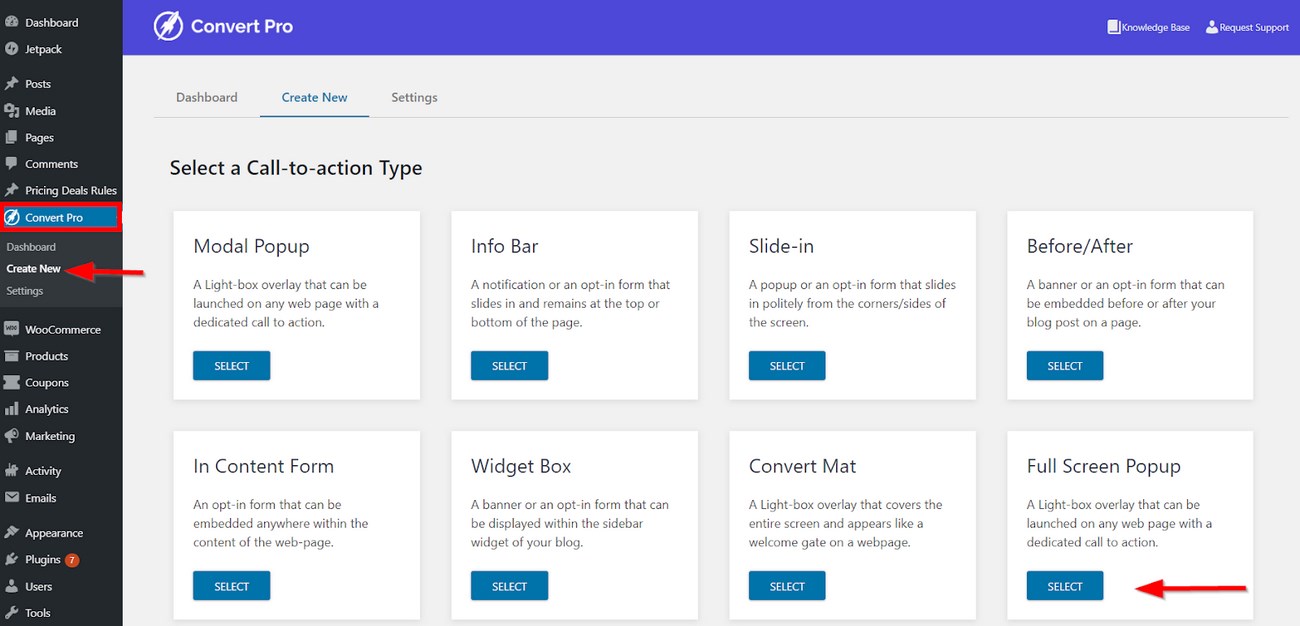
On this screen, click any Call to Action (CTA) type you find suitable. For this promotion, we’ll use the full screen popup.
On the next page, you’ll find a couple of ready-to-use templates. You can use the Select Your Goal bar to filter the available templates based on your specific needs.
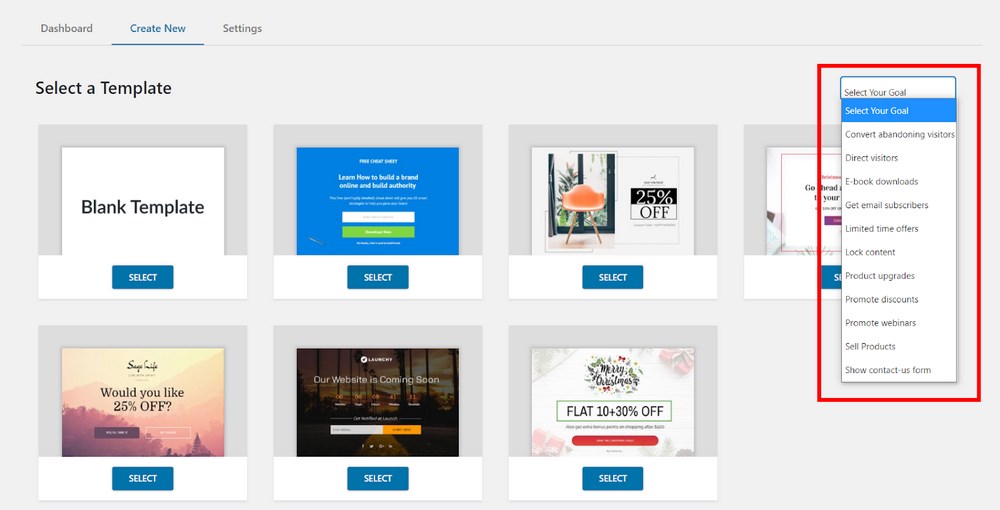
When you select a template, you’ll be required to enter the name of the promotion.
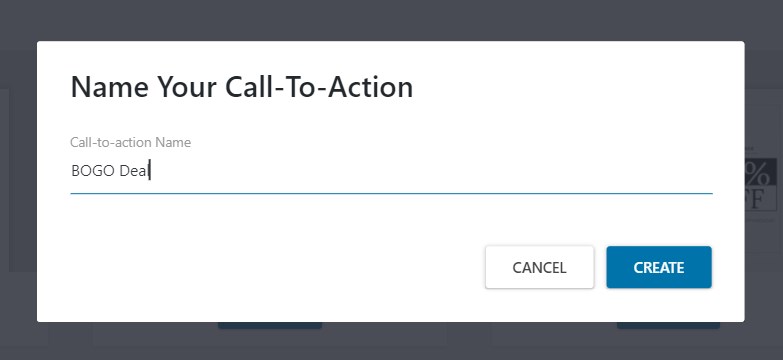
After clicking Create, you’ll be redirected to an editor that lets you tweak the pop-up design as much as you like.
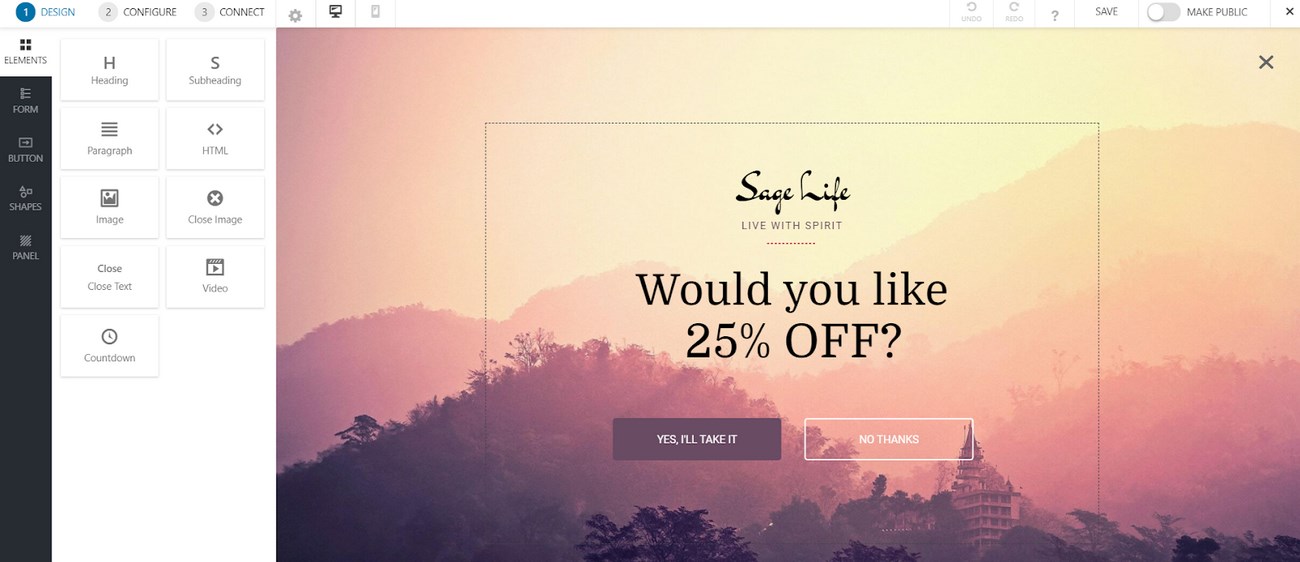
You can add images, change the fonts and colors, select a CTA button type, and add other interesting style elements. Once you’re satisfied with the look, click Save and navigate to the configuration settings.
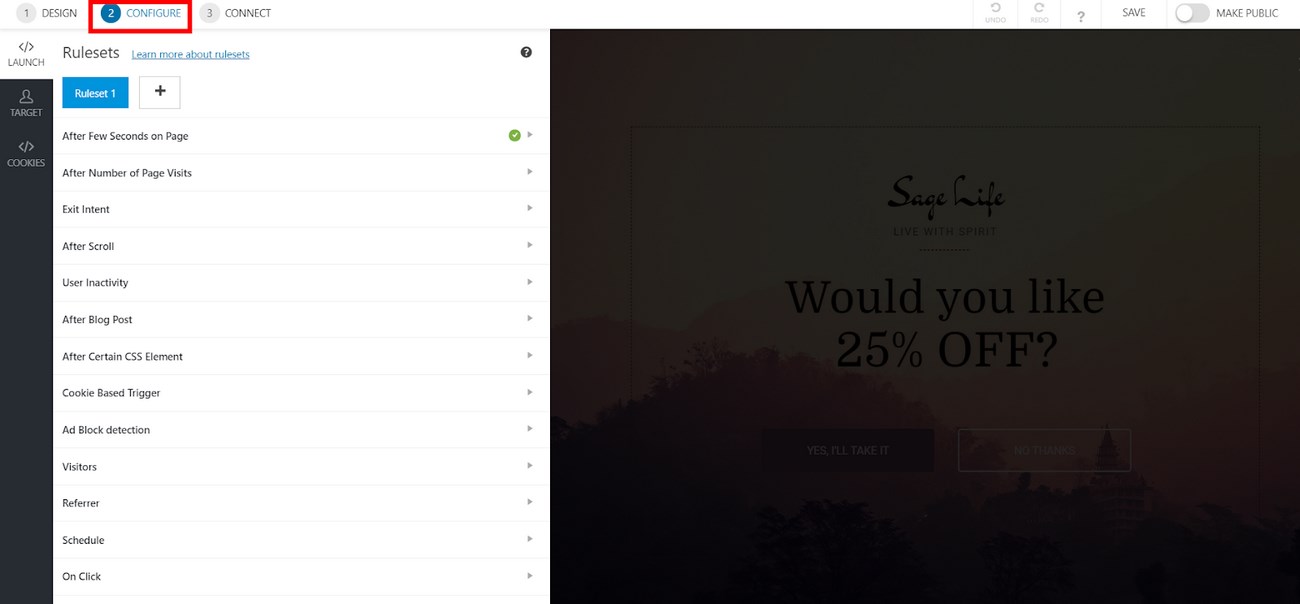
Here’s where you get to decide when, where, and to whom you want to promote your BOGO deal. In the Launch tab, you can set rules regulating how the pop-up can be triggered while the Target tab focuses on who gets to see the promotion.
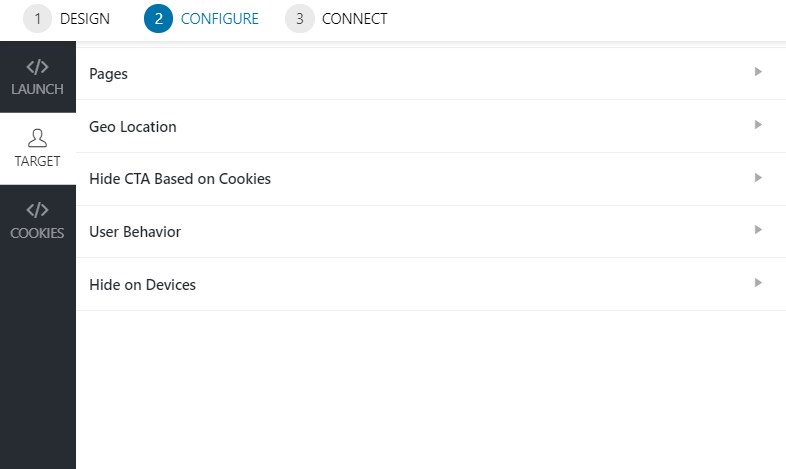
Now that you’ve set the launch rules and target audience, click Save followed by MAKE PUBLIC to publish the pop-up. Congratulations. Your first popup BOGO deal promotion has now been successfully published!
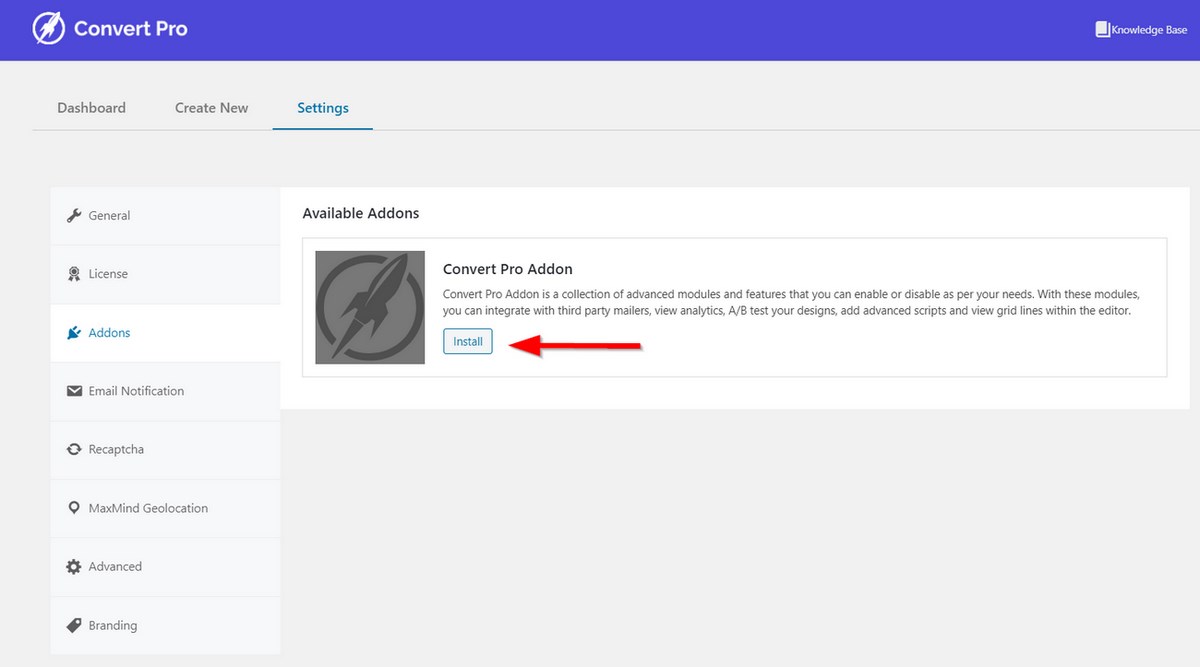
You can also connect the pop-up with other third-party integrations. To do this, go to the CONNECT section. Here, you’ll find a link to install and activate Convert Pro Addon. Click it and install the addon on the next page. It’s completely free.
Afterward, you also need to activate the Connects addon. You can find it by clicking on the Addons tab.
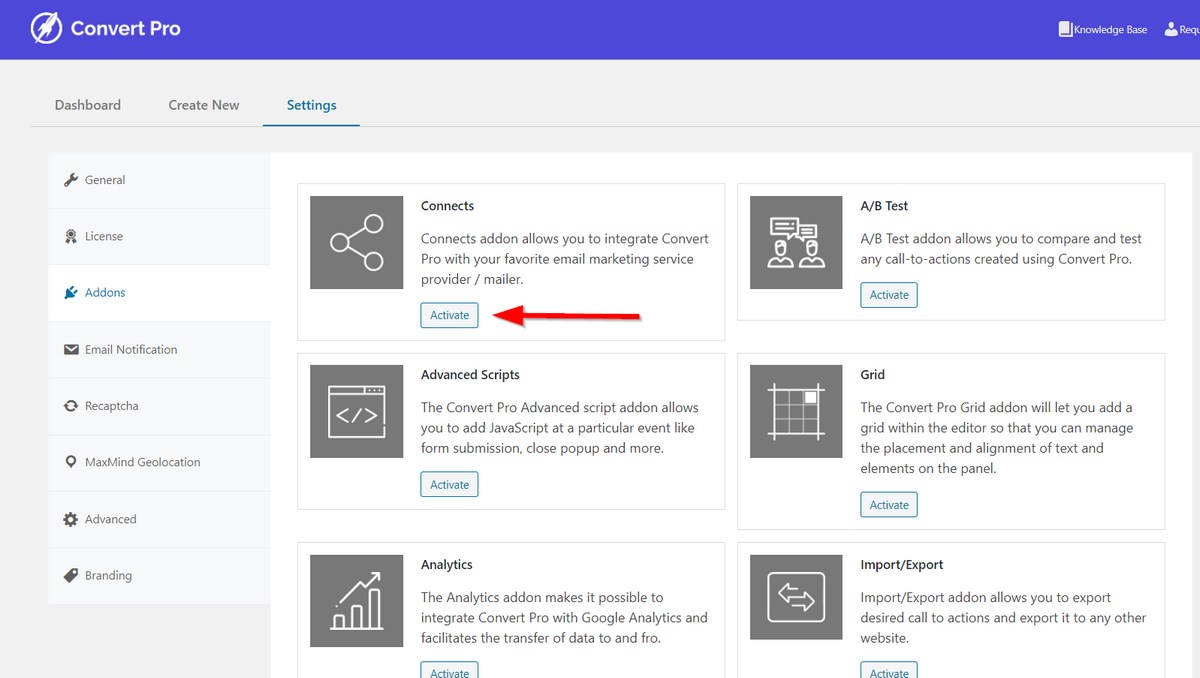
Once you find it, click Activate. Now, a list of supported connections will appear in the promotion editor.
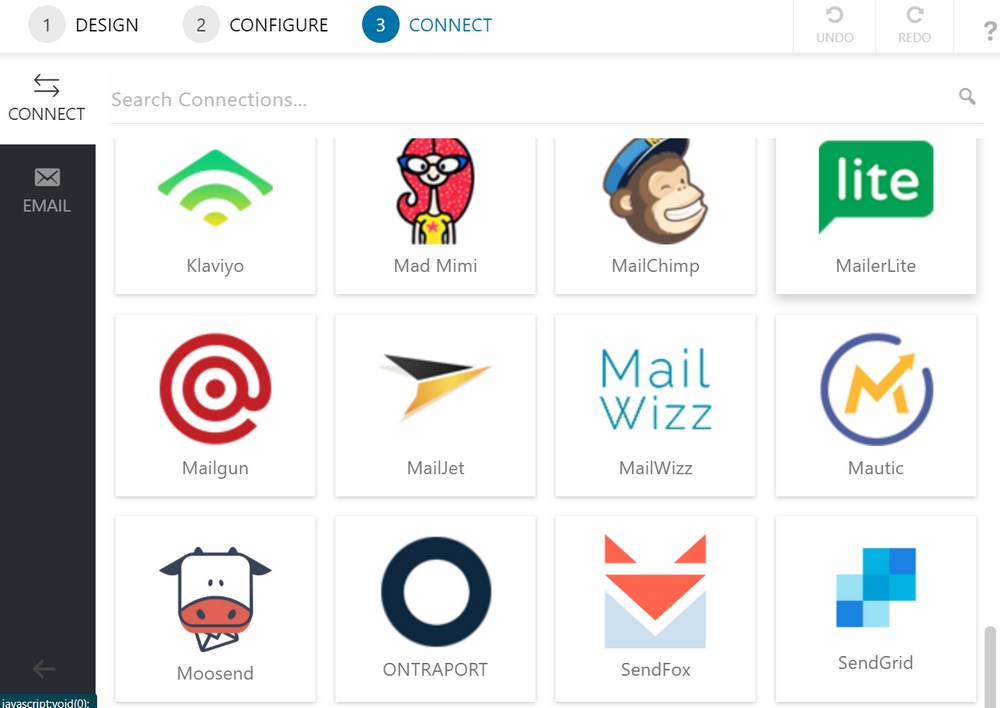
You can skip this step if you only want to display the BOGO deal on your website.
Frequently Asked Questions
What is a BOGO deal?
When should I use a BOGO deal?
Do I need a plugin to create a WooCommerce BOGO deal?
Of all the plugins in the WordPress repository, we recommend Advanced Coupons because of its powerful features and native integration. Pricing Deals for WooCommerce’s robust feature offering also makes it another great alternative.
How many BOGO deals can I add to my store at once?
How do I promote a BOGO deal on my site?
The plugin is a very powerful conversion tool with extensive features that integrate with several other marketing platforms. Additionally, the provider offers a free forever license to all WordPress users.
Creating Your First WooCommerce BOGO Deal
For all the sale and conversion benefits it brings to your store, a BOGO deal is a powerful tool every business owner should try. If you’ve already decided to implement one and don’t know how to go about it, our exhaustive guide will come in very handy.
In a nutshell, the process of creating a WooCommerce BOGO deal begins with choosing the right plugin. The level of effectiveness and flexibility you get to enjoy depends largely on this. In our experience, we’ve found Advanced Coupons to be the best option.
Once you’ve chosen your companion plugin, your BOGO deal could be up and running after five simple steps:
- Install and activate the coupon plugin
- Add a new coupon
- Create a BOGO deal with the coupon data
- Include some additional settings
- Publish and test the deal on your front-end
As best practice, you should also promote your BOGO deal once it’s all set up. This will ensure that site visitors do not miss it while making their purchase. A powerful tool like Convert Pro can deliver this functionality with a pop-up, sticky bar, or even a spin wheel.
If you’re looking to boost your sales and enhance customer loyalty, BOGO deals are worth giving a try. No doubt, WooCommerce marketing and conversion optimization consist of way more strategies.
To learn more about WooCommerce coupons in general, check out our article on the topic. Feel free to also ask questions and share your experience with BOGO deals in the comment section below!
Disclosure: This blog may contain affiliate links. If you make a purchase through one of these links, we may receive a small commission. Read disclosure. Rest assured that we only recommend products that we have personally used and believe will add value to our readers. Thanks for your support!
