A good WooCommerce checkout page design can increase store profits exponentially.
You’ll have to invest some time to customize the WooCommerce checkout page though.
The good news is, after doing it, you should see increased conversion rates without having to do anything else.
In this article we’ll teach you how to edit WooCommerce checkout pages. We’ll also show you how to create WooCommerce one page checkouts. One of the best-converting designs!
- The importance of an optimized checkout page for eCommerce
- How to customize the WooCommerce checkout page using the CartFlows plugin
- How to customize the WooCommerce checkout page without a plugin
- Alternative plugins to customize the WooCommerce checkout page
- How to create a one page WooCommerce checkout
- Bonus: Some recommended plugins for your WooCommerce site
- Final Thoughts
The importance of an optimized checkout page for eCommerce
According to our eCommerce stats study, 70% of online shopping carts are abandoned.
That means 7 out of 10 people were considering buying from your store but ended up giving up along the way.
There may be a number of reasons why they didn’t buy from you but you can bet a long or complicated checkout process was one of them!
Fast, frictionless checkout can transform the customer journey. The easier you make checkout, the more likely a customer is to complete it.
It’s that simple.
There is nothing better for a business than a happy customer.
It’s a win-win for everyone!
In WooCommerce, checkout page customization is even more important, since the default page is not the most attractive nor high converting.If you’re using WooCommerce and want to improve the checkout experience, read 15+ WooCommerce checkout optimization tips. It’s sure to help!
How to customize the WooCommerce checkout page using the CartFlows plugin
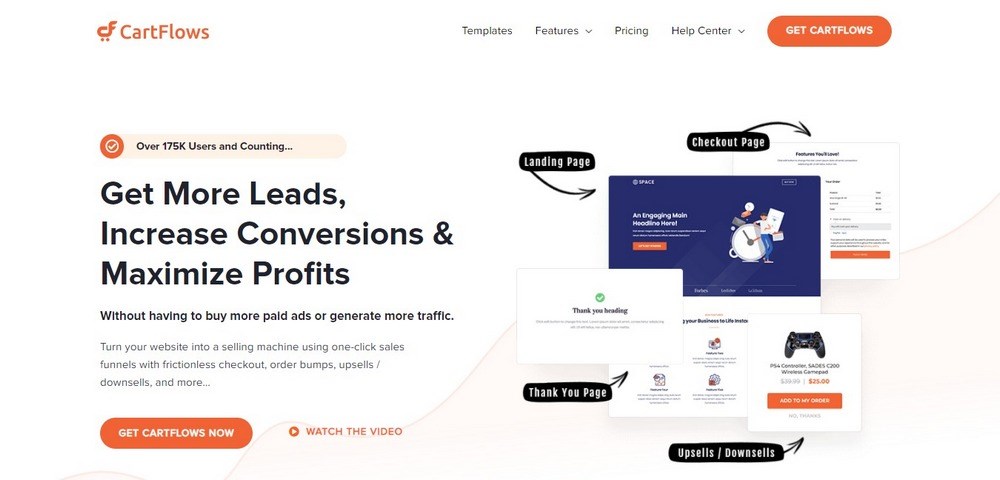
CartFlows is a feature-rich plugin that allows you to optimize your checkout flow to increase revenue per order. It’s an essential plugin we recommend every store owner uses as it more than pays for itself!
The checkout process depends on the theme you use. We recommend using an optimized theme.
Every problem has a solution and the problem of customizing the checkout process is no different.
In this section, we’ll create a custom checkout process complete with upsells and downsells using this plugin.
We’ll also illustrate how you can use the custom checkout templates, make changes to the checkout design, add or remove sales and customize the thank you page.
Please ensure that you’ve installed and activated CartFlows if you want to follow along
We also recommend using the new slick and faster UI:

- Use custom checkout page templates
- Make changes to the design of the checkout page
- Edit the checkout page settings in CartFlows
- Add or remove fields from your checkout page
- Create upsell offers in WooCommerce
- Create downsell offers in WooCommerce
- Customize the design of the WooCommerce thank you page
1. How to use custom checkout page templates
It is not complicated to use the checkout page templates in the CartFlows plugin.
First, log in to your site as an admin, and on the WordPress dashboard, click on CartFlows > Flows.
This will open a list of all the flow templates.
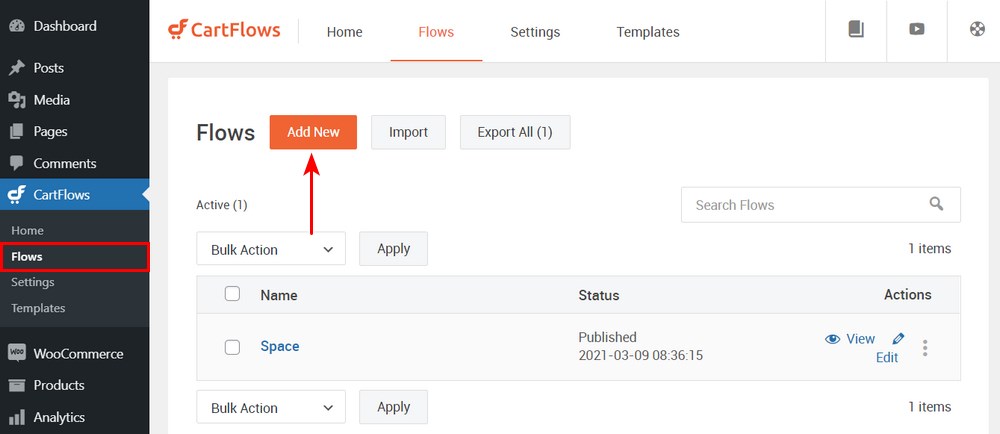
You can create your own template from scratch. You can also select a ready-made template, which you can customize.
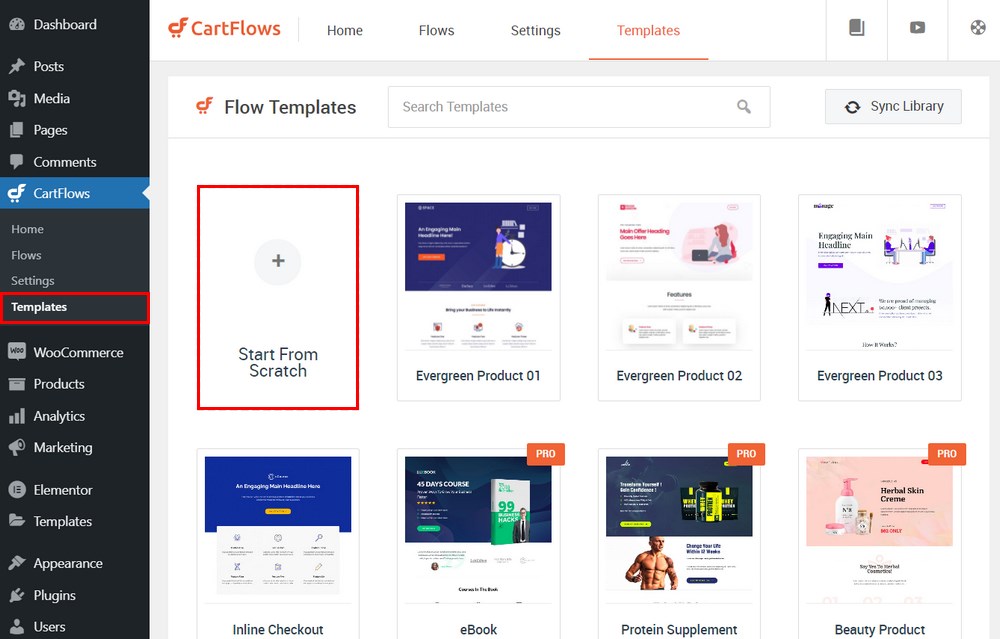
Click on Start From Scratch, where we’ll create our custom flow template.
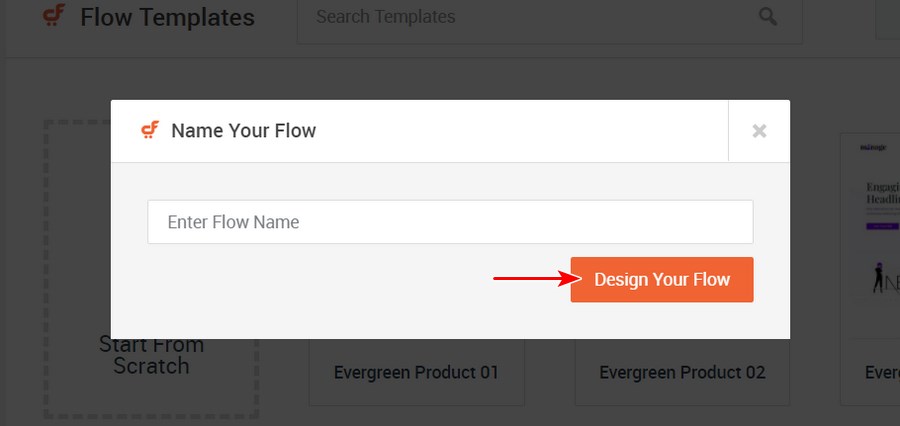
Enter the flow name and click on Design Your Flow.
This will redirect you to all the steps in the flow. To customize these steps, click on Edit.
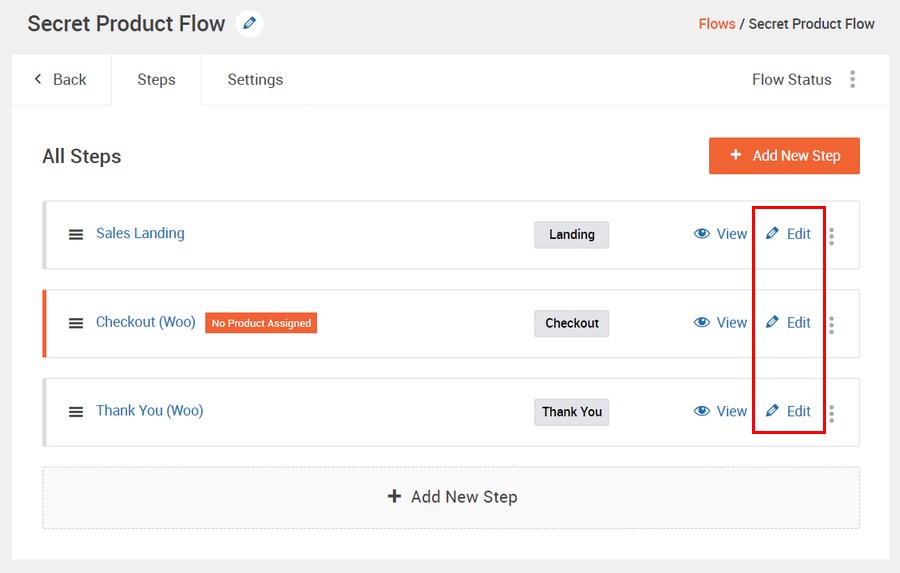
CartFlows is compatible with the Elementor page builder, allowing you to customize these steps.
Edit Landing Page
First, let’s edit the Landing page. All you need to do is click on the Settings tab and copy the Next Step Link.
You can use any page builder to design landing page and add this link to the button to take users to the next step of the flow.
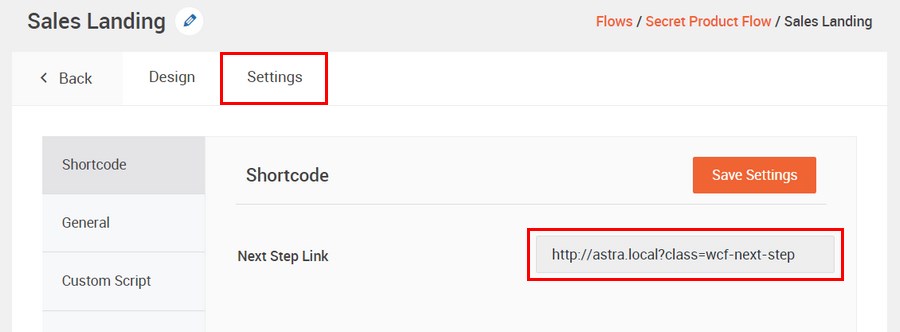
Once you are done, click on Back to edit Flow.
Edit Checkout Page
The next step is to edit the Checkout page. You’ll notice that there’s a notification informing you that no product has been assigned. Go ahead and click on Edit in the checkout page step.
Click on the Products tab, where you’ll add or create the product(s).
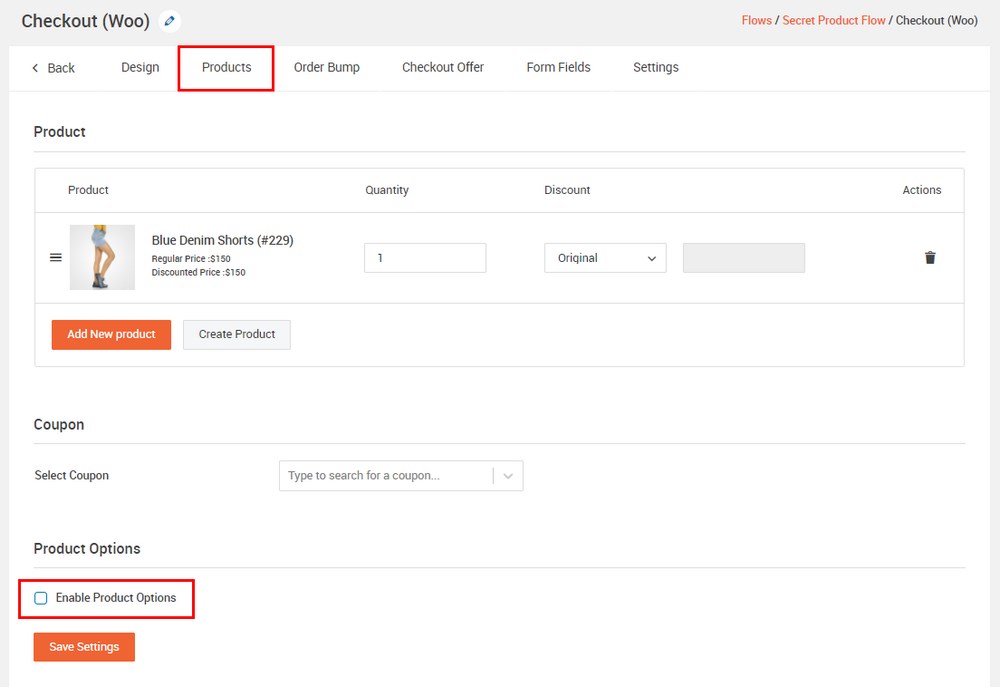
You can also enable the Product Options Conditions.
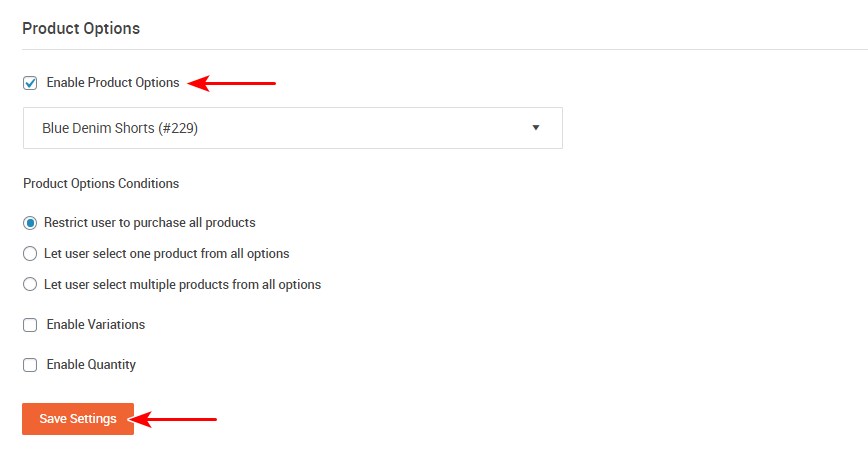
Click on the Save Settings button to update your changes.
Click on the Settings tab to copy the shortcode we’ll use to create the checkout page. It’s located in the Shortcodes section.
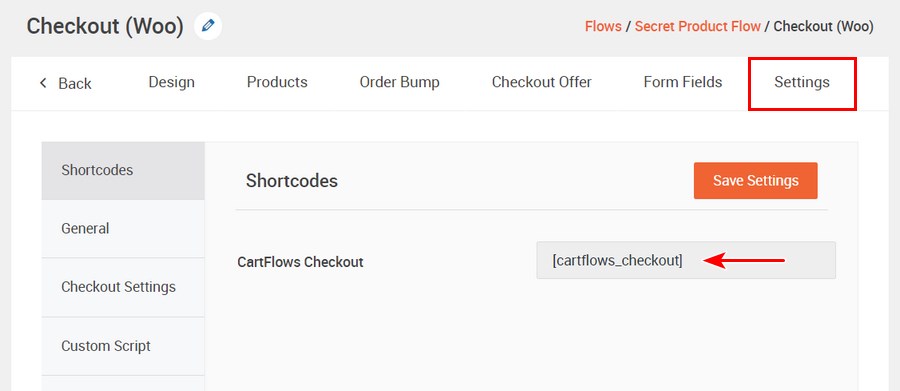
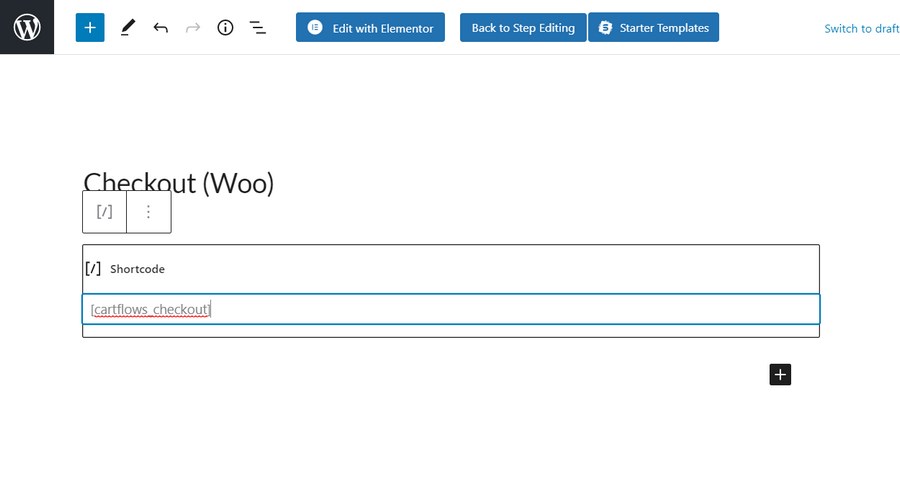
Once you’ve copied the shortcode, paste it to the checkout page that you’ll create.
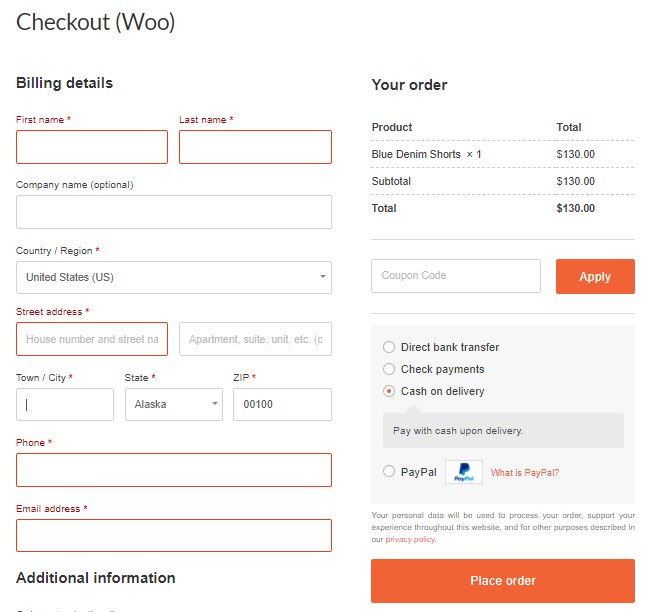
Once you are done, click on Back to edit Flow.
Edit Thank You Page
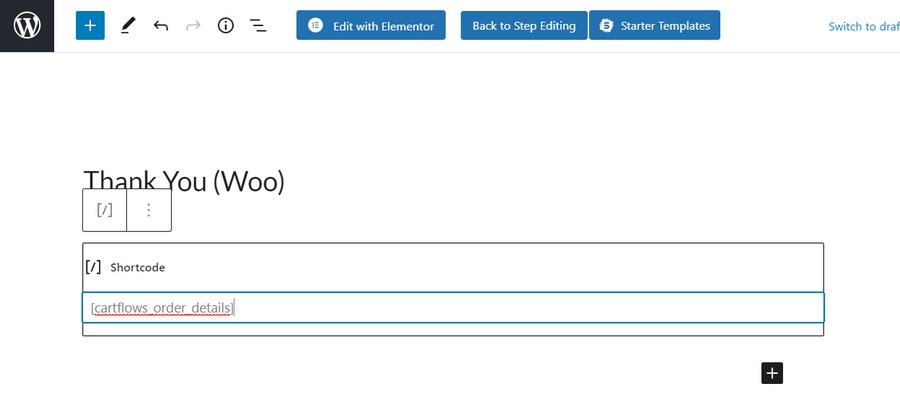
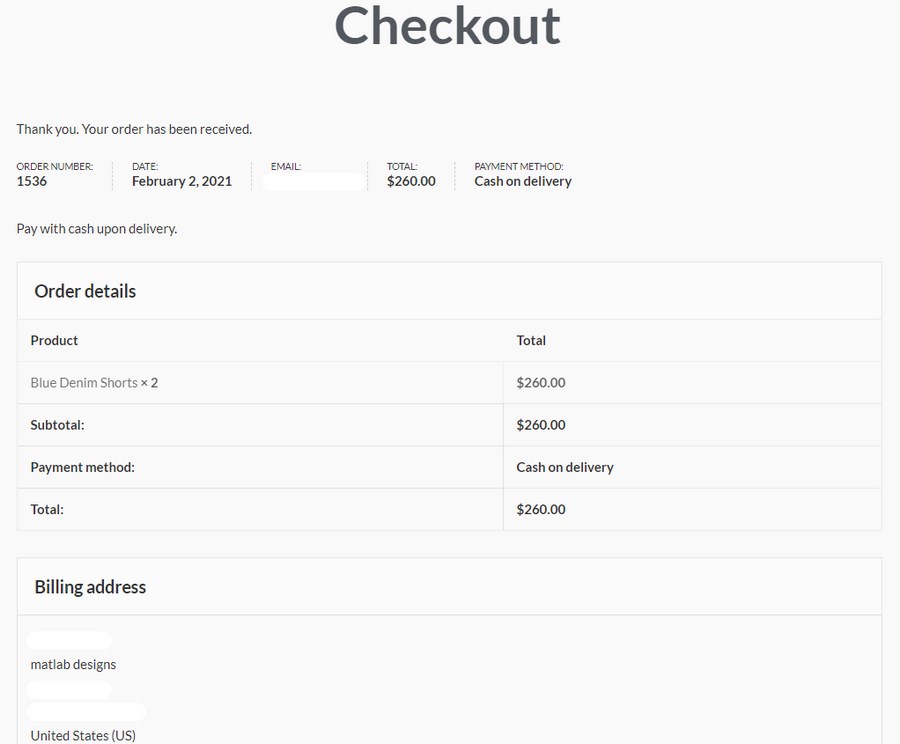
The last step is to edit the Thank You page. Click on Settings and click on the Shortcode tab.
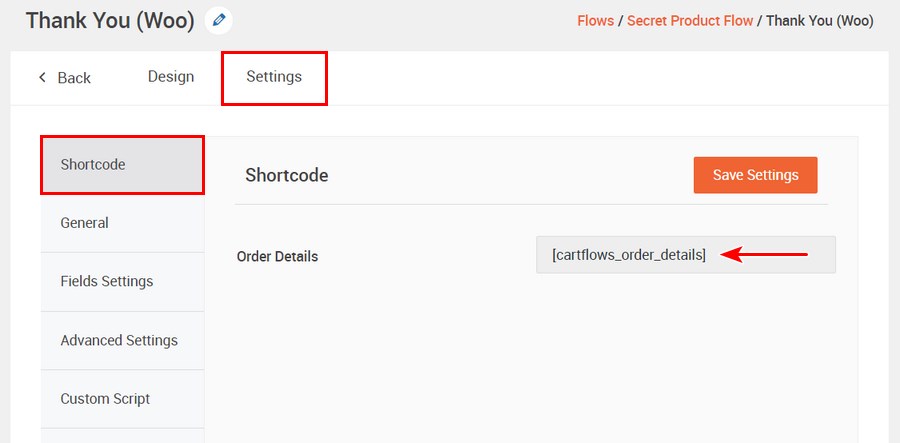
Copy the shortcode and paste it to the thank you page that you’ll create.
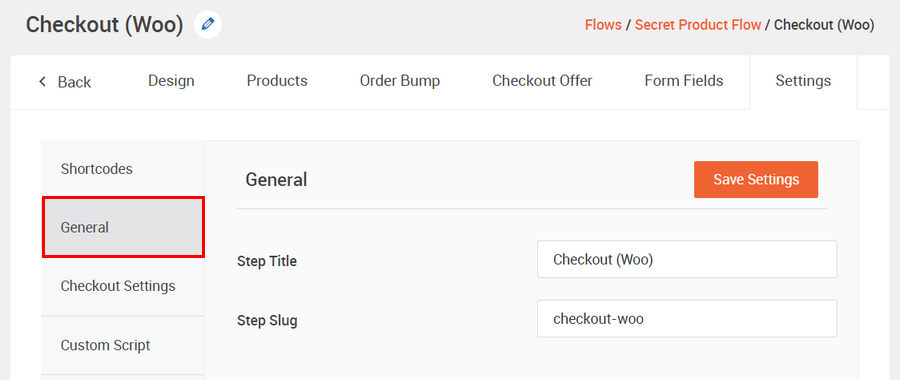
Next, click on the General tab, where you can change the step title and slug.
You can also enable the fields that you want to be displayed on this page, under the Field Settings tab.
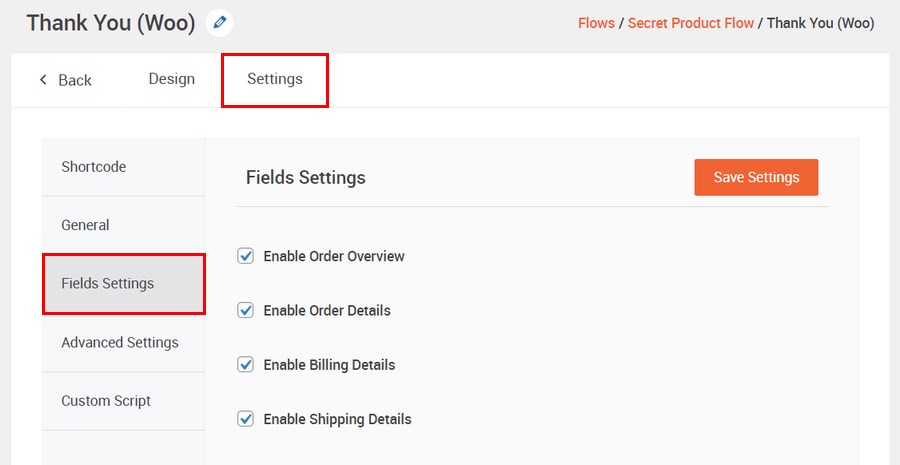
From this section, you can see that CartFlows includes features that will help you to optimize your checkout and boost sales.
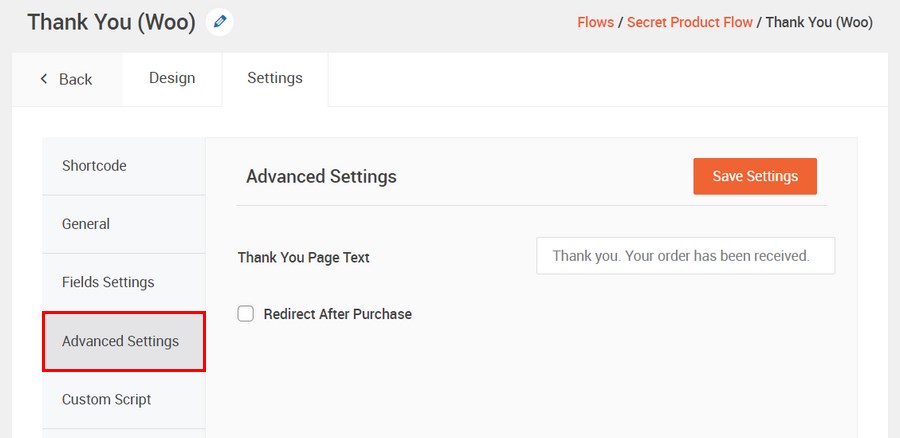
On the Advanced Settings tab, you can edit the thank you page text and enable redirects after purchase. Remember to save your changes by clicking on the Save Settings button.
Once you are done, click on Back to edit the Flow.
2. How to make changes to the design of the checkout page
CartFlows simplifies the process of customizing the design of the checkout page. The slick and fast UI also makes it easy for anyone to customize the design of the checkout page.
To customize the checkout design, click on Edit.
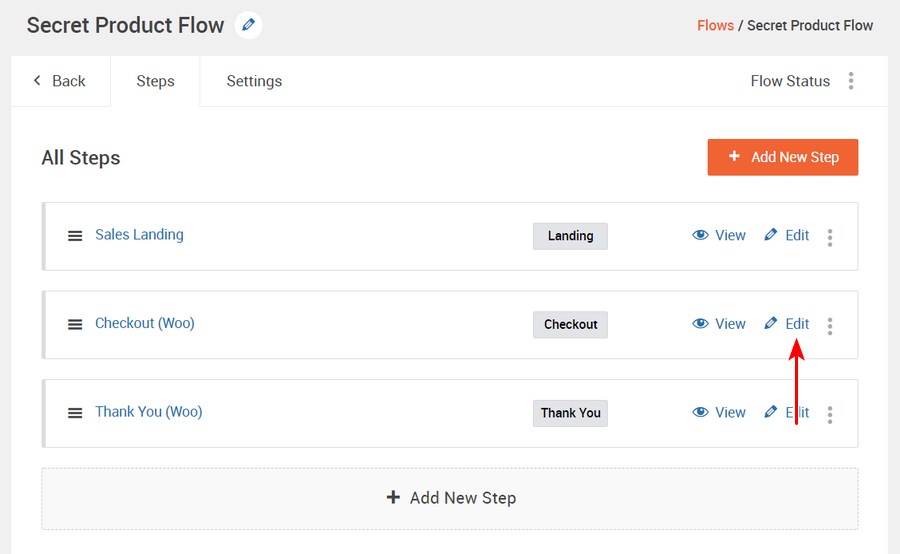
This will open the checkout page settings. Scroll down to the Design Settings section and check the Enable Design Settings option.
Click on the Checkout Design tab.
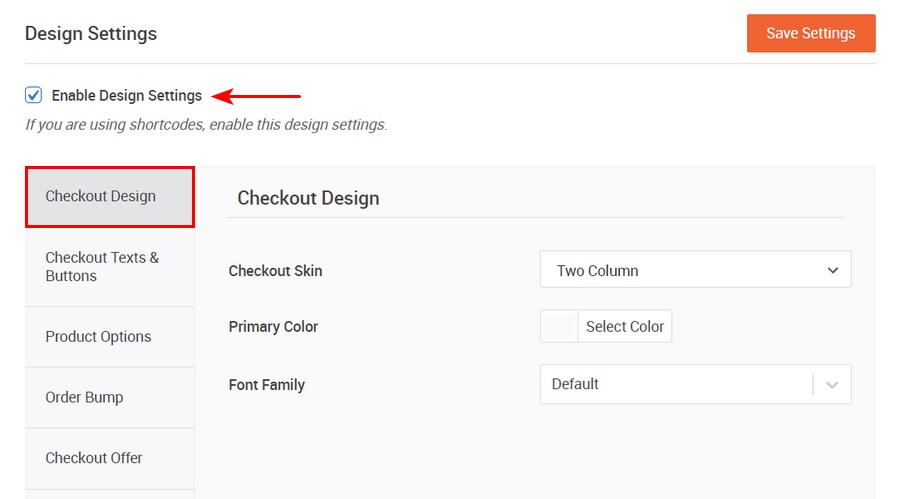
Under this tab, you can change the checkout skin, primary color, and font family.
The next tab is the Checkout Texts & Buttons.
You can enable Advanced Options, which allows you to customize the heading, input fields, buttons and sections.
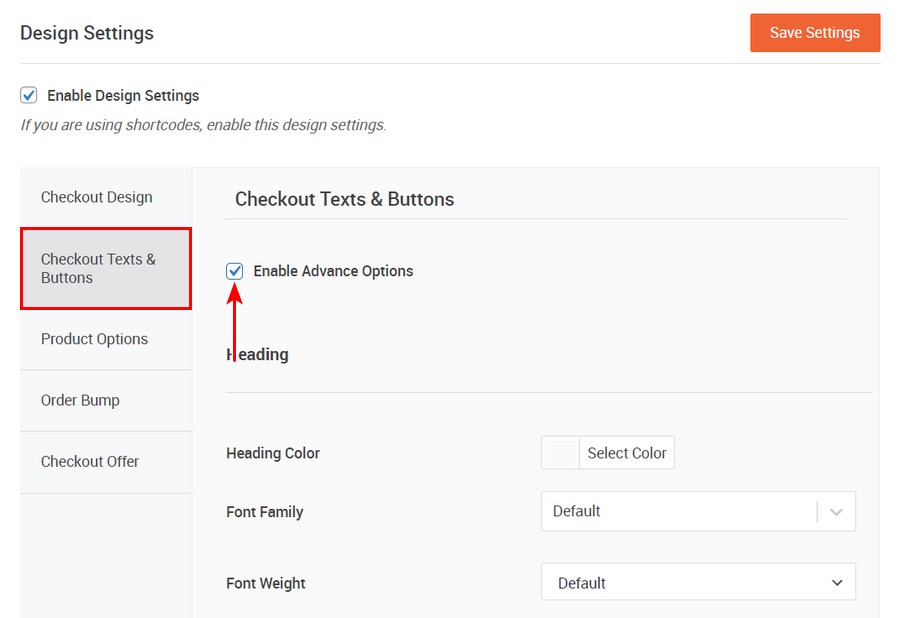
You can also change the order bump and checkout offer design.
Remember to click on Save Settings to update your changes.
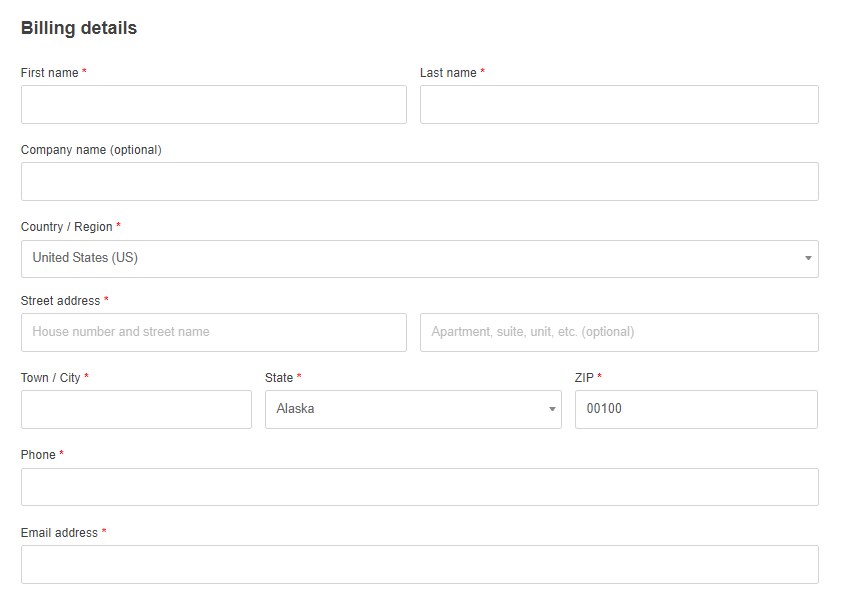
We’ve changed the checkout skin design to one column.
3. How to edit the checkout page settings in CartFlows
On the checkout page settings section, click on the Checkout Settings tab. Here, you can change the place order button text.
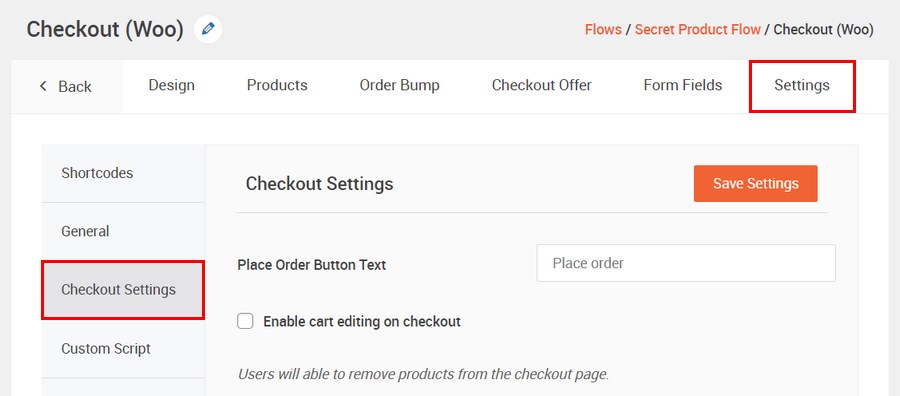
Remember to save the changes you make.
4. How to add or remove fields from your checkout page
As mentioned earlier, you only need between 6 to 8 fields on the checkout page.
In the standard WooCommerce checkout page, there are 18 – 20 fields, some of which are not necessary to complete an order.
CartFlows allows you to add or remove fields from your checkout page. On the checkout settings section, click on the Form Fields Tab to edit the fields.
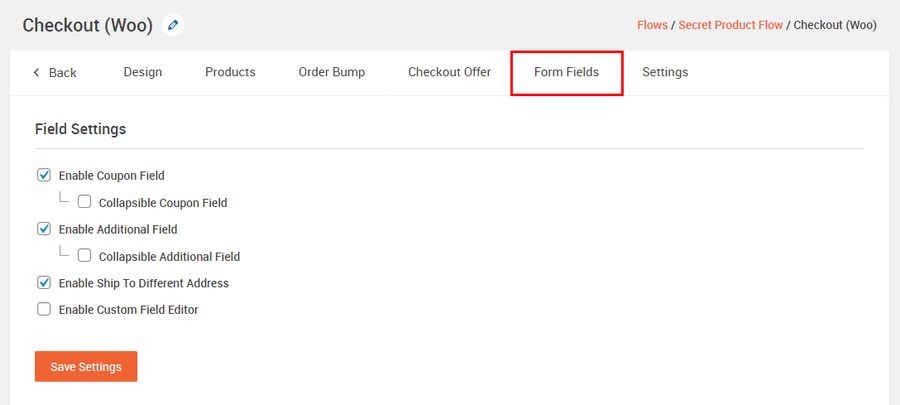
You can edit the coupon field, additional field, and the ship to a different address section. There is also an option to make the coupon field and additional field collapsible.
When you enable the custom field editor, you can remove any field by clicking on the ‘eye’ icon.
For example, we’ve disabled the company name field:
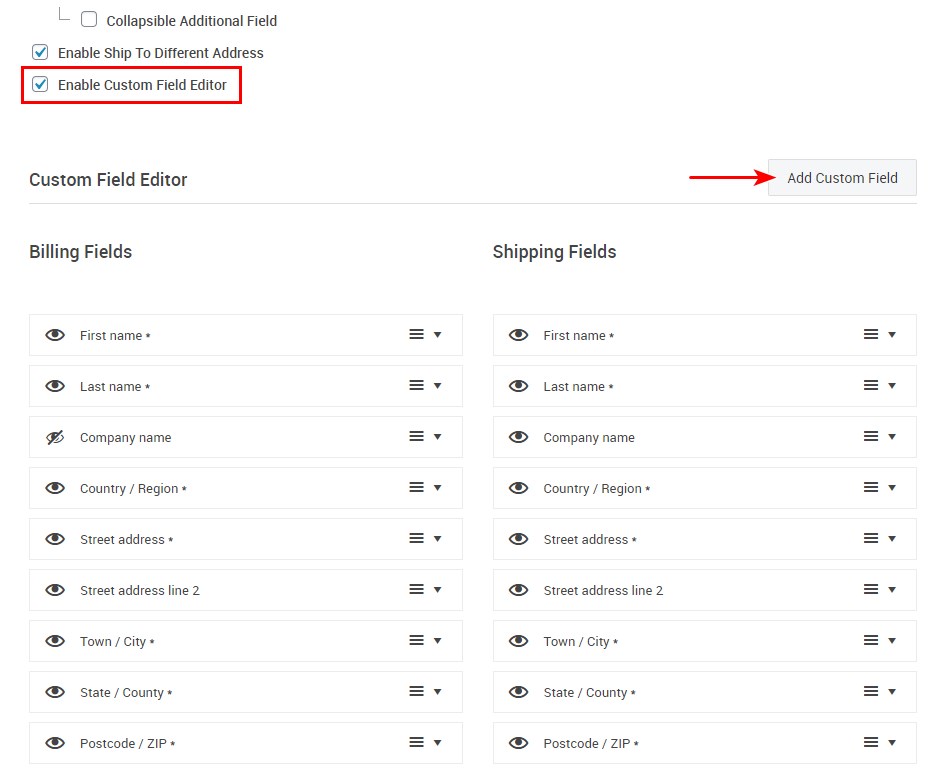
To add a custom field, click on the Add Custom Field button.
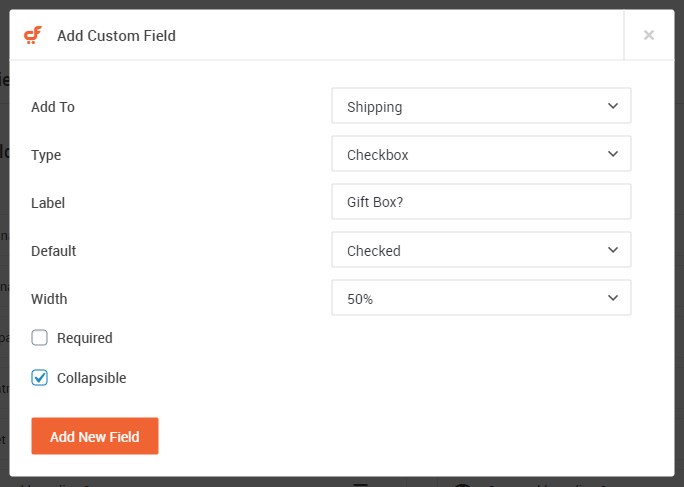
You can add the field to the billing or shipping section. There is also an option to enter the field label, default, and placeholder text.
You can adjust the width of the field and make it required or collapsible.
Once done, click on the Add New Field button.
Remember to click on Save Settings to save your changes.
We recommend adding the field if it’s necessary to complete the order. Adding many fields on the checkout page may increase the cart abandonment rate.
5. How to create Upsell offers in WooCommerce
One way of boosting sales in your store is to include an upsell on your checkout flow.
Upselling is where you encourage a customer to purchase a more expensive version of what they have in their basket. For example, you can suggest a MacBook Pro when a shopper has selected a MacBook.
Showing them this product may fulfill their needs and can increase AOV.
To add an upsell offer on your checkout flow, click on Add New Step.
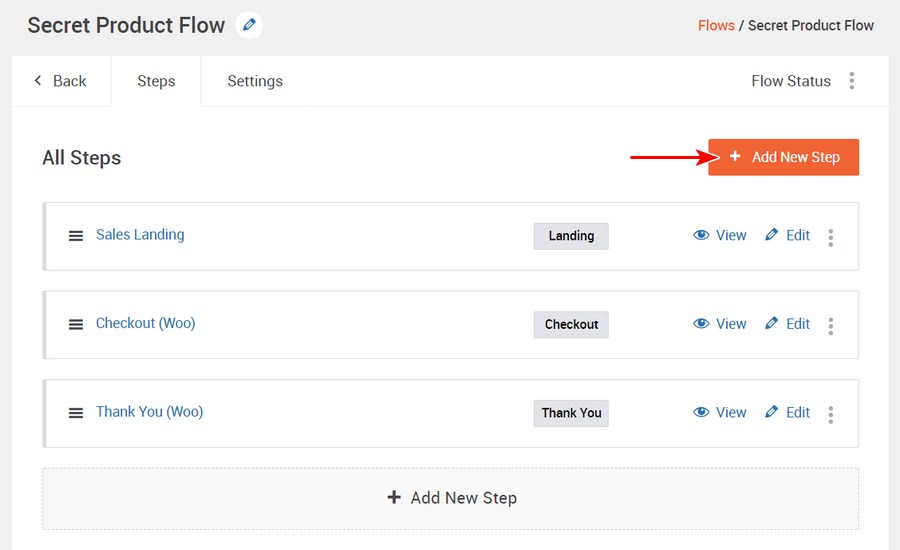
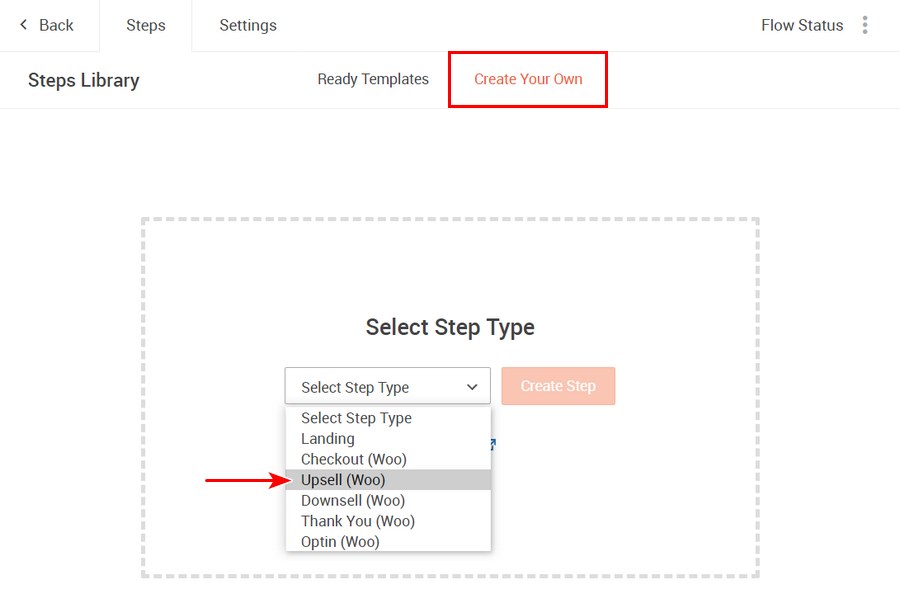
This will open the steps library page.
Click on the Create Your Own tab and select Upsell on the drop-down menu. Next, click on the Create Step button.
This will add a new step to the checkout flow, but first you’ll have to enter the step name. Drag the upsell step and position it below the checkout page step like so:
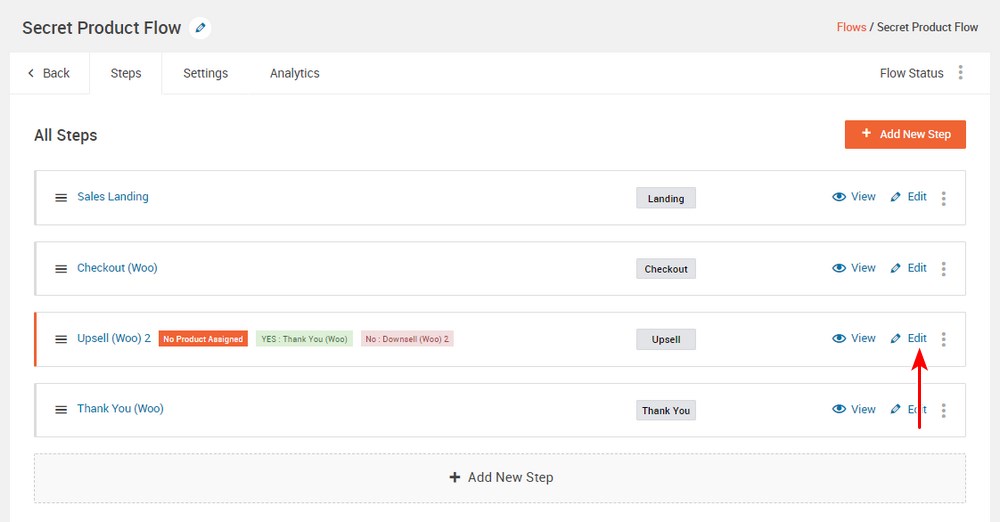
You’ll notice that there is a notification informing you that no product is assigned. To assign a product, click on Edit to open the Upsell settings page.
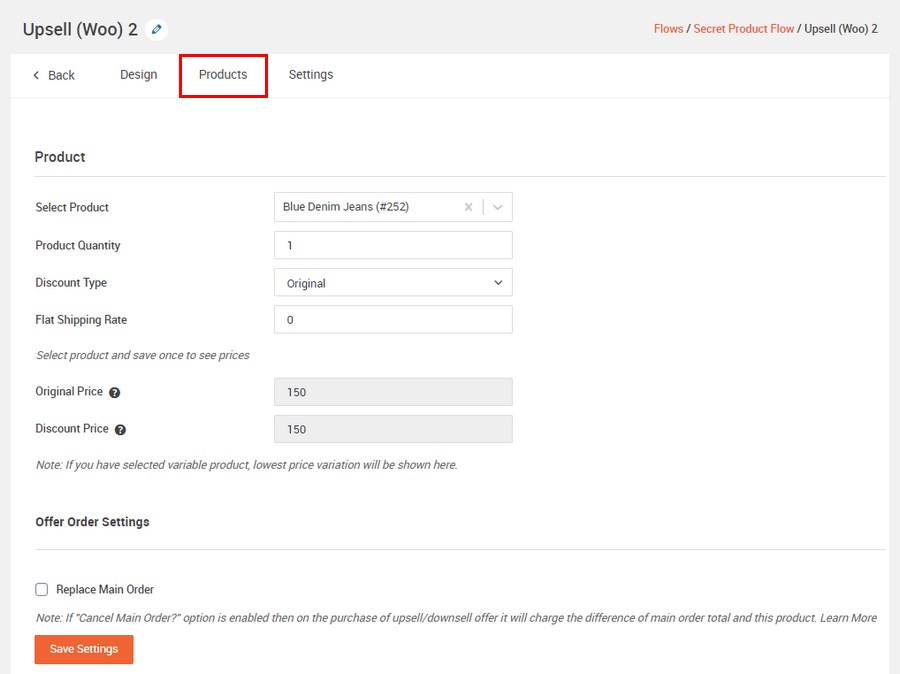
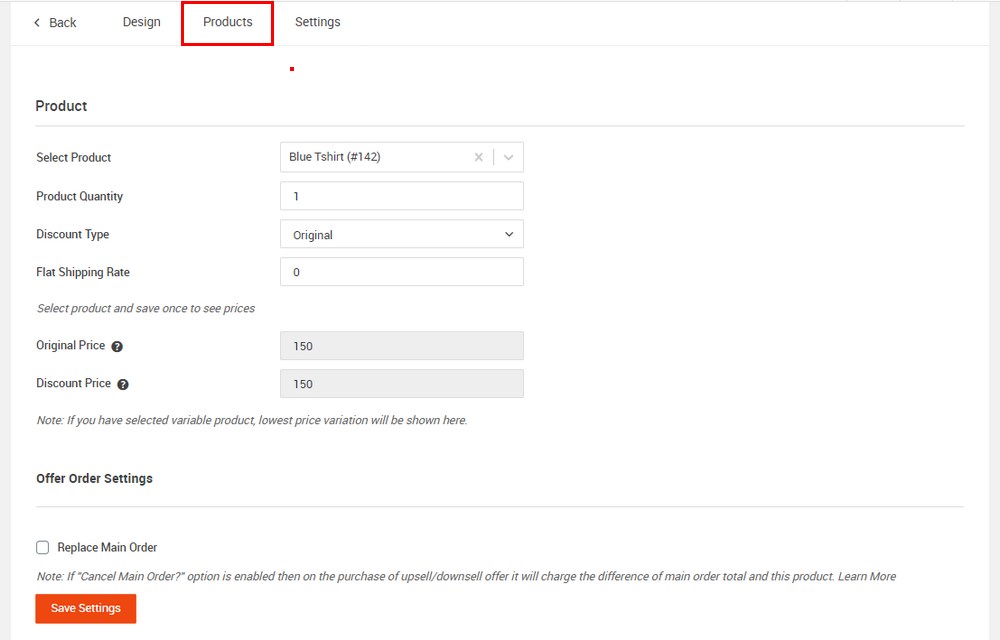
Click on the Products tab to select the upsell product. There are other options here that are worth exploring. They include the product quantity, flat shipping rate, discount price, discount type, and the offer order settings.
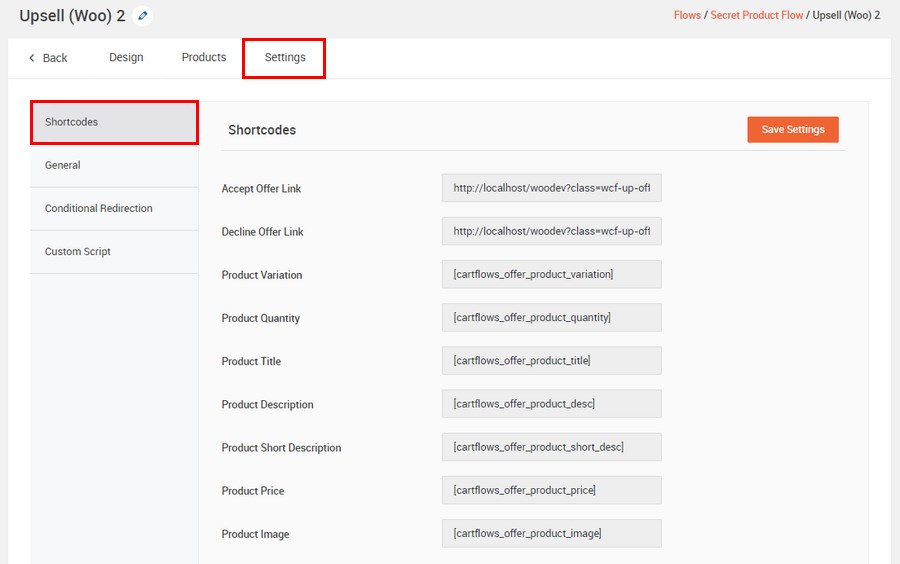
Next, click on the Settings tab, where you’ll find different shortcodes that can be used on the offer page.
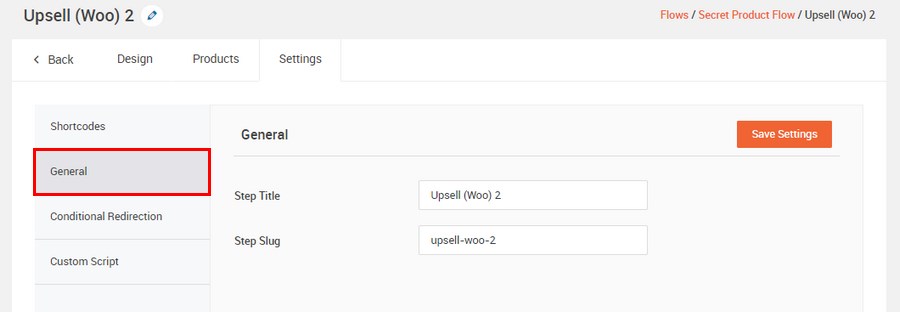
You can edit the step title and slug on the General tab.
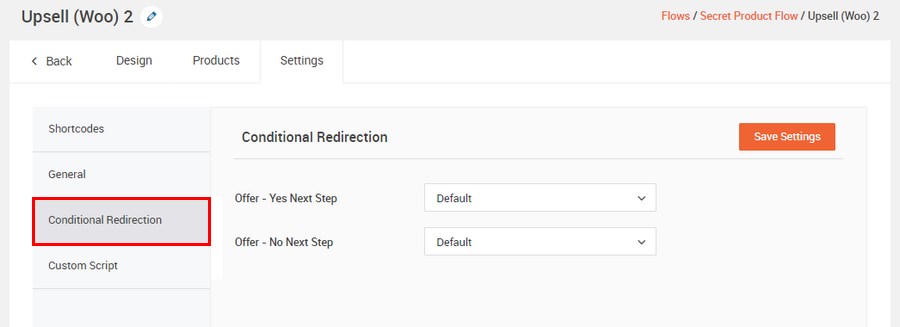
The Conditional Redirects tab allows you to add conditional redirects if the shopper accepts or rejects the offer.
Ensure that you select a product whose price is higher than the one on the cart.
Once you are satisfied with your settings, click on Save Settings.
6. How to create Downsell offers in WooCommerce
Downsell offers are cheaper alternatives the shopper can buy if they decline to purchase a product or an offer. Ideally, upsells should precede downsells but you have to design this to suit your target audience.
It uses the same process as creating an upsell.
On your checkout flow, click on Add New Step.
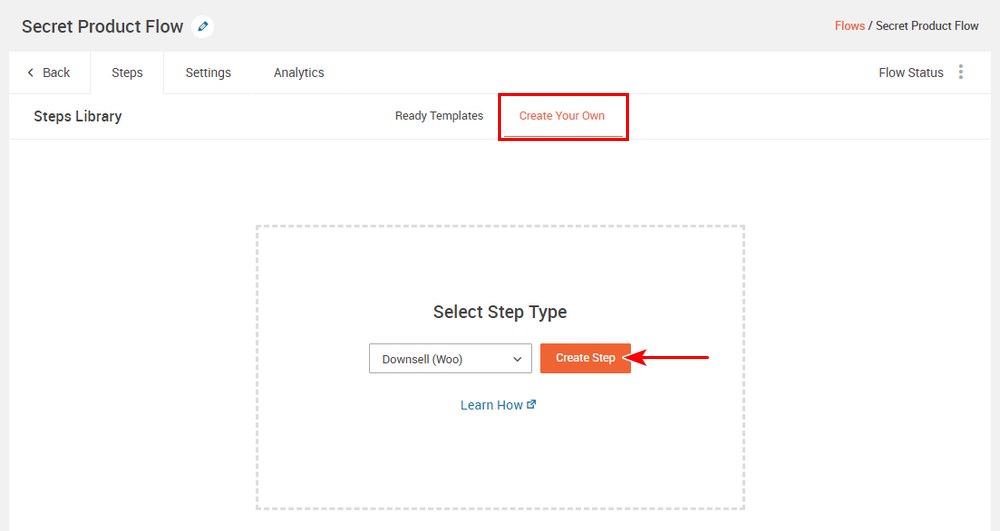
This will add a new step to the checkout flow. Drag the downsell step and position it below the upsell step like so:
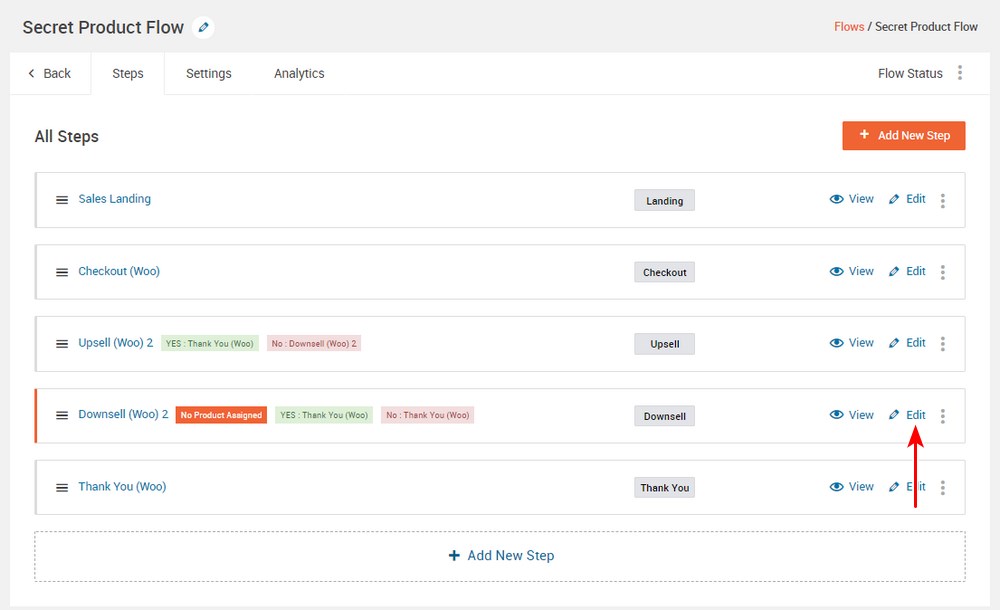
The next step is to assign a product by clicking on the Edit link. The steps are the same as creating an upsell, but you have to ensure that the product price is lower than that of the upsell product.
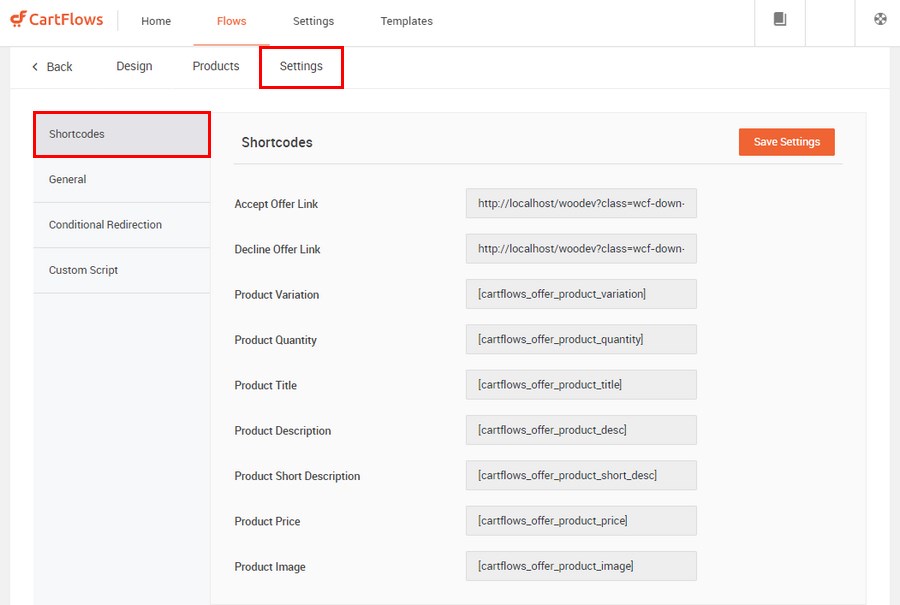
Next, click on the Settings tab, where you’ll find different shortcodes that can be used on the downsell offer page.
Just like the upsell offer, you can also change the step title, step slug, and edit the conditional redirects.
7. How to customize the design of the WooCommerce thank you page
The thank you page is one of the most inbound lead nurturing components in any WooCommerce store. This is the page where leads, visitors, and customers see after submitting a form on the landing page.
It is very useful, as it is the last step in the conversion process.
We recommend that you include a message, an offer, additional content, an extra call to action button, or social options.
CartFlows includes different templates that you can use or customize
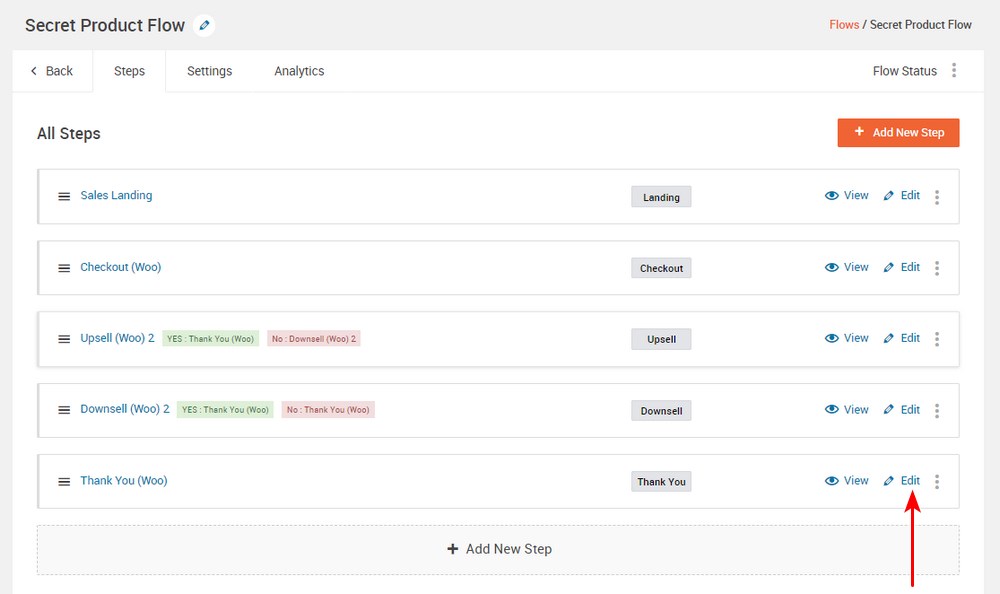
Customizing the Thank you page using CartFlows is not a complicated process. Click on the Edit link, as shown below:
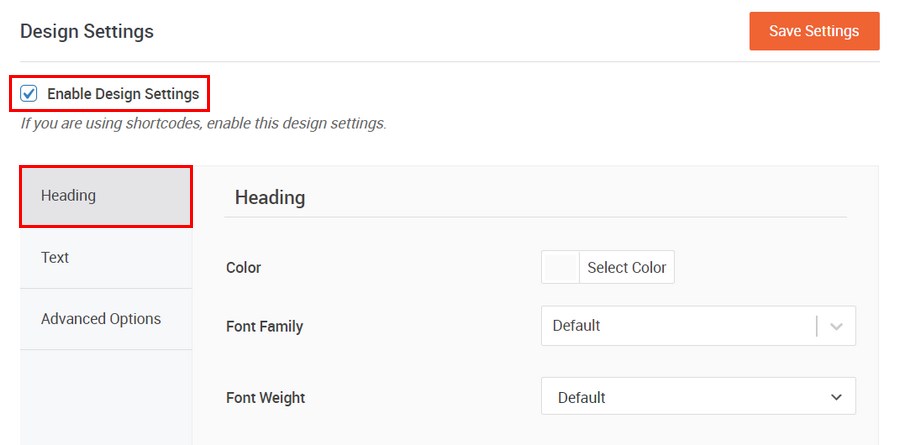
Click to the Design tab, and check the Enable Design Settings option.
On the Heading tab, you can change the color, font family, and font weight of the header.
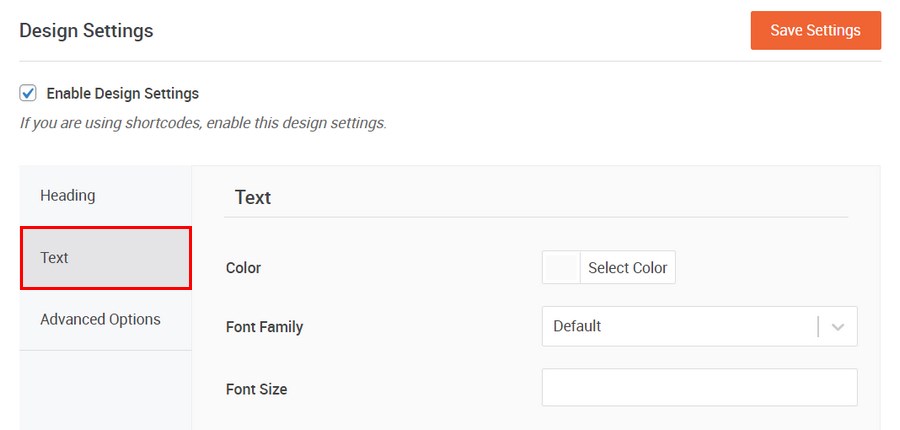
On the Text tab, you can change the text color, font family, and the desired font size.
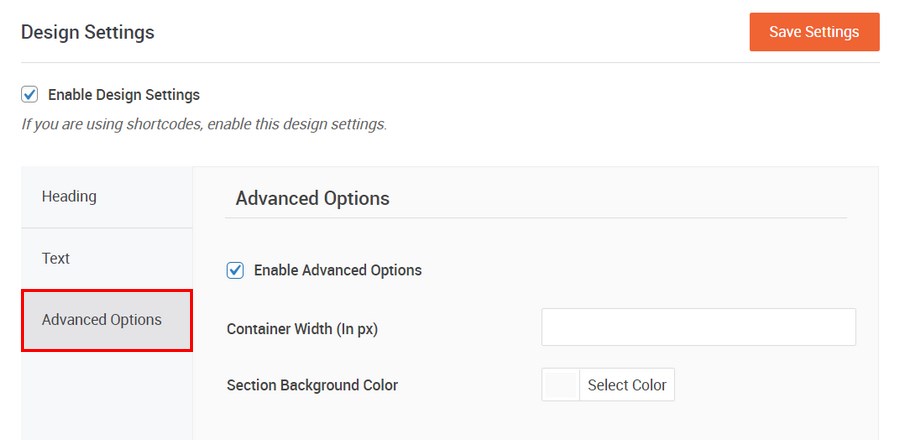
The next tab is the Advanced Options tab. Check the Enable Advanced Option setting to view the available option. Two new options will appear, allowing you to change the container width and the section background color.
Alternatively, you can choose one of the ready-made templates and customize them using any page builder or the WordPress editor.
How to customize the WooCommerce checkout page without a plugin
WooCommerce is flexible and usable by people at any experience level. If you’re comfortable with editing code, you can easily customize the checkout page.
To access the code view when you are on the checkout page, right click anywhere on the page and click on inspect.
The checkout page is the last step when completing an order, where you are required to enter the shipping and billing details.
Alternatively, you can click on F12 to launch the browser inspector in popular browsers like Chrome. The changes you make here will not be saved, and they will be lost once the page is refreshed.
Remember to always have a backup so that you can revert back to your default version in case something goes wrong. We recommend using a WordPress backup plugin.
First, we’ll look at the primary tags, including classes and IDs, which can be used to customize the design of the checkout page:
<body class=”woocommerce-checkout”>
<div class=”woocommerce”>
<form class=”woocommerce-checkout”>
<div id=”customer_details” class=”col2-set”>
<div class=”woocommerce-billing-fields”>
<p class=”form-row”>
<div class=”woocommerce-shipping-fields”>
<p class=”form-row”>
<div class=”woocommerce-additional-fields”>
<div id=”order_review” class=”woocommerce-checkout-review-order”>
<table class=”woocommerce-checkout-review-order-table”>
<div id=”payment”>
<ul class=”wc_payment_methods payment_methods methods”>
<div class=”form-row place-order”>
You can also remove elements on the checkout page using action hooks.
An action is a function in WordPress code that is run at certain points throughout the core of your site. There are many predefined actions in WordPress and WooCommerce that allow developers to add custom code. This allows you to extend WordPress or any other plugin like WooCommerce.
On the other hand, hooks are functions that can be applied to actions or filters. Filters allow you to modify functions.
The checkout page has 9 action hooks:
- woocommerce_before_checkout_form
- woocommerce_checkout_before_customer_details
- woocommerce_checkout_billing
- woocommerce_checkout_shipping
- woocommerce_checkout_after_customer_details
- woocommerce_checkout_before_order_review
- woocommerce_checkout_order_review
- woocommerce_checkout_after_order_review
- woocommerce_after_checkout_form
There are 7 additional hooks available. This depends on your layout:
- woocommerce_checkout_before_terms_and_conditions
- woocommerce_checkout_after_terms_and_conditions
- woocommerce_before_checkout_billing_form
- woocommerce_before_checkout_registration_form
- woocommerce_after_checkout_registration_form
- woocommerce_before_checkout_shipping_form
- woocommerce_after_checkout_shipping_form
Let’s now customize the checkout page without a plugin.
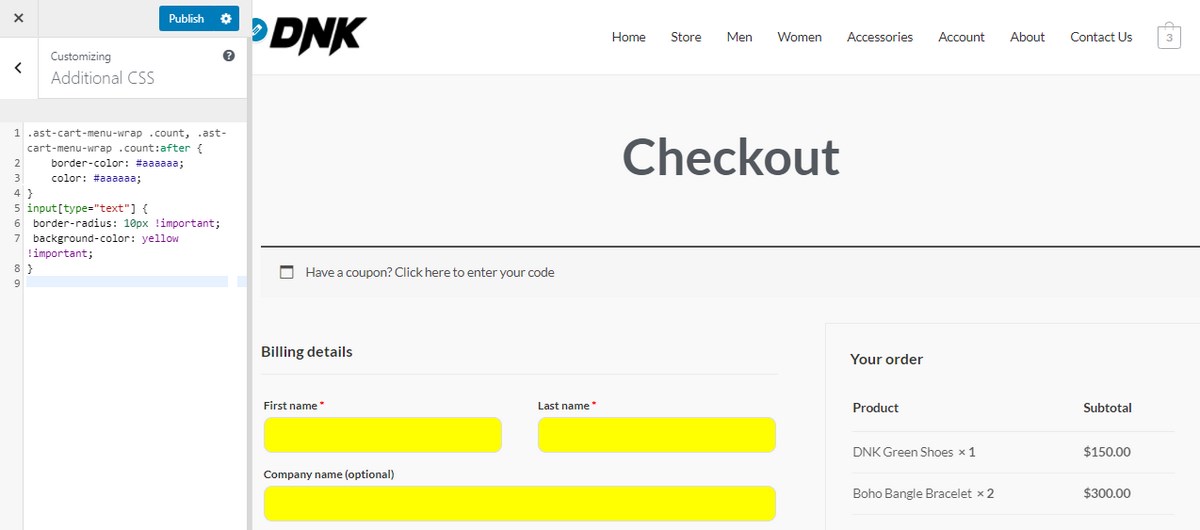
1. Change the background color of the fields and give them rounded corners
Add the following code snippet in the Additional CSS section.
To locate this section:
- Log into your WordPress site and access the Dashboard as the admin user.
- Click on Appearance Menu > Customize on the dashboard menu. This will launch the WordPress theme customizer interface.
- Click on the Additional CSS tab from the left pane.
- A new section will be launched where you can add custom CSS with a live preview n the right
Add the following CSS code:
input[type="text"] {
 border-radius: 10px !important;
 background-color: yellow !important;
}
2. Remove a checkout field:
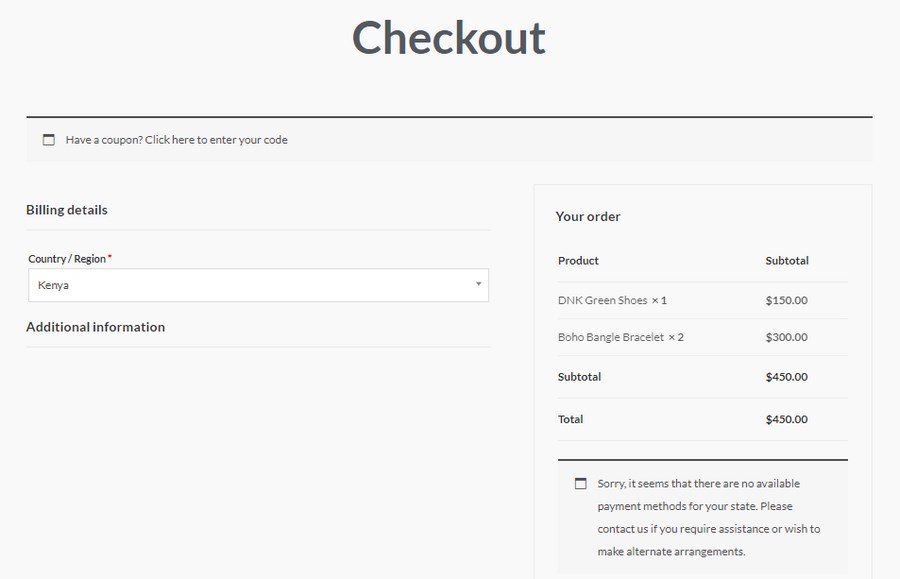
The following code snippet removes all the fields on the checkout page. Only include the fields you want to remove.
Copy and paste the following code snippet to the functions.php file of your child theme:
/**
 Remove all fields on the checkout page
 **/
function wpastra_remove_checkout_fields( $fields ) {
    // Billing fields
    unset( $fields['billing']['billing_company'] );
    unset( $fields['billing']['billing_email'] );
    unset( $fields['billing']['billing_phone'] );
    unset( $fields['billing']['billing_state'] );
    unset( $fields['billing']['billing_first_name'] );
    unset( $fields['billing']['billing_last_name'] );
    unset( $fields['billing']['billing_address_1'] );
    unset( $fields['billing']['billing_address_2'] );
    unset( $fields['billing']['billing_city'] );
    unset( $fields['billing']['billing_postcode'] );

    // Shipping fields
    unset( $fields['shipping']['shipping_company'] );
    unset( $fields['shipping']['shipping_phone'] );
    unset( $fields['shipping']['shipping_state'] );
    unset( $fields['shipping']['shipping_first_name'] );
    unset( $fields['shipping']['shipping_last_name'] );
    unset( $fields['shipping']['shipping_address_1'] );
    unset( $fields['shipping']['shipping_address_2'] );
    unset( $fields['shipping']['shipping_city'] );
    unset( $fields['shipping']['shipping_postcode'] );

    // Order fields
    unset( $fields['order']['order_comments'] );

    return $fields;
}
add_filter( 'woocommerce_checkout_fields', 'wpastra_remove_checkout_fields' );
You’ll notice that the country field is required. If you remove this field, orders in your store will not be completed. An error will be displayed saying, “Please enter an address to continue”.
3. Make a required field not required
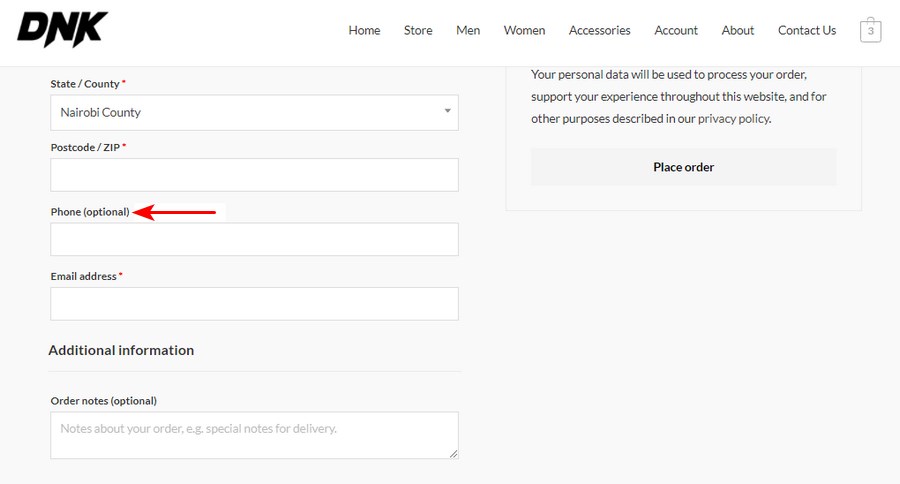
Copy and paste this code snippet to the functions.php file of your child theme before the closing code:
add_filter( 'woocommerce_billing_fields', 'wpastra_unrequire_wc_phone_field');
function wpastra_unrequire_wc_phone_field( $fields ) {
$fields['billing_phone']['required'] = false;
return $fields;
}
The code snippet above makes the phone field optional.
4. Change input field labels
Copy and paste this code snippet to the functions.php file of your child theme:
add_filter('woocommerce_checkout_fields', 'wpastra_override_checkout_fields');
function wpastra_override_checkout_fields($fields)
{
unset($fields['billing']['billing_address_2']);
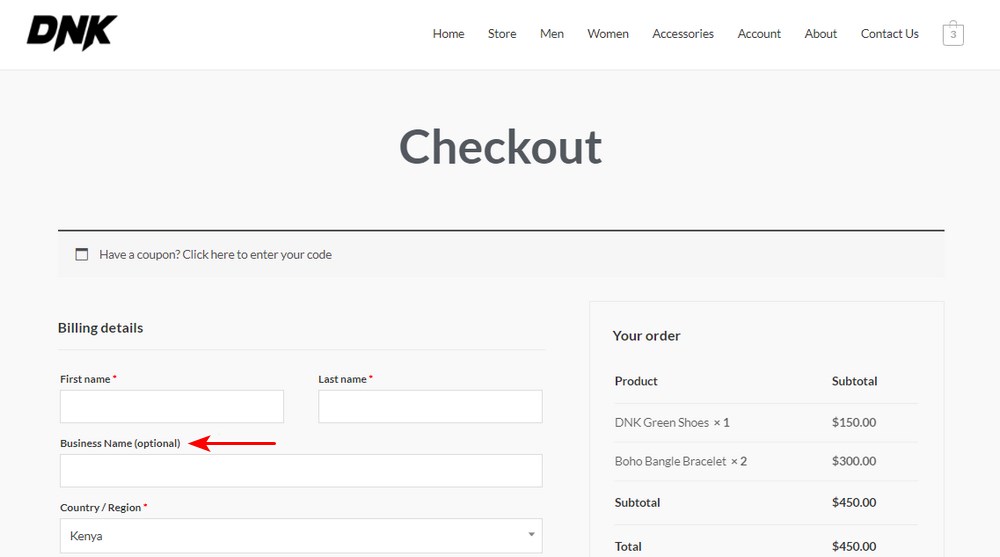
$fields['billing']['billing_company']['label'] = 'Business Name';
return $fields;
}
The code snippet above changes the “Company Name” input label to “Business Name”.
Alternative plugins to customize the WooCommerce checkout page
1. Checkout Manager for WooCommerce
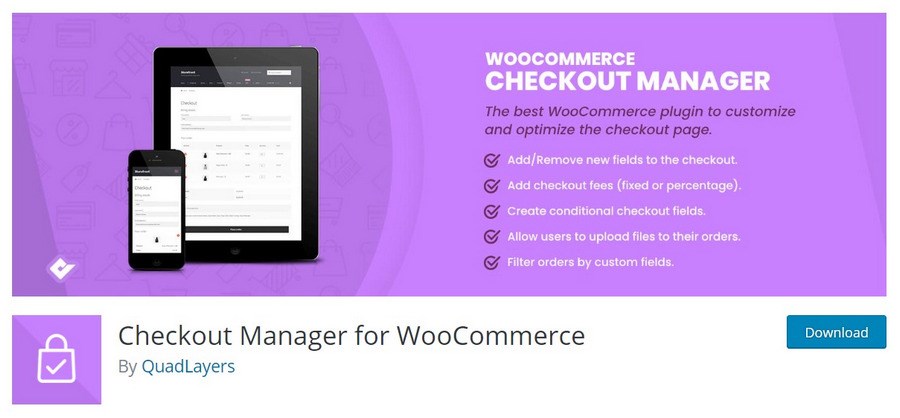
Checkout Manager for WooCommerce is a freemium plugin that allows you to customize fields on the checkout page.
The plugin has more than 80,000 active installations on the WordPress repository.
You can add custom fields to your checkout page and customize existing fields as required. The plugin also includes a unique feature that allows specific user roles to show or hide fields on the checkout page.
The plugin allows you to display or hide fields when certain conditions are met. For example, specific fields can appear or disappear based on the category or product added to the cart. If your store sells virtual goods, there’s no need to display fields on the shipping address section.
It also allows customers in your store to upload files. Data collected can be exported or imported if necessary.
The premium version’s pricing starts at $19 for a single site license.
Here are some of the main features:
- It allows you to remove unnecessary fields on the checkout, for a faster checkout process
- It enables you to add conditional fields. This allows you to modify the field’s appearance and behavior on certain conditions when viewing content
- It allows you to edit uploaded files directly on the dashboard to save time
2. Checkout Field Editor (Checkout Manager) for WooCommerce
Checkout Field Editor (Checkout Manager) for WooCommerce is a popular plugin that offers options to customize the checkout page fields. It allows you to add, delete, and rearrange fields with ease.
The plugin has more than 300,000 active installations.
It includes different field types you can add to the checkout page. In the free version, it offers text input and select field types. The premium version includes additional field types.
When creating new fields, you can define if the details submitted will be displayed on the email notifications or order details.
You can permanently remove a field or disable them for a specific period.
The plugin also includes an option to rearrange the default order of fields on the checkout page.
The basic version is free, but the best features are in the premium version. It’s priced at $39 for a single site license.
Here are some of the features:
- It offers 17 different field types that allows you to customize fields on the checkout page
- It includes conditional fields. This allows you to modify the field’s appearance and behavior on certain conditions when viewing content
- It has a custom validator for each field allowing customers to easily make changes in case of an error
- It allows you to add a new section with additional fields if you need to gather additional information
3. WooCommerce Multi-Step Checkout
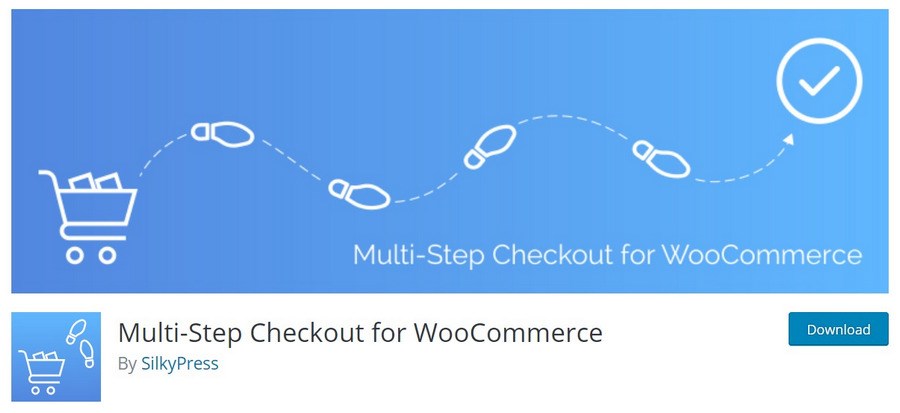
If you’re looking for a plugin to split the checkout process, WooCommerce Multi-Step Checkout is one of the solutions we recommend.
It breaks up a single checkout page into several small steps and provides a progress meter at the top. Progress meters provide visual guidance so shoppers know exactly where they are in the checkout process and how much further they have to go to complete their purchase.
This creates a rich user experience for shoppers in your store as it increases respondent engagement.
This plugin has more than 10,000 active installations on the WordPress repository and is regularly updated.
Customers will know exactly where they are on the checkout flow by checking on the progress indicator. This eliminates the worry that it will take longer and assures visitors that they are almost done.
WooCommerce Multi-Step Checkout also has an intuitive design that customers will love.
Here are some of the features:
- It has a responsive design that ensures the progress indicator appears well on any device
- It allows you to inherit the form buttons design from your theme so that it can seamlessly blend into your site
- It includes a clickable progress indicator bar that can take you back to the previous or next step
4. Flexible Checkout Fields for WooCommerce
Flexible Checkout Fields for WooCommerce is a powerful plugin that allows you to completely customize your WooCommerce store’s checkout page.
It has more than 70,000 active installations.
The plugin seamlessly integrates with WordPress and WooCommerce and allows you to add, edit, or delete fields in the checkout flow.
The free version allows you to edit and update up to 12 different field types, while the pro version allows 21 and includes other powerful features like adding custom sections and conditional fields.
Its pricing starts at $59 for a single site license.
Here are some of the features:
- It allows you to easily rearrange fields using a drag and drop editor saving time
- It allows you to add custom CSS to style new or existing fields
- It’s compatible with WPML allowing you to use this plugin with multiple languages
How to create a one page WooCommerce checkout
Ready to improve your WooCommerce experience? Let’s create a one page checkout page that’s as short as possible.
A one page checkout lets customers complete checkout on a single page using the least information possible.
This is something that SureCart does by default.
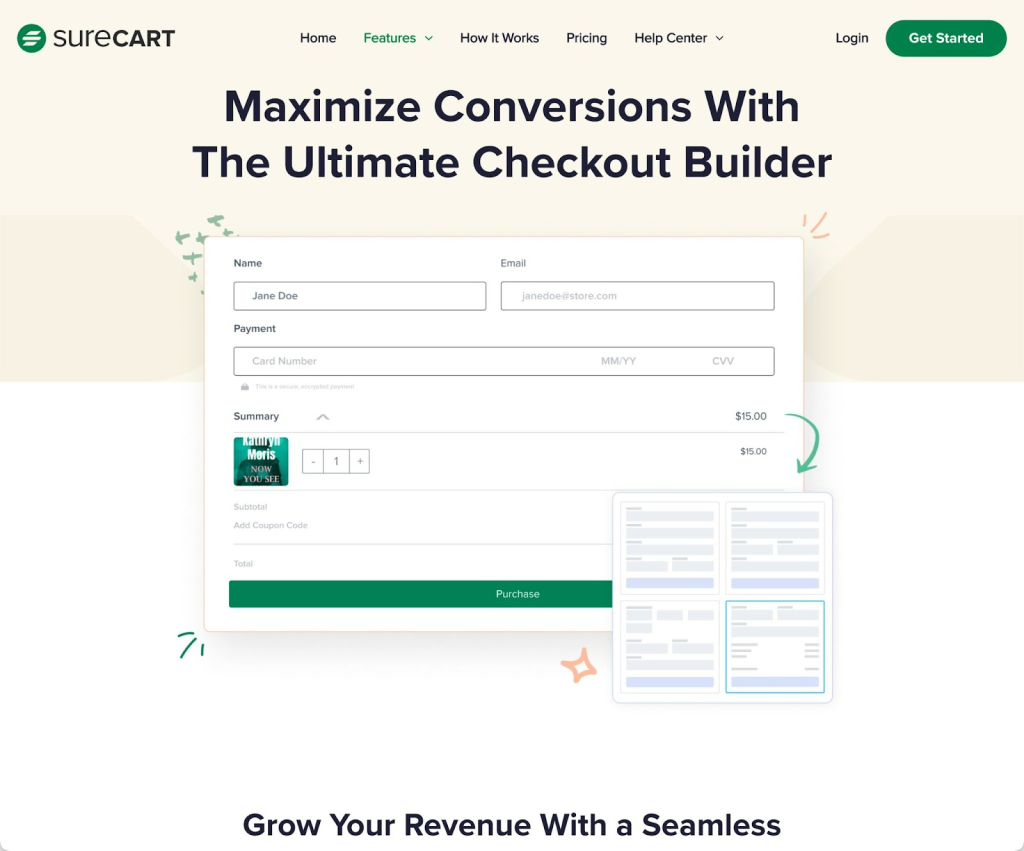
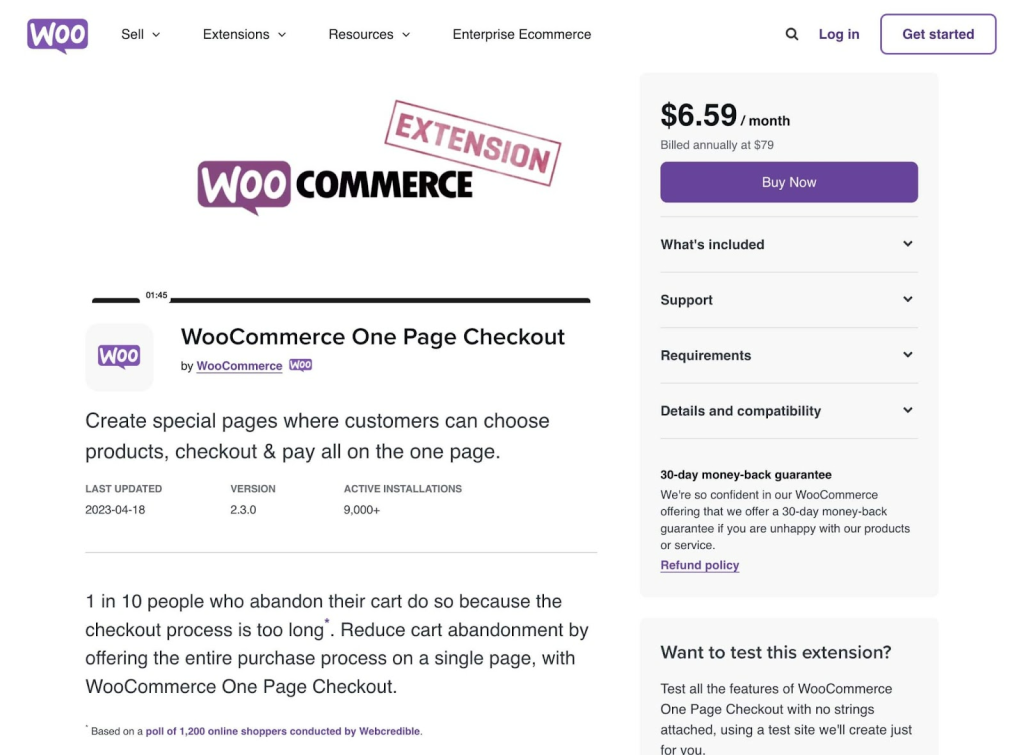
If you want to achieve something similar in WooCommerce, you’ll need a premium extension called WooCommerce One Page Checkout Extension.
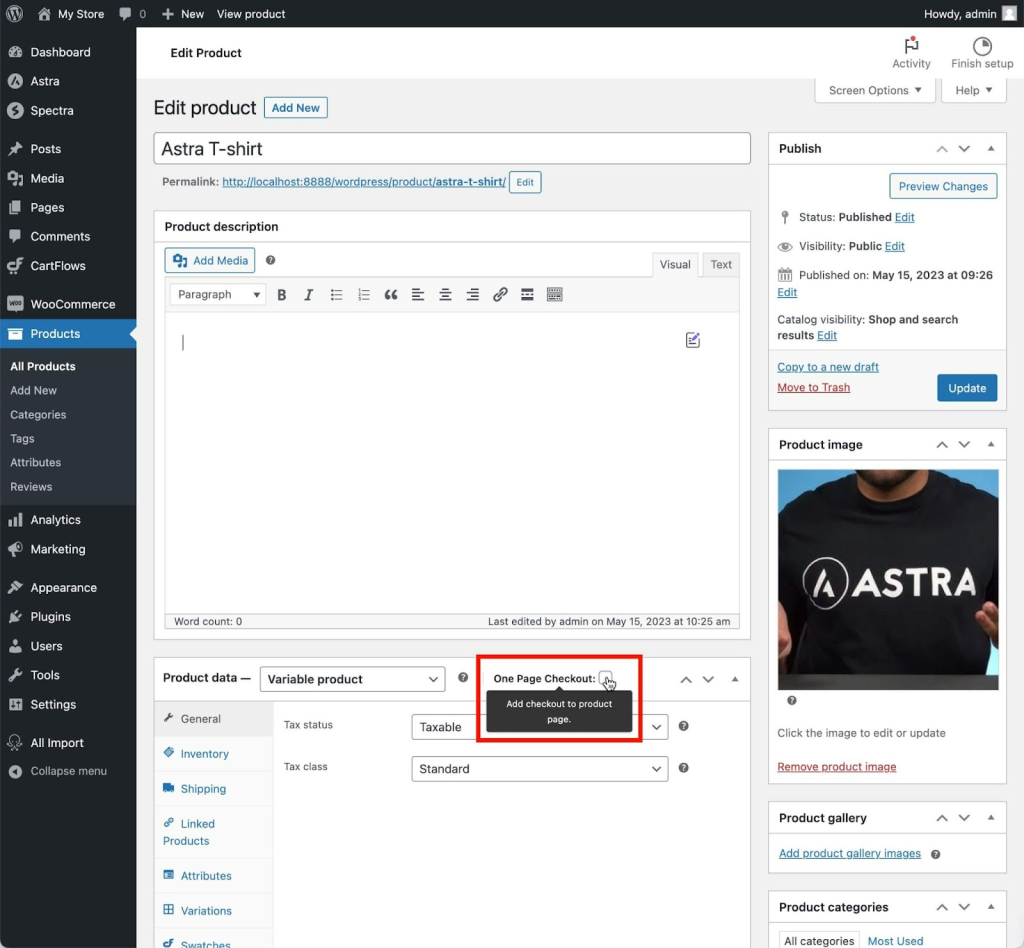
Once installed you’ll need to enable this feature for the product you want to use it with.
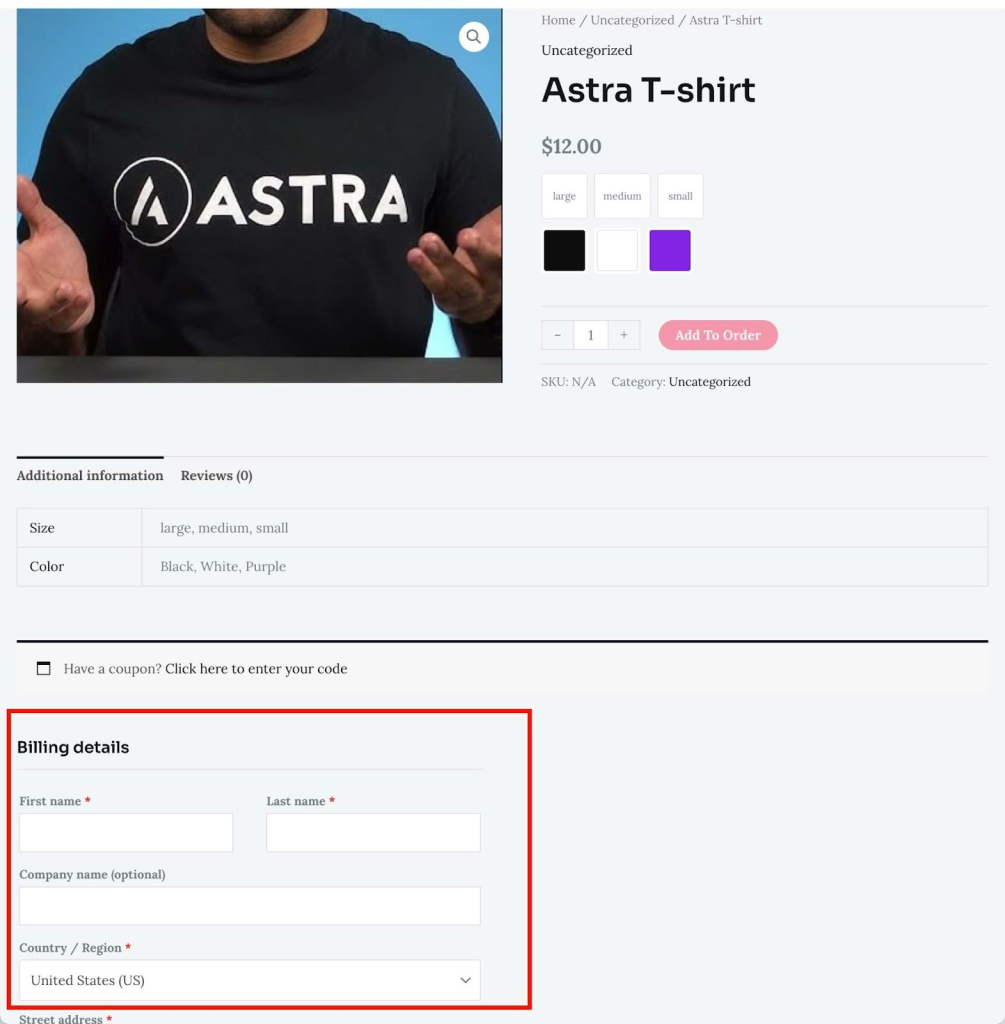
The product page will display the checkout on the same page so the customer can make the purchase directly from that page.
If you want to display the one page checkout somewhere specific, or show more products, you’ll need to use the following shortcode:
[woocommerce_one_page_checkout product_ids=“XXXX,YYYY”] Where XXXX and YYYY are the IDs of the products you want to display.
NOTE:
You can choose the WooCommerce checkout page template by adding the following code to the shortcode:
template=“product-single”Be careful though. If you have products with many variations, they will all be displayed with the default shortcode!
To avoid this add the following shortcode:
template=“product-single”.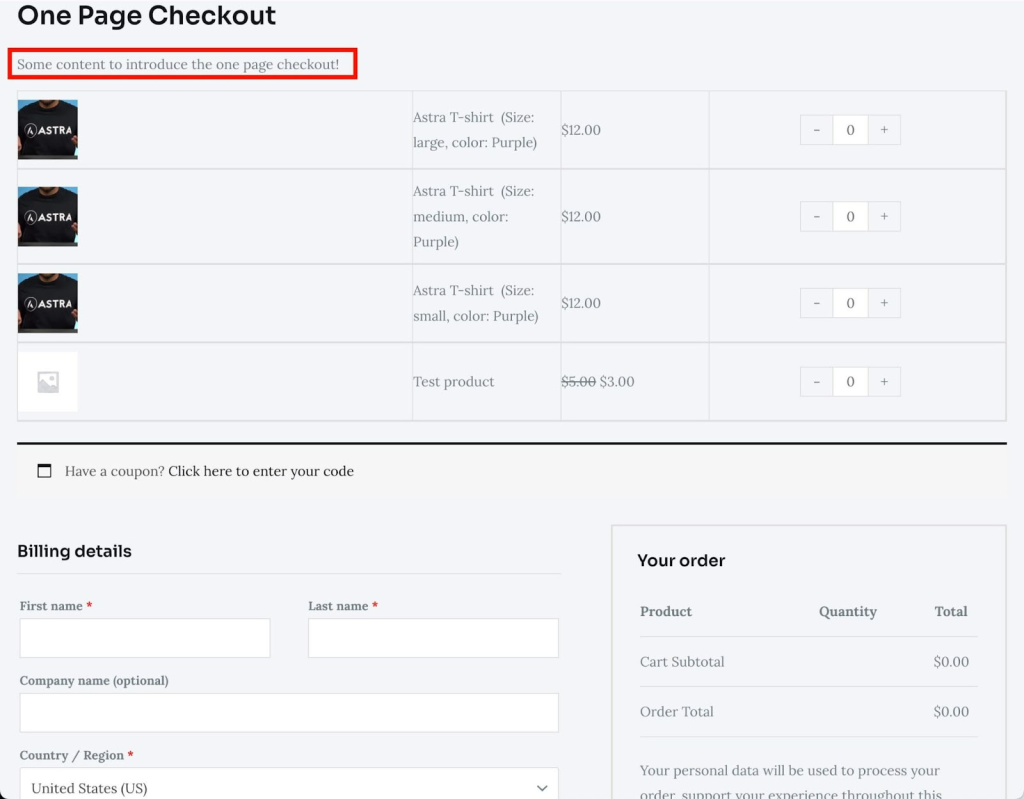
You can also build a WooCommerce one-page checkout with eEementor and CartFlows.
Bonus: Some recommended plugins for your WooCommerce site
Here are some essential WooCommerce plugins we recommend to optimize your WooCommerce store even further:
1. WooCommerce Abandoned Cart Recovery
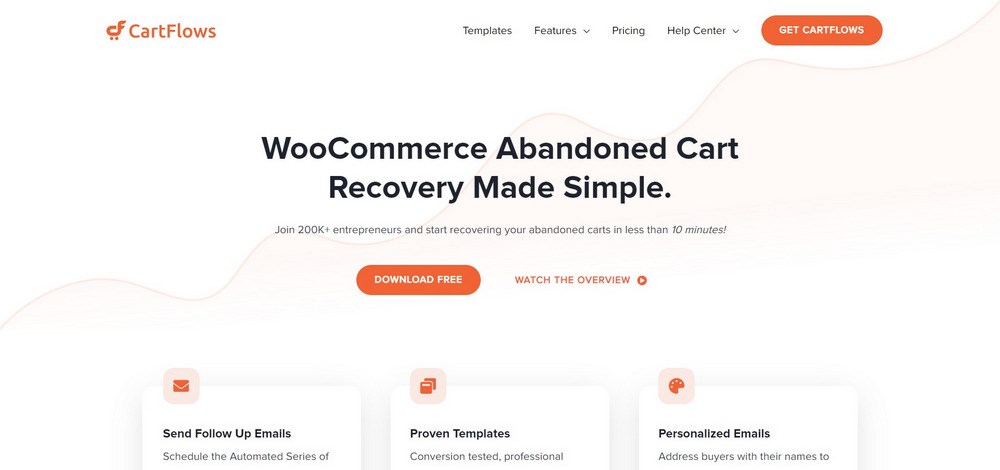
WooCommerce Abandoned Cart Recovery is a free plugin that allows you to send abandoned cart recovery emails and boost conversion.
The plugin captures shoppers’ emails and sends them a reminder if they don’t complete their order. You can automatically schedule the follow-up emails so that you do not forget to send the email.
It includes pre-made templates that have been conversion tested to help you boost sales. You can easily customize them to fit your brand.
Alternatively, you can create your own emails from scratch. You can also include incentives like coupon codes to entice shoppers to complete their purchase.
The plugin allows you to personalize the emails using shortcodes. For example, you can address buyers by their names to increase the click-through rate.
You can also send unique checkout links to each shopper that takes them exactly where they left off.
The plugin stops sending emails if the user completes their purchase.
Here are some of the features:
- It allows you to send personalized emails to increase the click through rate
- It includes webhook support that allows you to integrate automation tools like Campaign Monster
- It includes unique checkout links to each shopper that takes them to exactly where they left off
2. WooCommerce Menu Cart
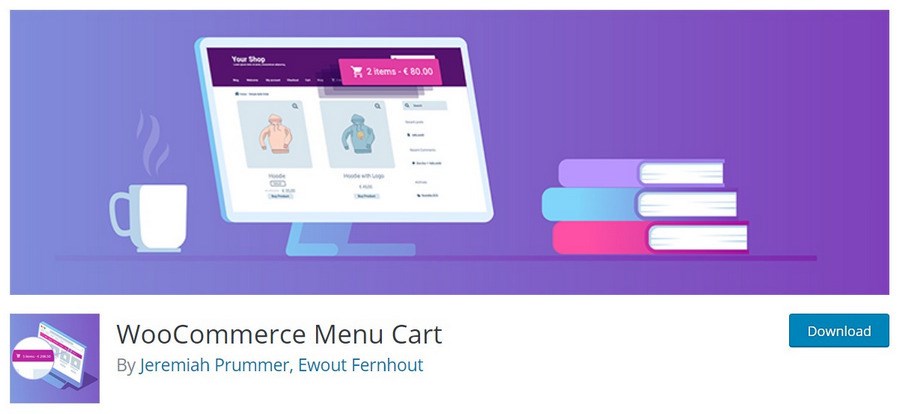
WooCommerce Menu Cart is a lightweight plugin that allows you to display a cart button on the navigation bar.
This plugin has more than 100,000 active installations.
The pro version is priced at €29. This version includes more than ten cart icons and a fully-featured cart details flyout.
It offers you the ability to add cart, add a flyout for unlimited menus and add custom CSS classes.
Here are some of the features:
- It allows you to display a cart icon, or only items/prices without touching any piece of code
- It allows you to display items only, price, or both
- It allows you to display always, or only when there are items in the cart
- Float left, float right, or use your menu’s default settings
- It allows you add custom CSS styling
- It offers outstanding support for premium users
Final Thoughts
The default version of WooCommerce doesn’t offer the best possible checkout experience.
Depending on the change you want to make, experience level and products you sell, you can optimize the checkout flow using WooCommerce plugins, page templates, or custom code.
It is something that should be done with a lot of care, as this is the last step in the purchase process but is well worth doing to minimize abandoned carts and maximize conversion.
With checkout page optimization, you should also optimize and design your WooCommerce product pages to stand out from the crowd.
Do you have any questions on how you can improve your checkout flow? What are some of the strategies that have worked out to deliver a unique shopping experience for your store?
We’d love to hear your thoughts in the comment section below!
Disclosure: This blog may contain affiliate links. If you make a purchase through one of these links, we may receive a small commission. Read disclosure. Rest assured that we only recommend products that we have personally used and believe will add value to our readers. Thanks for your support!



Very comprehensive list! Great job, and the explanations for each are great too.
Hello Jonathan,
So glad to hear about that! 🙂
Very good explanation! Great!