To allow guest checkout or not allow it? To require a user account in an online store or to not? Set up a private store that requires a login or leave it open? How will you configure your WooCommerce store?
These are all questions you will need to tackle when setting up WooCommerce. Each has its pros and cons and one will likely work best for your type of store.
Whichever route you go, you will need to set up at least one kind of customer login option. Perhaps more. That’s what this article is all about.
We are going to discuss WooCommerce customer logins, the options and how to implement each of them.
WooCommerce and WordPress
WooCommerce is an incredibly popular eCommerce plugin for WordPress. It’s free, easy to use and integrates seamlessly into WordPress.
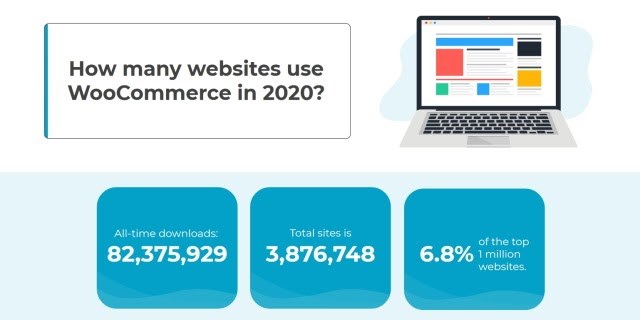
According to a recent survey, WooCommerce powers over 3.8 million online stores. If you’re planning to open your own online store, WooCommerce is definitely the way to go!
WordPress is free, very straightforward to use and infinitely flexible. Along with awesome WordPress themes such as Astra, you can literally build any website you want.
The 6 Types of WooCommerce Login Methods
There are 6 primary types of customer login for WooCommerce.
They include:
- Open store with guest checkout
- Open store with user accounts
- Open store with closed areas
- Private stores with mandatory login
- Auto-login links for stores with user accounts
- Social logins for stores with user accounts
There are also popup login options or WooCommerce login shortcodes which we will also cover.
Open WooCommerce Store With Guest Checkout
An open store with a guest checkout option is very common. It is primarily popular with customers because it allows faster purchases, which everyone likes. It also helps reduce abandoned carts and requires less personal information from that customer.
All things that work in a store’s favour.
This can be taken further if you use PayPal as a payment option as the customer has to do nothing to confirm the purchase except sign into PayPal and agree to the charge.
The downside of guest checkout is the store doesn’t get the personal information it can use for marketing.
Allowing or preventing guest checkout is a source of much discussion among store owners. We’ll discuss it further at the end of this article.
Open WooCommerce Store With User Accounts
An open store with mandatory user accounts is another popular approach to eCommerce. It requires a customer login to complete a purchase, which can aid repeat purchases if login is fast and easy. You can also integrate order history, build up recommendations and introduce loyalty promotions.
The downside is that the customer has to set up and remember yet another account. They also have to surrender personal information while doing it. Plus, asking someone to set up an account at checkout can be a barrier to purchase.
Open WooCommerce Store With Closed Areas
An open store with public areas and closed sections for members only is another way to run a store. This combines the accessibility of an open store with the exclusivity of being a member.
It’s an effective way to segregate products, offer specific discounts to members, offer subscriptions for products and services or introduce tiered pricing.
The downside is that users will have to set up an account and membership stores only work in certain niches.
Private WooCommerce Stores With Mandatory Login
Private stores are surprisingly popular in some circles. These are 100% membership-only stores open via invite or subscription only. They take exclusivity a step further and offer the opportunity to access products not available publicly or something else entirely.
Private stores are exclusive so your product or service portfolio has to be top class for this model to work.
Auto-Login Links for WooCommerce Store Access
Auto-login links can be useful for sidestepping the delay caused by requiring user accounts. Once a customer has signed up, you can send them a personalized URL that allows them to log in automatically to your store.
This enables you to combine the benefits of an open store with user accounts while sidestepping our weariness of having to log in everywhere we go.
Social Logins for WooCommerce Store Access
Finally, we have social media login for store access. You can use this method for any store configuration with user accounts. You can use a variety of plugins that authenticate a user with their social media and allow them to log in and buy.
The benefit is that the user has one less login to cope with and has a much shorter path to purchase.
So that covers your customer login options for WooCommerce. Now let’s go about setting each of them up!
Setting up Your Login Options in WooCommerce
Each of these options is set up in a slightly different way. You will need a fully operational WooCommerce store for any of these to work and we’ll assume you have that already.
If you don’t, this guide on setting up WooCommerce in WordPress might help.
Setting up an Open WooCommerce Store With Guest Checkout
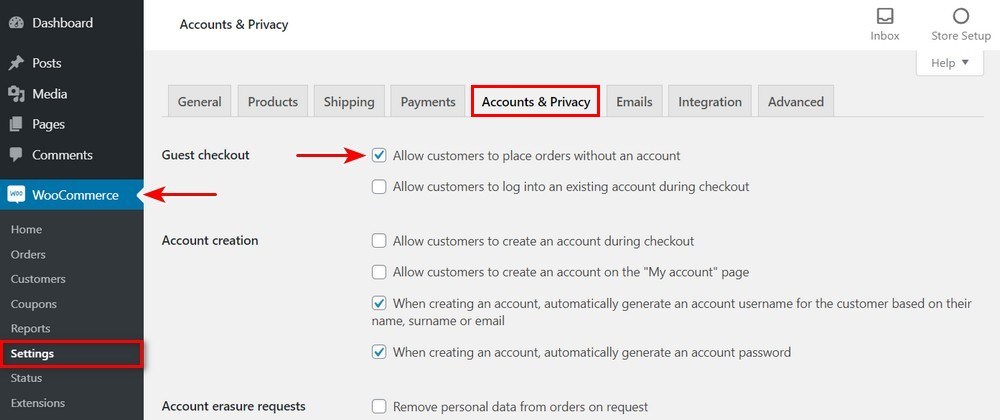
Setting up WooCommerce with guest checkout is a very straightforward process.
- Log into WordPress and select WooCommerce from your dashboard.
- Select Settings from the WooCommerce menu on the left.
- Select the Accounts and Privacy tab in the main window.
- Check the box next to ‘Allow customers to place orders without an account’.
This setting will allow customers to purchase from your store without having to set up an account. They will still be able to set one up if they like but it will be purely optional.
Alternatively, if you want to prevent guest checkout in your store, simply uncheck the box and save the change.
Setting up an Open WooCmmerce Store With User Accounts
Setting up your store to accept user accounts means adding a registration page and a login page to your store setup. This involves a few more steps than allowing guest checkout but is still very straightforward.
You can set up user accounts with or without the guest checkout option.
If you followed the WooCommerce setup wizard, one of the options you will have been offered is to set up all required pages. This means you should already have a basic My Account page.
- Select Settings from the WooCommerce menu on the left of your WordPress dashboard.
- Select the Accounts and Privacy tab in the main window.
- Uncheck the box next to ‘Allow customers to place orders without an account’ if you don’t want to allow guest checkout.
- Check the box next to ‘Allow customers to create an account on the “My account” page’.
- Open functions.php in CPanel or locally.
- Add the following code to the end of the file and save it.
function woo_login_redirect() {
if (
! is_user_logged_in()
&& (is_woocommerce() || is_cart() || is_checkout())
) {
wp_redirect( '/my-account/' );
exit;
}
}
add_action('template_redirect', 'woo_login_redirect');
The code will force users to log into your store. If they try to purchase without logging in, they will be requested to log in before the transaction completes.
Displaying the Registration Form
If you plan to use an account as one of your options, you’re going to need to show the registration form on the My Account page. This is how:
- Select WooCommerce and Settings.
- Select Accounts and Privacy and check the box next to ‘Enable registration on the My Account page’.
- Select Save Changes when done.
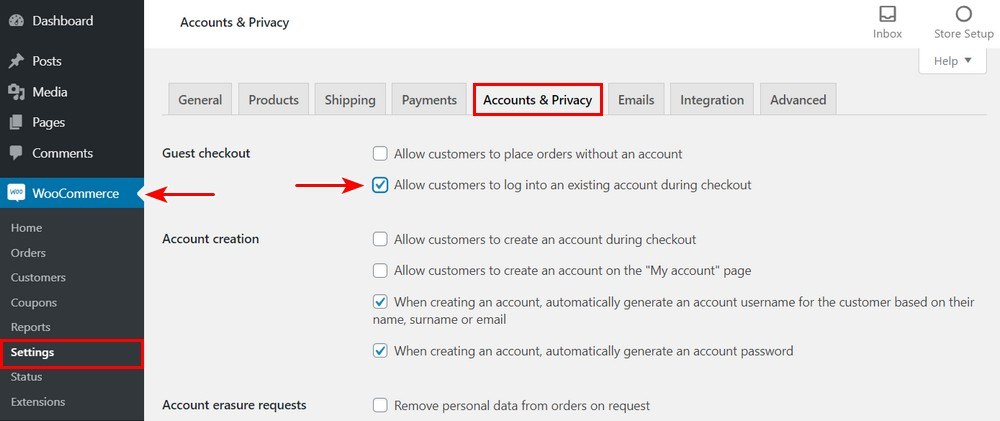
You can also set WooCommerce to show the login page at checkout.
- Select WooCommerce from your WordPress dashboard.
- Select Settings from the WooCommerce menu on the left.
- Select the Accounts and Privacy tab in the main window.
- Check the box next to ‘Allow customers to log into an existing account during checkout’.
- Select Save changes when complete.
Setting up an Open WooCommerce Store With Closed Areas
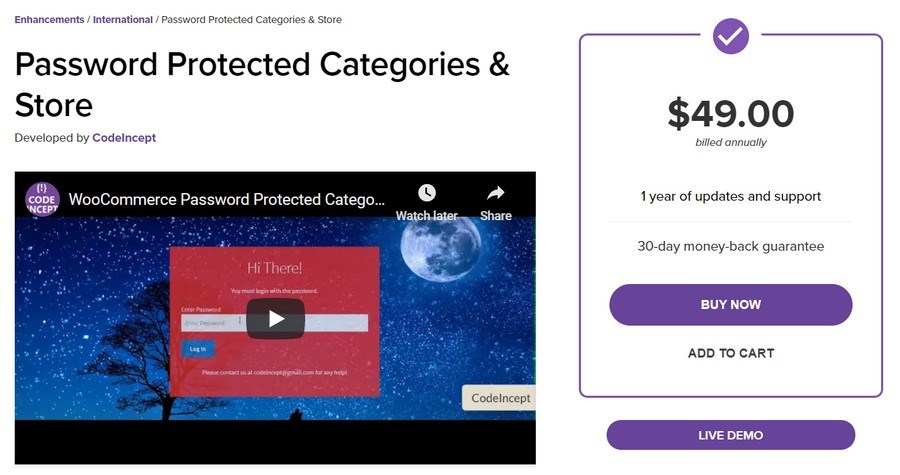
Setting up an open store with exclusive areas for members is a well-established way of creating a feeling of exclusivity. It won’t work for every type of store but it works for some.
You will need a plugin for this to work. We recommend the WooCommerce Password Protected Categories & Store plugin. It’s a premium plugin but is the simplest way to implement this type of store.
- Upload and install the plugin to your WordPress site.
- Select Password Protected from the WooCommerce menu.
- Check the box next to ‘Enable password protected store functionality’.
This enables the store to lock down products or categories behind a password.
Once you have set password protection functionality, you can use it to lock down categories.
To restrict store categories:
- Select Products and Categories from the WooCommerce menu.
- Scroll down to Password Protect.
- Check the box next to ‘Enable password protection for this term’.
- Set a password underneath the checkbox.
- Select the blue Update button.
You can do this for any category or number of categories you like. You can keep the password the same or vary it to enable tiered access.
Setting up a Private WooCommerce Store With Mandatory Login
You can set up an entire private store with the same WooCommerce Password Protected Categories & Store plugin we used above.
This will require the user to sign in to view anything in your store and is the ideal way to close off a store to the public.
- Login to WordPress as you usually would.
- Select Password Protect from the left menu of the dashboard.
- Select the Complete Protect menu item.
- Check the box by ‘Enable this option to password protect the whole website’.
- Select Save Changes.
Now visitors will have to sign in even to view your products and categories!
If you’re planning an exclusive members-only store, you could also look at Private Store for WooCommerce.
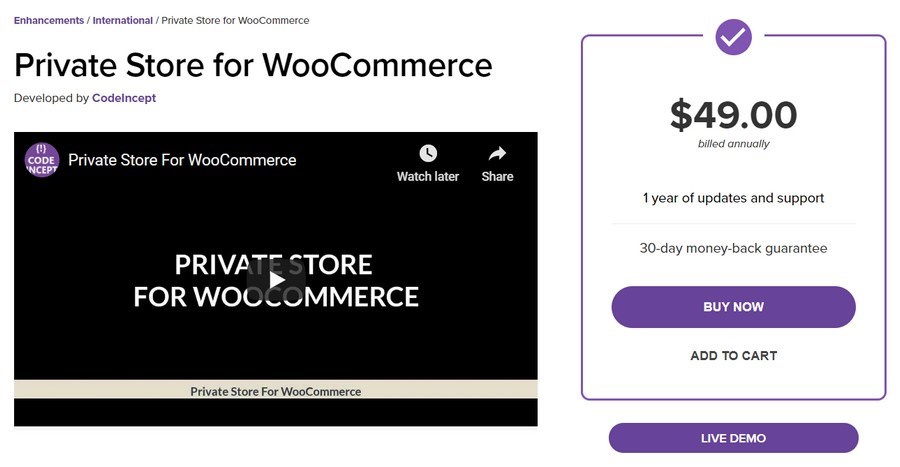
It works in a similar way to WooCommerce Password Protected Categories & Store but has a slightly more attractive login screen and the ability to password protect individual products as well as categories.
Setting up Auto-Login Links for WooCommerce Store Access
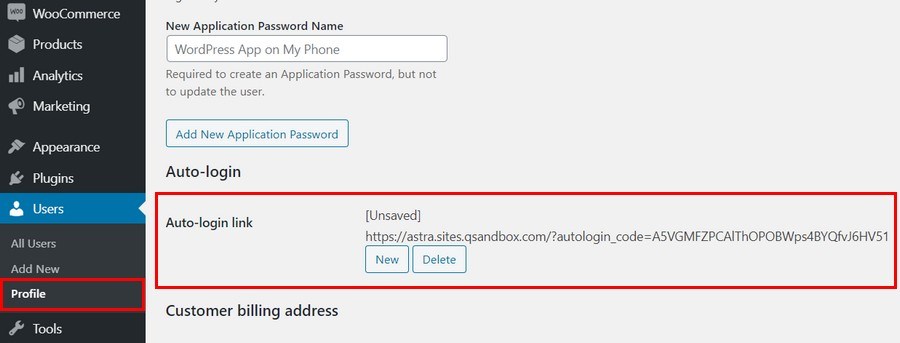
Auto-login URLs are a convenient way to provide the benefits of membership without having to log into every account.
You will need a plugin for this to work. We recommend Autologin Links. It’s a free plugin that integrates into WooCommerce to allow private URLs to be sent to customers enabling automatic login.
- Log into WordPress and select Plugins and Add New.
- Locate Autologin Links and select Install and Activate.
- Select Users and Profile from the left WordPress menu.
- Select the user you want to mail the link to.
- Scroll down the profile page until you see Auto-login.
- Select the New button to generate a URL.
- Copy the URL and email it to the user.
That’s all there is to using auto-login links to enable access to a WooCommerce store.
Setting up Social Logins for WooCommerce Store Access
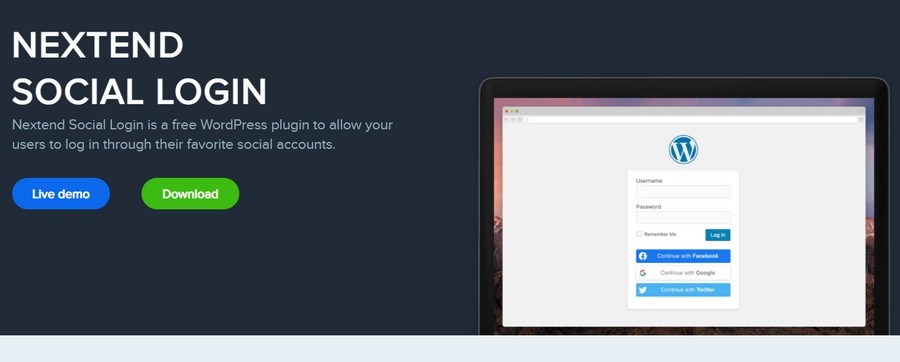
Social logins are a popular way of using existing authentication to enable access to private areas. It’s very convenient for users and means they can use Facebook, Twitter or Google to log into a store without having to remember yet another username and password.
You’ll need a plugin to use this method. We recommend Nextend Social Login. It’s a premium plugin but worth it. There is a free version but it is somewhat limited and doesn’t include WooCommerce integration.
- Buy Nextend Social Login and install it into WordPress.
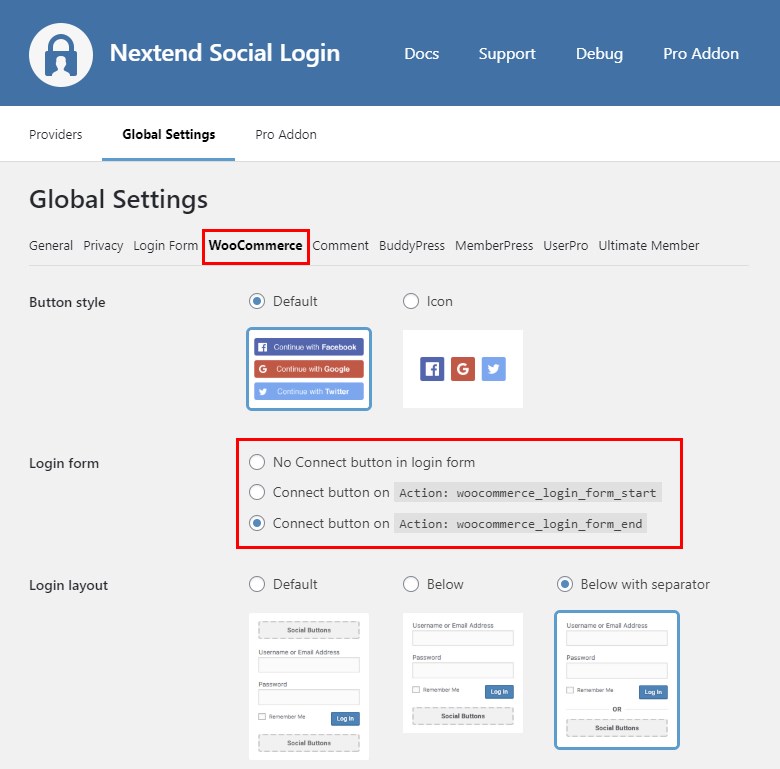
- Select the Nextend Social Login menu item from the left menu of your dashboard.
- Select Global Settings and the WooCommerce tab.
- Set a Login form from the two options.
- Select a Login layout underneath.
- Set your register form and layout further down the page.
- Add an optional billing and account form as required.
- Select the blue Save Changes option at the bottom of the page.
Other WooCommerce Login Methods
There are some other ways you can allow logins to WooCommerce. They include popups and WooCommerce login shortcodes to display the login form.
Both are supplementary ways of handling user accounts and can work well in the right store.
We recommend a plugin to handle both of these functions. The innovatively titled, Login/Signup Popup plugin to be exact.
The plugin not only enables popup logins and WooCommerce login shortcodes, it can also replace the default WooCommerce login page.
- Download and install the Login/Signup Popup plugin and activate when ready.
- Select the Login/Signup Popup menu item that appears in your WordPress dashboard.
- Select Settings to access the main configuration area.
- Select to enable registration and select the green save button.
We are now ready to configure popups and shortcodes.
If you don’t want the Login/Signup Popup plugin to replace the WooCommerce login page, toggle off ‘Replace my account form’ and ‘Replace checkout login form’ on the Settings screen.
Popups for WooCommerce Logins
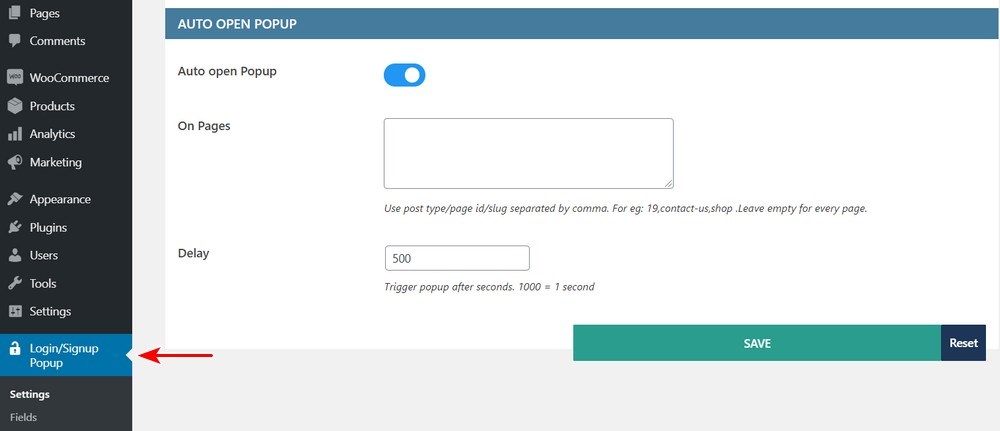
- To use popups, Login/Signup Popup should be installed and set to run. We now just need to configure it to provide a login popup for customers to use.
- If you’re still in the Settings and General page from above, scroll to Auto Open Popup.
- Toggle Auto open popup to on.
- Add the pages you want the popup to appear in the box underneath. Use page ID or slug.
- Set a delay for the popup to appear, if required.
- Select the Style tab from the top.
- Style your popup to fit your store design.
- Scroll down to Form Fields and add any fields required in the popup.
- Select the green Save button when done.
When a visitor lands on your store, a popup should now appear when they open a page you specified.
Using WooCommerce Login Shortcodes
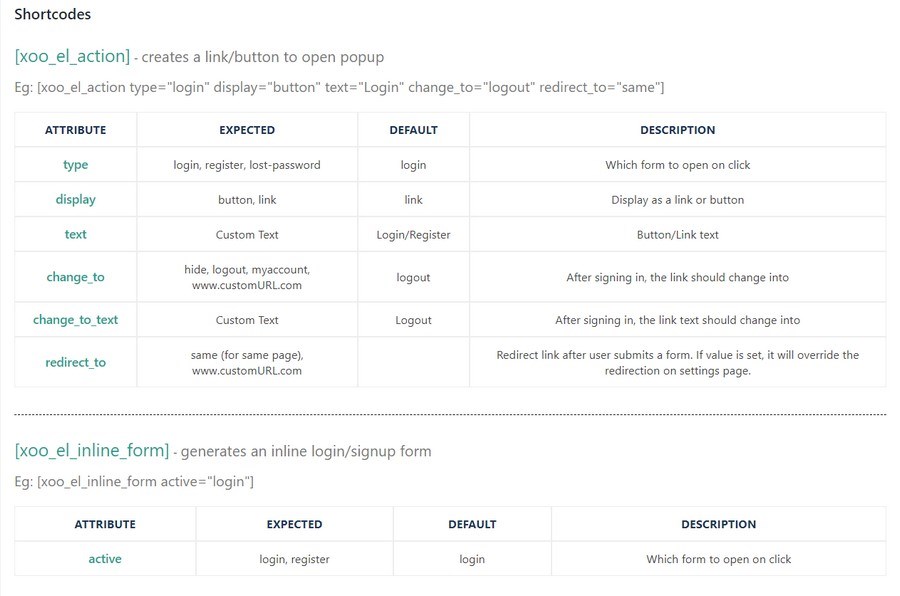
The same plugin we used for popups also works with shortcodes.
You have two options for implementing WooCommerce login shortcodes:
- [xoo_el_action] – Creates a link/button to open popup
- [xoo_el_inline_form] – Generates an inline login/signup form
Both can be found in the Login/Signup Popup Settings menu under the Info tab. The tab includes the variables you can use to control exactly what happens with the shortcodes too.
Want more excellent WooCommerce plugins you could use to set yourself up for success?
Allow Guest Checkout or Not?
Of all the various questions around online shopping, WooCommerce customer accounts, privacy and convenience, the question of whether to allow guest checkouts or not still has no firm answer.
We cannot answer for you but we can outline the pros and cons of each option.
The Case for Guest Checkout in WooCommerce
Enabling guest checkout in your store has several benefits to users.
- It allows for a much faster path to purchase with minimal disruption
- It enables customers to buy without surrendering too much personal information
- It can convince first-time buyers to buy from you as purchase doesn’t require personal data
- It can reduce abandoned carts by streamlining the purchase process
- It is viewed as less of a commitment to a store which helps conversion
- It is closest to brick and mortar retail
The Case Against Guest Checkout in WooCommerce
The case against guest checkout is mainly concerned with the retailer rather than the customer.
- Guest checkout reduces the amount of data you can collect on customers
- It lowers the chances of sparking that initial relationship as accounts can increase return visits.
- It doesn’t allow for loyalty programs or member offers.
- There is no option for you or the customer to check order or account history.
- Accounts can enable one-click buy options as payment details can be retained
There is no ‘best’ option here. Much depends on your target market and the type of store you run. You could offer guest checkout, you could offer mandatory registration, or you could offer both.
It’s entirely up to you!
WooCommerce Login Options
There are multiple ways to enable user interaction within your WooCommerce store. Each offers different benefits to different store and user types and it’s up to you to figure out which works for your target market.
Once you decide, you have all the information you need right here to implement one type of login or the other.
How have you set up your store? Do you allow guest checkout or not? Do you know of any totally private stores? Do you use popups or WooCommerce login shortcodes? Have anything to add that could help people setting up WooCommerce logins? Let us know below!
Disclosure: This blog may contain affiliate links. If you make a purchase through one of these links, we may receive a small commission. Read disclosure. Rest assured that we only recommend products that we have personally used and believe will add value to our readers. Thanks for your support!



Hi, is there a way to allow customers that already have a WordPress registration on my site to place an order in the WooCommerce store without having to log in first?
I have the guest checkout disabled in WooCommerce (as I need the customer details; they are purchasing a course on my site and need to have a login/password to it, therefore the creation of a wordpress customer account is necessary).
But when the come back and want to order another product/course, WooCommerce checkout does not allow them to place the order without fist loggin in. (When the fill out the order without being logged in, WooCommerce checks their data with the customer/user list on the site, finds their email among the registered ones and gives them an error message along the lines of you already have a registration, please log in to continue/place the order”)
This surely must be a huge issue for all/anyone selling anything using a WooCommerce store: Forcing existing customers to log into their account is a major sales deterrent. A since lot of customers don´t remember their account details, they often have to go though a password reset first. But if we force them to do (log in to their account, but since they don´t rememebre their passwords they have to do a password reset first) this whilst in the middle of ordering, they will just abandon the order and go somewhere else.
Am I wrong in thinking that there must be a simple solution to this? Or are all those hundrends of thousands of people using a WooCommrce store just throwing their potential orders away by forcing their clients to log in before placing an order?
Hi Mark, I totally agree on your thoughts and are looking for the same solution. Have you got any ideas?
Best / Peter
Locking categories or products using a password is nice, though. But can we lock categories depending on the user’s age?
Social login is the best way to encourage users to login as it takes less time, and no need to remember or type ID Pass.
I find how to do that in this article, very well explained.
Can we able to add a captcha for the WooCommerce login page? Any thought on this?
Do these methods also work for a regular website? I liked the idea of having a private website or at least hide some content for specific users.
Hello Amariah,
Yes, it would work for even a regular website!
woocommerce private store is best plugin for user role or category, tag, product to purchase that