In this tutorial, we’ll cover how to transfer from a Weebly website to a WordPress site and will discuss it step by step so you can get started quickly.
Most people began to create their website with Weebly because it is free and fast to set-up. But along the way, you might want to have more customization options and more control over your site. Moving from Weebly to WordPress is ideal for both of those.
If you don’t know how to move from Weebly to WordPress and you don’t want to start building your website all over again, we can help.
In this article, I’m going to walk you through step-by-step how to migrate your Weebly site to a WordPress site properly. I will also provide some tips on setting up your website before the actual migration procedure and suggest some of the best plugins you can use to customize your website.
So let’s get started!
Pre-Migration Setup for WordPress
Before we discuss how to migrate your website, we need to set up a few things first. We need to set up your hosting and purchase your domain name. While WordPress is a free platform, the domain and web hosting will cost you around $10 / year for a domain name and $7.99 / month for web hosting.
Moving from Weebly to WordPress isn’t just as simple as transferring your stuff from one box to another. You need to understand that Weebly and WordPress are different types of boxes. Confused? Let me explain.
When building a site for your business or any other purposes, you need to determine whether you need a website builder or a content management system. Knowing the difference will help you a lot and give you less headache along the way.
A website builder like Weebly provides everything you need to launch a site, from website building tools, hosting, domain registration, SSL certification, templates, and support.
It provides almost everything you need, but in exchange, you’ll lose some control over your site in the process. You can’t just drag and drop any elements anywhere on your site, you can’t edit parts of the source code, and you can’t pick a third-party hosting provider.
A content management system, like WordPress, on the other hand, provides much more flexibility.
You can completely customize your site’s appearance, edit the underlying source code, choose your hosting, and more. It means you are in control of your site, but it also means you’ll have to take more of the responsibilities of setting up and running your site.
Register and Purchase a Domain Name
The first step you need to do to create your WordPress website is to purchase a domain name.
Your domain name is the web address that users type in to go to your website.
With Weebly, you might have the <my site>.weebly.com domain name. If you have already had a domain name feel free to skip to Step 2 – Selecting a hosting provider.
Purchasing domain names will cost you around $10 to $20 a year. I have written a detailed article on creating a website, including buying your domain name. Visit creating a website for more detail.
There are many choices for you to purchase your domain name
Purchase Your Hosting
Your web host is where you store all the files, images, and everything you put in your WordPress website. There many web hosting companies available for you to choose from.
Here are what we consider some of the top web hosts you can use:
If you’re looking for the best web hosting service, I recommend SiteGround. This web host provides top performance and keeps your websites secure. It comes with amazing customer support that will help you through every step.
SiteGround is popular because their servers are specifically optimized for WordPress. They provide support, auto-updates, easy WordPress install and an in-house built WordPress starter tool for easily starting a website.
It also provides a WP caching plugin that speeds up the site’s performance.
If you want more details about hosting your website with SiteGround, check out our article How to make a WordPress website in less than 60 minutes. Just choose the plan you want to start with. Purchase through our link today, to get up to 73% discount from your first bill.
Install and Set up WordPress
There are a few ways to install WordPress. Different hosts handle this process differently. Some web hosts use an auto-installer script that allows you to easily install WordPress with just a few clicks like Softaculous, bespoke installation, automatic installation and more.
Your dashboard mayl look different depending on your web host but the experience should be the same.

Once you have finished the installation process you now have the infrastructure supporting your website (domain name, hosting, and WordPress).
Step 1: Export Your Website From Weebly
Now that your website is set up, you’re ready to export your content from Weebly to WordPress.
There are two ways to export your website content from Weebly: manually or by using a plugin.
To do it manually, just go to your Weebly editor, copy what you want from the post, and paste it into your new WordPress post. Easy! Right? You just need to create the pages and posts on the new site.
But this is good if you only have a few pages to copy. If you have more than a handful of posts and pages, manually copying and pasting it to WordPress will take a long time.
For this, I recommend using plugins to speed up the process.
You can use several helpful plugins. Just be aware that sometimes you need to correct some of your content after importing as some plugins don’t always work as expected!
You can use several tools, like the WP All Import plugin, Weebly to WordPress Importer Tool, and Feedzy, among others.
For this tutorial, we will use the Weebly to WordPress Importer Tool plugin. This is a free online tool that imports Weebly content and converts it into a WordPress compatible import format.
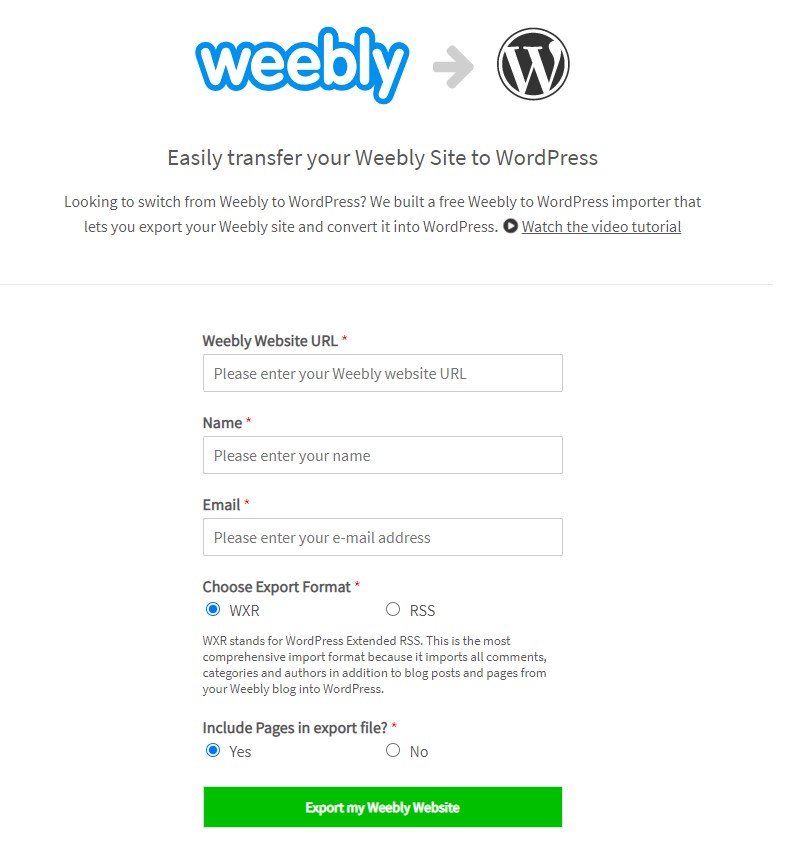
Just enter your Weebly URL, your name, email address, and select an export format. Choose the default WXR format, include pages in your export file, and then click on the ‘Export my Weebly Website’ button.
Your content will be imported from your Weebly website and will be converted to a WordPress compatible export file.
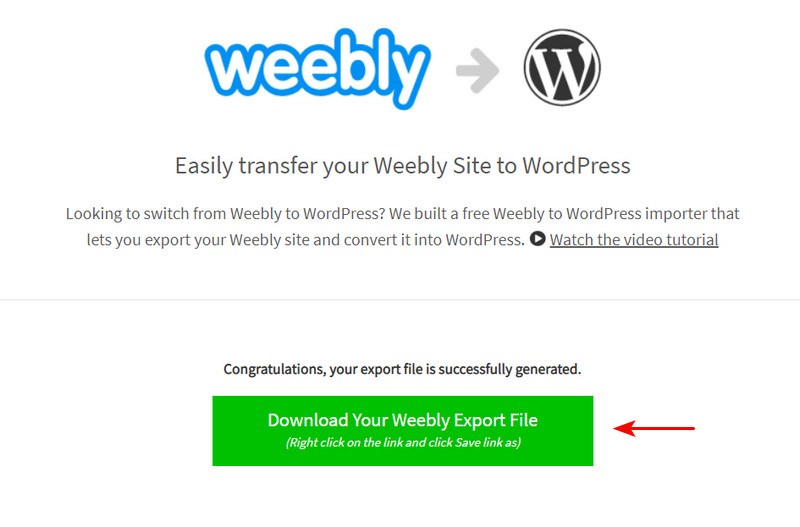
A “Download Your Weebly Export file” button will appear. Right-click on it and select ‘Save link as’ to download the export.xml file to your computer.
Step 2: Import Your Weebly Website to WordPress
The next step is to import the data that we just exported and saved on your computer. Weebly uses the ATOM format rather than RSS, so the default WordPress importer cannot be used to import your files from Weebly. You will need to download an import plugin for this process.
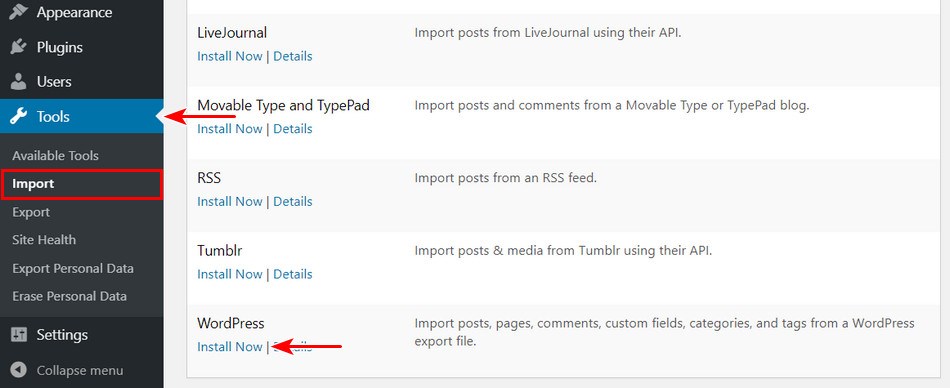
To do this you need to open your WordPress dashboard, click on Tools >> Import, look for WordPress, and click on Install Now >> Run Importer.
Click on Choose File and select the files you exported in our earlier step. Download and import file attachments to your WordPress website.

Once done, click on Posts to see if all your files are imported properly.
Step 3: Create Redirects
Once all of your files are properly imported, the next thing you need to do is set up redirects to make your Weebly domain name redirect your site visitors to your new WordPress site.
To do this, go to the domains area of your WordPress hosting control panel and look for the DNS section to find your hosting provider’s nameservers.
Once you have your nameservers, go to your Weebly Domains page. Select your domain name, click on Change then enter the nameservers of your WordPress site, then click Save.
Step 4: Manage Permalinks / URL Structure
Weebly sites use the “yoursite.com/blog/post-title” URL format for posts and have “.html” at the end of the URL. WordPress uses a different URL structure. This will lead users visiting your posts using the old URLs to end up in 404 error pages.
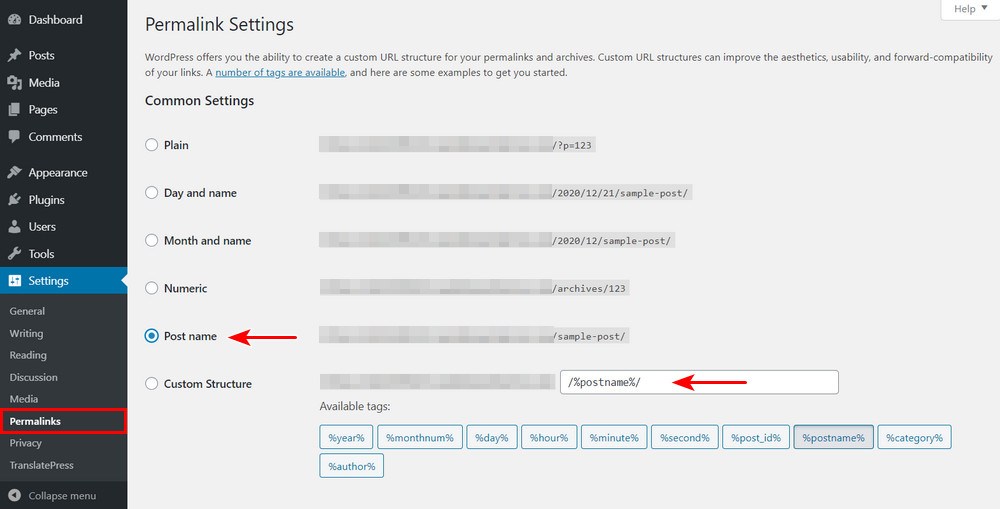
You can fix this by going to your WordPress dashboard, click on Settings >> Permalinks, select Custom Structure, and copy how your URL is structured from your Weebly site or enter “/blog/%postname%” into the text field, then click on Save Changes.
Troubleshooting Errors During Migration
While in the process of migration, you may have some broken internal links. Look through all of your posts and pages, check and edit each link to make sure they’re pointing to the proper pages.
Sometimes there are unexpected errors on the site that you might experience. In such cases, I recommend you try these basic debugging steps to find out the root cause of the problem.
This can be done in a staging site where you can perform basic debugging steps. But to check conflicts on the production/live site I would recommend using the Health Check & Troubleshooting plugin.
WordPress Customization and Plugins
Now you have to set up your WordPress site. The next step to this is to find and install a theme. You can search for many options on WordPress.org. Just login into your WordPress Dashboard, click on Appearance >> Themes.

I recommend you choose the super fast and lightweight Astra theme. It’s cost-effective, fast, and highly customizable with over 1,000,000 + active installs and 4703 5-star reviews.
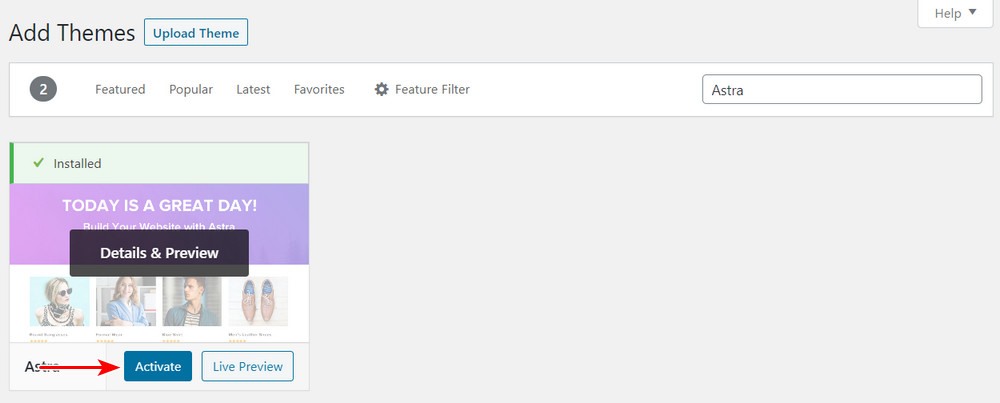
To install the Astra theme go to your WordPress Dashboard, click on Appearance >> Themes, then Add New. Search for “Astra” then click the Install & Preview button and the Astra themes will be installed in less than a minute.

Click on Activate >> Get Started.
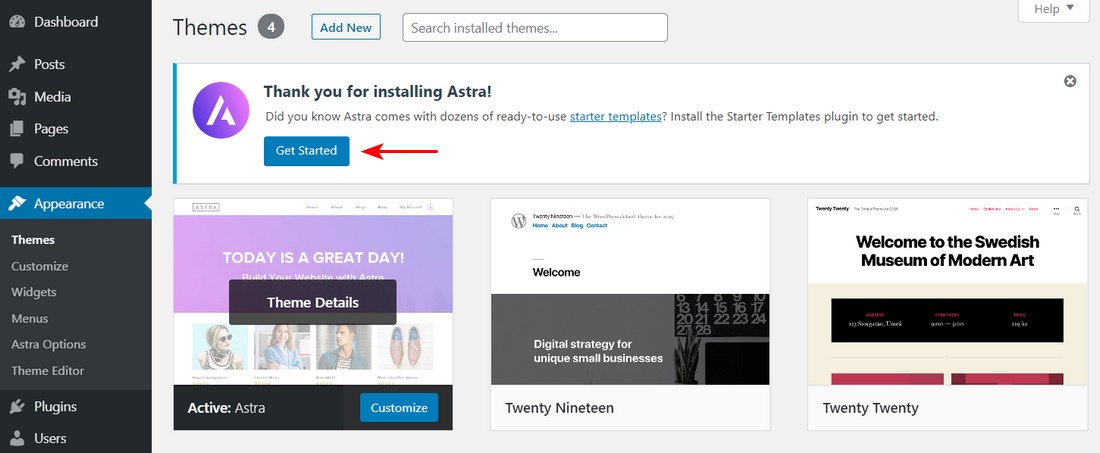
You can now select Astra’s Starter Templates to see a library of 100+ templates you can choose from. For the complete guide on How to Make a WordPress Website with Astra themes, visit our video tutorial.
Installing WordPress and themes also come with pre-installed plugins that are very useful in your Website functionality. But there are some plugins that you might not need.
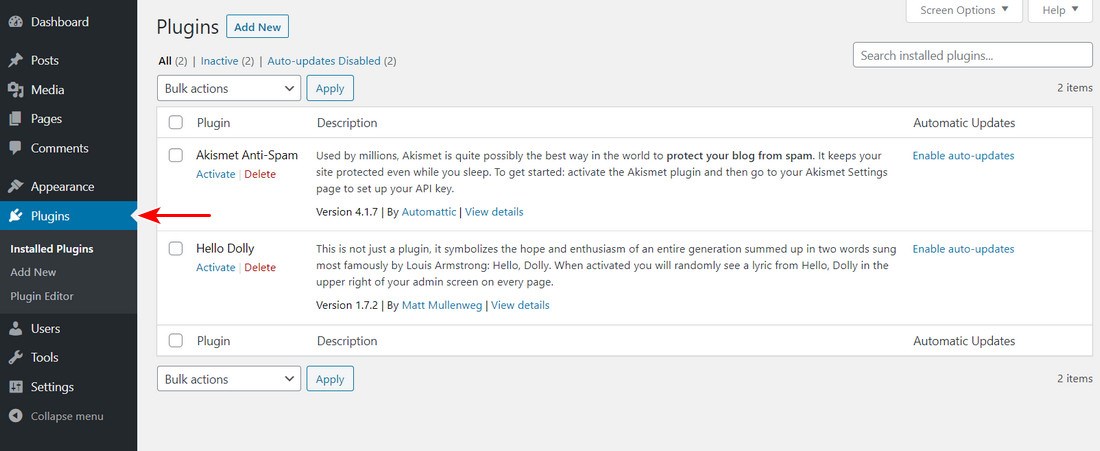
You can go to your Dashboard and click Plugins to view them. You can choose which plugin you want and delete those you do not need. If you want a detailed list check out our blog on Must-have plugins for WordPress in 2020.
Here are the top must-have plugins for your new WordPress site:
Yoast for SEO
Yoast SEO, with 5+ million active installs, is one of the best SEO plugins for WordPress. It has both free and paid versions that come with almost all of the features to optimize your website. It can optimize SEO titles and descriptions, social media images, and Open Graph metadata on all of your posts and pages.
Yoast SEO adds links to your content on the RSS feed to protect your RSS feed from being scrapped. In this way, search engines will rank your published content higher than your website.
This plugin offers the following features:
- Page analysis features.
- Total control over your WordPress site’s breadcrumbs.
- XML sitemaps creation, management, and automatic recreation.
- Excellent redirect feature.
- Offers templates for titles and meta-descriptions
- Identify and avoid duplicate content.
If you want more about optimizing your WebSite SEO, visit our complete guide to WordPress SEO.
Schema Pro

Schema Pro is the best WordPress plugin for managing web schema. It’s user-friendly and best for beginners or users with no programming and coding skills. Schema is what search engines use to make sense of what is on a page and to display rich snippets in the search engine results.
With Schema Pro, a rich snippet can show ratings, costs, features, and other pieces of relevant information with this plugin.
Schema Pro has the quality and dedicated developers working behind. It supports all kinds of schema markup — an excellent plugin in making your websites look attractive to search engines.
Schema Pro comes with the following features:
- JSON-LD support
- Markup automation
- Custom fields support
- Highly optimized code and lightweight
- Supports 13 schema types
- Responsive and helpful plugin support
- No coding required
- Supports custom fields
- Supports all post types
- Clean code that meets Google’s guidelines
- Includes filters for additional fields
Set up Google Analytics
Google Analytics is web analytics software that tracks and reports website traffic. This helps you better understand your customers and their actions and interactions on your website. You can use that understanding to give them a better experience.
A good analytics plugin should collect and present the data you need and help you achieve your end goal.
Visit our post on the Best Google Analytics plugin to learn more. You will learn what you should look for in a Google Analytics plugin, and the top free and premium analytics plugins you must have in your WordPress website.
Get Started With Your New WordPress Site
By now, you already know how to move your site from Weebly to WordPress. As I mentioned, the pre-migration stage is crucial, and you need to consider all the suggestions from registering your domain name, choosing the right web host for you, and installing WordPress.
The migration process should be easy if you follow this tutorial!
Moving from Weebly to WordPress doesn’t end at launching your site. You now have more control and more freedom to make your site stand out from thousands of other WordPress websites out there.
If that wasn’t reason enough to migrate from Weebly to WordPress, we don’t know what is!
Disclosure: This blog may contain affiliate links. If you make a purchase through one of these links, we may receive a small commission. Read disclosure. Rest assured that we only recommend products that we have personally used and believe will add value to our readers. Thanks for your support!




It is definitely worth switching from Weebly to WordPress. I’m impressed with the way we can customize WordPress with free themes and plugins. Thanks for this detailed article.
Hello Orlando,
Glad that you found the article useful! 🙂
Thanks for the article. Does this also import images while switching from Weebly to WordPress?
My Weebly website contains lots of images, so I’m worried about that.
I already have a domain connected to the Weebly website, and it is not purchased on Weebly. Can I use the same domain for my new WordPress-based website?
Hello Juana,
Yes, if your Hosting Provider allows adding a WordPress installation then sure you can connect with any domain of your choice.
Could not find any content in your weebly blog to export. Did you enter the correct URL?
Hello there,
You can refer to the Video Tutorial or enter the details on this URL.
I hope that helps. 🙂 Feel free to reach out to the Weebly support to help you out quickly.
Hi,
I got the same error message. The tool simply doesn’t find my content.
Hello Tiffany,
That’s strange! We would recommend once to check with their Support once to see if they can provide some insights on the cause of this issue.
Before the Weebly account expires, you still have to transfer the domain name to a new Domain name host.
The trick is getting Weebly to participate in the transfer.
Do you have any tips on having a smooth transition?
wonderful article