What’s the first thought that comes into your mind when you consider shifting your WooCommerce store to a new hosting service provider?
I’m guessing it is how long it’s going to take to backup your entire store and export all those products. How to export all your products, the product variants, images, customer details, reviews, blog articles, well, just about your entire store.
This article will walk you through the entire process of exporting WooCommerce products quickly and easily.
You could also check out our article on How To Build A WooCommerce Website With Elementor and Astra Theme if you’d like to create a WooCommerce store from scratch.
In addition to shifting to a new hosting service provider, you may need to update the products in bulk or even keep a backup of all your products, just in case.
This article will show you how to do exactly that.
This article will cover how to export your WooCommerce products using two foolproof methods.
In the first method, we will use the default WooCommerce system. In the second, we will make use of a WordPress plugin.
While there are several plugins available, both free and paid, we will make use of the ‘Product import-export for WooCommerce’ plugin.
Product import-export for WooCommerce is one of the most common plugins to help you manage your WooCommerce products.
Before we go ahead and cover how to export WooCommerce products, we need to become familiar with CSV files as both methods of exporting from WooCommerce requires them.
Both methods we suggest for easily exporting WooCommerce products, manual export, and using a plugin, use CSV files.
What Is a CSV File?
A CSV file, a Comma Separated Values file is a simple text file that contains a list of data. These files are used to exchange data between different applications.
For example, applications with huge databases often support CSV files. You can export the data from one application as a CSV file and then import it to another application also as a CSV file.
These files, more often than not, use the comma character to separate the data. Hence the terminology, Comma Separated Values (CSV) file.
For example, let’s say you have a few products in your WooCommerce database, and you export them as a CSV file.
You will get a file containing text similar to this,
Product Name,Type,Make,Size
Polo T-Shirt,Clothing,ABC,S/M/L
That’s really what a CSV file is.
Of course, it will contain way more data than I’ve shown here but you get the idea!
Once you have exported a CSV file, you can access it through a text editor of your choice, such as Notepad.
However, with the amount of data in a CSV file and without any text wrap, it will be difficult to view the file, let alone edit it.
I would recommend you open the file using a spreadsheet. You could use Microsoft Excel or even upload the file online and use Google Sheets.
Now you know what a CSV file is, let’s see how to use them in the export process.
Method 1: How to Export Products Using the Default WooCommerce Tool
In this first method, we will be using the default WooCommerce tool that has a built-in product CSV importer and exporter. You could import, export, or even update the products in your WooCommerce store with a single CSV.
This tool supports all types of products, i.e., the Simple, Group, External/Affiliate, and Variable products.
Before we begin, I’m assuming you have WooCommerce installed on your WordPress website.
For this article, I’ve installed WooCommerce on my store and used the ‘Simply Natural’ Astra starter template. You could select an Astra Starter template of your choice.

Upon successful installation of WooCommerce and your starter template, you will have several sample products in your store.
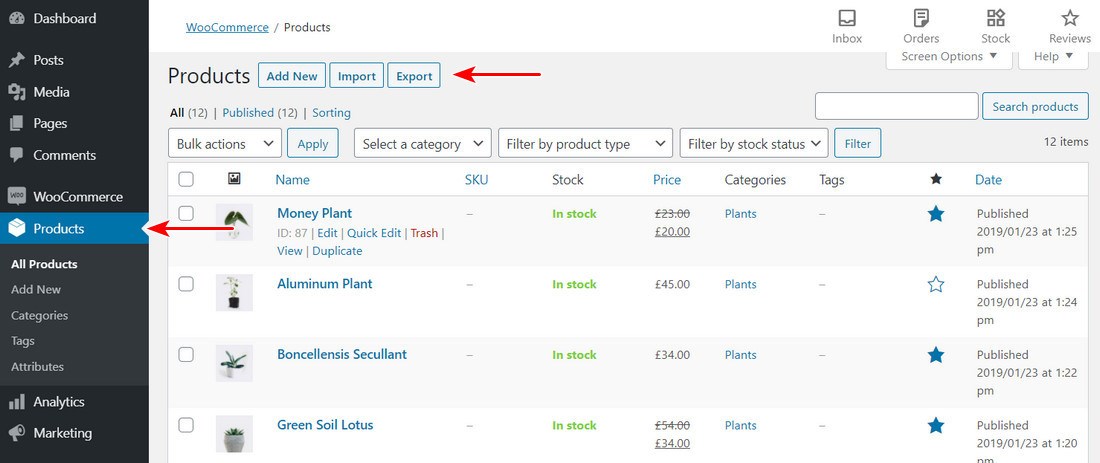
To export these products, go ahead and click on ‘Export’ on the top.
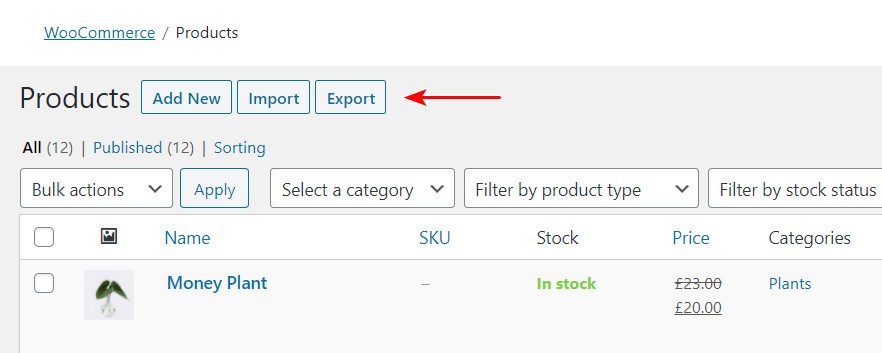
You’d find yourself on the following page.
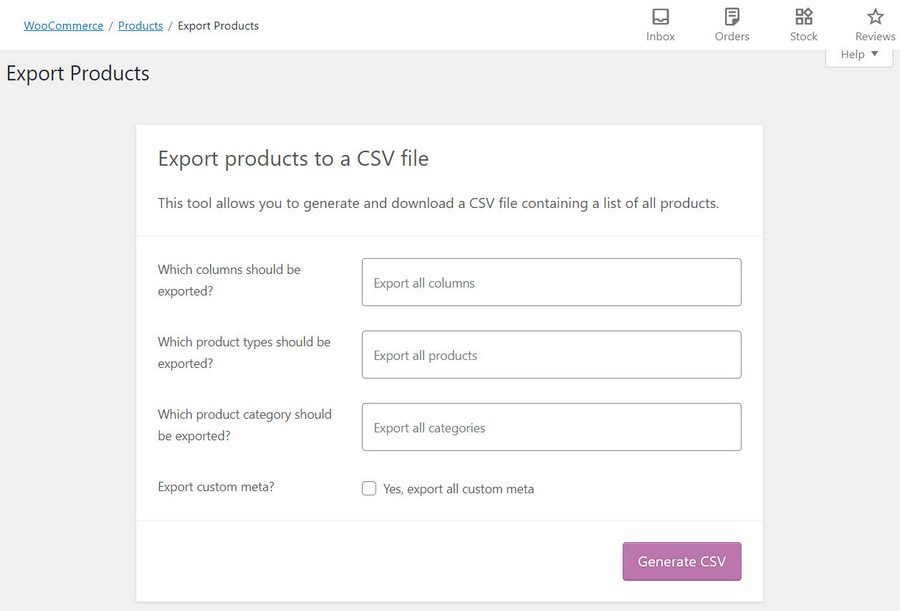
You could now choose the columns, product types, and product categories you’d like to export.
By clicking on any field, you’d get a drop-down, as shown below.
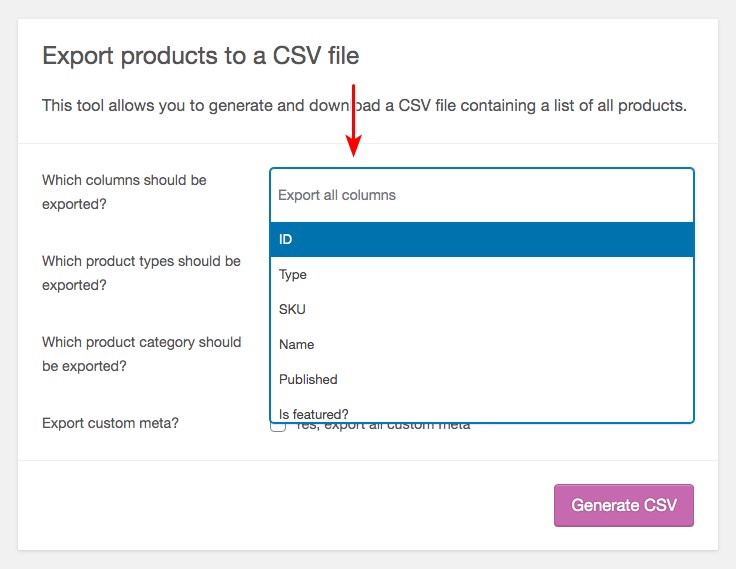
If you’d like to export all the fields and data, irrespective of having data in it or otherwise, just leave it the way it is and click on ‘Generate CSV’.
If you have data in only a few select fields, you could opt only for those options that you want to be exported.
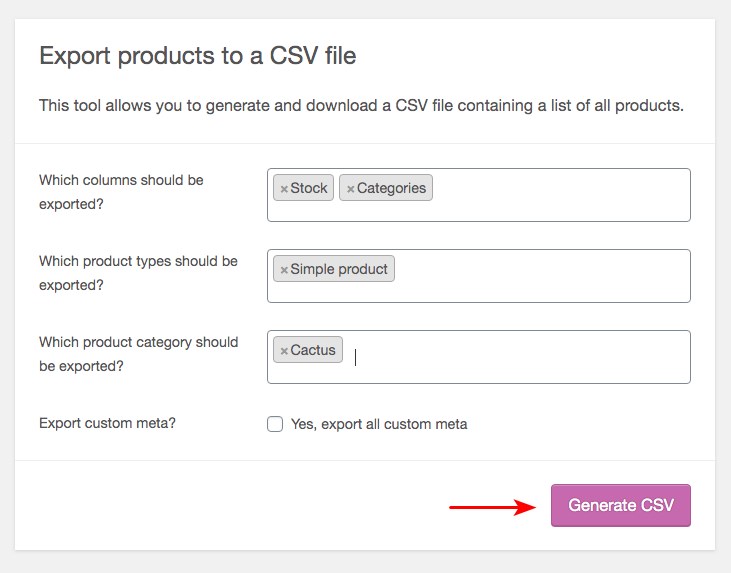
Let’s say my store has data on only the ‘Cactus’ product category. The product type is ‘Simple product’ and I have data in only the ‘Stock’ and ‘Categories’ fields.
I would select only these fields, as shown above.
If you have installed a plugin to add additional information for your products via any meta plugin, you could check the ‘Export custom meta?’ field too.
Once you have completed these steps, click on ‘Generate CSV’.
Once the export is complete, your CSV file will be downloaded. The CSV file may have the date included within the file name.
For example, ‘wc-product-export-13-11-2020-1605232625008.csv’ is the file that was downloaded when I did it.
And just in case you are wondering if you could customize the file name, which did cross my mind too, well, it gets a little technical.
You’d have to access the ‘abstract-wc-csv-exporter.php’ file under ‘woocommerce > includes > export’ from your website control panel and edit the following section.

WooCommerce Product CSV Import Suite
You may notice that the default option that WooCommerce has to offer has a few limitations.
One such limitation is in exporting complex product variations. Especially when you have variable products with multiple attributes (e.g., colour and size, if your store sells apparel).
In addition to the product variations, if you would like to export custom data from bookings, product vendors, or create and update thousands of products all at once, you could consider the WooCommerce Product CSV Import Suite.
However, this is a paid option.
Using the WooCommerce Product CSV Import Suite, you could include complex products, bulk update the standard items like price and description, along with custom data like appointment availability, resources, and more.
For a full list of features, check out the WooCommerce Product CSV Import Suite page.
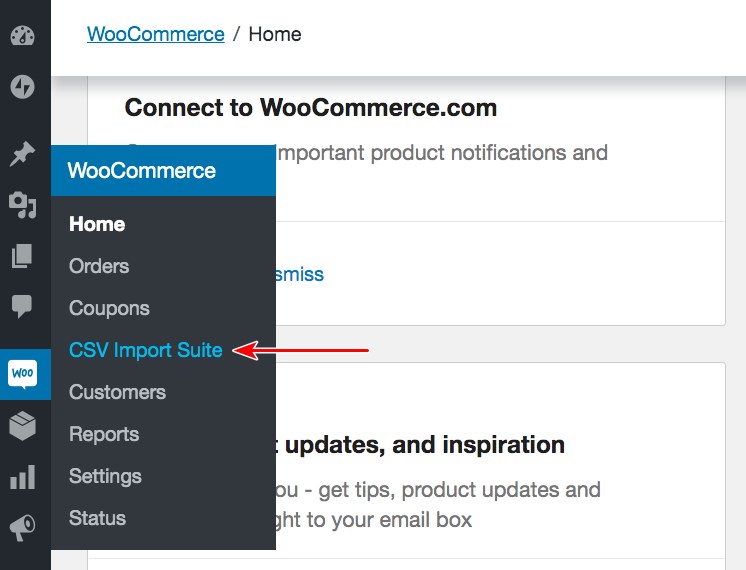
Once you have downloaded the WooCommerce Product CSV Import Suite, you will find a ‘CSV Import Suite’ link under WooCommerce in your dashboard.
Under ‘CSV Import Suite’, you have the option to ‘Import Products’ as well as ‘Export Products’ as shown in the following image.
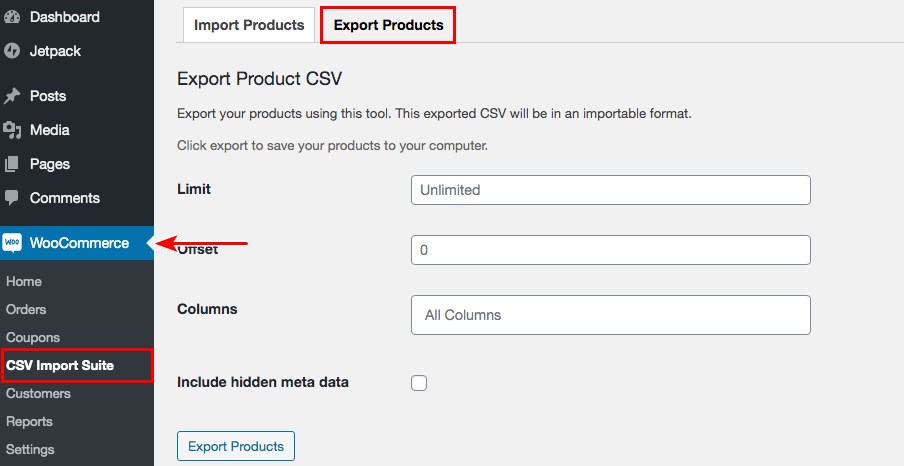
Click on the ‘Export Products’ tab.
You have the option to export either the products by themselves or export the product variations too.
As in the case with the default WooCommerce system, you have several export options.
You can set a limit to the maximum number of products you wish to export. For example, if you set the ‘Limit’ to 100 with an ‘Offset’ of 200, you could then export the products from 200 up to 300 to your CSV.
The ‘Limit to parent ID(s)’ is applicable only for the product variations. If you wish to export only select variations of a specific parent product, you could mention those product IDs, separated by commas.
For example, if you are selling shirts with variants such as colour and size, you could select the specific variant you’d like to export.
Under the ‘Columns’ option, you could select the specific column(s) you wish to export.
You can opt to select the ‘Include hidden metadata’, if you wish to show custom metadata information, such as custom booking orders, customer information, for your products and/or product variations.
Once you’ve completed the above steps, select ‘Export Products’ or ‘Export Variations’ based on your requirement. Your CSV file will be downloaded.
Method 2: How to Export WooCommerce Products Using a Plugin
A common saying in the WordPress fraternity is that there’s a plugin for just about anything. And yes, there are several plugins available to export your WooCommerce products.
While we will be covering some of the recommended plugins to help you import and export your products later in this article, we will install one such plugin here. The ‘Product Import Export for WooCommerce’ plugin. Or you can install WP All Import WooCommerce product export premium plugin.
Product Import Export for WooCommerce is a very popular plugin. There is a free version and a pro version that offers more features and benefits.
The free version allows you to import and export only simple products. For products with variations, you would have to consider the pro version.
Some features of the pro version include import and export of all types of products such as simple, group, external, and variation products, export products by their category, import and export product reviews, amongst many more.
Go ahead, search for the plugin, install, and activate it.
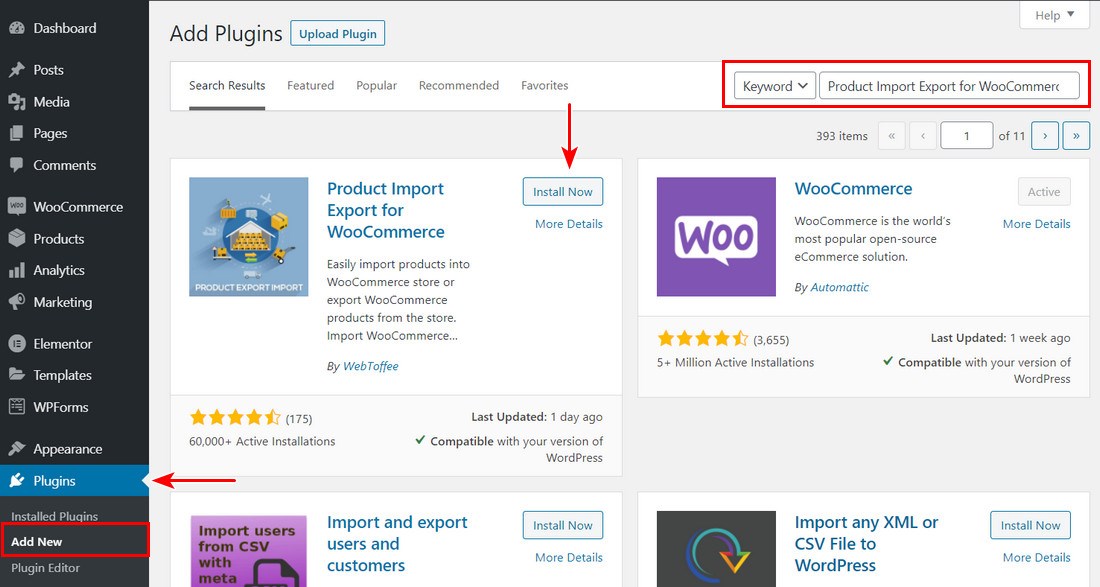
Once installed, you will see a new menu option under Products in WooCommerce. Click on ‘Product Im-Ex’ under ‘Products’.
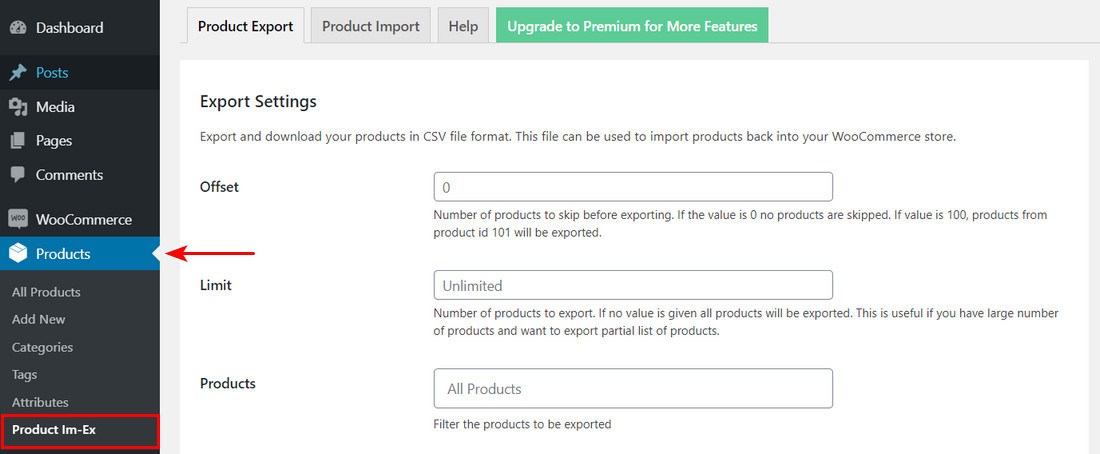
Under the default ‘Product Export’ tab, you will notice ‘Offset’ and ‘Limit’ in addition to several fields under Columns.
As in the case of the WooCommerce Product CSV Import Suite, we covered earlier, you could set an ‘Offset’ and a ‘Limit’ number.
Just to recall, if you set the ‘Limit’ to 100 with an ‘Offset’ of 200, you could then export the products from 200 up to 300 to your CSV.
The next set of fields are the Columns.
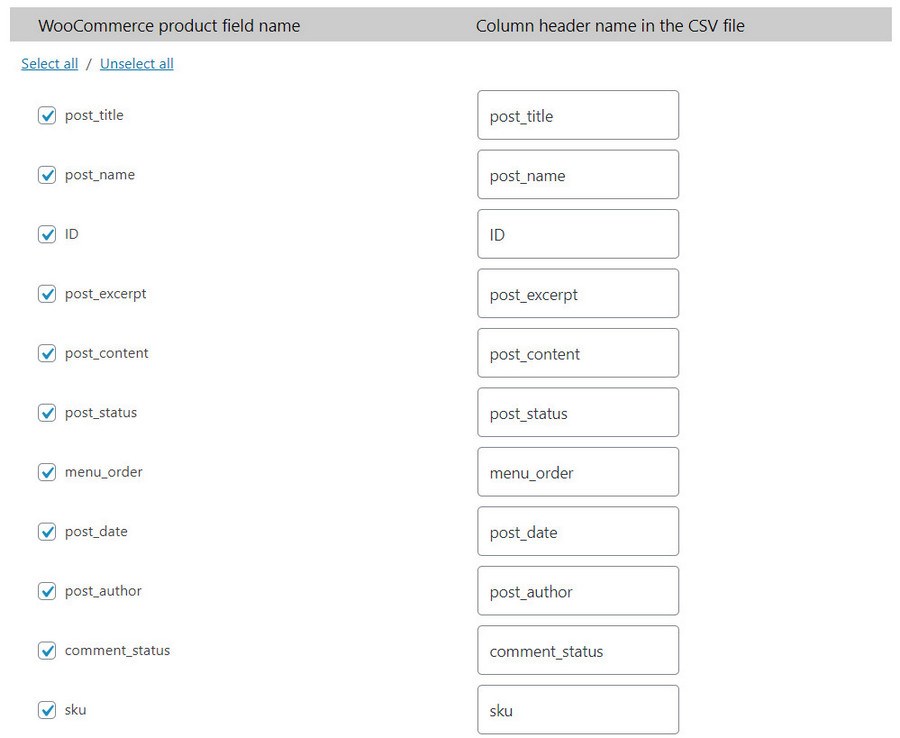
You can use checkboxes to select the various fields you would like to export. You also have the option of customizing your column header, to how it should appear in your CSV file.
Once you have selected the required options, click on ‘Export Products’, and your CSV file will be downloaded.
If you purchase the premium version of this plugin, you have the option to export ‘Variable Products too’.
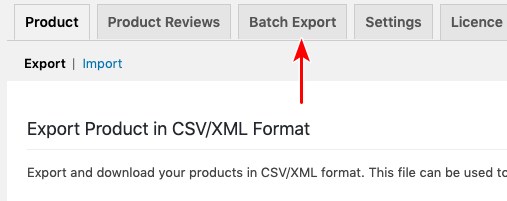
In addition to ‘Variable Products’, you have some additional options such as exporting and importing Product Reviews, Batch Export, and more plugin settings.
The Batch Export tab is particularly helpful when you have a huge number of products and would like to set a limit to the number of products exported per batch.
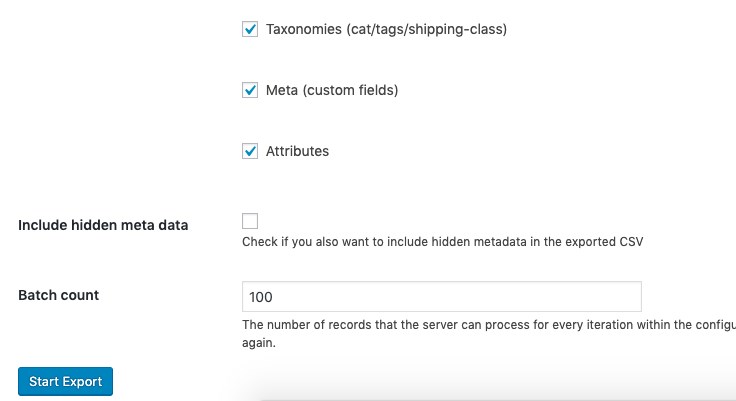
As indicated in the image above, setting a ‘Batch count’ limit helps overcome memory limitations or low timeout interval in WordPress.
Once set, click on ‘Start Export’ to download your CSV file.
How to Import WooCommerce Products Using a CSV File
We now know how to export WooCommerce products. The next obvious question would be, how do we import the products into a new store?
And while I am pretty confident that you’ve already guessed how to go about importing products, when we covered exporting, I will go ahead and explain how to import your CSV file anyway.
Go to ‘Product > All Products’.
Whether you’re starting a new store or adding new products to an existing store, the procedure is going to be the same.
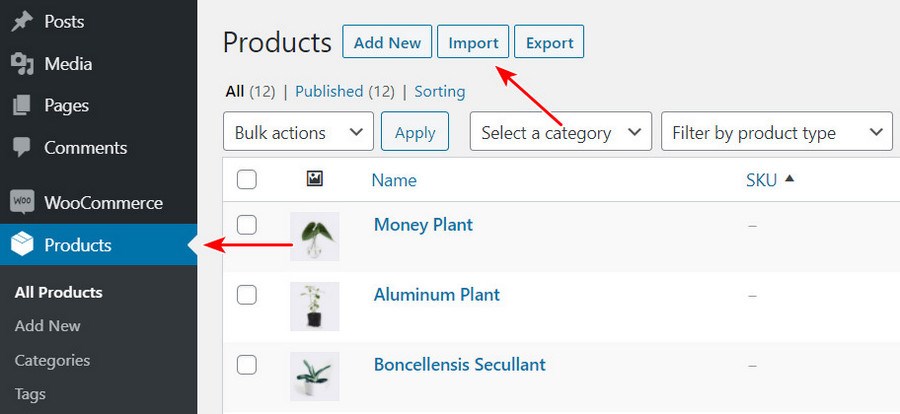
The image above is if you have existing products in your store, and you want to add new products. Simply click on ‘Import’.
If you have no products in your store so far and would like to add new ones, the following page will be displayed.
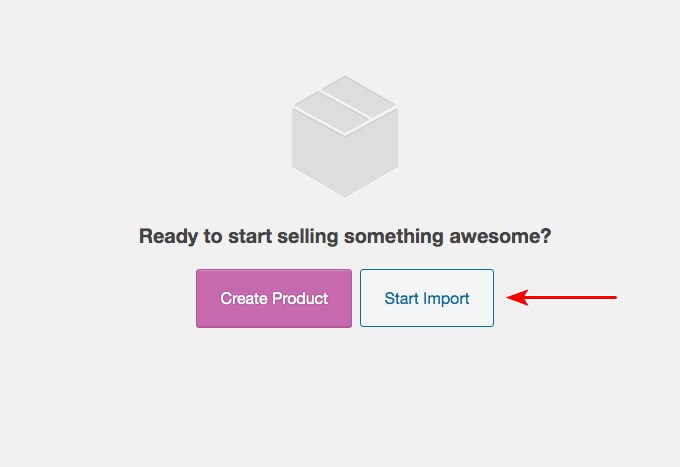
Click on ‘Start Import’.
The rest of the steps remain the same whether you have existing products in your store or not.
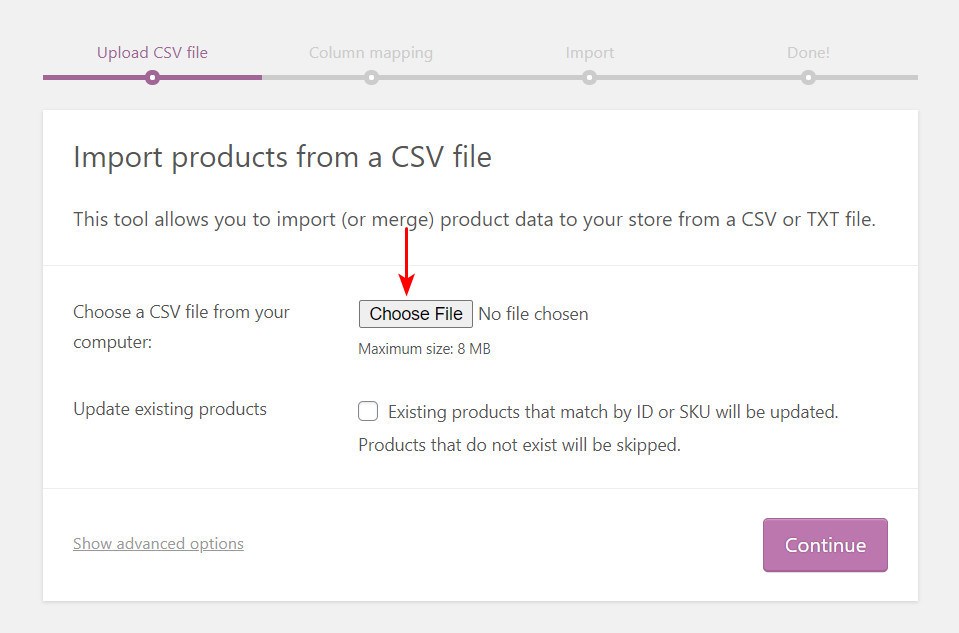
The first step would be to ‘Upload CSV file’.
For this article, I will go ahead and upload the same CSV file that I exported earlier, the ‘wc-product-export-13-11-2020-1605232625008.csv’ file.
Click on ‘Continue’ after selecting your file.
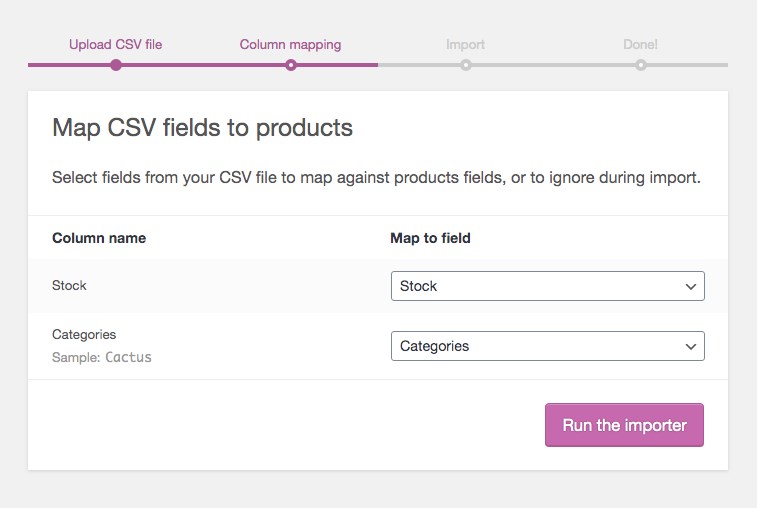
In the current screen, ‘Column mapping’, the WooCommerce system automatically “maps” the Column Name from your CSV to the Fields.
When I exported the CSV file earlier, I selected only the ‘Stock’ and ‘Categories’ fields. So that is what you get to see under ‘Column name’, on the left-hand side. If you had selected additional fields, the same would get displayed under ‘Column name’.
The WooCommerce system automatically maps the column name to its respective field. As shown in the image above, ‘Stock’ is automatically mapped to ‘Stock’ under ‘Map to field’. Similarly, ‘Categories’ to ‘Categories’.
You could make use of the dropdown menus on the right side to adjust the fields accordingly.
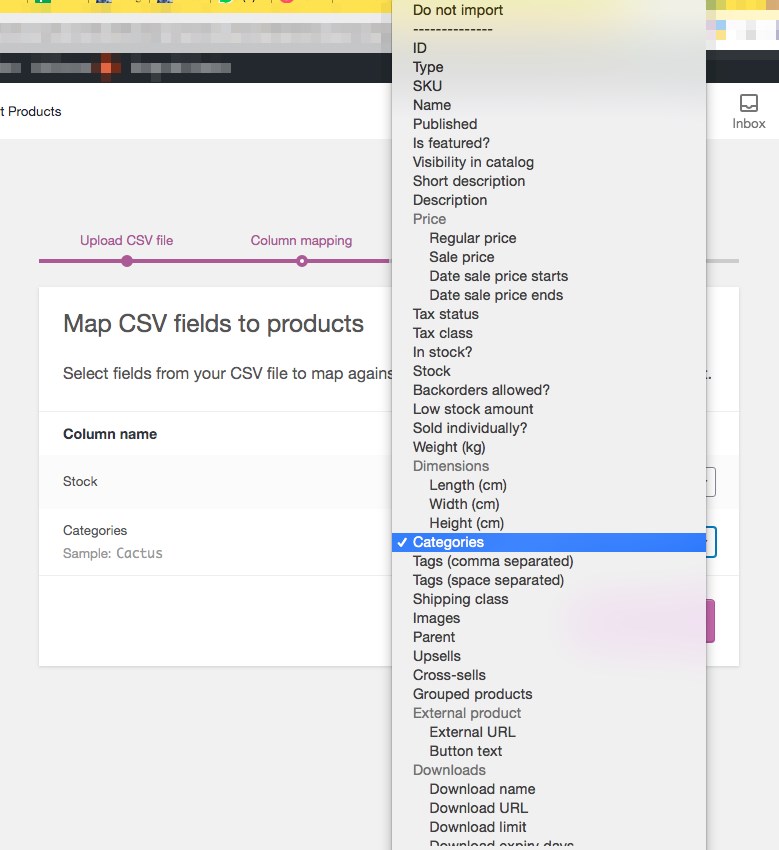
If there is a situation where you don’t want to import a particular field, under ‘Column name’, you could opt for the ‘Do not import’ option on the right-hand side.
On completion of these steps, click on ‘Run the importer’.
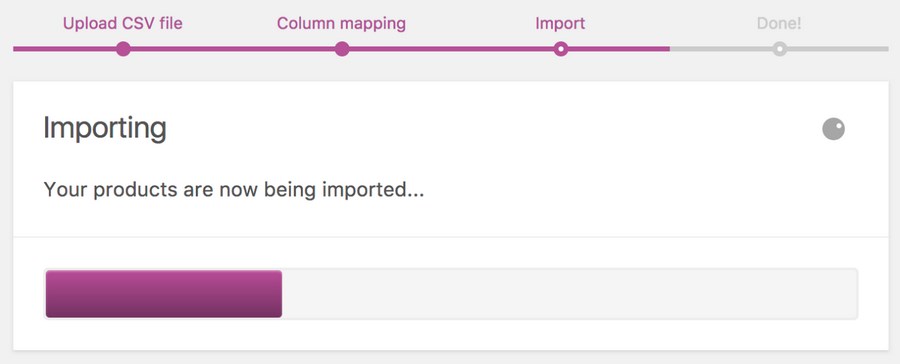
Once the import has been completed, the ‘Done!’ screen will be displayed.
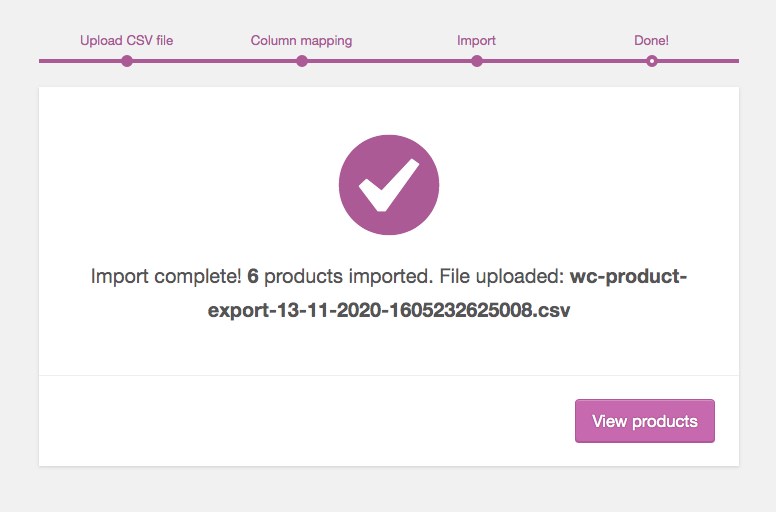
As indicated in the above image, six products were imported.
Update Existing Products
Let’s say you’d like to update an existing product with some additional information such as taxes, or location. While the process is more or less the same as what we’ve just covered, a key element to take note of is the inclusion of the product ID.
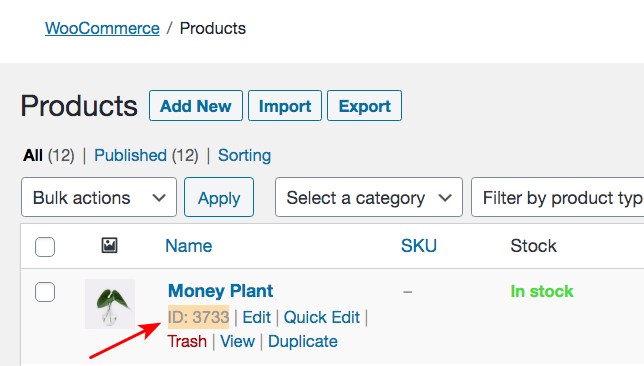
If you hover over any product, you will notice the ‘ID’. In the above example, you’d notice the ID is 3733. Similarly, every product has a unique ID.
While creating your CSV file, you must include the product ID. This will allow the WooCommerce system to automatically map the product against the respective product ID and update it.
For example, I’ve gone ahead and exported a new file.
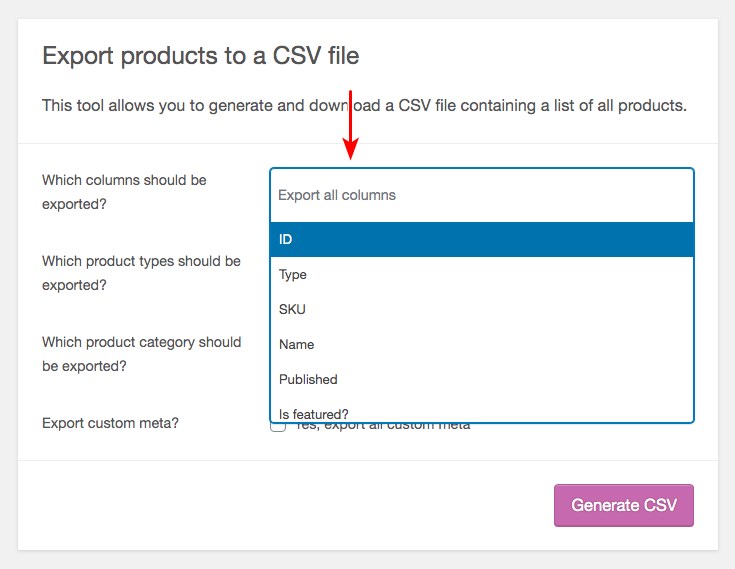
This time around, I’ve exported additional fields, and most importantly, included/exported the product ID too.
The following screen displays the exported CSV file opened in Google Sheets.
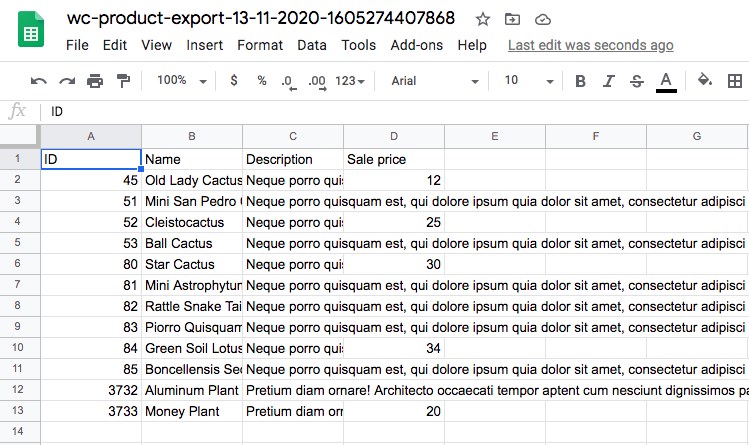
Now, I will include a new column. For example, I will include a new column ‘Location’.
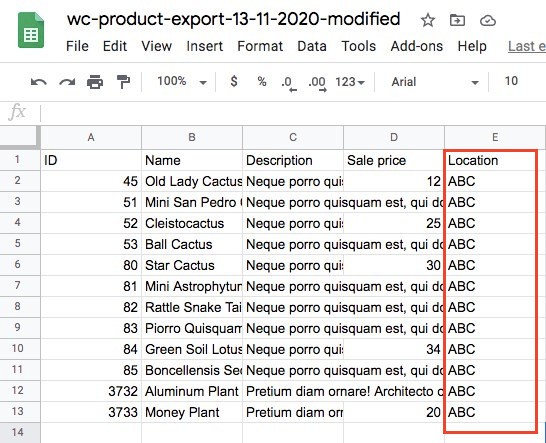
I’ve entered some dummy values under ‘Location’ and renamed the file with a ‘modified’ included in the file name.
The next step remains the same, i.e., click on ‘Import’ under ‘Products > All Products’ and select the file you’d wish to import.
Which in this example is a CSV file with a ‘modified’ at the end of the file name.
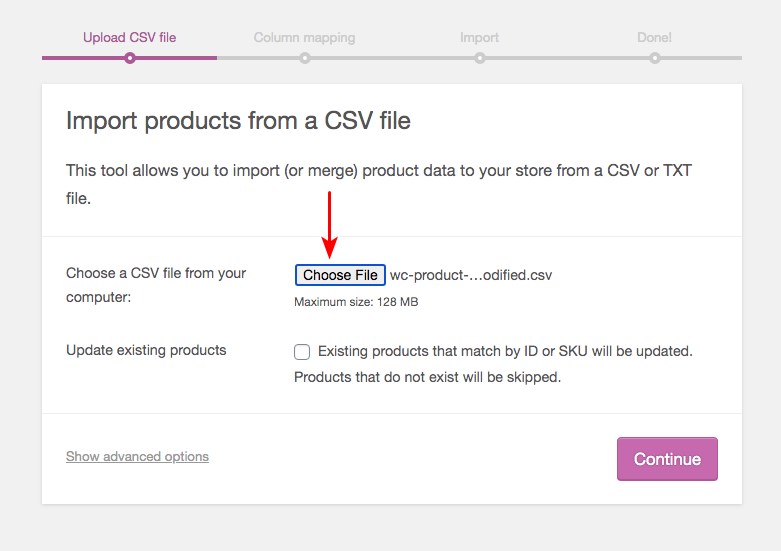
The only difference this time around is to check the ‘Update existing products’ option.
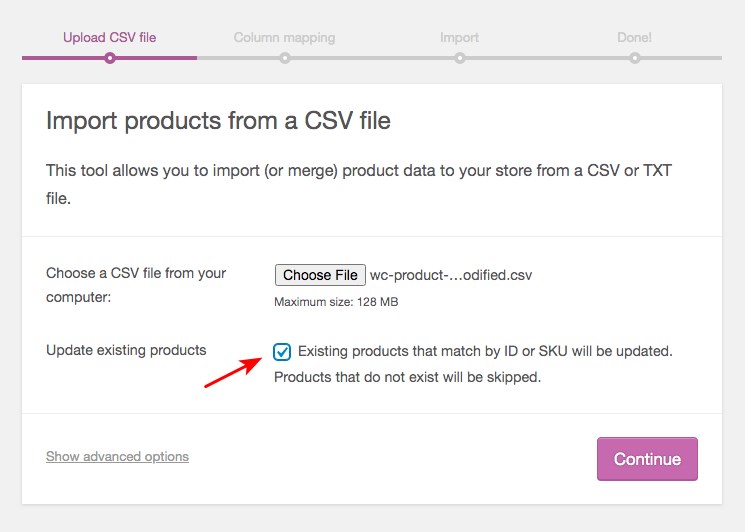
Click on ‘Continue’ and the ‘Column mapping’ screen will be displayed.
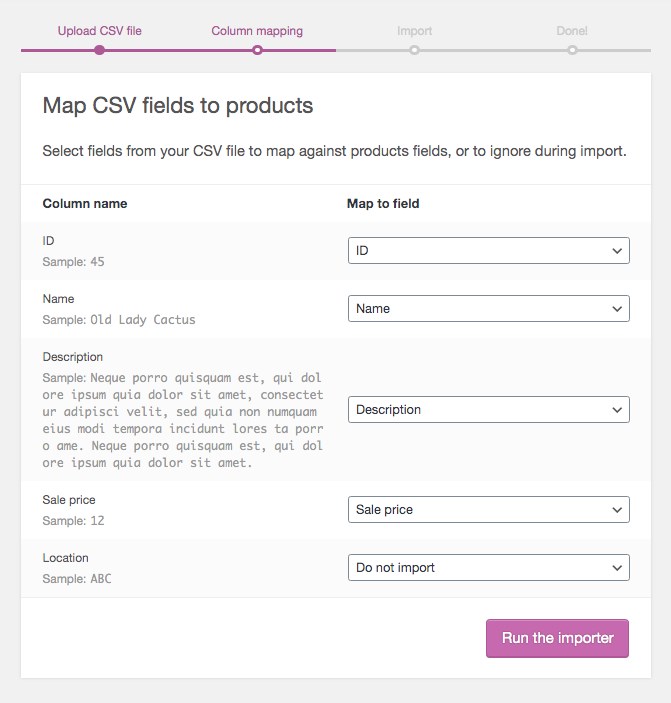
You will notice that all the fields under the ‘Column name’ have been mapped accordingly, except for the field we just included, i.e., ‘Location’.
You could either opt for ‘Do not import’ or select an option corresponding to your field.
Once this step is completed, click on ‘Run the importer’.
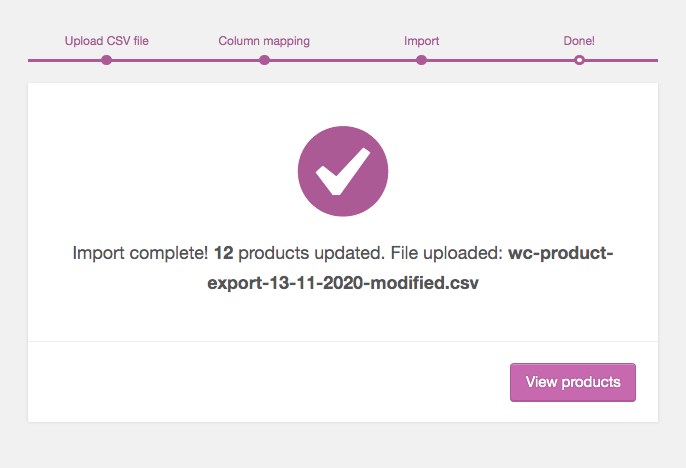
Your products have been updated successfully.
How do you check if the products have been successfully updated? The simplest method is to export the products and check to see if they were updated.
Now that we have covered how to import and export WooCommerce products using the default WooCommerce system and the ‘Product Import Export Plugin for WooCommerce’ plugin, let’s cover some additional plugins that you could consider.
Plugins to Help You Export WooCommerce Products
Ok, heads up. Most of the plugins mentioned here provide the best features and functionality if you buy the premium version. If you are looking only for the basic export and import functionality, the WooCommerce built-in import and export feature should suffice.
But features such as exporting and importing product variants, bulk products, product reviews, custom booking details, customer details, among many more are available only with the premium versions.
Some of the following plugins specialize in specific tasks such as importing and exporting. Some are capable of a lot more.
1. WooCommerce Product CSV Import Suite
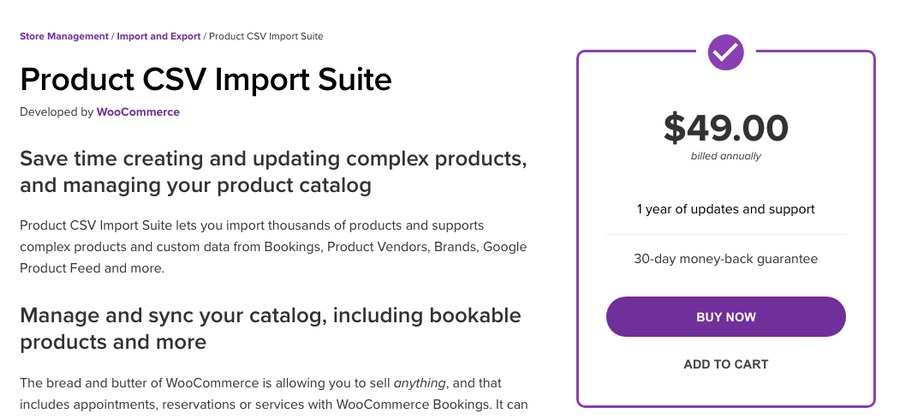
This is my first choice to help you import and export WooCommerce products. We have covered this earlier in the article too.
You could even test this extension before purchasing it. Click on the ‘Try before you buy’ button, below the buy now button. A demo site will be created for you to test the extension.
For a complete list of features and to consider this extension, visit the Product CSV Import Suite page.
2. WP All Import
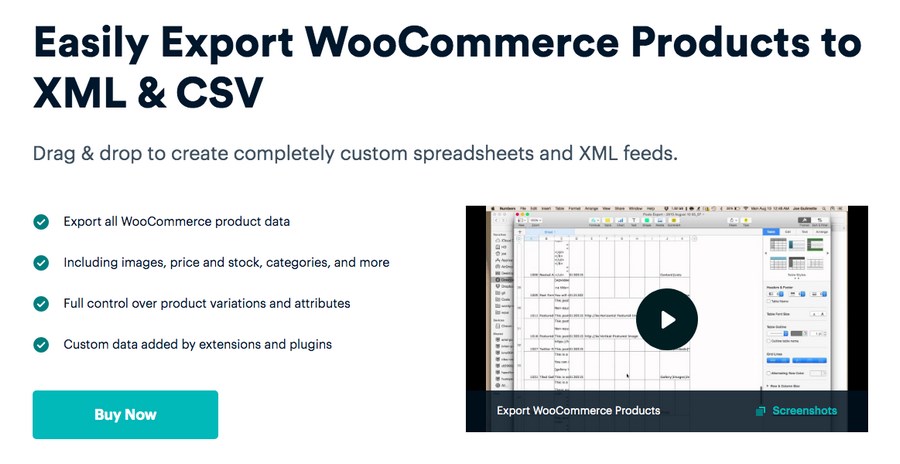
WP All Import is another popular plugin to help you import and export your products in a matter of a few clicks.Image
You can try the ‘WP All Import’ plugin for free for 7 days. Visit the ‘WP All Import’ product page, create a sandbox (demo site), and give it a try.
3. Product Import Export Plugin for WooCommerce
Another very popular plugin, and one we have also used in this article, is the ‘Product Import Export Plugin for WooCommerce’ plugin.
This plugin is available for free in the WordPress plugin repository. The free plugin has limited options as we discovered. To explore the extended functionality, you could consider the premium version.
To check out the various features of the premium version and to purchase the plugin, visit the ‘Product Import Export Plugin for WooCommerce’ page.
4. WooEXIM
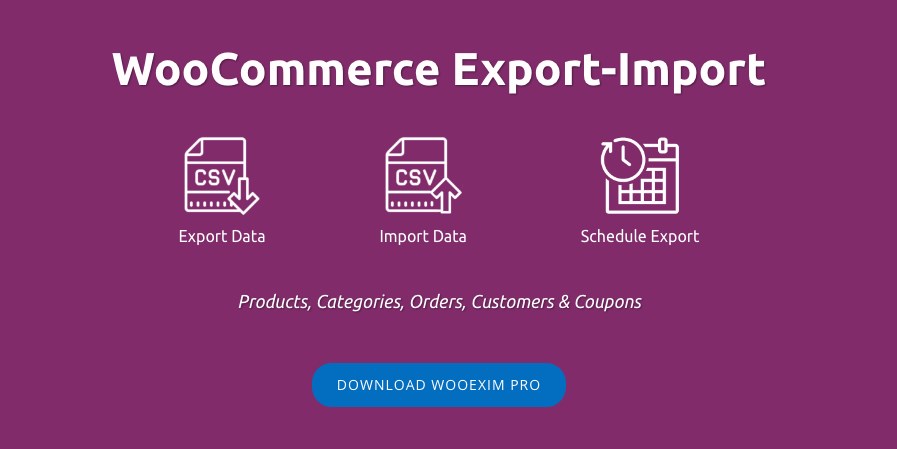
My final recommendation is WooEXIM.
In addition to helping you import and export your WooCommerce products, you can use the WooEXIM plugin to import and export data such as customers, orders, coupons, and much more. You can also schedule your export for a convenient time.
For a detailed list of its features and demos, do visit the WooEXIM product page.
Conclusion
If you are running a WooCommerce store, exporting products will soon become second nature. In addition to exporting WooCommerce orders, creating backups, updating your product information, or even migrating to a new site, you may need to export the product data for inventory accounting purposes.
The default WooCommerce system has a fairly decent set of tools to handle the import and export of your products. However, some of the solutions available in the market offer much better features and functionality compared to the default WooCommerce system.
This article on how to export WooCommerce products should have given you a fair indication of what these export plugins can do and how to go about exporting your products too.
Do you use any of these plugins? Do you know of a better tool to import or export WooCommerce plugins? Share your thoughts in the comments.
Disclosure: This blog may contain affiliate links. If you make a purchase through one of these links, we may receive a small commission. Read disclosure. Rest assured that we only recommend products that we have personally used and believe will add value to our readers. Thanks for your support!


As always amazing guide, very detailed and informative.
Exporting WooCommerce products comes in handy, when you have to transfer WordPress website from one host to another.
This article will defiantly help newbies. Thanks.
Great tutorial, It was quick and on point.
It was simple and done it without any problem. Thanks to you guys.
This was easier than thought. I like the detailed guide and other methods.
I m currently working on WooCommerce based project and it is amazing to see that it has so many fuctions and dept.
By the way, nice guide.
This was easier than thought. I like the detailed guide and other methods.