A browser cache is a collection of temporary copies or snapshots of a website’s files, images, and code that helps visitors experience a faster load time when they next visit that same website.
Browser caching usually provides a fast and optimal user experience for website visitors, however, there are a few instances when it’s recommended to clear the browser cache periodically.
In this article, we’ll discuss exactly what a browser cache is, and how you can clear the browser cache in all the major browsers. We’ll also discuss how website owners can proactively enable browser caching on their end to ensure an optimal page speed.
What Is a Browser Cache?
A Browser Cache (pronounced as ‘cash’) is a temporary copy of the elements or assets of a particular website that will be stored on a visitor’s computer, for faster-loading of that website for future visits.
The cache only creates copies of static assets such as:
- Media (pictures, Logo, pictures, videos, background images, etc).
- HTML
- CSS
- JavaScript
Simply put, it’s just a collection of assets stored on your computer to help display a webpage. It’s always faster to get something from your computer (hard disk) than the internet (due to potential bandwidth and internet speed issues).
When users visit a website, their browser makes a request to that particular website’s remote servers, and that server sends back one or many of the website’s assets to the browser. Some of the static assets (as explained above) are stored on the user’s hard drives.
In many instances, caches are sometimes confused with ‘cookies’.
Cookies track specific information about a user’s web browsing experience such as:
- The pages you have visited.
- How many pages have you viewed?
- How long have you spent on the website?
- What type of content are you reading?
- What have you clicked?
- What’s in your shopping carts, etc.?
- Your demographic information.
Cookies help the webmaster and advertisers to personalize your experience for that particular website, and also to show you relevant ads.
On the other hand, the browser cache is strictly local, and it’s unique to that particular website you’re visiting. Its main purpose is to help load that particular webpage faster.
Why Do You Need to Clear Your Browser Cache?
- Hard Disk Hygiene — If you’re a heavy internet user and are spending a lot of your time visiting and browsing multiple websites, then your browser cache will continue to increase the size of temporary files in your hard drive. By clearing the browser cache, you will free up hard disk space.
- Speed and Performance — You might have occasionally notice that your browser loads slower than usual. You might also be noticing 404 and 502 errors, which is another indication that browser cache is possibly corrupted. If this happens, then one of the first things you can do is to clear the browser cache.
- Up-to-date Pages — Most webmasters update their websites with new design, content, structure, etc. By clearing the browser cache, you will be visiting the most up-to-date version of those webpages.
- Privacy — If and when using a public computer, then others can also view your browsing history and activity. A good practice is to clear your cache and browsing history once you’re done using that particular computer.
- Security — In some cases, malware or adware can infect your computer when you visit certain websites; and many times you don’t know the existence of malware unless it spreads to local files and becomes more severe. A good remedy would be to clear the browser cache.
How to Clear Browser Cache?
How to Clear Browser Cache in Google Chrome
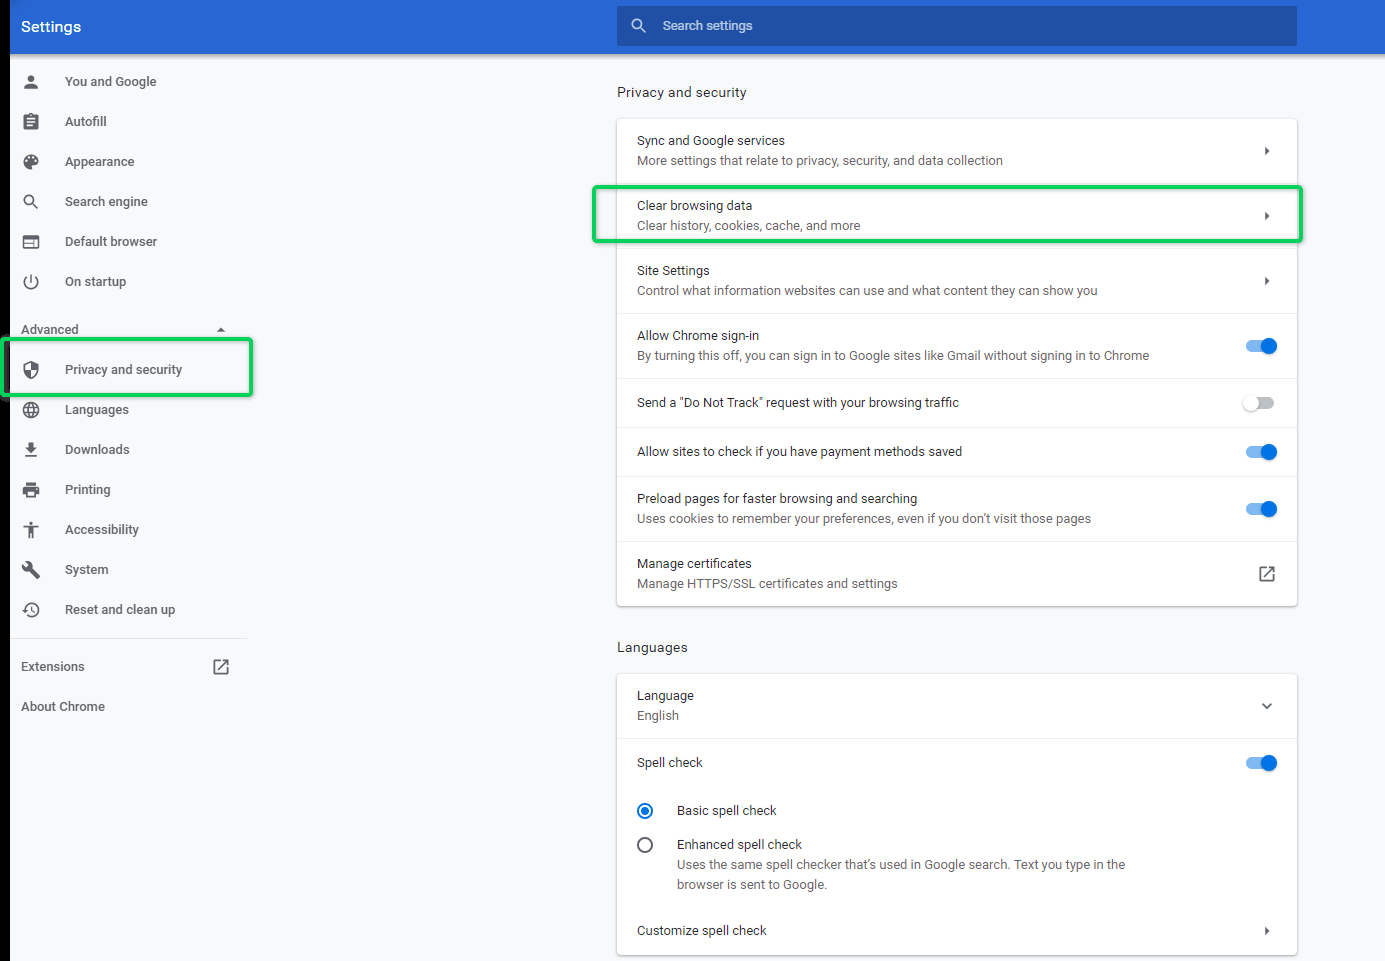
- Click the Customize and Control Google Chrome in the top right-hand corner (the 3-dot menu next to your profile picture).
- Open Settings.
- Expand Advanced on the left-hand side, and you will see few options.
- Click Privacy and Security.
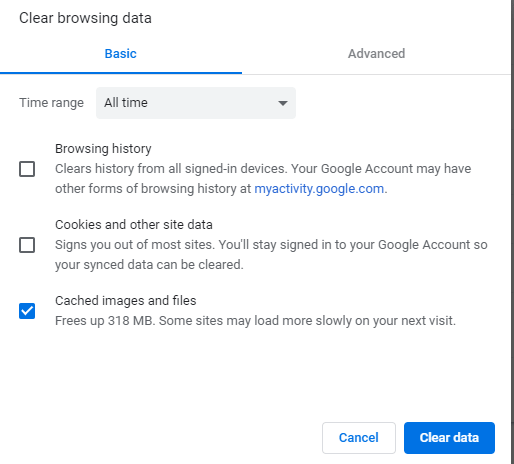
- Open Clear Browsing data, and it will open a pop-up.
- Under Time range — Choose the All-Time option.
- Uncheck Browsing History and Cookies and other site data.
- Ensure that Cached Images and Files is still checked. It should tell you how much space you will potentially free up by clearing the cache.
- Click Clear Data. This process will take a few seconds to minutes depending on how big your cache is.
Google Chrome Shortcut
Alternatively, you can also use Ctrl+Shift+Del on Chrome to access the Clear Browsing Data settings.
How to Clear Browser Cache in Firefox
- Click the 3-line menu in the top right-hand corner.
- Go to Options.
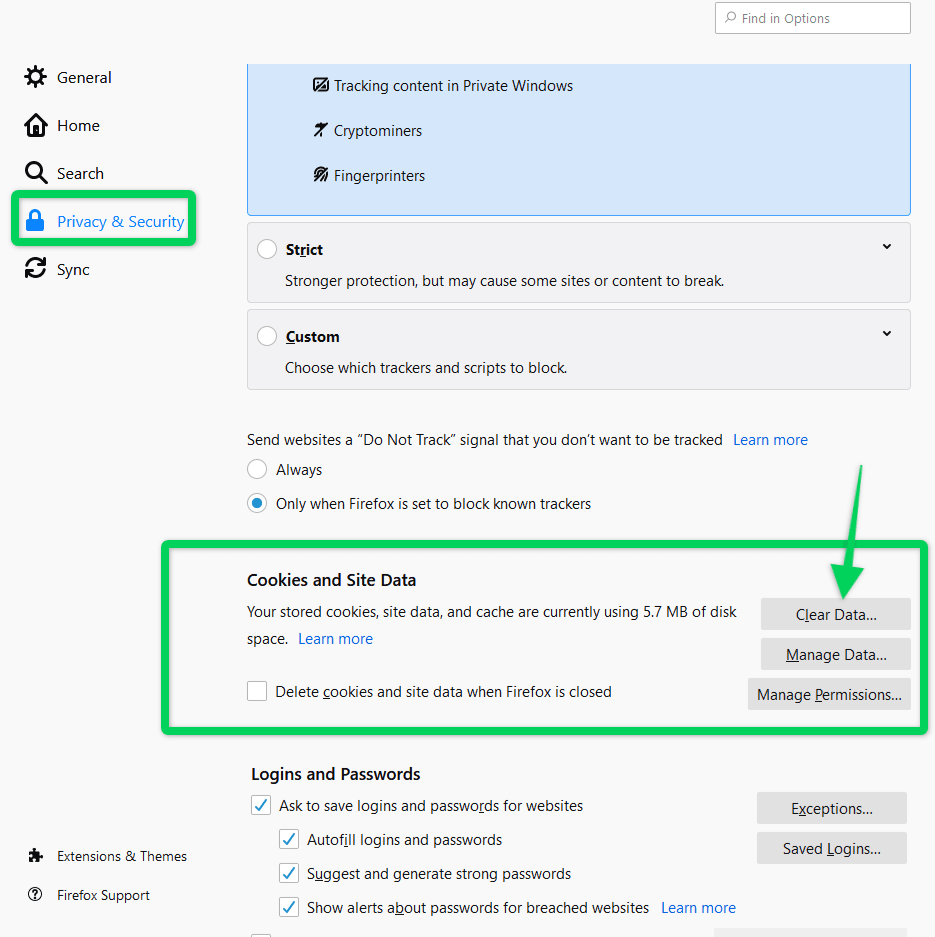
- Click Privacy & Security on the left-hand side.
- It should bring the Browser Privacy options. Scroll to Cookies and Site Data section.
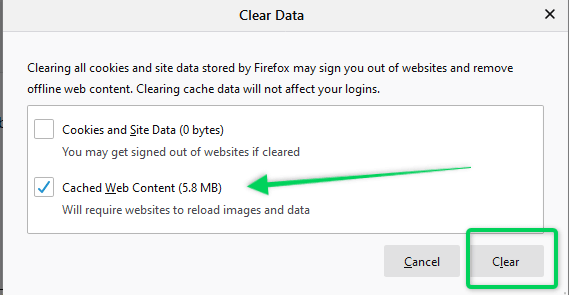
- Open Clear Data, and it will open a pop-up.
- Uncheck Cookies and Site Data.
- Check Cached Web Content.
- Click Clear.
Firefox Shortcut
Alternatively, you can also use Ctrl+Shift+Del on Chrome to access the Clear Browsing Data settings.
How to Clear Browser Cache in Microsoft Edge
- Click Settings and More (the 3-dot menu) in the top right-hand corner. Alternatively, use the shortcut Alt+F to access settings.
- Go to Settings towards the bottom.
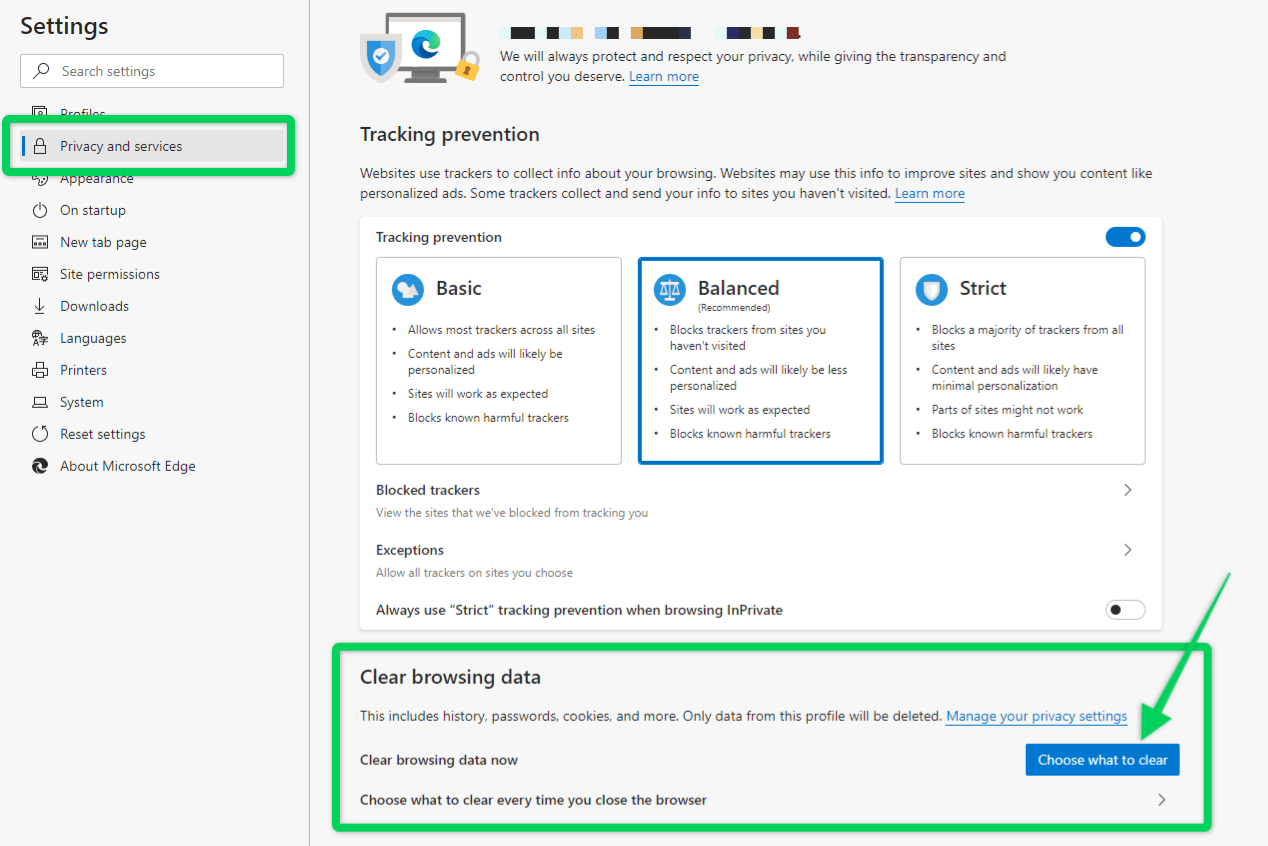
- On the left-hand side, click Privacy and Services.
- Under Clear Browsing Data, click the Choose what to clear button.
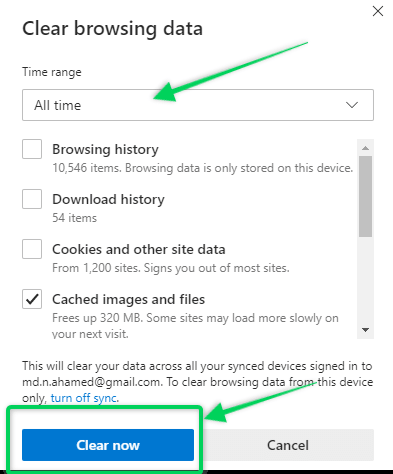
- A pop-up called Clear Browsing Data will open.
- Under Time range — Choose the All-time option.
- Uncheck Browsing History, Download History, and Cookies and other site data.
- Ensure that Cached Images and Files are still checked.
- Click Clear Now.
Microsoft Edge Shortcut
Alternatively, you can also use Ctrl+Shift+Del on Chrome to access the Clear Browsing Data settings.
How to Clear Browser Cache in Internet Explorer
- Click the Settings icon on the top right-hand corner.
- Go to Internet Options towards the bottom.
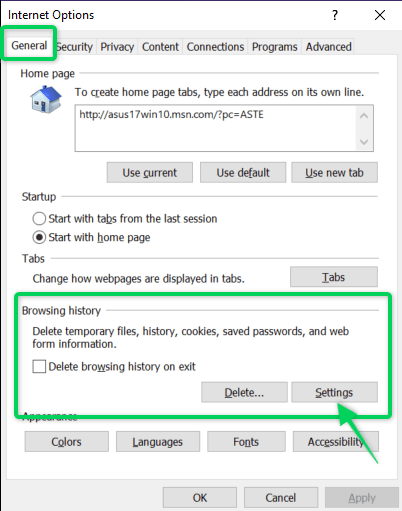
- On the General tab, you will notice Browsing history.
- Click Settings, and it will open a pop-up called Website Data Settings
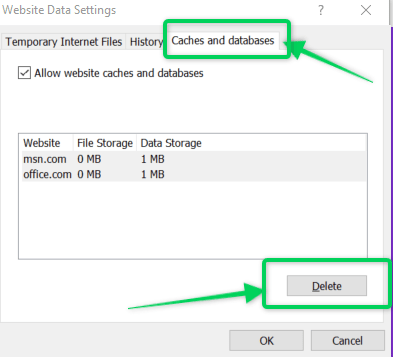
- Go to the Caches and databases tab.
- Choose all the websites listed, and then click Delete to clear the cache.
Internet Explorer Shortcut:
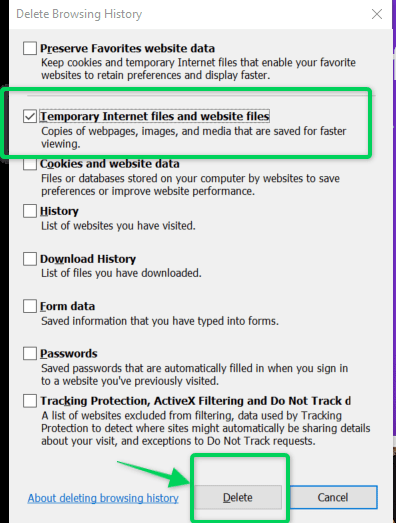
Alternatively, you can also use Ctrl+Shift+Del on Internet Explorer to access Delete Browsing History.
Next, check the second option — Temporary Internet files and website files.
Then click the Delete button to clear browser cache.
How to Clear Browser Cache in Brave
- Click Customize and control brave (the 3-dot menu) in the top right-hand corner. Alternatively, use the shortcut Alt+F to access settings.
- Go to Settings towards the bottom.
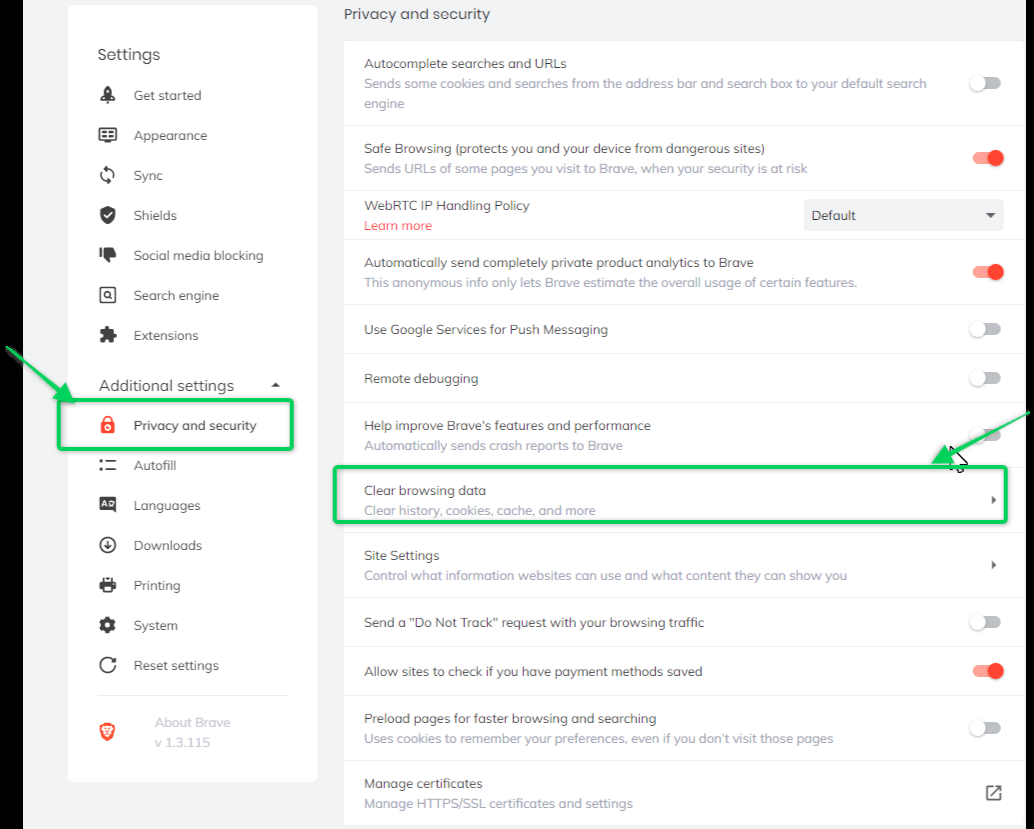
- On the left-hand side, expand Additional Settings.
- Click on Privacy and security.
- Open Clear Browsing Data and a pop-up will open.
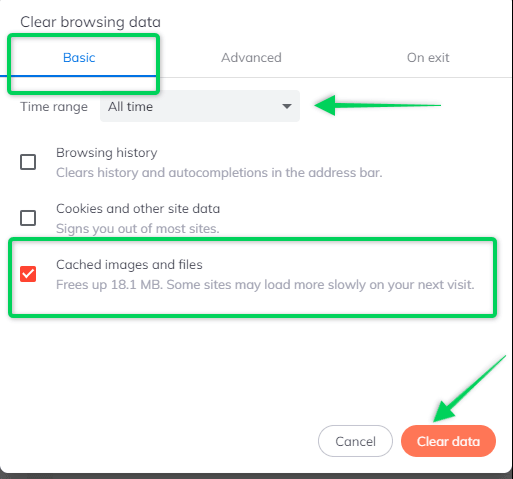
- Under Time range — Choose the All-time option.
- Uncheck Browsing History and Cookies and other site data.
- Ensure that Cached Images and Files are still checked.
- Click Clear data.
Brave Shortcut
Alternatively, you can also use Ctrl+Shift+Del on Chrome to access the Clear Browsing Data settings
How to Clear Browser Cache In Opera
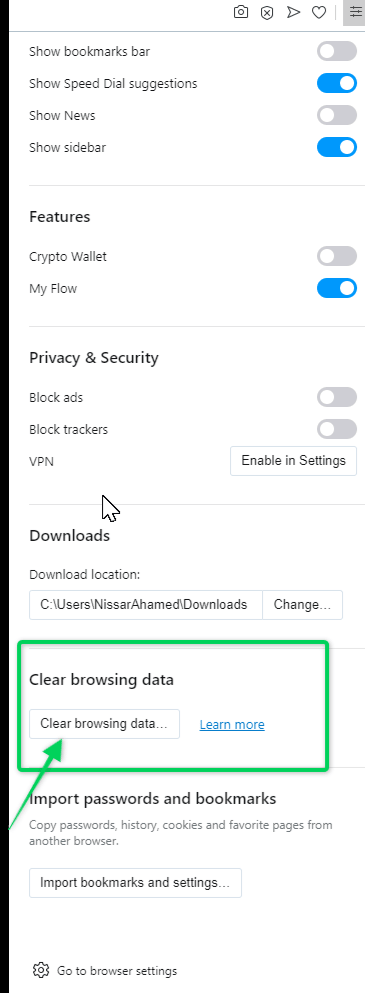
- Click Easy Setup (the 3-line menu) in the top right-hand corner.
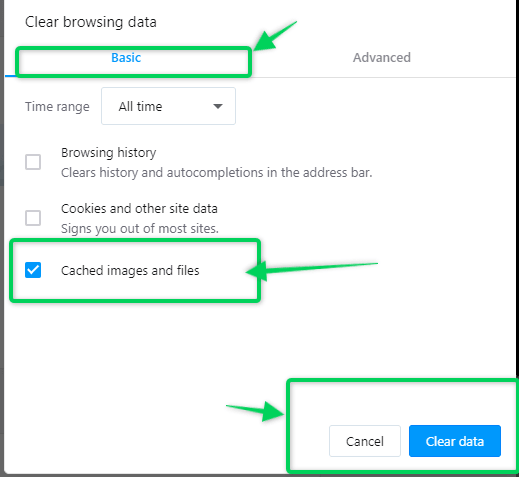
- Scroll down to Clear browsing data towards the bottom, and it will take you directly to the Privacy protection settings, and open a pop-up named Clear browsing data.
- Under Time range — Choose the All-time option.
- Uncheck Browsing History and Cookies and other site data.
- Ensure that Cached Images and Files is still checked.
- Click Clear data.
Opera Shortcut
Alternatively, you can also use Ctrl+Shift+Del on Opera to access the Clear Browsing Data settings
How to Clear Browser Cache in Safari
- Click the Settings icon in the top right-hand corner.
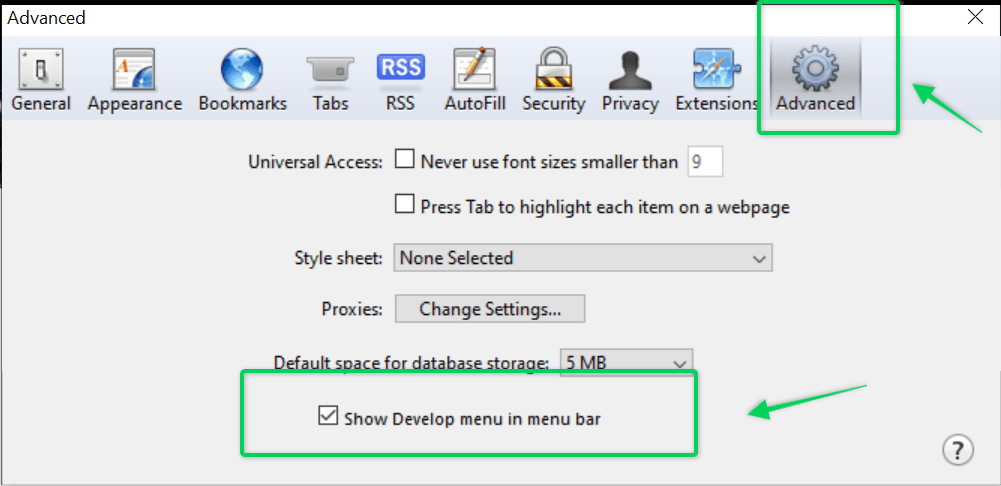
- Go to Preferences towards the bottom, and it will open a pop-up Advanced.
- Click on the Advanced tab on the right-hand side.
- Check the Show Develop menu in the menu bar. Then close the pop-up.
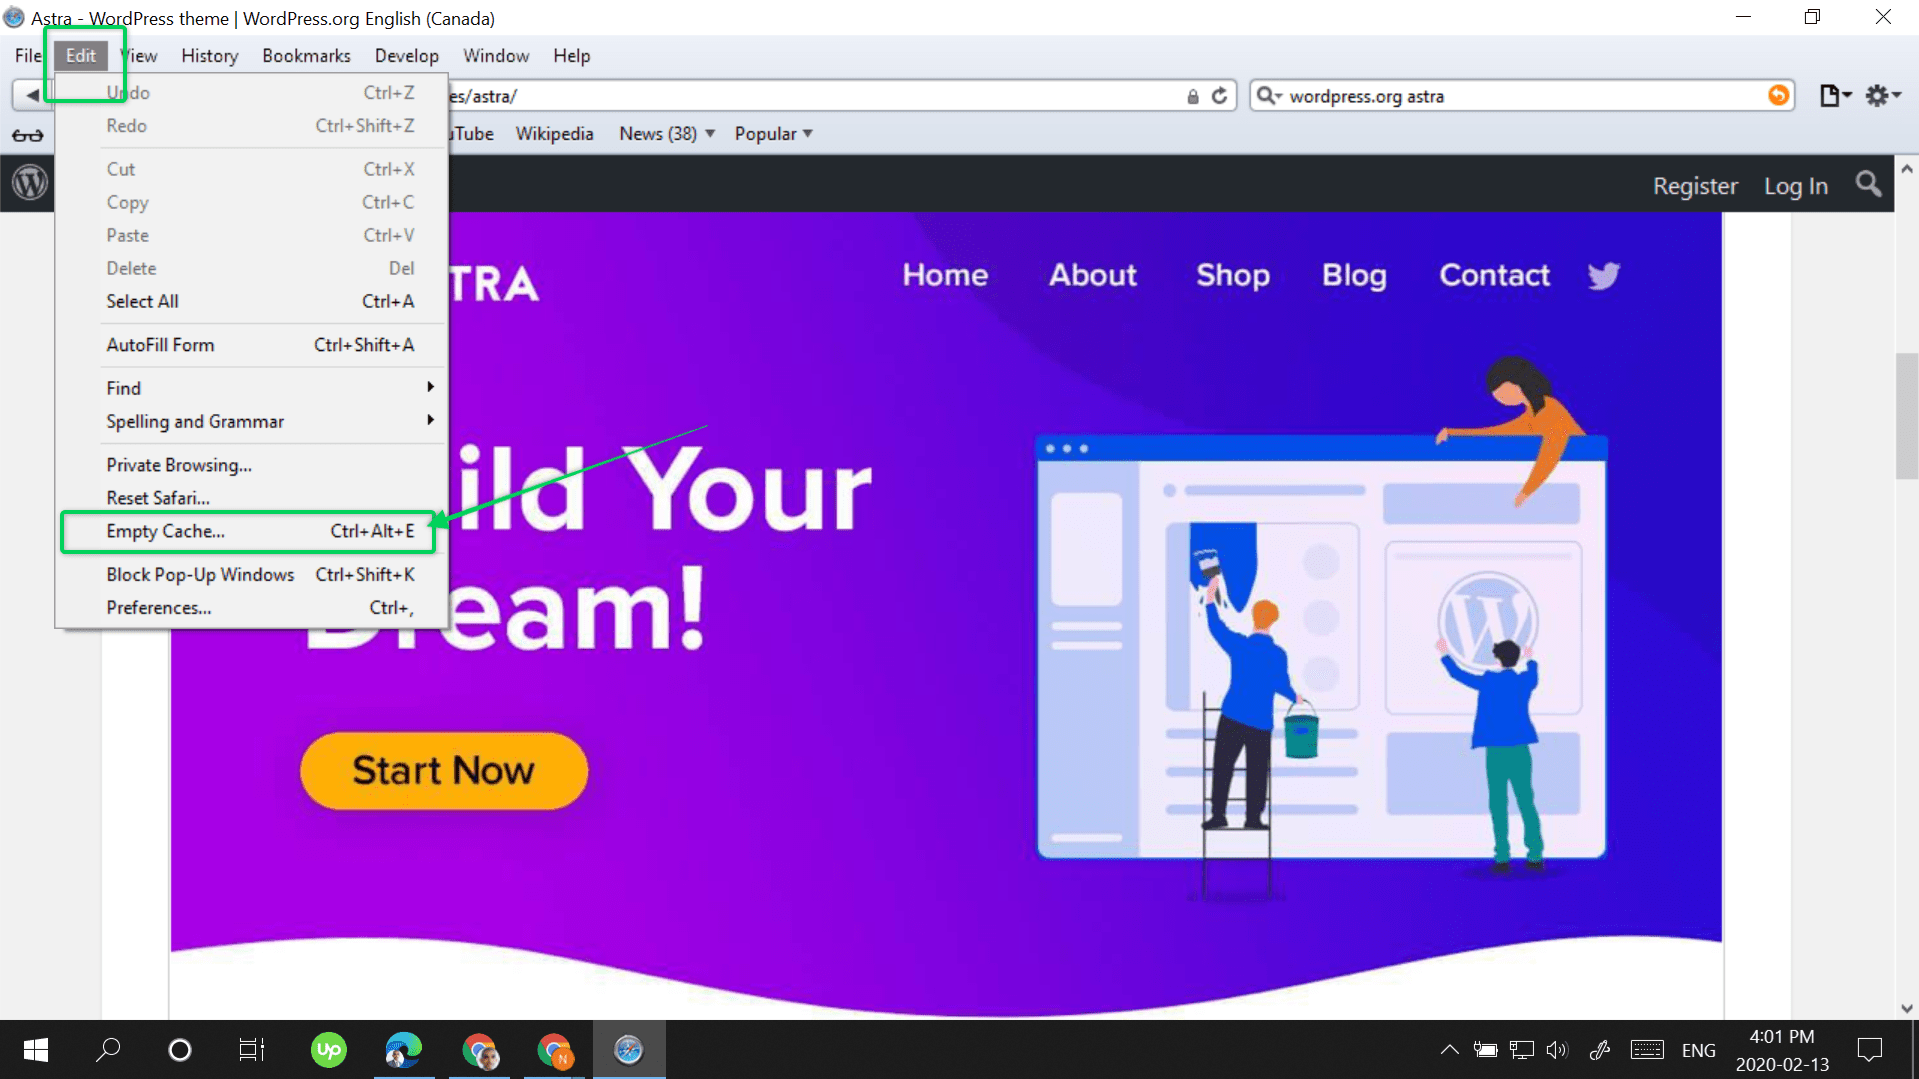
- Open Edit from the top menu, and pick Empty Cache.
- A new pop-up will open asking your permission to empty the cache. Click Empty.
Boosting Site Speed With the Hummingbird WordPress Plugin
So far we have covered how website users (or visitors) can manually clear their browser cache. However, browser caching is just one method that can help speed up a web page.
Website owners and developers can proactively take other measures to ensure that their web pages load faster for all their visitors — get faster web hosting, install a Content Delivery Network (CDN), image optimization, using a lightweight WordPress theme, and so on.
An easy, simple and proven way to ensure optimum pagespeed without sacrificing the user experience is by installing a speed optimization and WordPress caching plugin such as Hummingbird.
Let’s review the many ways that the Hummingbird WordPress plugin can help websites load faster and comply with Google Pagespeed Insights guidelines.
Hummingbird is a speed optimization plugin created and maintained by the team at WPMU DEV, the team behind powerful WordPress plugins such as Smush, SmartCrawl, Defender, Hustle.
The free version of Hummingbird has been installed on over 100,000+ websites and has received over 1311+ 5-star reviews.
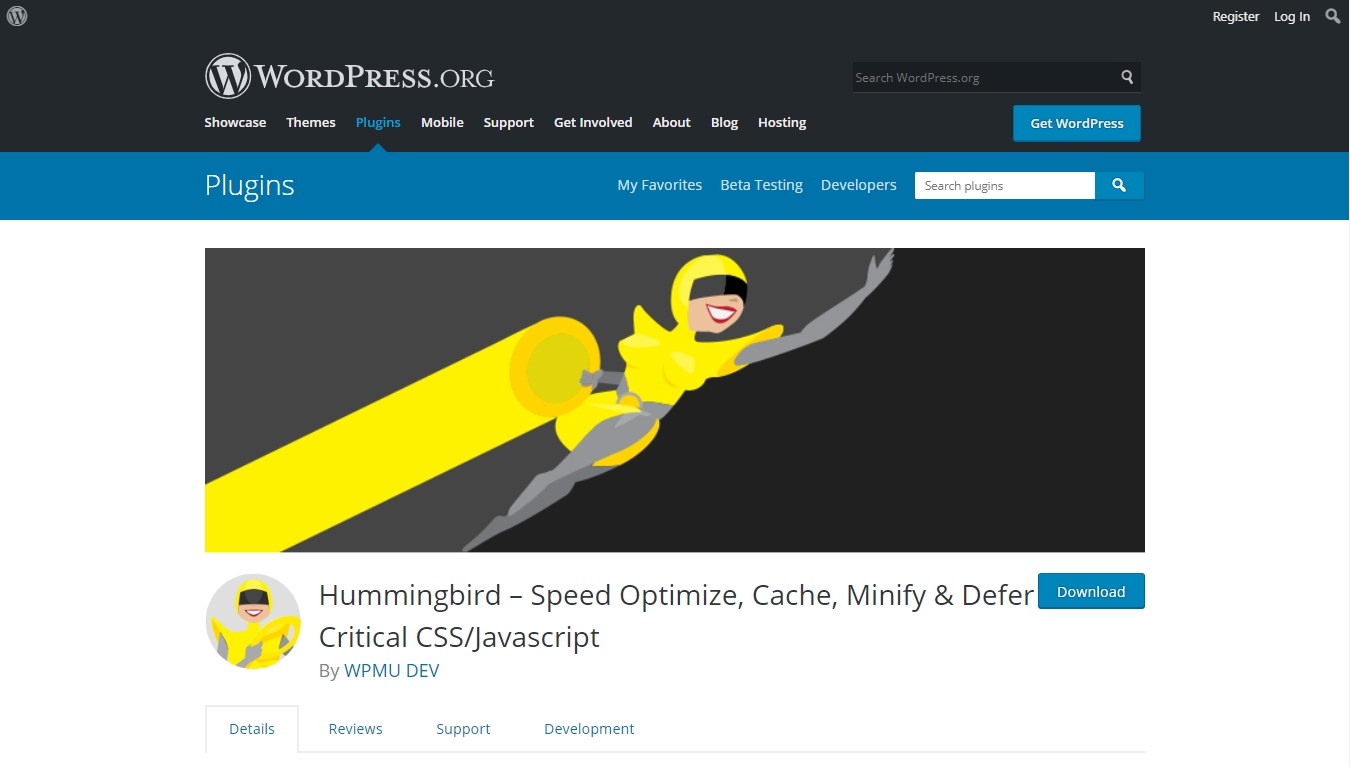
Hummingbird Features:
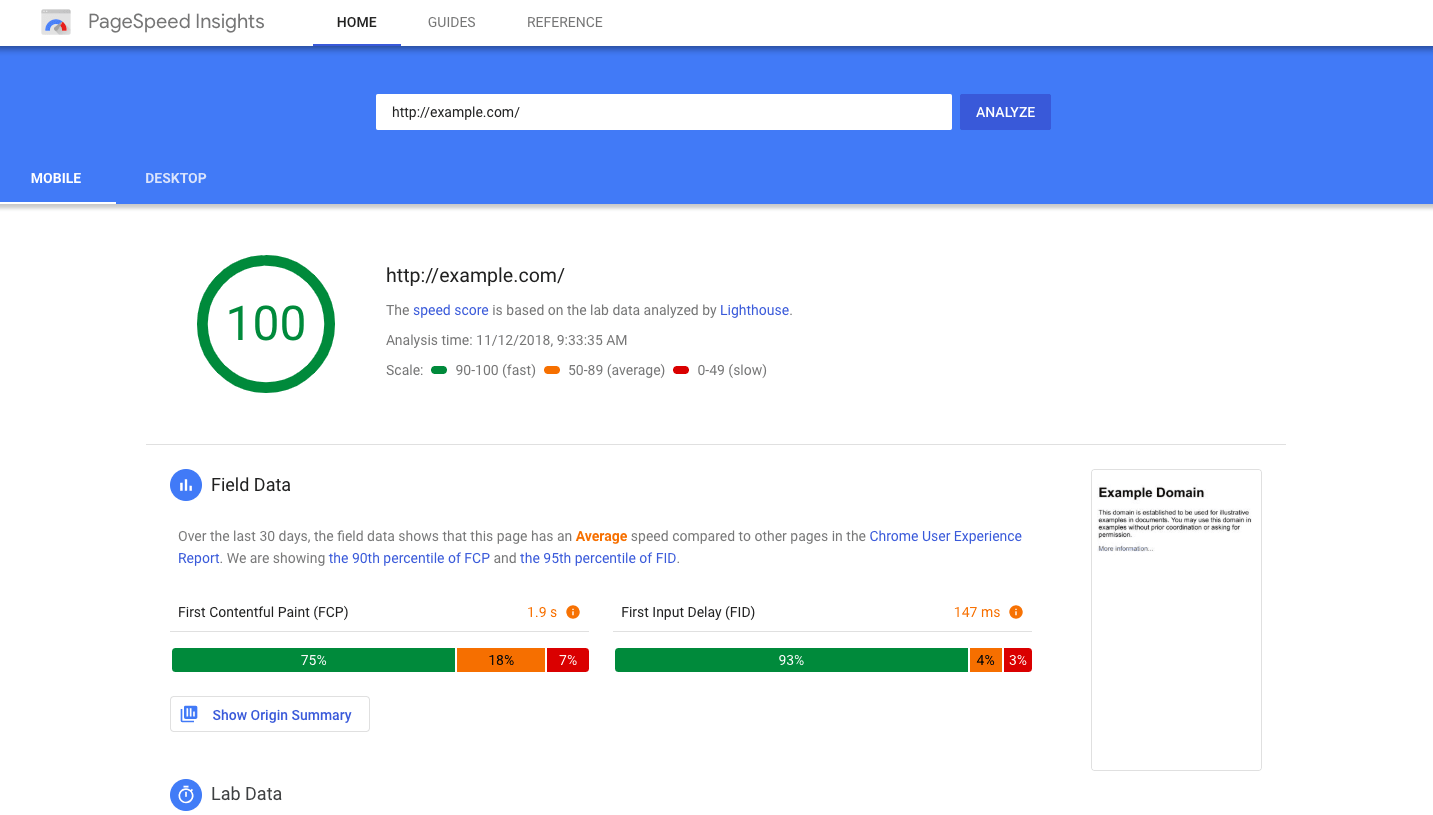
- Google Pagespeed Insights — Provides performance reports and specific fixes to help you achieve a 100/100 score. Users can run the speed test right within the WordPress dashboard using Hummingbird.
- Page Caching — Stores static HTML copies of your posts and pages. These copies are then served to visitors, reducing the load on your servers, and also increasing page load times.
- Browser Caching — Stores temporary data on your visitors’ devices or browsers, and resulting in a much faster load time then next time they visit your website.
- Gravatar Caching — Stores local copies of Gravatars (WordPress avatars) that are used in comments.
- RSS Caching — Control the expiry time of the default WordPress caching of your RSS feeds.
- GZip Compression — A file compression system that reduces page sizes by up to 70% and increases page speed.
- Asset Optimization — Provides you with a list of all your website assets with their current compression status, and option to manually optimize them.
- Database Optimization — Manually or automatically clean up your WordPress database directly from the Hummingbird dashboard.
- Minification — Hummingbird minifies unused CSS and Javascript, and speeds up the page load time.
- Performance Scans — The plugin scans your website and provides 1-click fixes to speed up the site.
Hummingbird Pro — Additional Features:
- Uptime Monitoring — Provides real-time email notifications if there is a problem with your WordPress website.
- Smush Pro Plugin — Award-winning image optimization plugin.
- Global CDN — Leverage WPUM DEV’s CDN network to speed up your page load times for visitors around the world.
- Enhanced File Minification — 2X file compression to help load files faster.
- Whitelabel Automated Reporting — Ideal for agencies that manage multiple clients, the plugin will send you automated performance and uptime reporting.
- Unlimited Websites.
- 24×7 live support.
Hummingbird Pricing:
- Free — Single Website.
- WPMUDEV’s Membership — $49/month (Unlimited websites); Includes all the other plugins from WPMU DEV, and dedicated hosting.
- 30-day free trial available.
- 24x7x365 email and live chat support.
- Includes $30 hosting credit that can be used for 3 websites. Additional hosting credits can be purchased as required.
When Clearing Browser Cache Isn’t Enough?
There are a few instances when a visitor clears their browser cache but still does not see any new changes or updates from that webpage.
This might happen due to a few reasons:
- Web Server configuration issues.
- Google Analytics errors.
- 3rd-party script errors.
Webmasters can be proactive by “leveraging browser caching” — i.e. instructing browsers how their resources should be dealt with, thereby taking the responsibility off the end-user or visitor.
Leverage Browser Caching can be done in a few ways:
- CPanel/Hosting Panel — Most managed WordPress hosting companies (SiteGround, Kinsta, Cloudways, FlyWheel, WP Engine) provide their customers with a dashboard using which they can access and make changes to caching.
- Manually Update the .htaccess file— The .htaccess file is a small text file that controls how your webpages will be displayed.
- Cache-Control — An HTTP header that pre-defines the duration and how a file is to be cached. Each resource on your website can be pre-set with unique caching rules and duration.
- Switch off eTags — Entity Tags (eTags), they refer to new versions of caches files. If Cache-control is already set, then eTags can use be switched off for improved page load times.
- Dedicated Plugin — Leverage Browser Caching plugin will fix the browser caching issues, and it improves the page speed scores on Google PageSpeed Insights.
- Caching Plugins — WordPress caching plugins such as WPRocket, W3 Total Cache or Hummingbird have Leverage Browser Caching features that can be modified using their dashboard.
Wrapping Up
Browser caching is a beneficial process for both the website owner and the visitor.
For visitors, it means using lesser bandwidth and experiencing a faster load time while not sacrificing their user experience.
For website owners, they can ensure that their website loads faster on all browsers and devices, and as a result, reduce bounce rates, improve time-on-page, increase page views, increase conversions, and build reader loyalty.
In this guide, we covered how a visitor can clear their browser cache on all the major browsers (Google Chrome, Microsoft Edge, Internet Explorer, Firefox, Brave, Safari, Opera).
We’ve also covered how website owners can proactively ensure browser caching by using the Hummingbird WordPress plugin. Along with the benefits of Leverage Browser Caching and how to implement it.
What has your experience been with browser caching? Did you notice a considerable difference in your website page load time?
Let us know in the comments below.
Disclosure: This blog may contain affiliate links. If you make a purchase through one of these links, we may receive a small commission. Read disclosure. Rest assured that we only recommend products that we have personally used and believe will add value to our readers. Thanks for your support!


