If you want to create and monetize your own online courses, LearnDash is one of the best tools available.
But, as helpful as the LearnDash interface and documentation is, it can still be a little overwhelming trying to set everything up, right?
It’s not just about making your courses “kind of work” – you want your course site to function perfectly to give your course content the presentation it deserves. And if you’re planning to monetize your courses, you’ll also want to make sure your setup is conversion-friendly so that you don’t miss out on any revenue and convert as many visitors into course-takers as is possible.
To help, we’ve created this detailed LearnDash tutorial where we’ll take you through everything you need to create successful courses with LearnDash. This isn’t just about setting up LearnDash itself either, we’ll also share some must-have complementary plugins that you can use to create a better course experience and drive more revenue.
Let’s dig in, starting at the very beginning…
Side note – if you want a simpler version of this tutorial, check out our guide on how to set up a LearnDash course using a pre-built Astra starter site.
1. Install WordPress on Good Hosting
Before you can get started with LearnDash, you need to set up your basic WordPress site.
To do this, you’ll need to:
- Purchase web hosting
- Purchase a domain name
- Install the WordPress software
To knock out all three, we recommend SiteGround, a popular and affordable managed WordPress host.
SiteGround provides the best security, top performance, and amazing customer support. To provide the fastest speed for your website they have optimized their servers specially for WordPress. Their WP caching plugin further speeds up the website’s performance further.
Easy WordPress install, and auto-updates, an in-house built WordPress Starter tool makes it easy to get started with building a website.
Purchasing a SiteGround plan through our link here can offer up to 73% discount on your first bill.
SiteGround provides 3 different plans. All plans come with free CDN, pre-installed SSL and daily backups of your website.
StartUp plan ($14.99) is suitable for beginners that host 1 website and can handle up to 10,000 visits per month.
In case you want to host more than one website and also want a great site performance, then we recommend choosing the GrowBig plan ($24.99). This plan comes with the SuperCacher plugin. Which is built in-house by SiteGround’s and provides the best website speed.
GoGeek plan ($39.99) comes with the highest tire of server resources. So in case you are building a website that requires more resources, such as an e-commerce website you can choose this plan. This plan is covered with priority advanced support, which means your queries will be acknowledged by SiteGround’s most experienced agents on preference.
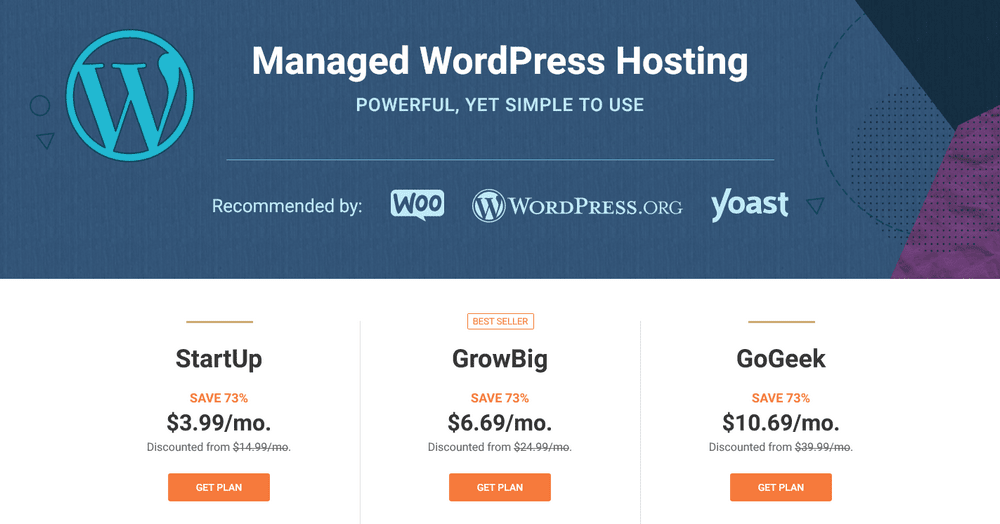
Once you finish your purchase, SiteGround will give you a welcome wizard where you can have SiteGround pre-install WordPress for you.
In case you need detailed help in registering and purchasing a domain name, choosing host, etc. you can refer to the article – How to Make a WordPress Website in Less Than 60 Minutes.
2. Install the LearnDash Plugin
Once you have SiteGround install WordPress for you, you can access your WordPress dashboard at yoursite.com/wp-admin
Now, you’re ready to install the LearnDash plugin.
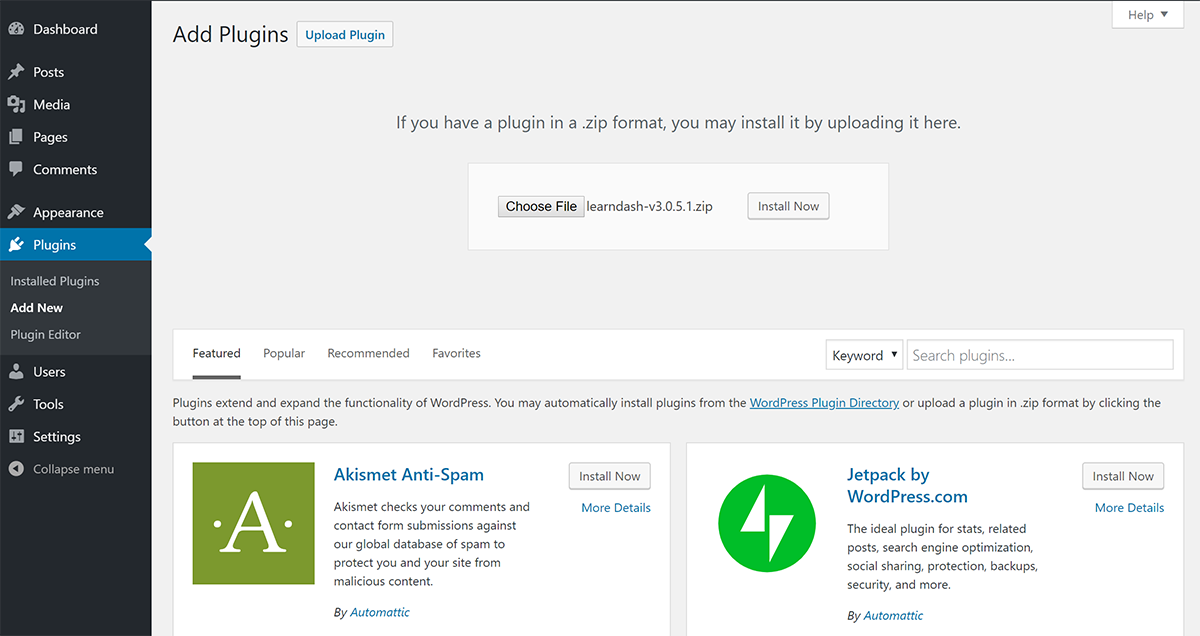
To do that, go to Plugins → Add New and upload the zip file from your LearnDash account:
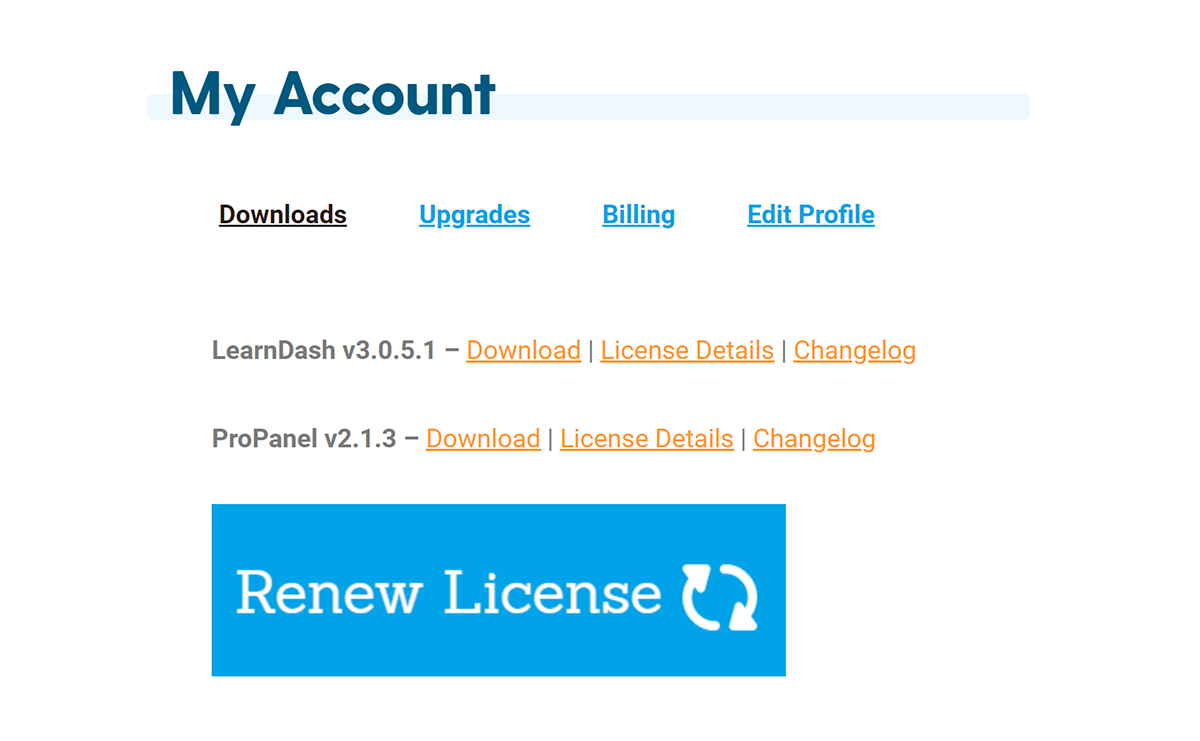
If you haven’t purchased LearnDash yet, head here and do that. You can then download the file from your My Account page at the LearnDash website:
3. Install a LearnDash-Compatible Theme
Before we dig into the actual LearnDash settings, you’ll want to install a LearnDash-compatible WordPress theme so that all the course content you create looks great from day one.
Your theme will control how your course content looks, as well as the rest of your site – like your navigation menu and footer.
The Astra theme offers a customizable foundation with a dedicated integration for LearnDash. Not only will you be able to fully customize your site’s design itself, but you’ll also be able to quickly switch up your LearnDash course layouts, improve your sales pages, enable distraction-free learning, and more.
The core Astra theme and basic LearnDash integration is free, but you can also unlock additional options and a deeper LearnDash integration by purchasing Astra Pro for $49 €45 .
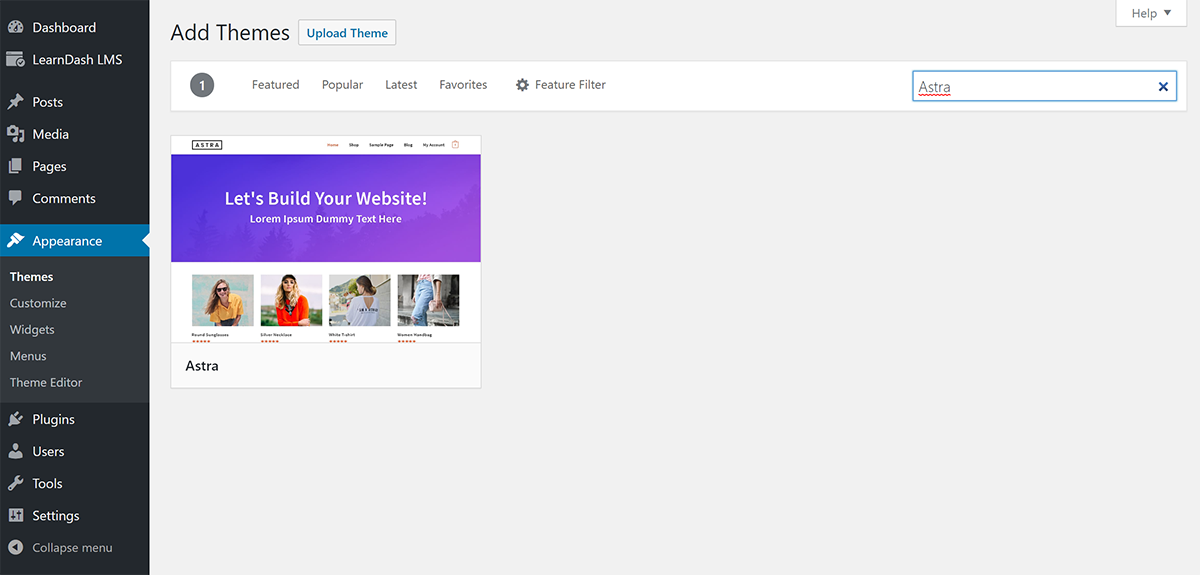
To get started, go to Appearance → Themes → Add New in your WordPress dashboard and search for “Astra”:
4. Configure Basic Astra Theme Settings
There are two ways that you can control how your site looks with Astra.
First, if you just want a quick way to get up and running, Astra offers a large importable demo site library that lets you import pre-built site designs. There’s even a dedicated LearnDash Academy starter site that you can import for free.
To import these sites, you can install the Starter Templates plugin and then go to Appearance → Starter Templates:
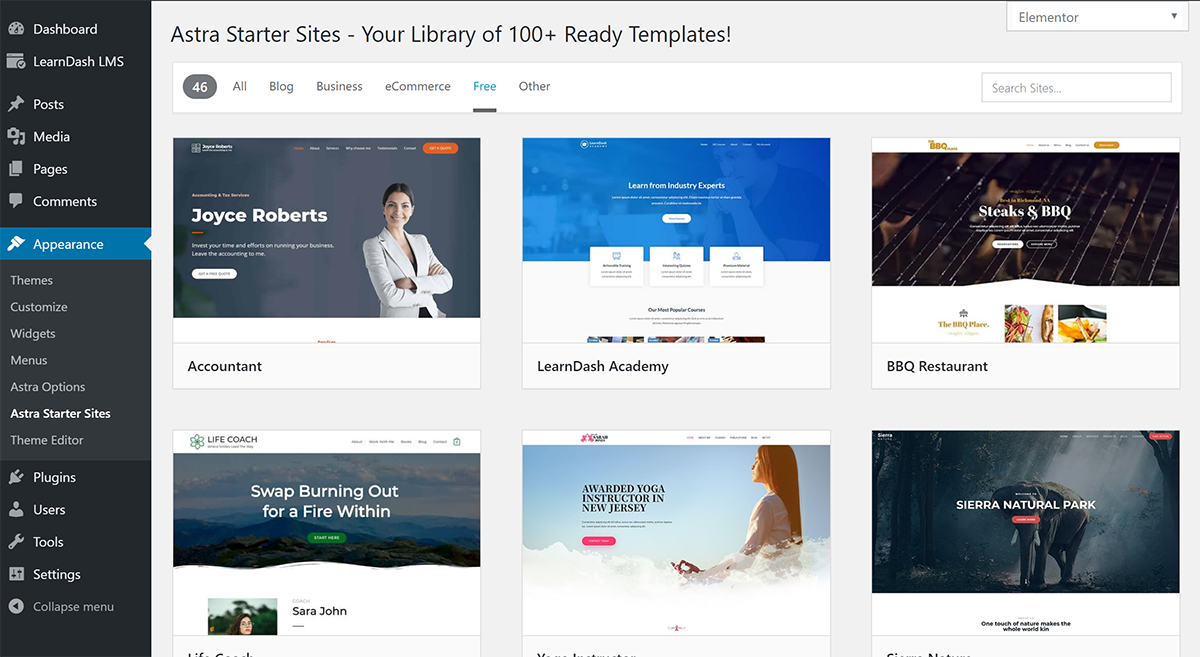
Or, you can also design your site from scratch.
Whether you start from the basic Astra theme or import a starter site, you’ll be able to control all your theme’s settings from the real-time WordPress Customizer.
To get started, go to Appearance → Customize to launch the WordPress Customizer.
Here, you’ll be able to make changes in the sidebar and instantly see those changes on the live preview of your site.
Feel free to check out all the settings, but you’ll especially want to pay attention to the:
- Colors
- Typography
- Header
- Footer
5. Create Your First Course in LearnDash
Once you’ve set up your site’s basic looks, you’re ready to create your first course in LearnDash.
To do that, go to LearnDash LMS → Courses. Then, click the Add your first Course button to create your course:
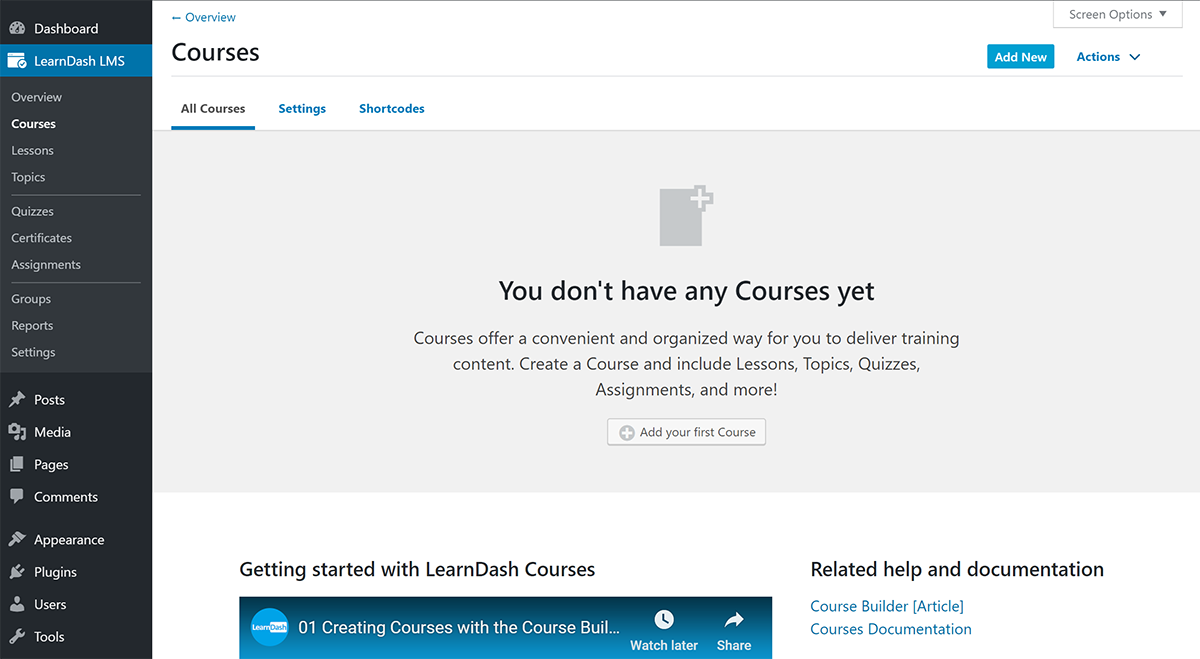
Give your course a name and description.
Then, go to the Builder tab to set up your course’s content, including sections, lessons, and quizzes:
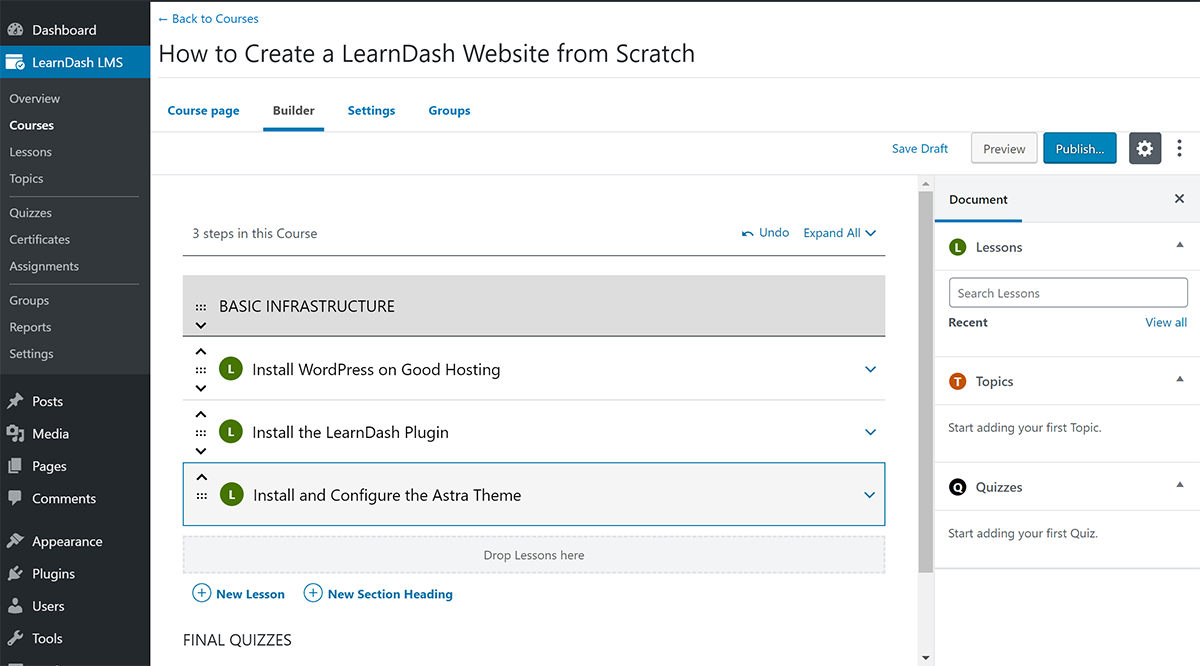
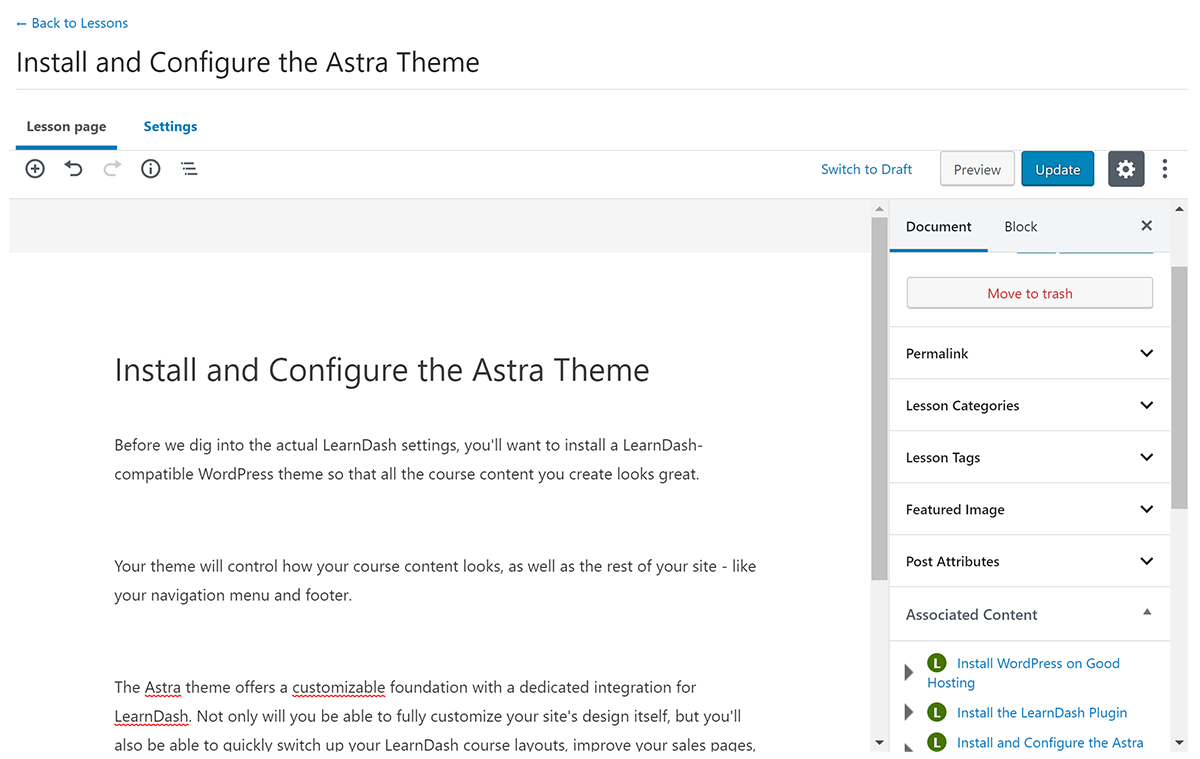
If you hover over an individual lesson, you’ll see an Edit link, which will open a new page where you can add lesson content and configure other settings:
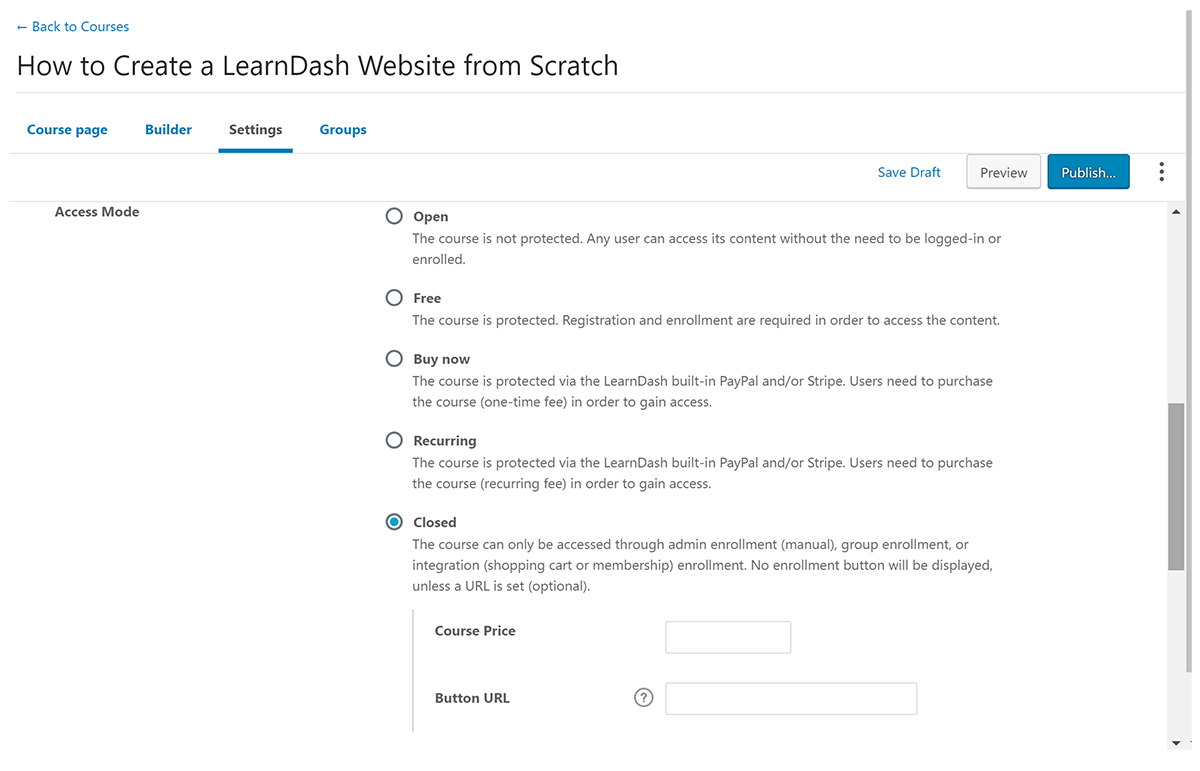
In the main course settings, you can also go to the Settings tab to configure a variety of other settings. Specifically, you’ll want to make its Access Mode equal to Closed for now. Later in the tutorial, you’ll learn how to set up your payment gateway so that you can start charging for your course:
6. Install Elementor and Design Core Pages
Once you’ve finished building your course, you’ll want to step away from LearnDash for a second to design some other important pages on your site, like your home, about, and contact pages.
To do this, you can use the free Elementor plugin, which is a visual, drag-and-drop page builder plugin.
You can install it by going to Plugins → Add New and searching for “Elementor”. Then, you can launch the Elementor interface by creating a regular WordPress page and clicking Edit with Elementor:
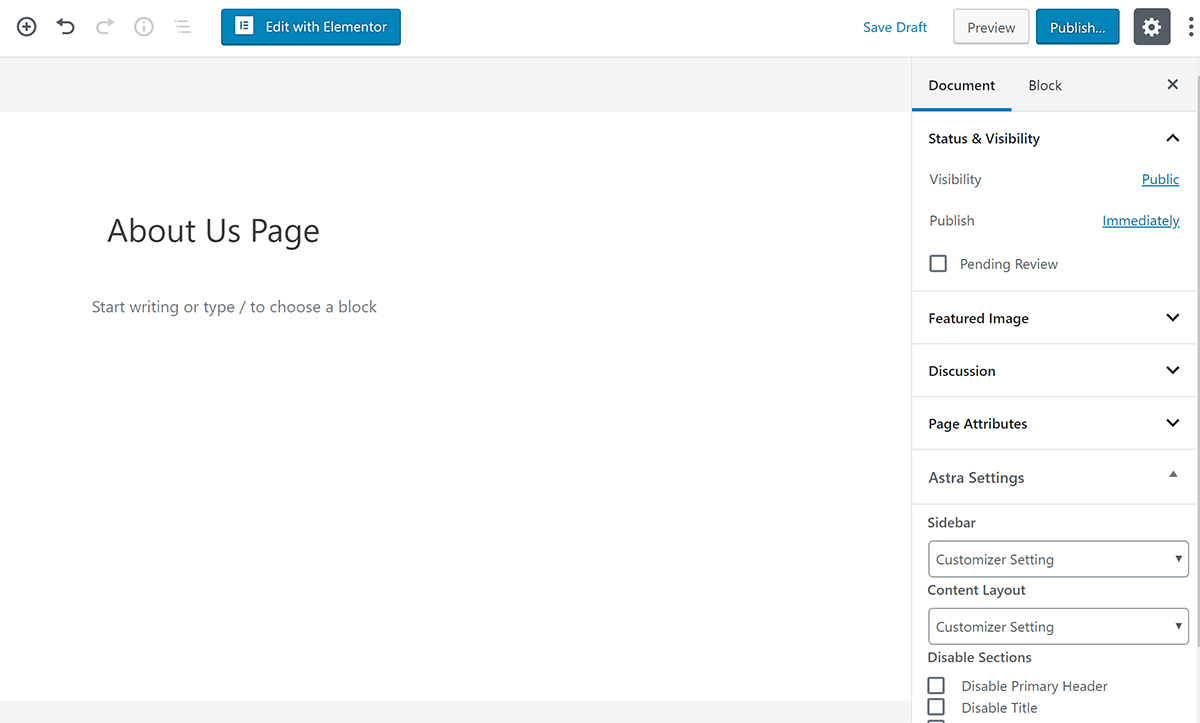
The Elementor interface is pretty intuitive. But if you need a helping hand, you can check out this tutorial video:
Once you get the hang of things, go through and design all your core generic pages. Again, at a minimum, that should be:
- Home
- About
- Contact
- Etc.
Don’t worry about your checkout and course pages – you’ll use some other plugins for those.
7. Create a Course Page with Course Grid Plugin (If Offering Multiple Courses)
If you’re only selling a single course, you probably don’t need a dedicated course page. Later on, we’re going to show you how to create a dedicated checkout page for a course that’s optimized for conversions.
But if you’re going to offer multiple LearnDash courses, you’ll probably want a way to display all your offerings so that visitors know their options.
To set this up, you can use the free LearnDash Course Grid add-on.
You can install it by going to LearnDash LMS → Add-ons in your WordPress dashboard:
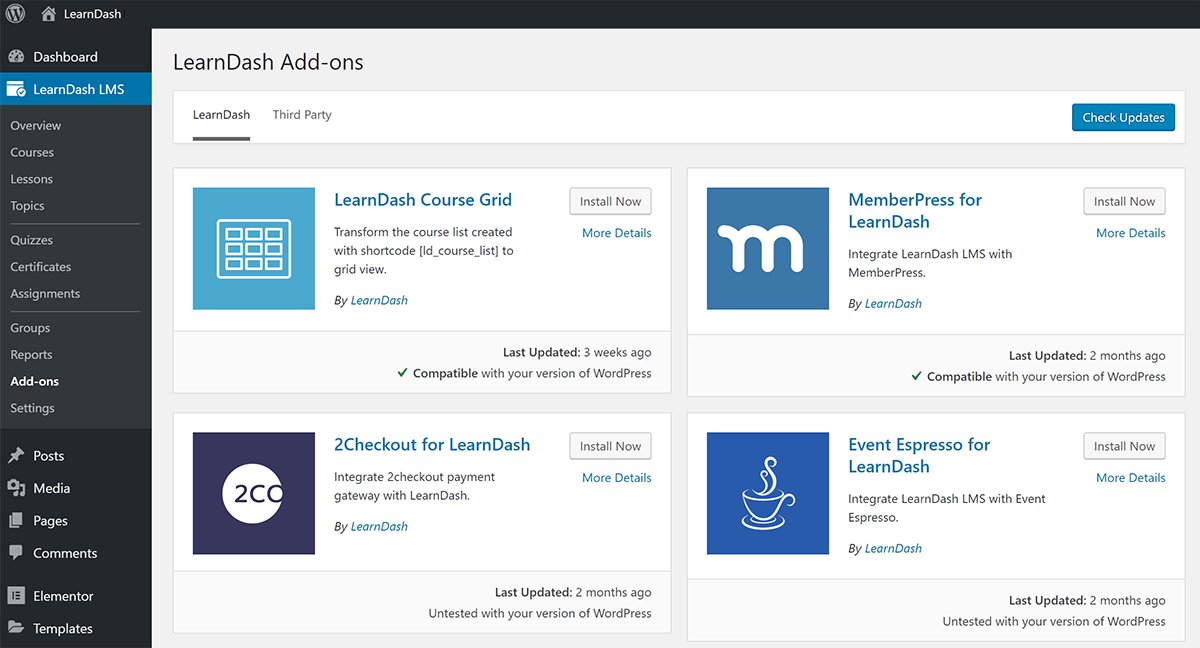
Then, you’ll be able to display all your courses using a shortcode or a Gutenberg block.
8. Create Your Login and Registration Page
If you have a front-facing course, you probably don’t want to use the default WordPress login and registration pages.
While those are fine for site administrators, they’re not the most user-friendly way to log in for your course-takers.
To create a custom login/registration page for your LearnDash course, you have two options:
- Use LearnDash’s login/registration functionality.
- Use a free plugin like Theme My Login.
LearnDash will automatically add its login/registration features to your course pages, and you can also use the [learndash_login] shortcode to add a login page in other spots, including your Elementor designs.
9. Create Custom Navigation Menus for Guests and Students
By default, your WordPress site has one navigation menu for all visitors. Now, that’s fine for most WordPress sites, but it’s not a great option for a LearnDash course because you’ll probably want to create a custom menu for your students that helps them access important parts of their courses.
To set up this functionality, you can use the free Nav Menu Roles plugin.
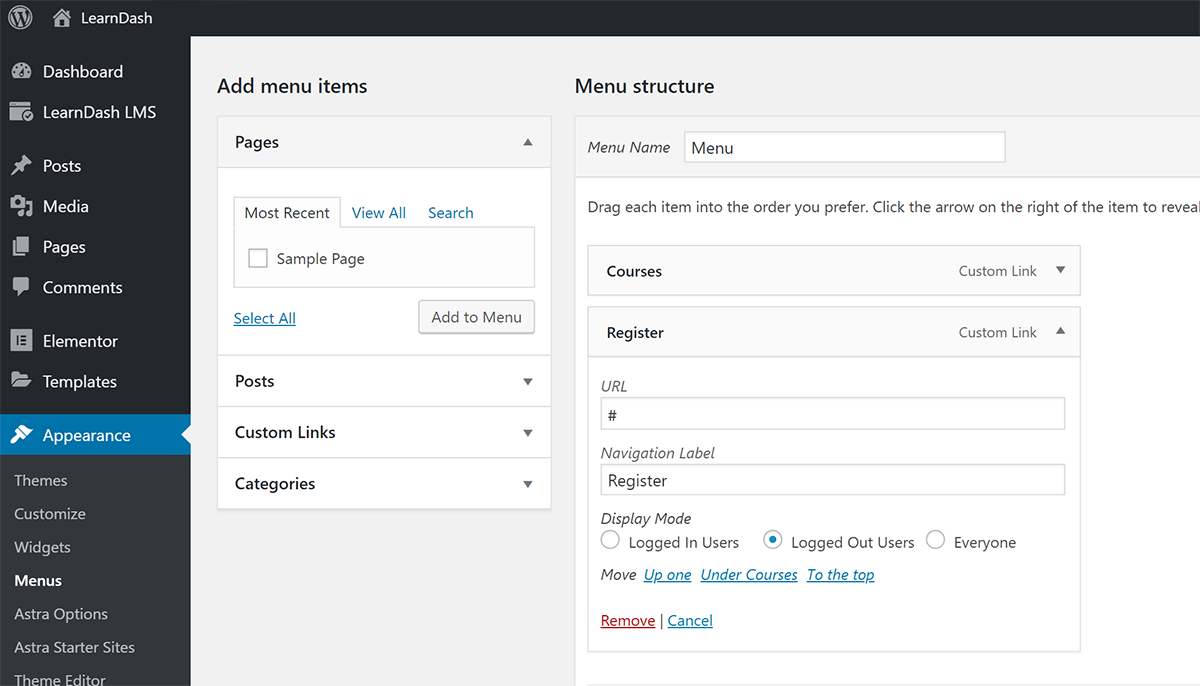
Once you install and activate the plugin, you can go to the regular Appearance → Menus area.
Then, when you click on specific menu links, you’ll be able to customize who can see which navigation items by using the new Display Mode options.
To target anonymous visitors, select Logged Out Users, and select Logged In Users to target students:
10. Set Up WooCommerce to Accept Payments and Add Products
While LearnDash does offer built-in support for payments, we recommend using LearnDash’s WooCommerce integration instead because it will give you a lot more flexibility.
Specifically, if you use WooCommerce, you’ll be able to create more conversion-optimized checkout pages, as well as full sales funnels, complete with order bumps and upsells.
This gives you a chance to greatly boost your revenue, which is worth a little bit more complexity. Later in this LearnDash tutorial, we’ll show you how to actually create the checkout pages/funnels for your courses.
Install and Configure WooCommerce
To get started, install the free WooCommerce plugin from WordPress.org. Then, go through the WooCommerce setup wizard, which should automatically launch as soon as you activate the plugin:
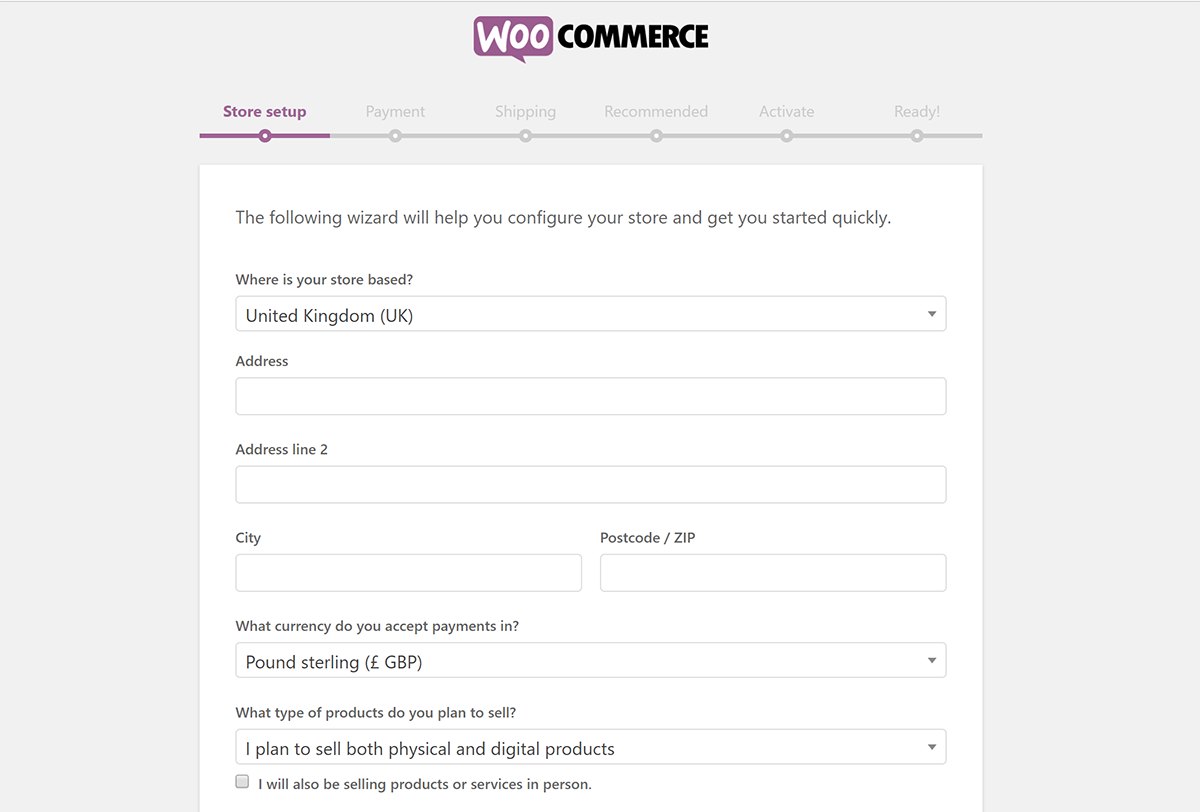
This will help you set up key details, as well as payment gateways.
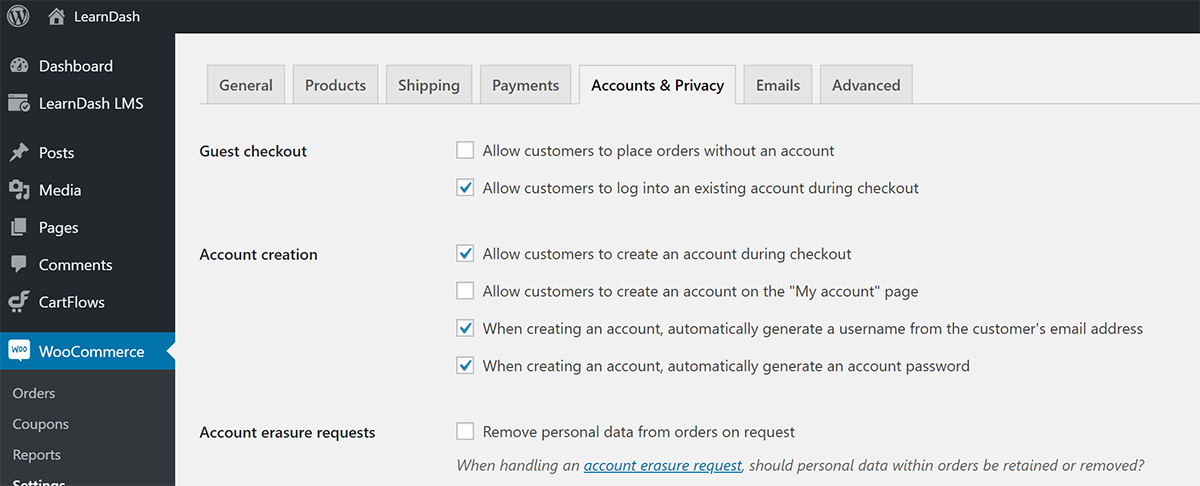
In addition to the setup wizard, you’ll also want to go to WooCommerce → Settings → Accounts & Privacy:
- Disable the option to let people place an order without an account.
- Enable the option to log in during checkout.
- Enable the Account creation during checkout option.
Integrate with LearnDash
Once you set up WooCommerce, you’ll want to install the free LearnDash WooCommerce integration add-on to connect the two. Again, you can do this by going to LearnDash LMS → Add-ons in your WordPress dashboard.
Create Products to Sell Courses
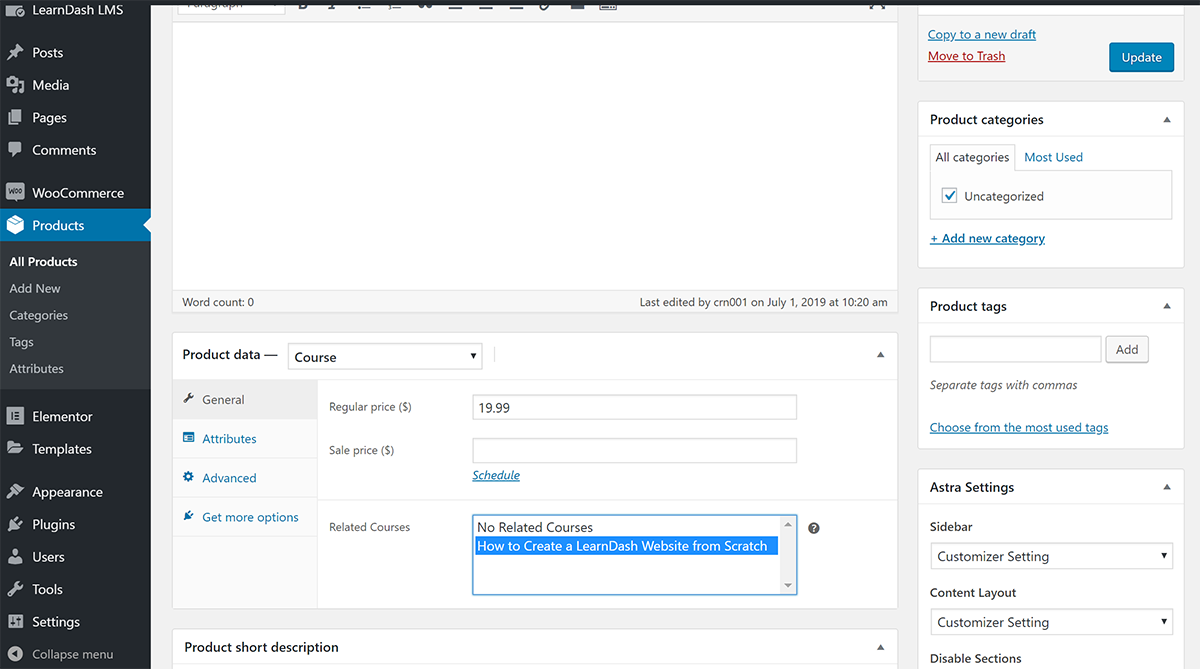
Once you’ve activated the LearnDash WooCommerce Integration, you can create a WooCommerce “product” to sell your course.
To do that, go to Products → Add New and then use the Product data box to tell WooCommerce that you want to sell a Course. Then, use the Related Courses picker to select which course(s) to sell – you can even bundle multiple courses together if you’d like:
Make sure to repeat the process for all the courses that you want to sell.
Integrate LearnDash Profile with WooCommerce
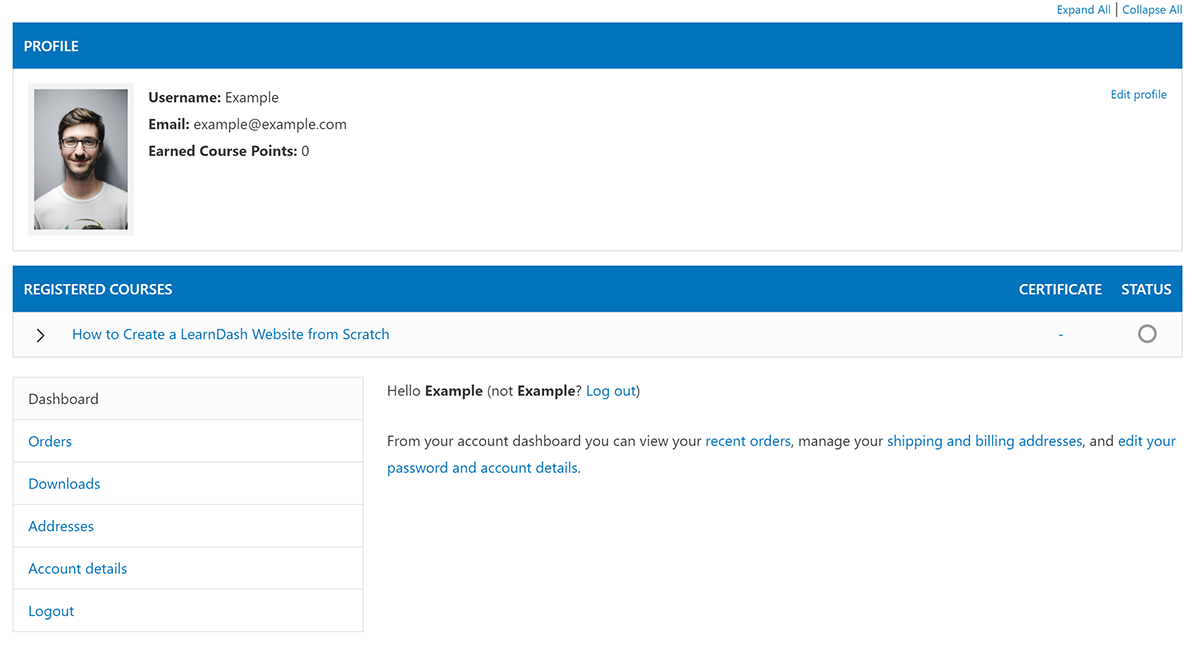
To create a single page that displays both a user’s LearnDash profile, as well as their WooCommerce purchase history, you can create a single page that combines the [ld_profile] shortcode with the [woocommerce_my_account] shortcode, as detailed in this post:
11. Create a Checkout Page or Funnel with CartFlows
The reason that we recommend using WooCommerce to sell your courses is that it gives you the option to create more conversion-friendly checkout pages and funnels.
To actually create your checkout pages, you can use the CartFlows plugin, which comes in both a free and premium version.
CartFlows lets you create a conversion-optimized checkout funnel, along with the option to add as many upsells and order bumps as you’d like (these are techniques for boosting your revenue).
For example, when someone is purchasing a course, you could offer an order bump that offers a special deal on a related eBook. Or, you could upsell them to a higher course level.
To get started, install and activate the CartFlows plugin – you can start with the free version from WordPress.org.
Then, go to the new CartFlows area in your WordPress dashboard and run the setup wizard (you should see a prompt).
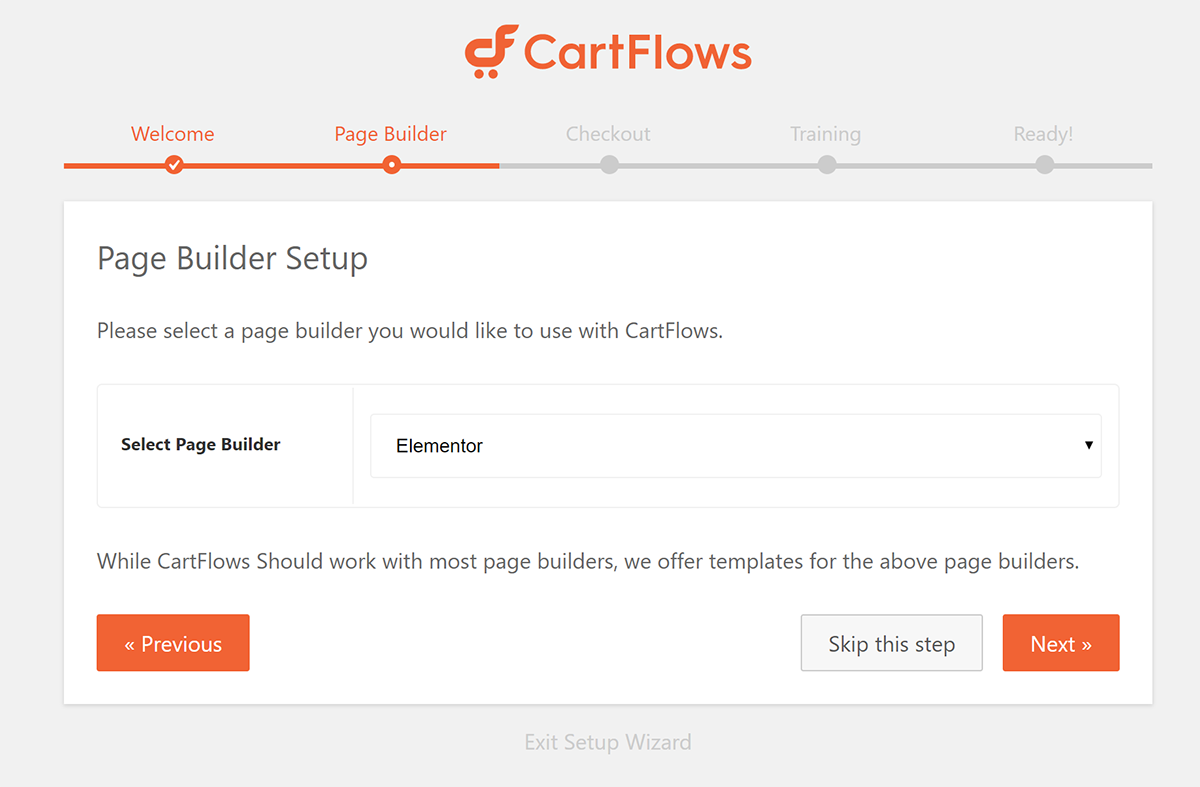
During the setup wizard, select your page builder – Elementor – as well as some other basics:
Then, go to CartFlows → Add New to create your first “flow” (which is another name for a checkout page/funnel).
Here, you can first choose from a few templates or start from scratch:
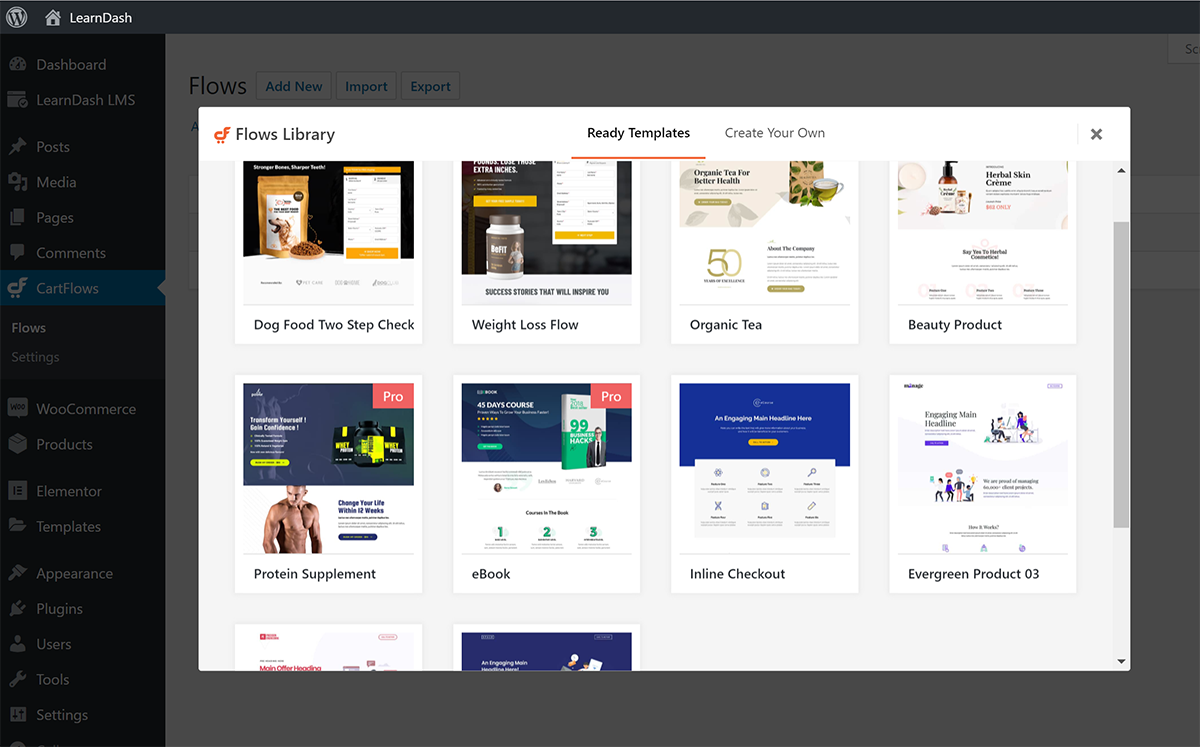
From there, you can use Elementor to edit the design of your content, and you can use the plugin’s settings to control the funnel options and steps.
For a more detailed look, check out this complete CartFlows tutorial:
Once you publish your Flow, you’ll get a link to your checkout page that you can link to from anywhere on your site.
You can also create multiple checkout pages customized for each course that you sell.
12. Install Must-Have WordPress Plugins for Key Functionality
At this point, you’ve taken care of all the LearnDash-specific functionality.
But before you call it a day, you’ll want to make sure you’ve installed some of the basic, must-have plugins that all WordPress sites need – including LearnDash sites.
Consider:
- HubSpot – adds key marketing functionality like forms, live chat, email marketing, analytics, and more to your site.
- UpdraftPlus – automatically backs up your site, to keep your course and student data safe and secure.
- Wordfence – stops malicious actors in their tracks and keeps your site secure from a range of different attacks.
- Yoast SEO – helps your site and courses rank in search engines like Google.
Improve and Iterate
And that wraps up our LearnDash tutorial on how to create your very own course from scratch.
However, your work shouldn’t end once you launch your course(s)…
Instead, you should keep tweaking and improving your website as you get more visitors.
Consider testing different copy on your CartFlows checkout pages…
See if you can use an upsell or order bump to grow your revenue…
There are all kinds of ways that you can experiment to create a more successful course website – do the work and make it awesome!
Disclosure: This blog may contain affiliate links. If you make a purchase through one of these links, we may receive a small commission. Read disclosure. Rest assured that we only recommend products that we have personally used and believe will add value to our readers. Thanks for your support!





Great tutorial! Is there a way to setup the default course content (i.e. lessons) to be displayed as a grid instead of a boring list /table with no thumbnails? I saw that you can use a shortcode to display a list of the lessons in a course but that only works on a custom page. What if you want this to be the default so when you click on a course the lessons are by default displayed as a grid with thumbnails?
Thanks Sujay, this was so helpfull!
You’re welcome Diego!
We are glad you found it useful. 🙂
Thanks Sujay, this was so helpfull!
Greatful ..you are a blessing
I cloned a course and needed to add some videos to it. How can I remove some of the videos that I no longer need from the original course?
Thank you!
Alia
What are your thoughts on using Spectra as a website builder with LearnDash instead of Elementor?