Are you looking for an easy way to automate bookings and appointments?
Create a booking website with WordPress!
It’s simple, cost-effective and scalable.
Whether you manage a salon, clinic or consultancy, this is the ultimate way to maximize your bookings.
In this tutorial, we’ll walk you through each step and make it easy to create a booking website in no time.
We’ll discuss:
- Essential features of booking websites
- The ingredients you need to create a compelling booking site
- The steps to build a booking website the right way
Let’s begin our journey!
Essential Features of a Booking Website
We think a great booking website needs:
| Customer-facing Features |
| • A visually appealing and responsive booking system • Sign in / Sign up option • Easy booking process • Multiple payment options • Customer dashboard for managing appointments • Easy to choose your preferred service or favorite staff member • Ability to chat with agents/service provider • Video meeting facility • Calendar to manage appointments |
| Owner-facing Features |
| • Comprehensive activity monitoring dashboard • Dedicated pages to view customers, appointments and payments • In-house addons for advanced features • Multiple service, agent and location management • Complete control over bookings • Integration with popular calendars and video meeting platforms • Coupon management • Built-in payment gateways • Customization according to business needs |
If you’re curious to see an example of the booking website we’ll be building, check out this video for a closer look.
3 Best Tools to Create Your Booking Site
To build a solid booking website, you need tools that are sturdy, flexible, and packed with features.
For instance, if you rely on Google Calendar for appointments, you’ll want a booking system that seamlessly integrates with it.
There are a number of good WordPress booking plugins out there but we’ll pick the cream of the crop.
Here’s all you need to create a reliable booking system:
- Astra theme
- Spectra page builder
- LatePoint booking plugin
Let’s quickly discuss a few things about these awesome tools.
LatePoint: This awesome booking plugin is used by more than 20,000 businesses.
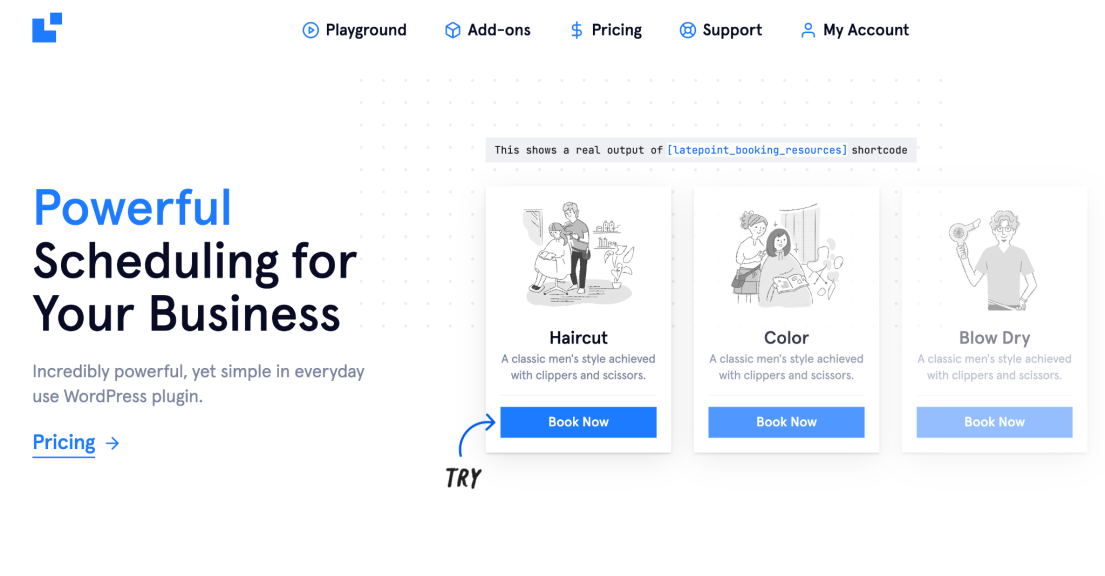
We love it because it’s simple to use, packed with modern features, integrates smoothly, and has clean code.
With this plugin, handling everything from choosing a service to making a payment and getting appointment confirmations is super easy.
Customers get their own dashboard where they can manage bookings and chat with your team whenever they need to.
The plugin is fully supported too. You can look forward to continuous developments and improvements and seamless integration with popular products.
Want to know more? Check out our full LatePoint review.
Get LatePoint
The Astra theme: Astra is a fantastic multipurpose WordPress theme perfect for any website.

Astra is light, responsive, and easy to customize. It gives you full control over how you want to design your website.
One of the things that we like about this WordPress theme is its vast collection of starter templates. This is an easy way for beginners to build websites quickly and easily.
Just pick the template that suits your needs and Astra will take care of the rest.
What sets Astra apart is its compatibility with popular plugins and services. You can literally run your website at any scale you want!
While the free version is fantastic, we recommend going pro for the ultimate experience.
Get Astra
Spectra website builder: If you’re looking for a lightning-fast website builder that provides total design freedom, Spectra is the way to go.

What’s cool about Spectra is that it’s built to integrate into the WordPress native block system.
Spectra is known for its readymade templates and blocks that makes it easy to create stunning pages.
You can design pro level homepages with Spectra without touching a line of code.
Spectra is also available in both free and premium versions.
Want to know what more Spectra Pro can do for you? Here’s a review worth reading.
Get Spectra
Let’s use these tools to create an amazing booking website.
Create a Booking Website in 3 Steps
In this tutorial, we’ll walk you through setting up a website for a hair salon. You can use the same steps to build a site for any kind of business.
We’ll use Astra, LatePoint, Spectra and a new AI website builder called ZipWP.
Here are the steps:
- Build your website with ZipWP (in just 60 seconds!)
- Publish your website
- Set up LatePoint to automate appointments
Let’s begin!
1. Build Your Website With ZipWP

The ZipWP website builder is an awesome tool that helps you create a website using the power of AI.
You can design, tweak, and test your website however you want before launching it.
All it takes is a quick sign-up and tell ZipWP a few details about your business.
If you want to see every step of building your website and personalize it to match your brand, watch this video.
Did you notice how simple it was to create your website?
2. Publish Your Booking Website
When you log in to your website on ZipWP for the first time, you’ll see a notification about your site’s temporary status.
Just follow the instructions, and the system will guide you to your booking site.
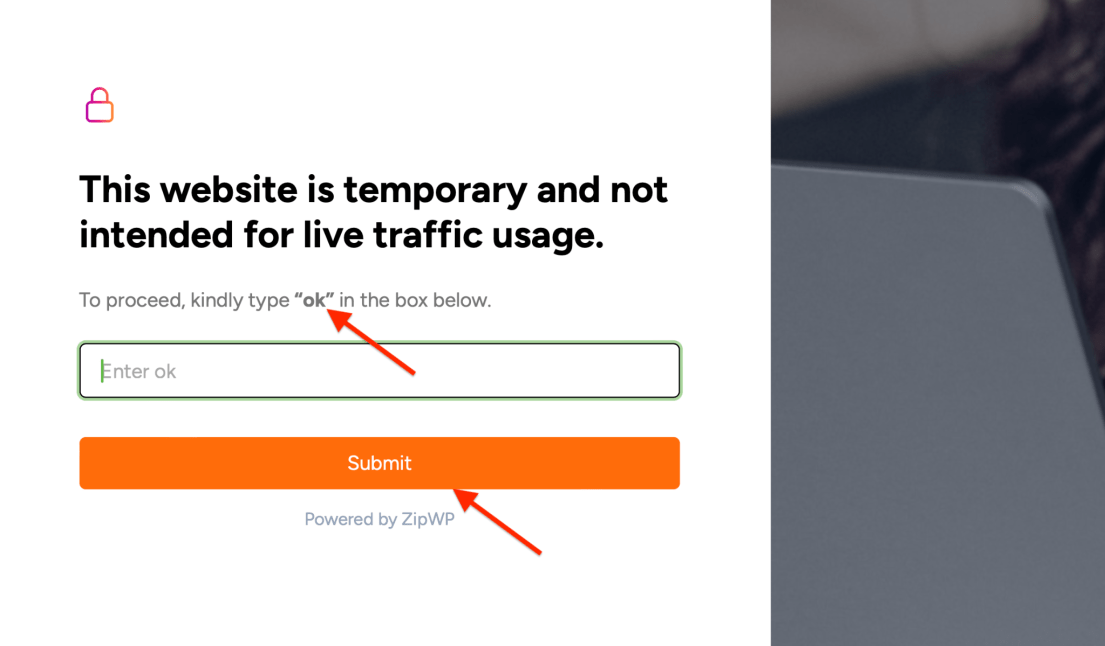
Remember, this is just a temporary website and will disappear after 24 hours. It’s best to move it to your permanent hosting account.
If you’re not familiar with hosting or web hosts, don’t worry. Here’s what a web host does typically:
- It hosts your website on its server
- It keeps your website in a folder
- Then it links your website with the domain name
This arrangement allows people to access your website through their browsers.
For example: we just made a website using ZipWP as our temporary host. It lets us access the site and do what we need to do.
But if you look at the URL, it’s just a bunch of random characters. You can’t use that for commercial purposes.
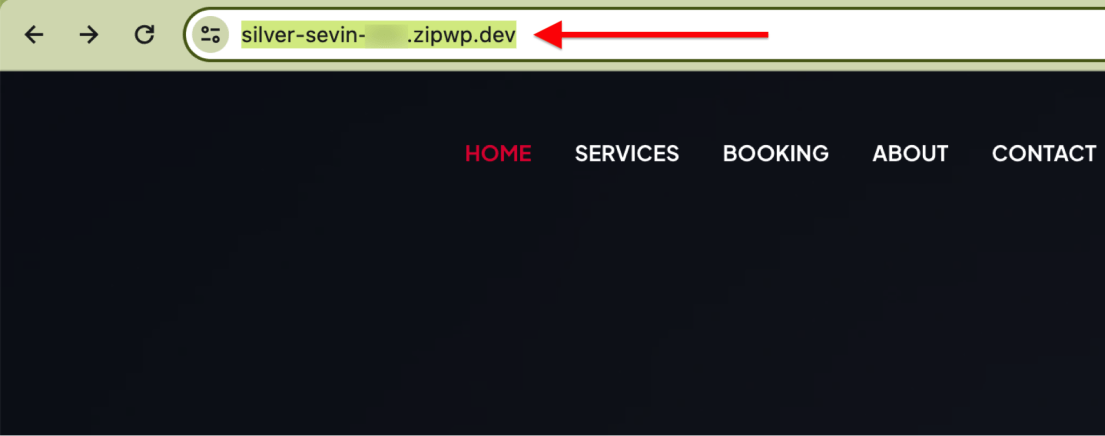
To publish your site, you need a domain name and a proper web host.
Companies like Hostinger, SiteGround, or GreenGeeks provide a free domain when you sign up for hosting.
For example, with Hostinger, each plan includes a free domain for the first year.
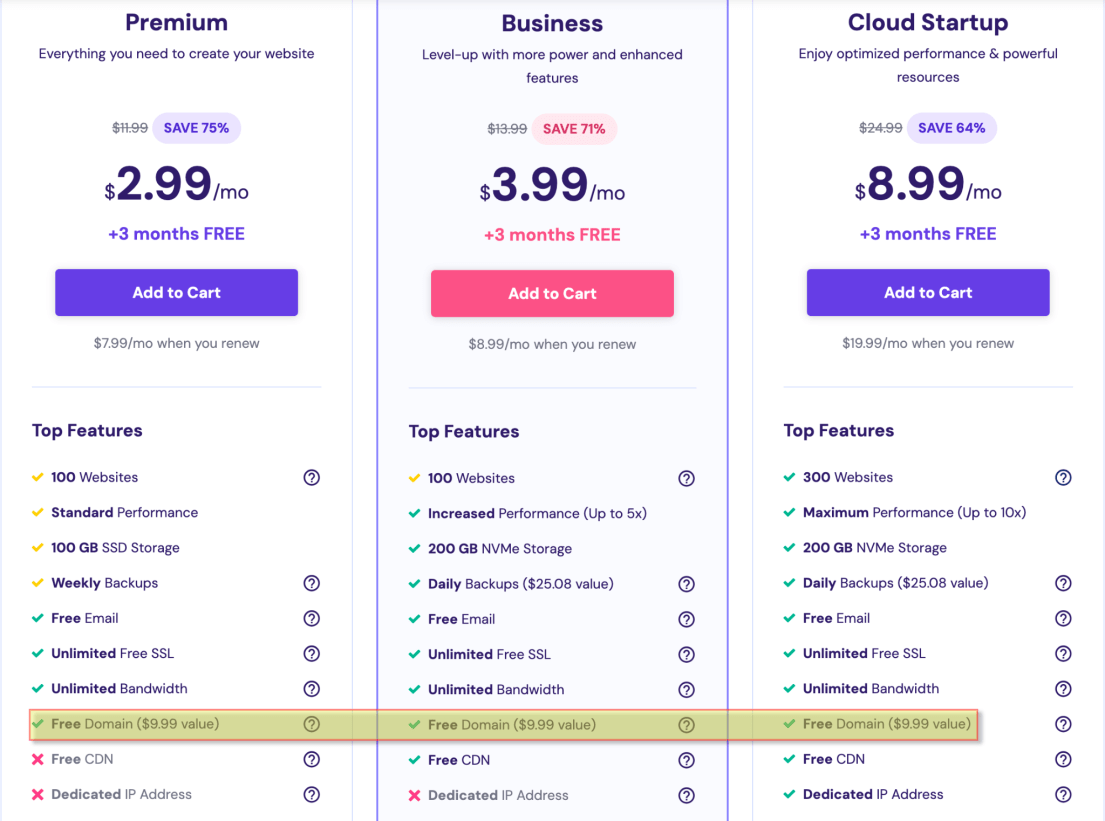
All you have to do is pick a hosting plan and use the setup wizard to register your domain and set up WordPress.

Pro Tip:
You only have to install WordPress. No need to pick a theme or tweak your site yet. We’ll swap it out soon with the website we made earlier during the migration process.
If you want more details on how to register a domain and get your site up and running, check out this tutorial. It covers everything you need to know.
Migrate Your Website
After you’ve finished setting up your chosen web host and installing WordPress, you can begin the migration.
We’ll use a migration plugin to transfer our entire website to the live site.
Check out this video for a detailed explanation of website migration.
Migration will move everything you created earlier on ZipWP to your new hosting plan.
Once complete, you should see a fully working version of the site you created earlier.
Now, we’ll focus on setting up our booking system on our live site.
3. Install and Set Up LatePoint
Here’s a comprehensive video that explains how to install and set up LatePoint properly.
Like most premium WordPress plugins, you can access the LatePoint [.zip] file from the customer dashboard.
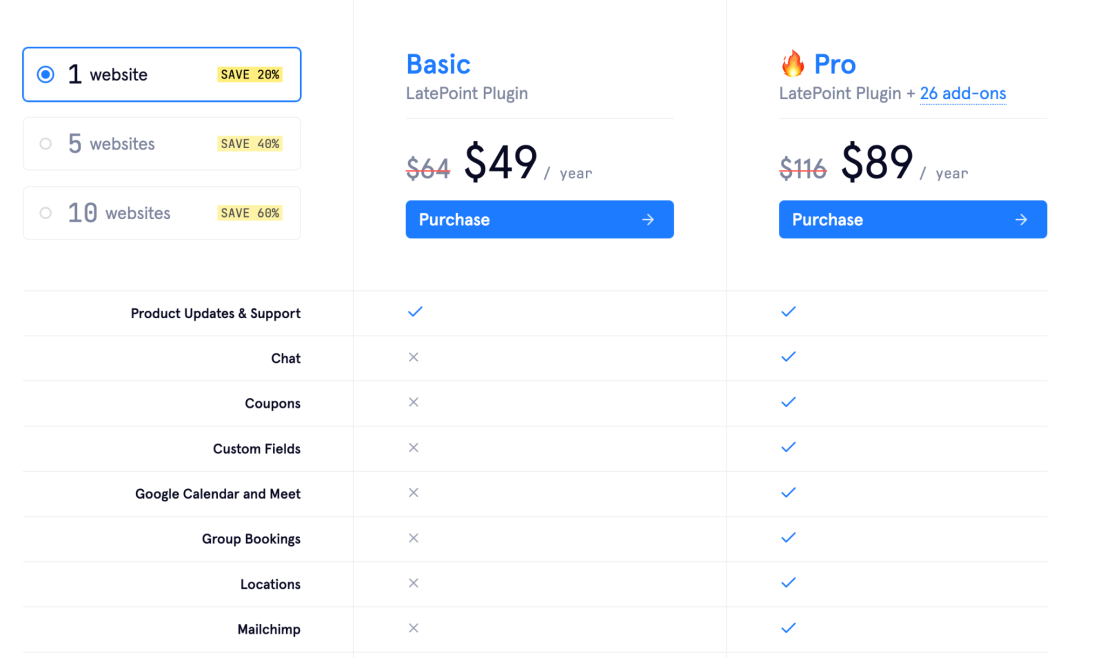
LatePoint offers two plans: Basic and Pro. Choose whichever suits your needs best.

Pro Tip:
If you want to try LatePoint before buying, there’s a 7-day sandbox trial available so you can test it out.
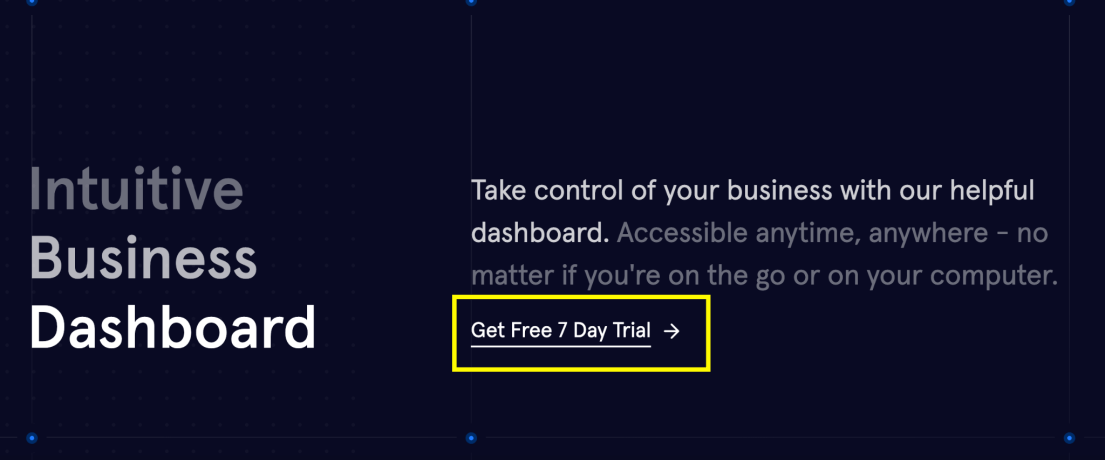
You can install LatePoint just like any other plugin.
Simply go to the Plugin menu in your WordPress admin area, click on Add New Plugin and upload the plugin file from your computer.
Once uploaded, install and activate the plugin.
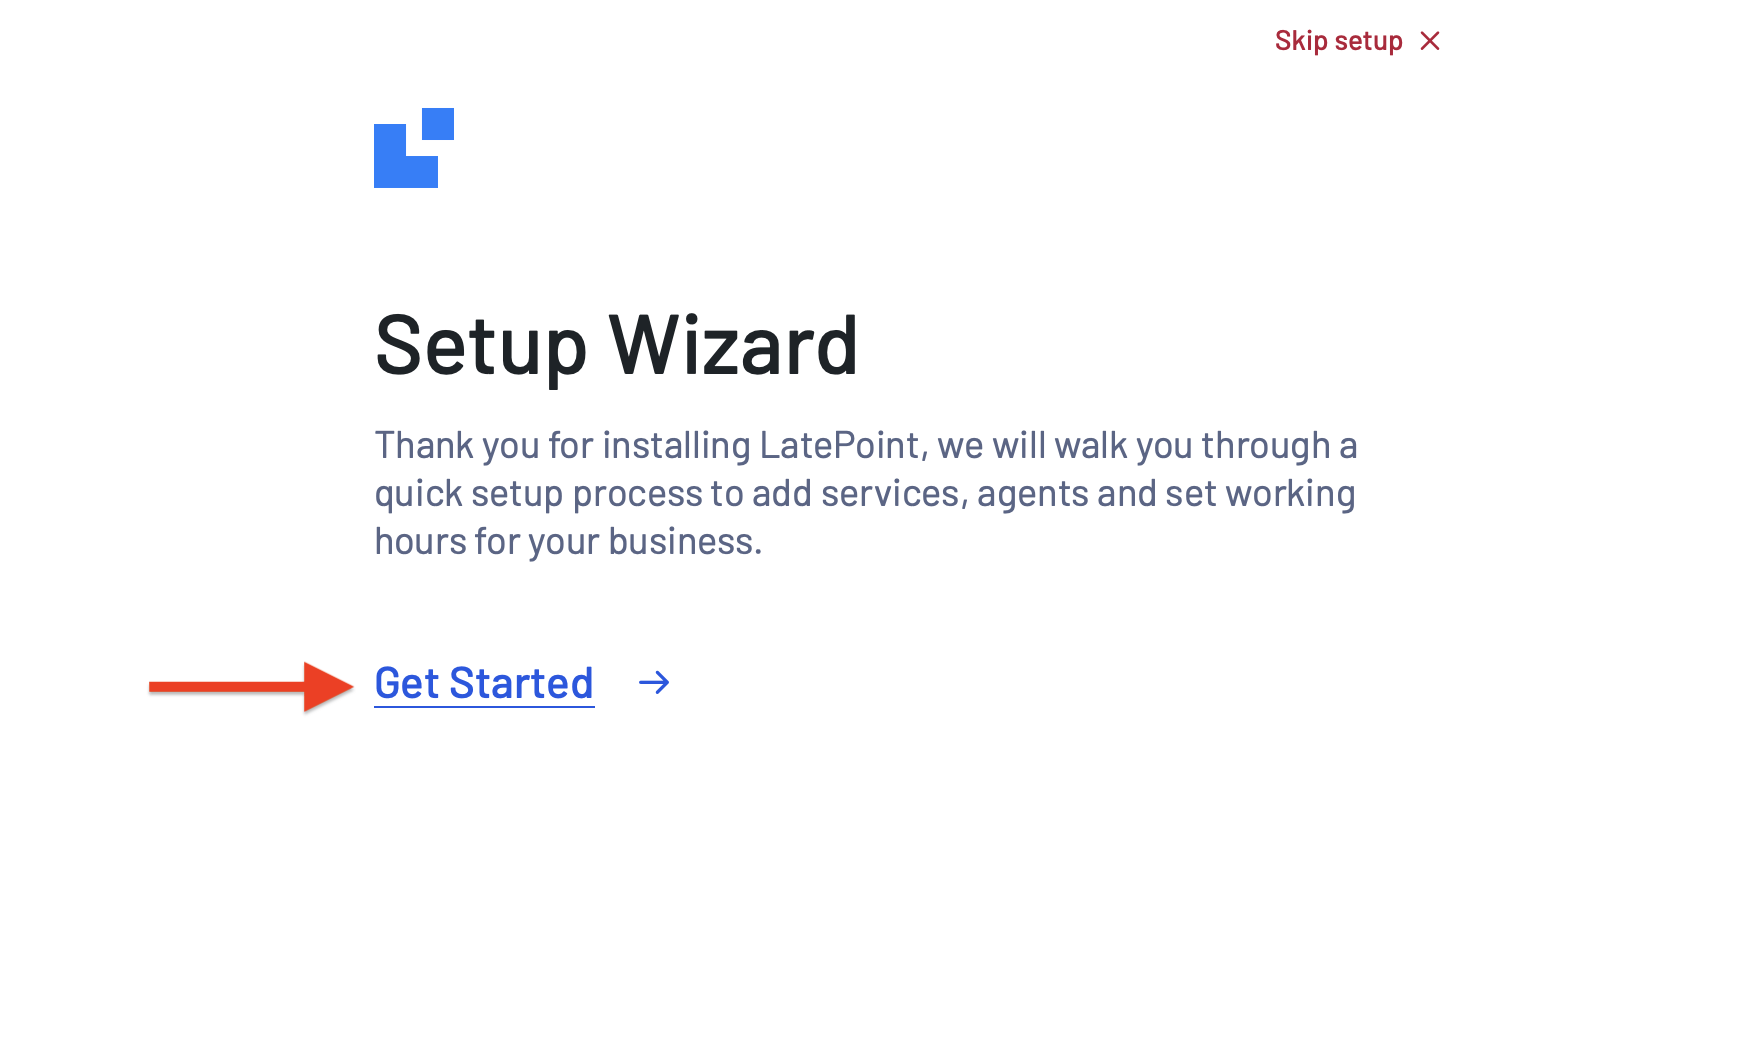
After activation, LatePoint will load a setup wizard to get you started.
Note
While you can skip this step and configure everything later, we recommend using the wizard for a quick setup, especially for beginners.
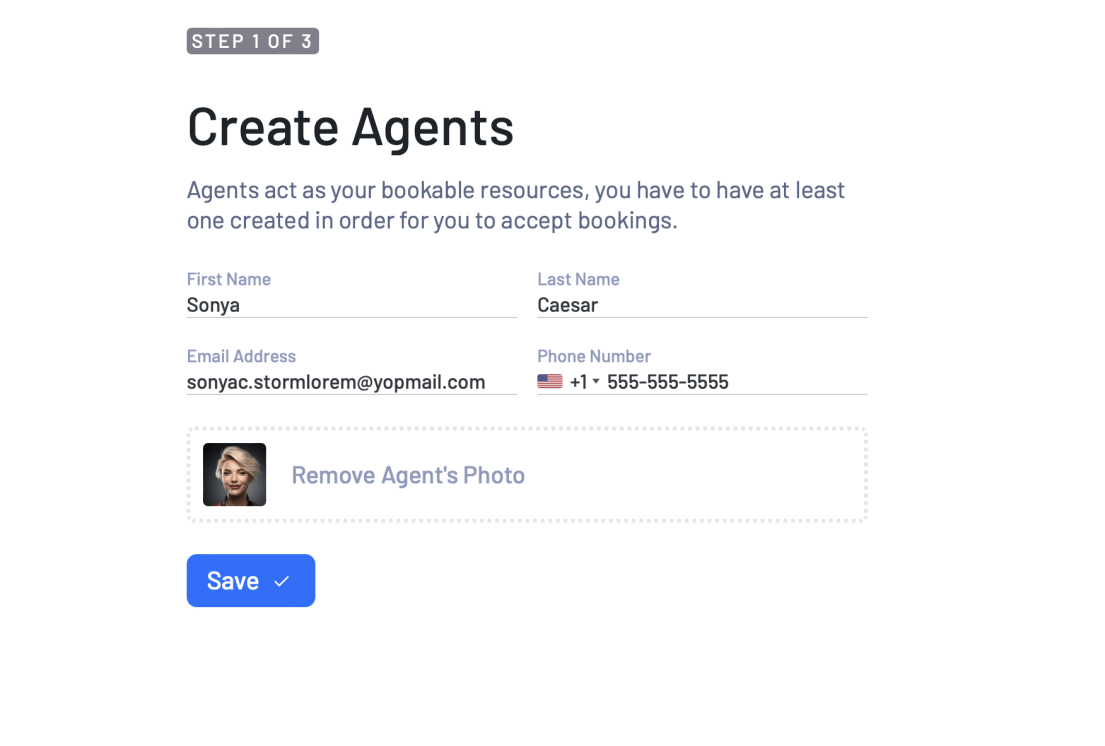
In the first step, you can create agents who will provide your services.
In our case, these agents are hairstylists.
Just enter their name, phone number, email, and upload their picture, then click Save.
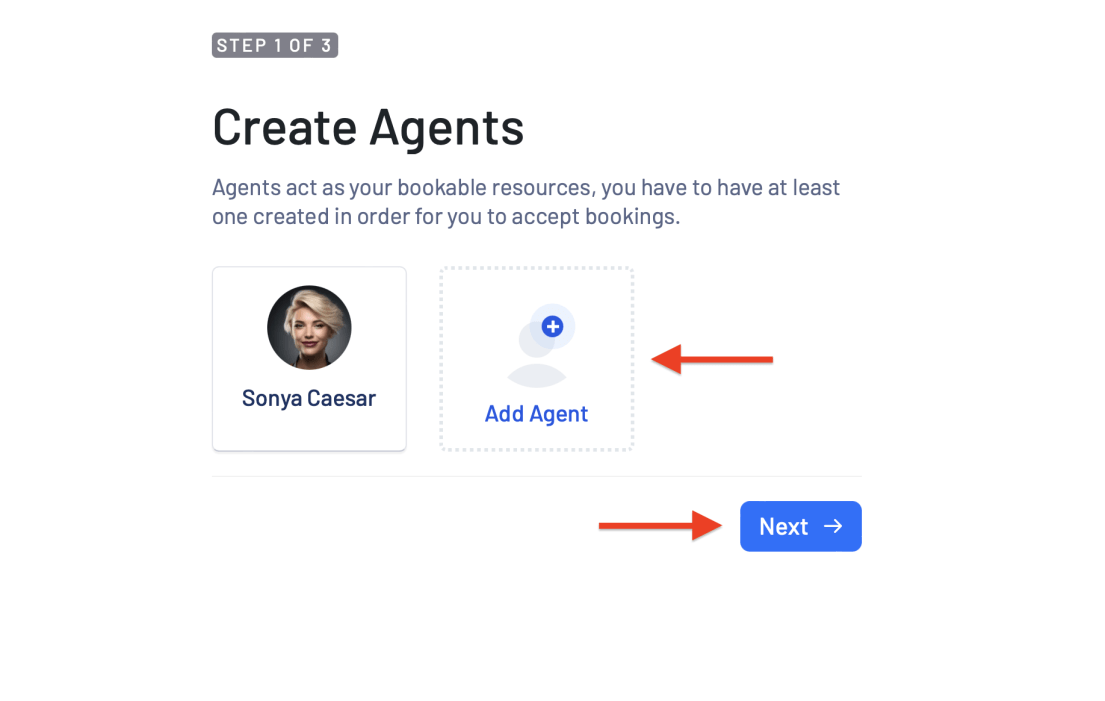
Next, you’ll see the option to Add Agent. You can repeat this process to add as many agents as you need for your company.
Click Next to move to step 2.
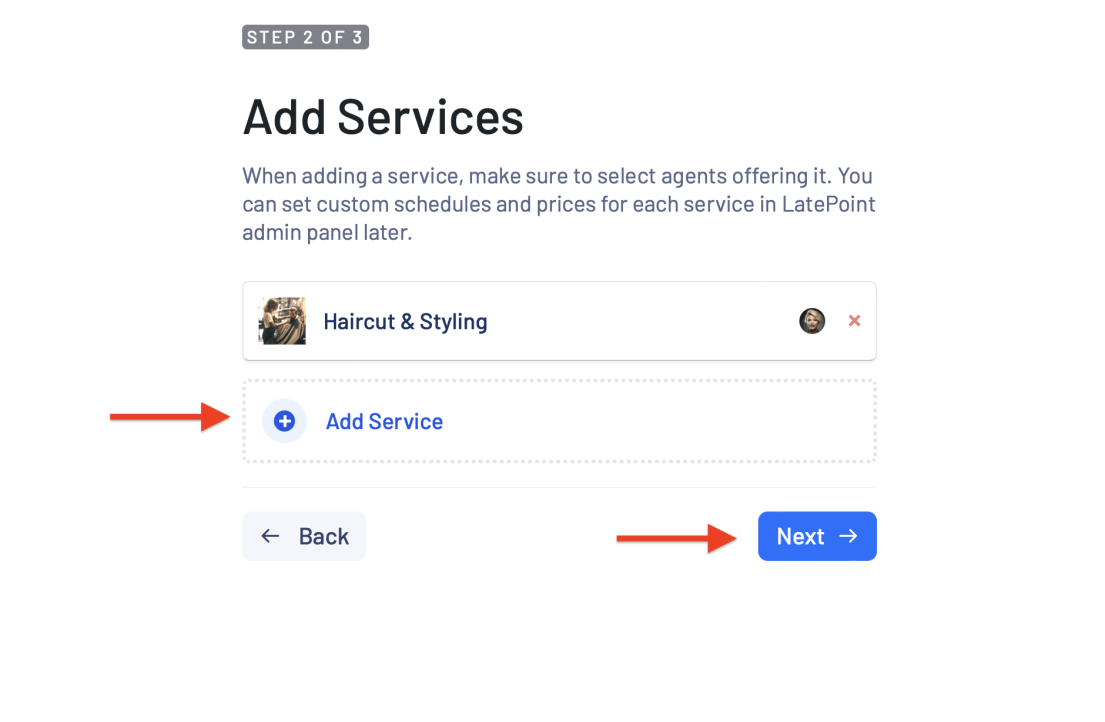
In step 2, you can add the services you want to offer, like hair cutting, hairstyling, dying, or foot massage.
Enter the service name, set the duration, upload a relevant image, and select the agent.
If multiple agents can provide the same service, you can choose them here.
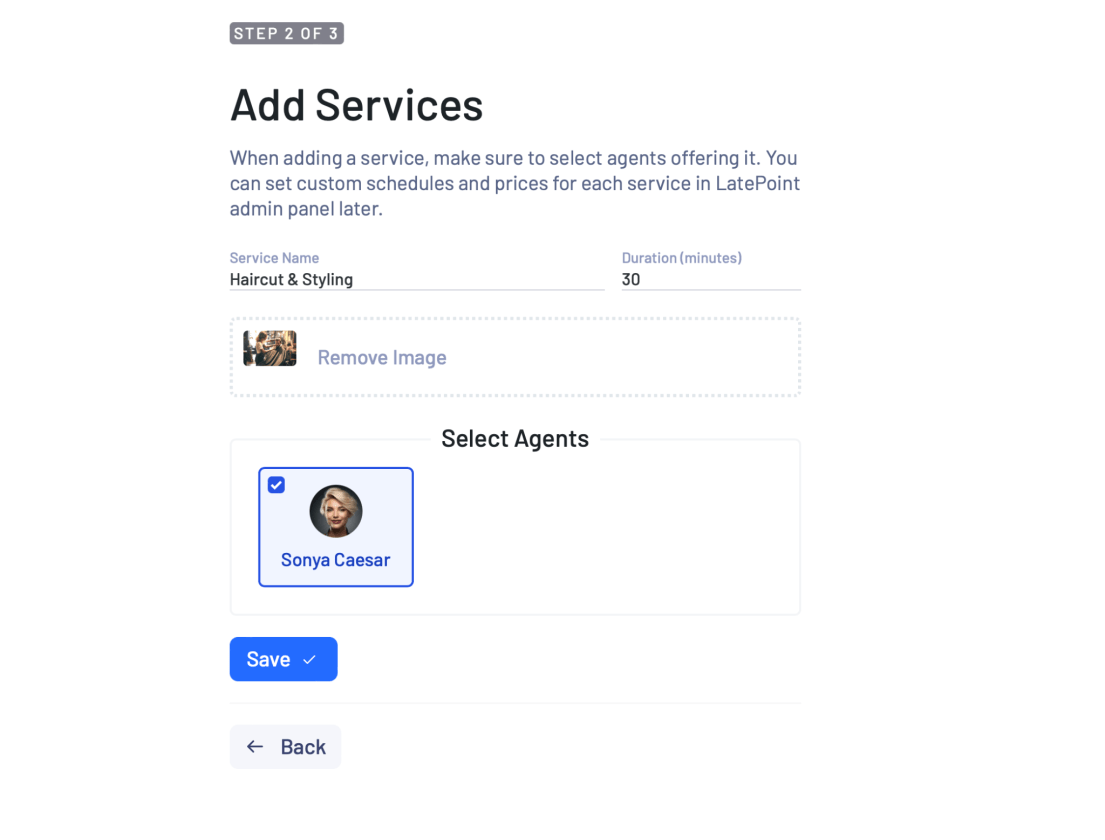
Press the Save button to proceed. You can add more services by clicking the Add Service button.
When you’re ready to move on, click Next to go to step 3.
In the final step, you’ll set your weekly schedule.
By default, all days of the week are selected as working days, but you can uncheck the ones you don’t want to work.
You can also change the working hours and add breaks as needed.
Click the small pencil icon to edit the timings for a specific day.
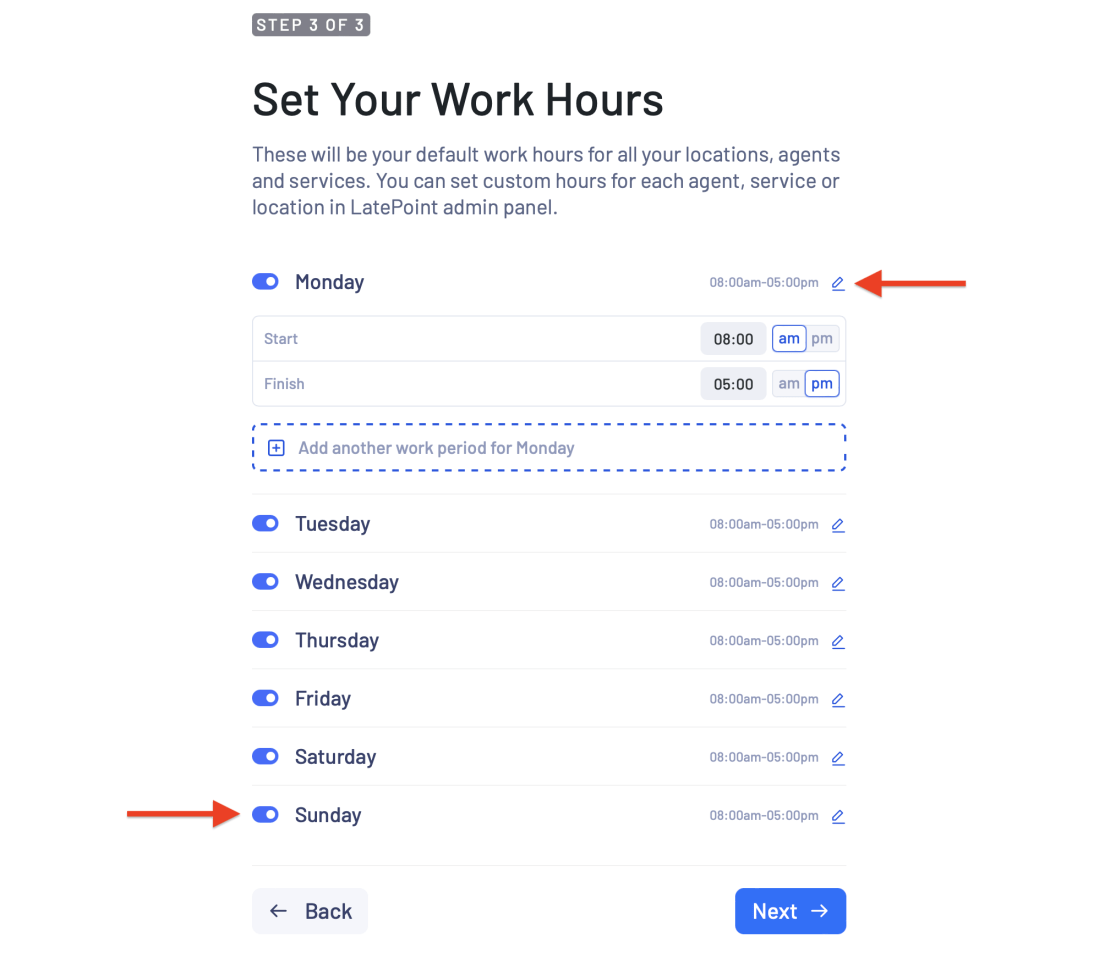
After you finish setting up the weekly schedule, click Next to complete setup.
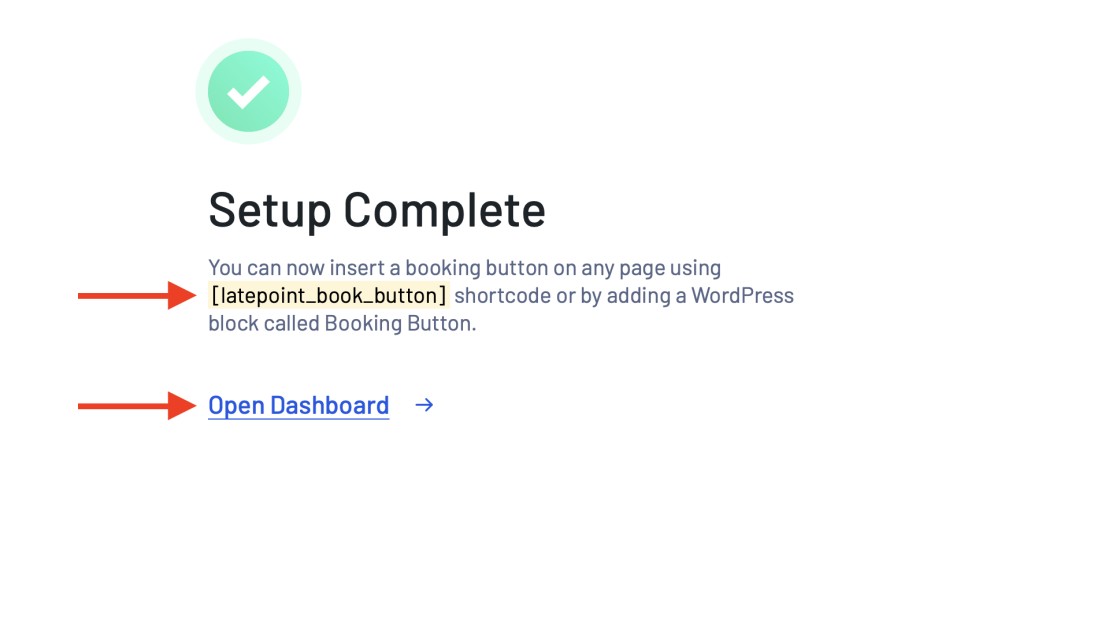
On the last screen, you’ll see a [latepoint_book_button] shortcode. This lets you add a booking button to any page on your site.
Alternatively, you can use the Booking Button WordPress block.
Click the Open Dashboard link to access the LatePoint admin area.
The LatePoint dashboard has a unique style different from the usual WordPress interface.
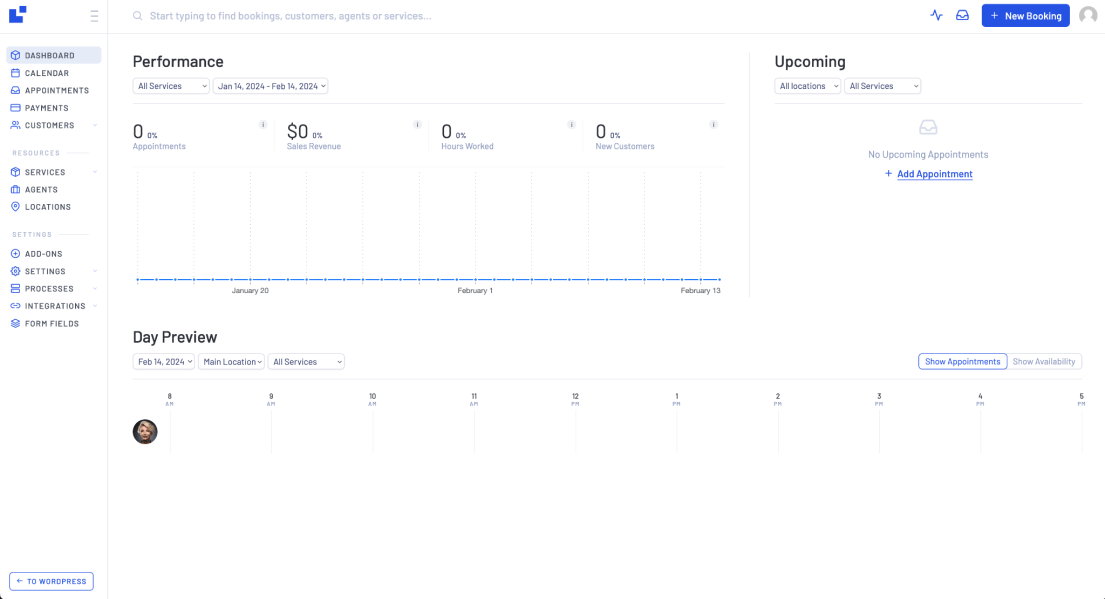
You’ll find all options upfront on a white background that provides a great user experience.
We’ll cover how to effectively use the dashboard later in this tutorial.
But first, something important!
We recommend activating LatePoint with your license key to unlock advanced features from the start.
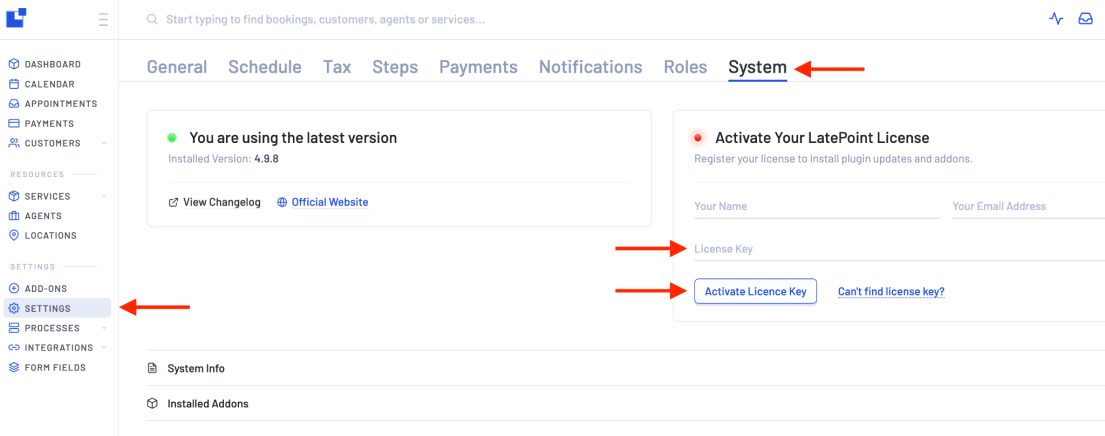
To activate the license, go to Settings > System.
Enter your name, license key, and email address used for purchasing the plugin, then click Activate License Key.
3.1. Add Resources (Agents and Services)
Let’s demonstrate how LatePoint operates by adding some sample data and guiding you through the process.
We’ll begin by adding agents who can provide services, also referred to as resources.
Adding Agents
To add an agent, go to the Agents menu in the LatePoint dashboard and select Create New Agent.
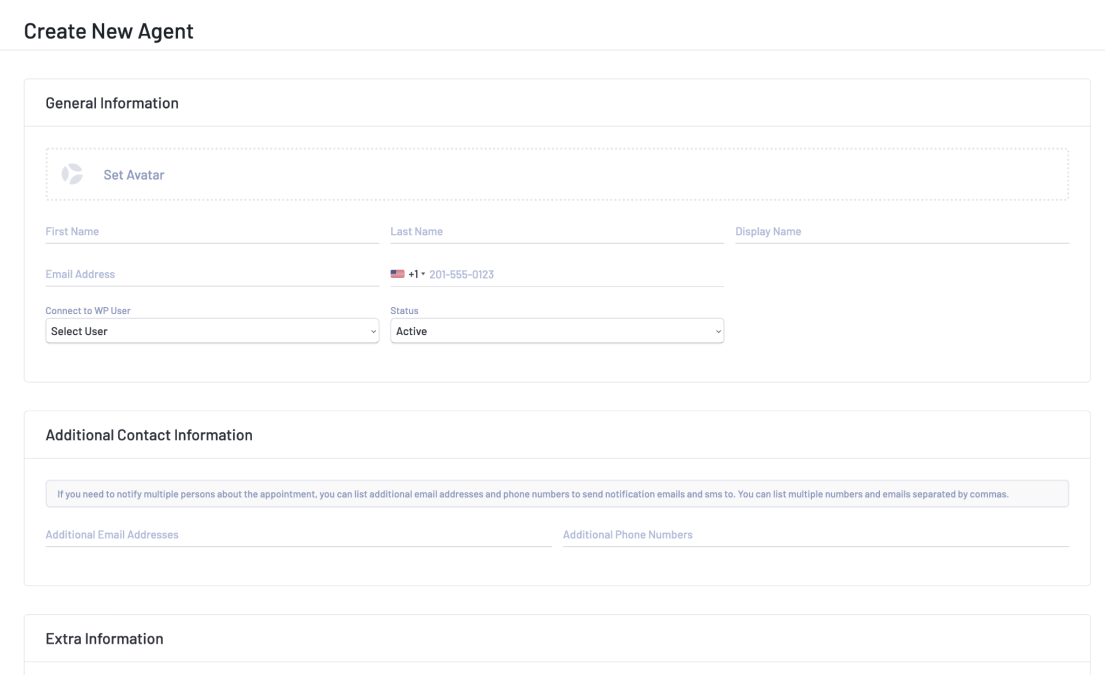
The page is divided into different sections:
- General information: Add name, picture, email address or phone number
- Additional contact information: Add email and phone number of additional resources who you want to notify for appointments
- Extra information: Brief bio of the agent to inform customers about their experience
- Agent highlights: Quickly inform customers about the achievement of the agents
- Offered services: List of services a particular agent provides
- Agent schedule: Optional custom schedule for agents that may differ from your general schedule
Provide relevant details to help your clients choose the right agent for their services.
Adding Services
Next, we’ll list the services our salon provides. To do this, click on the Services menu item in the left sidebar.
This will take you to the page where you can add services, categories, and service extras.
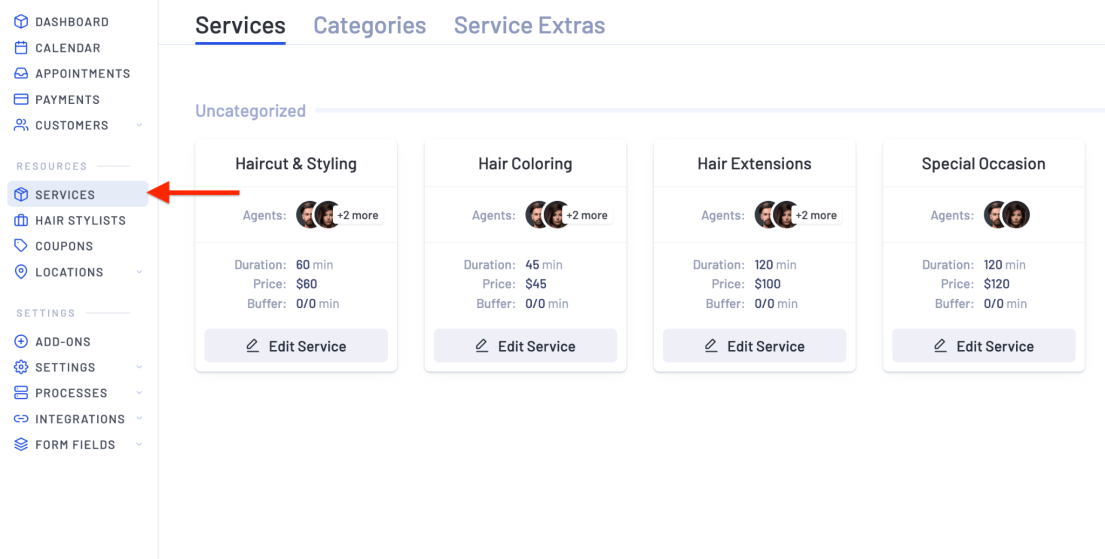
Categories are useful when you offer multiple services.
Service extras are additional services your clients may want to add to their primary service.
For instance, if you offer foot massages during haircuts, clients can select it during booking.
The service extras tab will appear once you add the addon for it. We’ll show you how to do that shortly.
Similar to adding agents, the Add New Service page is divided into different sections, including:
- General information: Name your service, categorize it, set its visibility and style it
- Media: Upload an image to represent your service
- Service duration and price: Set the duration of the service and the price you’ll charge
- Display price: Minimum and maximum price as visible to customers for marketing purposes
- Other settings: Set a buffer time before and after the service session. Also override the default service status
- Agents who offer this service: Choose the agents who will offer the service
- Service schedule: Customize a schedule and make it available on defined days
- Days with custom schedules: Take service schedules to an advanced level. Pick specific days and times of the year to offer this service
- Holidays and days off: Mark specific days of the year as off such as the 4th of July or Christmas
- Service extras: Choose extra services you want to make available when someone chooses the main service
- Restrictions on service extras: Restrict extras with a minimum or maximum value
Although the services page offers a lot of advanced options, you don’t need to fill in each of them to start working.
You can always set up a basic service and tweak later.
3.2. Activate Addons
LatePoint comes with 26 addons designed for various purposes like communication, marketing, payment, and more.
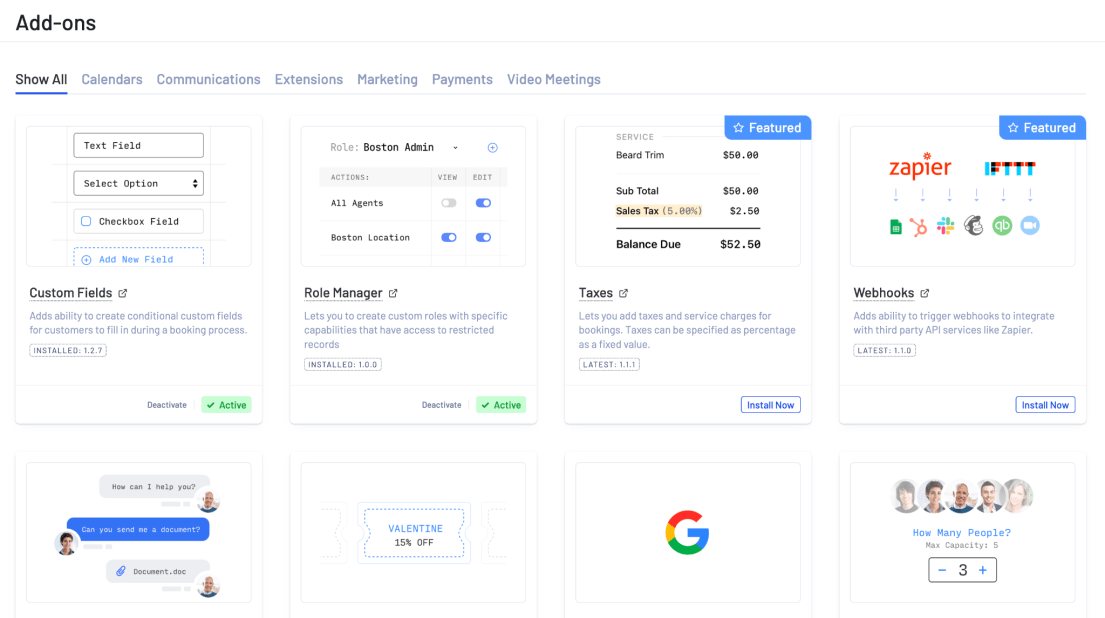
For instance, you can add extra payment options including Stripe, PayPal, Paystack, Square, Razorpay, Braintree, and others.
These are purely optional but can be useful.
Let’s install a few essential addons to enable the features we need for our booking website.
To install an addon, go to the Add-ons menu in the WordPress sidebar. You’ll see all available addons categorized in different tabs.
Each addon has an Install Now button. Click it to activate the addon.
Here’s a list of addons we activated:
| Addon | Purpose |
|---|---|
| Custom Fields | Get more information from customer during booking process |
| Role Manager | Give different level of access to team members |
| Chat | Allow customers to communication with you or agents |
| Coupons | Offer discounts during the booking process |
| Stripe | Accept payments |
| QR Code Info | Customers can scan the code to add bookings to their calendars |
| Service Extra | Like upsells, it allows you to sell more services |
| Google Calendar | Seamlessly add your appointments to personal calendar |
Now we’ve activated some addons, let’s dive into the settings to customize our booking module.
3.3. Explore Settings
LatePoint provides an extensive settings area that controls the entire plugin.
It’s organized into different subpages that makes it easy for users of all skill levels to manage.
When you activate an addon, its options will appear in a relevant subpage.
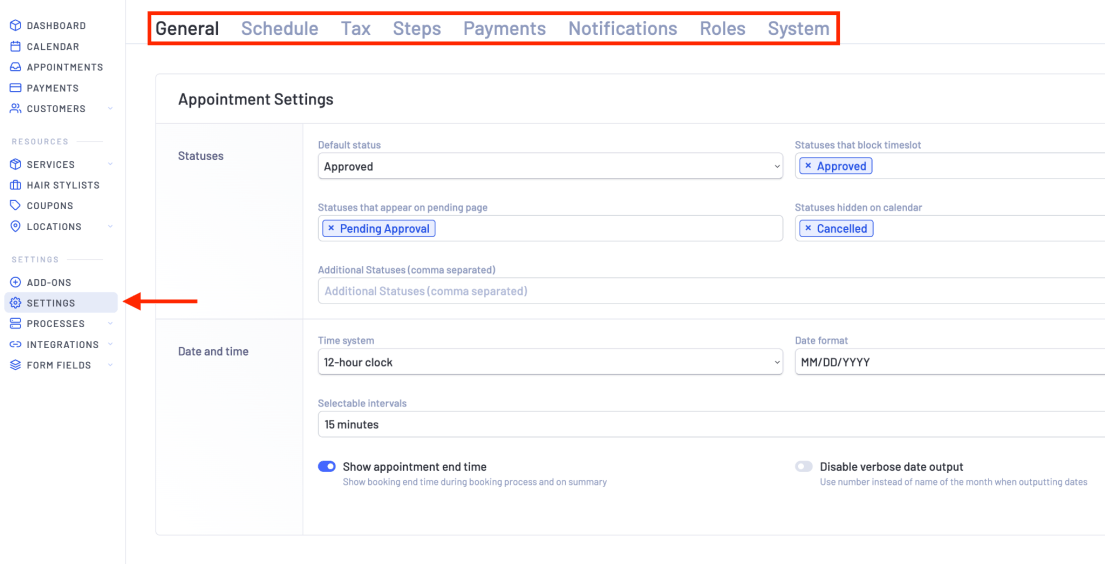
For example, if you haven’t activated the Taxes addon yet, the tax subpage will display a message saying Install Taxes add-on.

General
The General subpage has the most options, divided into multiple sections.
In the Appointment Settings section, you can set the Default Status field value to Approved if you want to accept every booking.
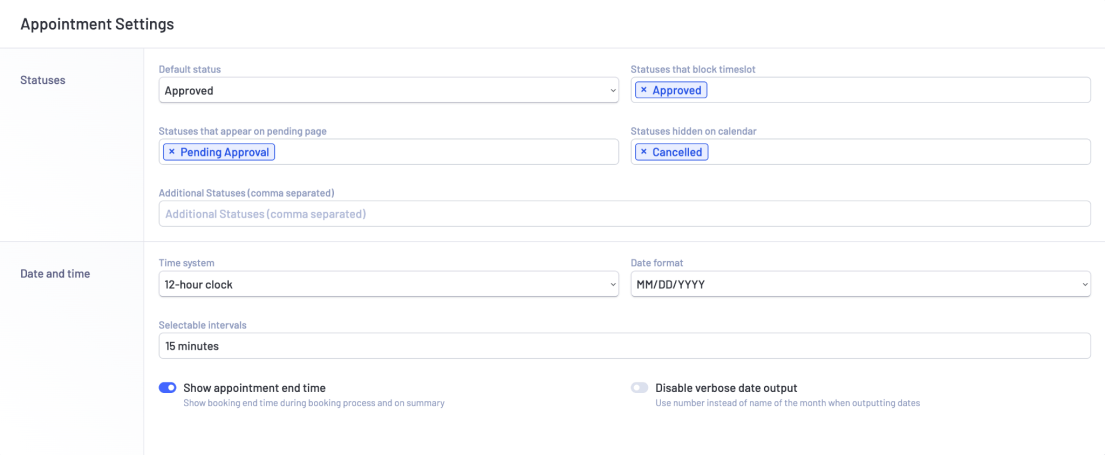
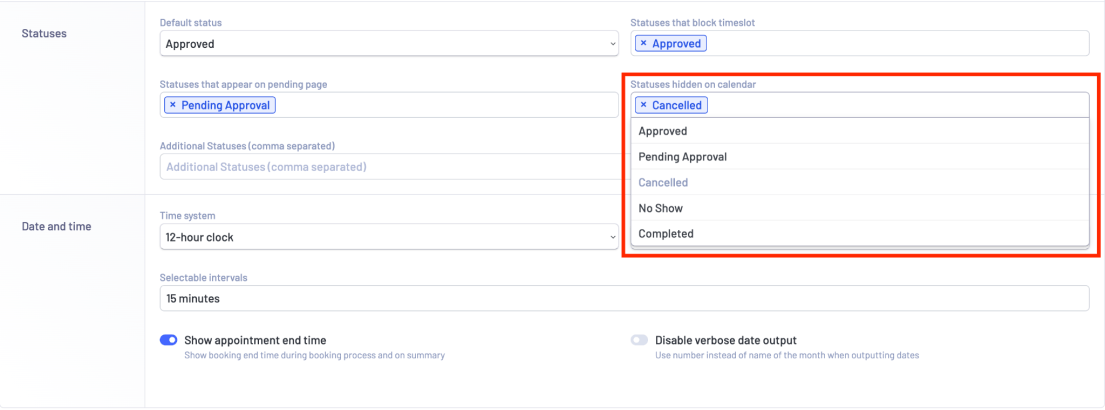
You can also use different preset values based on different conditions.
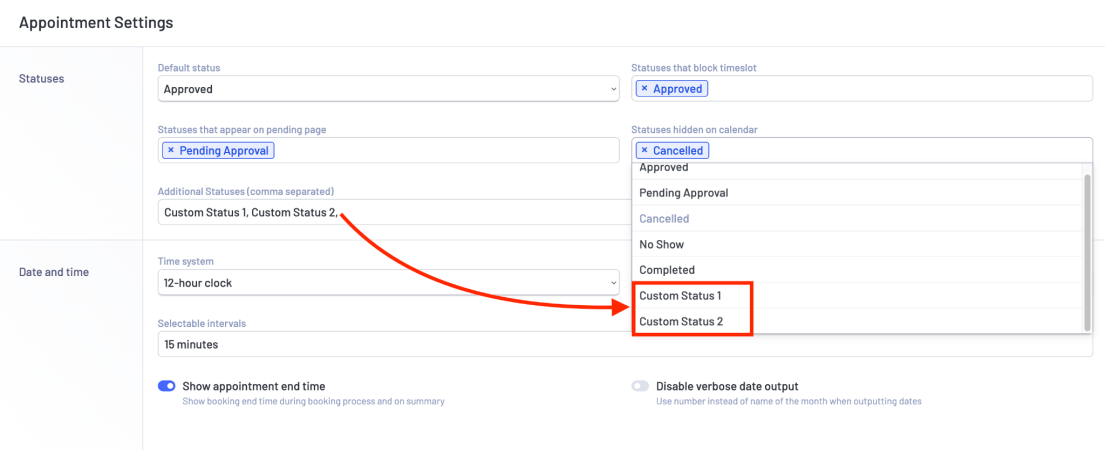
If you want to add custom statuses, you can use the Additional Statuses field to enter values of your choice.
Note:
Don’t forget to save and refresh the page after adding a custom status.
Next, you can adjust options related to date and time, such as the time system, date format, interval between sessions, and more.
In the Restrictions section, you can decide how early customers can book appointments with the Earliest Possible Booking field.

For instance, setting it to +1 day means customers can book a slot starting from the next day.
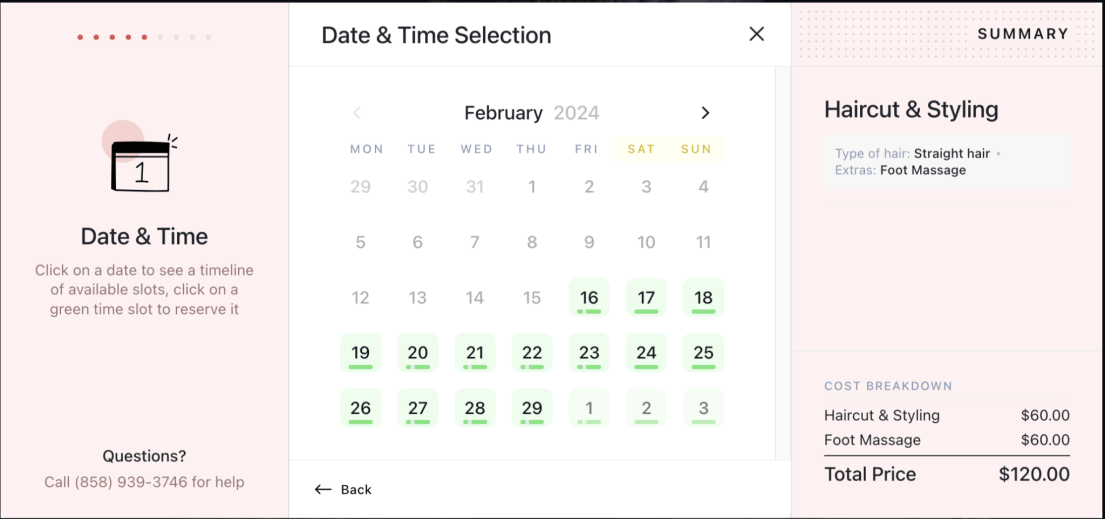
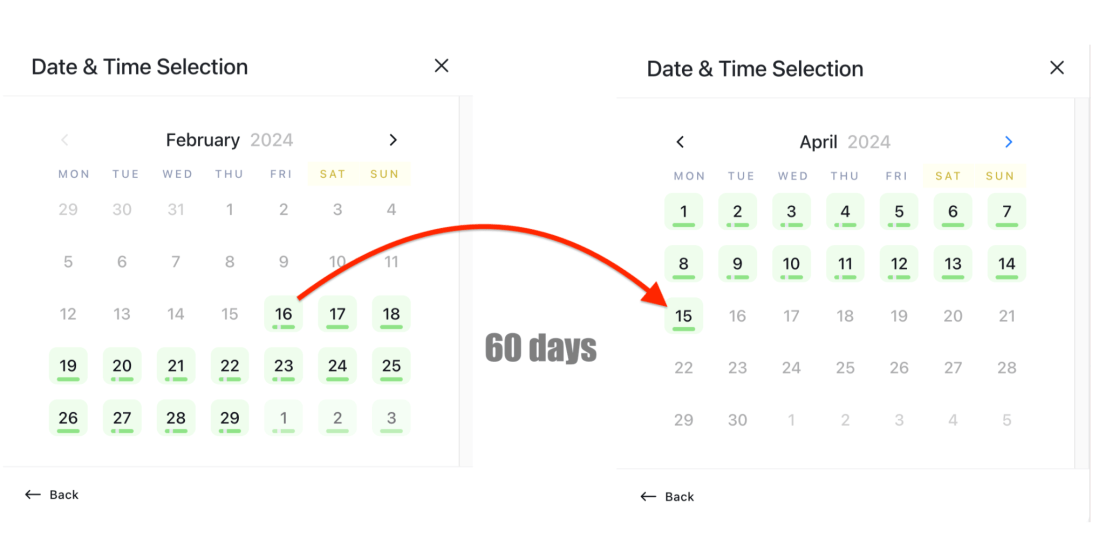
Similarly, you can use the Latest Possible Booking field to restrict future bookings.
For instance, setting it to +60 days means customers can’t book appointments beyond 60 days from today.
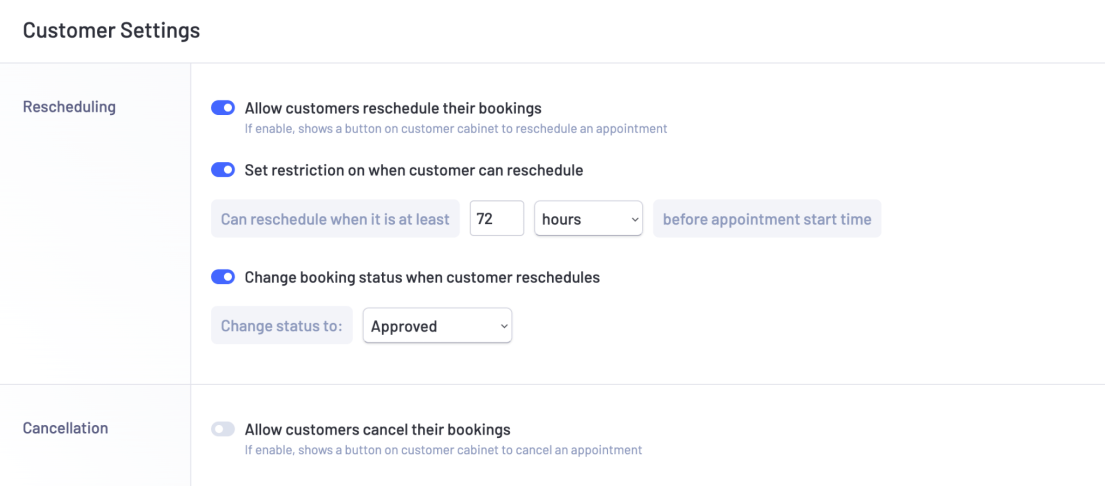
In the Customer Settings section, you can allow customers to reschedule or cancel bookings.
You can also set restrictions on how early they can reschedule from the appointment date.
If you want to accept these changes immediately, you can enable the option in the same section.
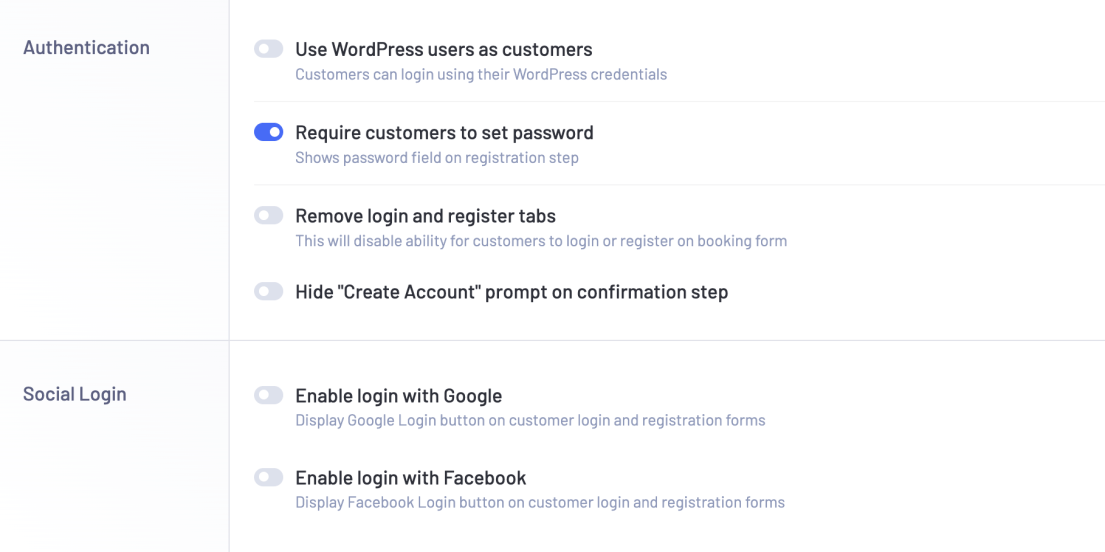
Additionally, you can give customers the option to set a password for their dashboard.
You can also allow them to login with their social media accounts, like Google and Facebook.
Payments
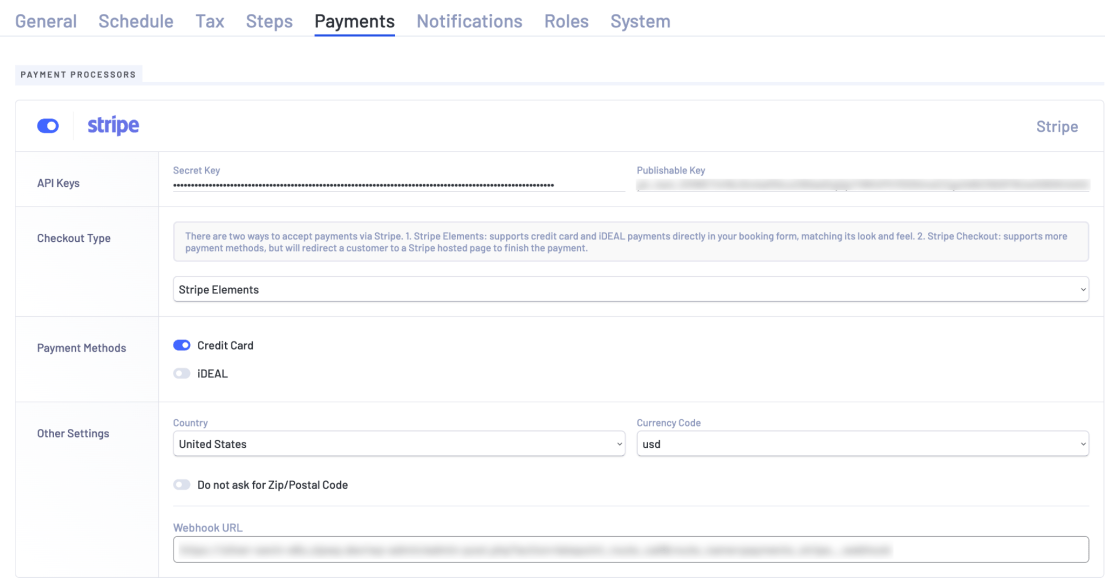
An important section to pay attention to is Payments. It’s where you can activate the payment methods provided by LatePoint.
In this tutorial on creating a booking website, we activated Stripe for payments.
If you already have a Stripe account, simply enter your API Keys, Publishable Key, and Webhook URL to enable it.
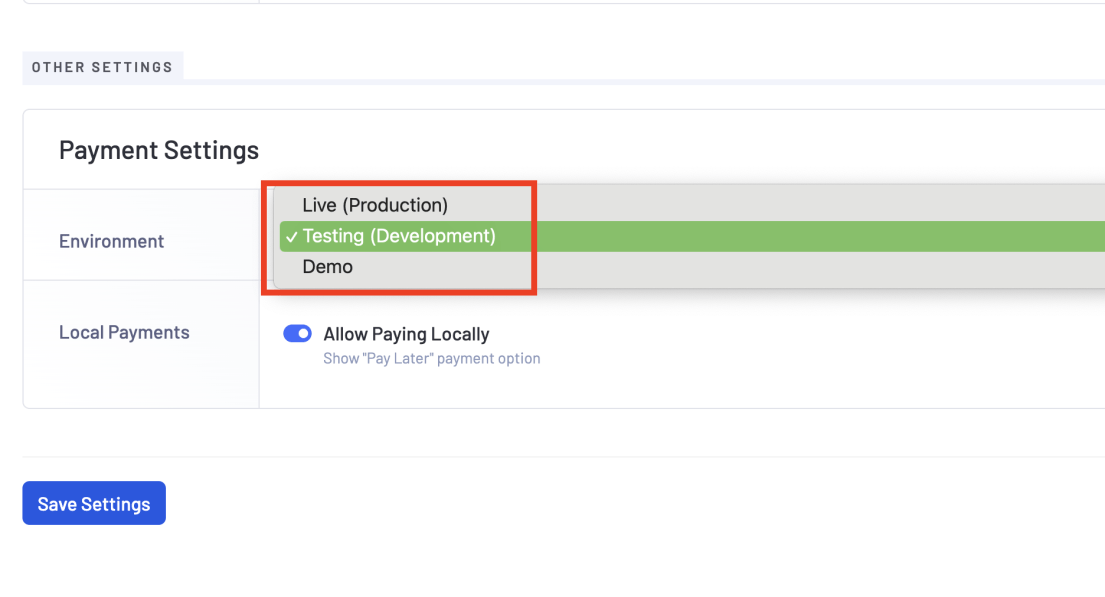
When you first install LatePoint on your website, it’s wise to test your environment before going live.
On the Payments subpage, scroll down to find the Other Settings section.
Use the Environment field to choose the value you prefer.
3.4. Integrations
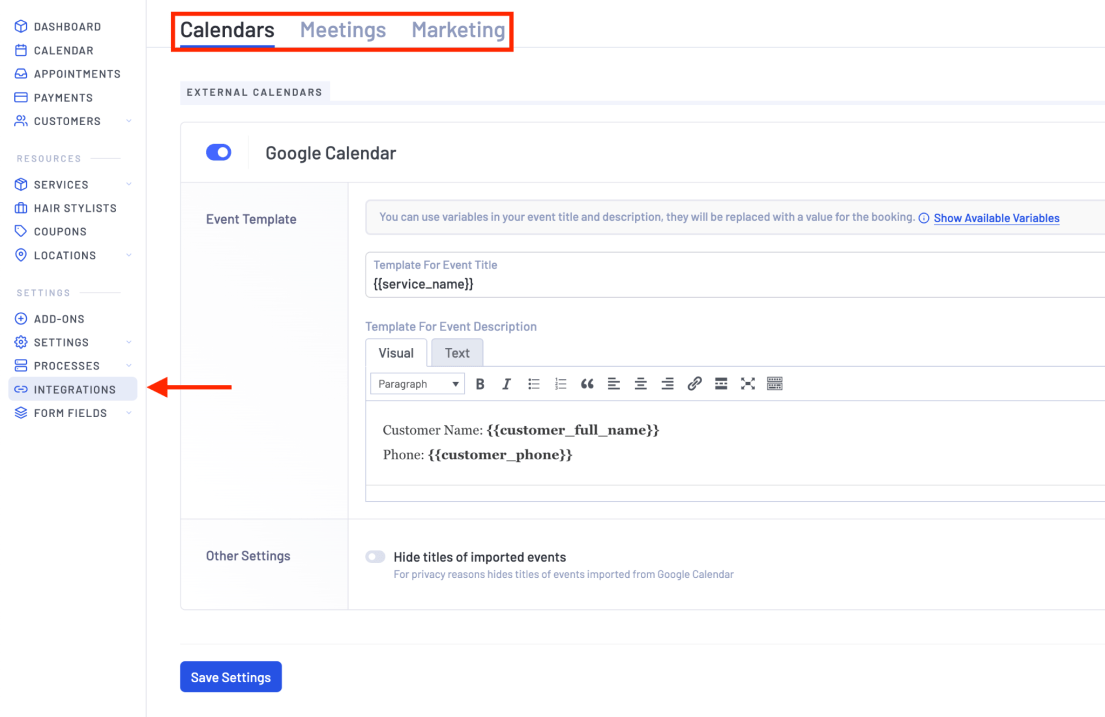
The integrations page lets you add Google Calendar, Google Meet, and MailChimp email marketing tools to your website.
For example, to integrate Google Calendar, go to the Integrations page in the left sidebar and toggle on the Google Calendar button under the Calendar subpage.
If you’re new to this, you might need some assistance setting up Google Calendar.
But don’t worry, LatePoint has a detailed knowledge base that explains everything about the plugin in an easy-to-understand manner.
3.5. Form Fields
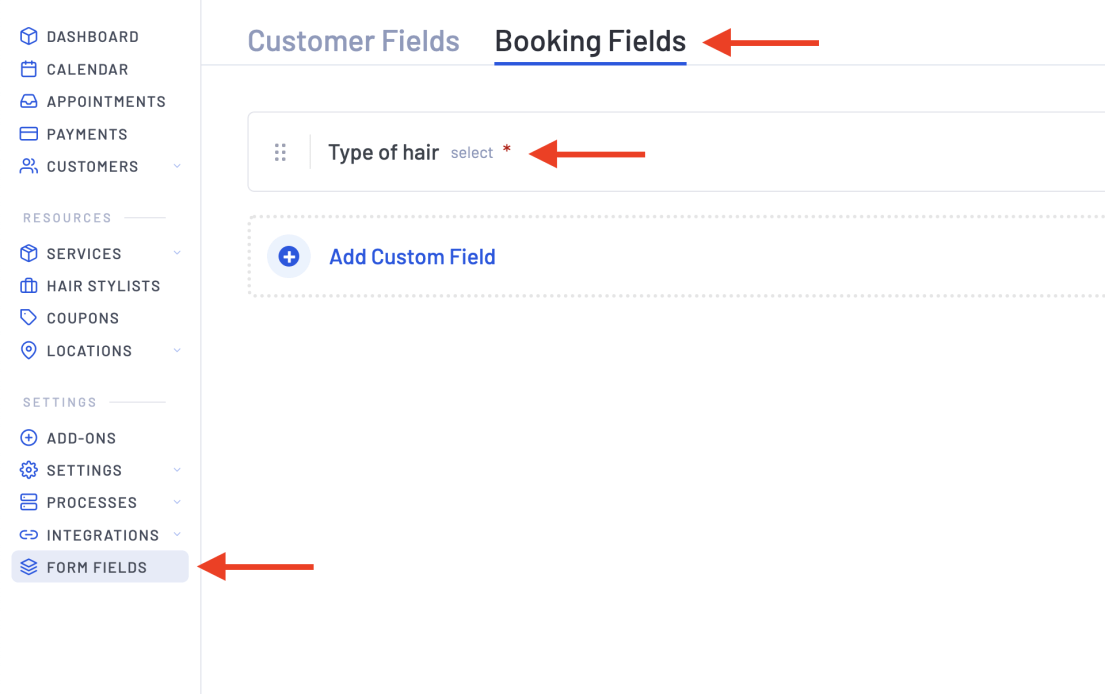
We’ve also set up some custom fields. This feature comes in handy when you need more details from customers.
For instance, at our salon, we ask customers about their hair type during the booking process.
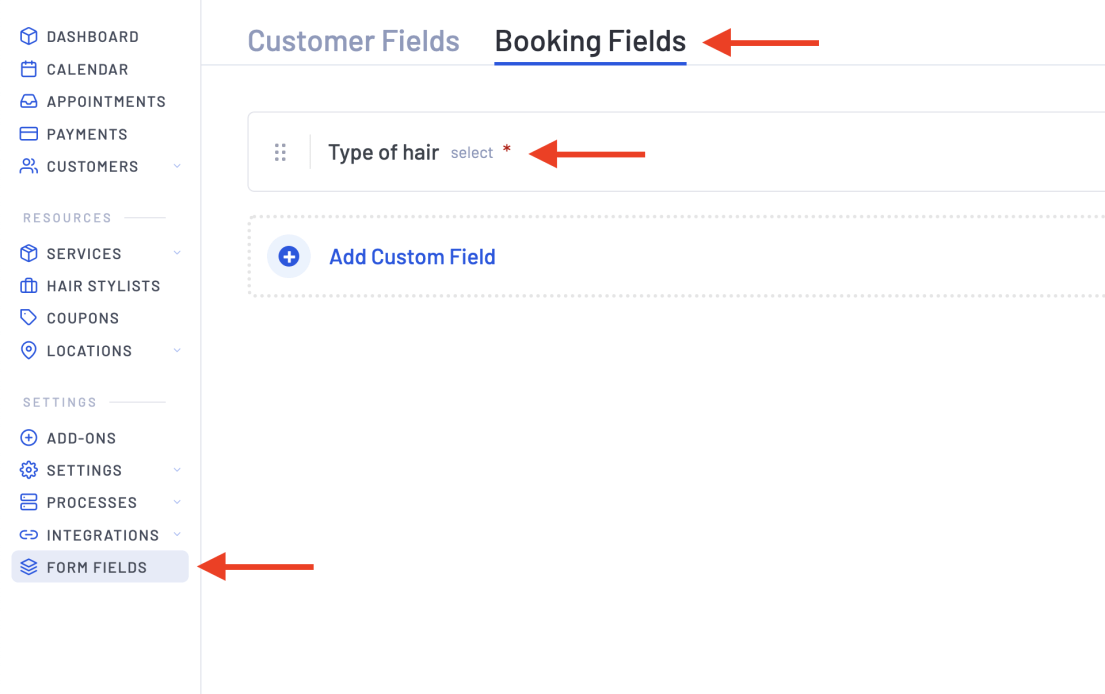
Hair stylists often find this information helpful for understanding the customer’s needs better.
You can access this feature from the Form Fields page.
Just go to the Booking Fields subpage and add your desired custom field.
These are some essential options in LatePoint to help you get started.
Now, let’s explore how the LatePoint dashboard area helps you monitor bookings.
3.6. LatePoint DashBoard
As a manager or booking agent, this is where you’ll likely spend a significant amount of time. It helps you gather information on your upcoming bookings, revenue, and agent schedules.
The dashboard is divided into three main sections: Performance, Upcoming, and Day Preview.
Let’s explore each of them.
Performance
This section offers a summary of your overall business activity. You can see how many appointments you’ve booked within a specific timeframe.
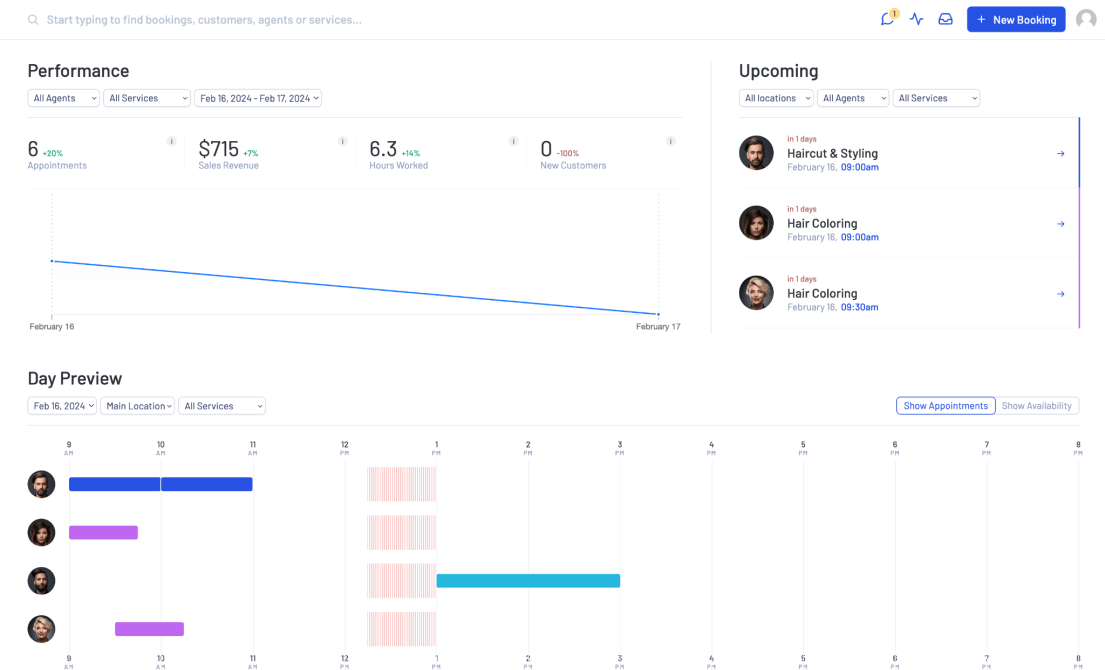
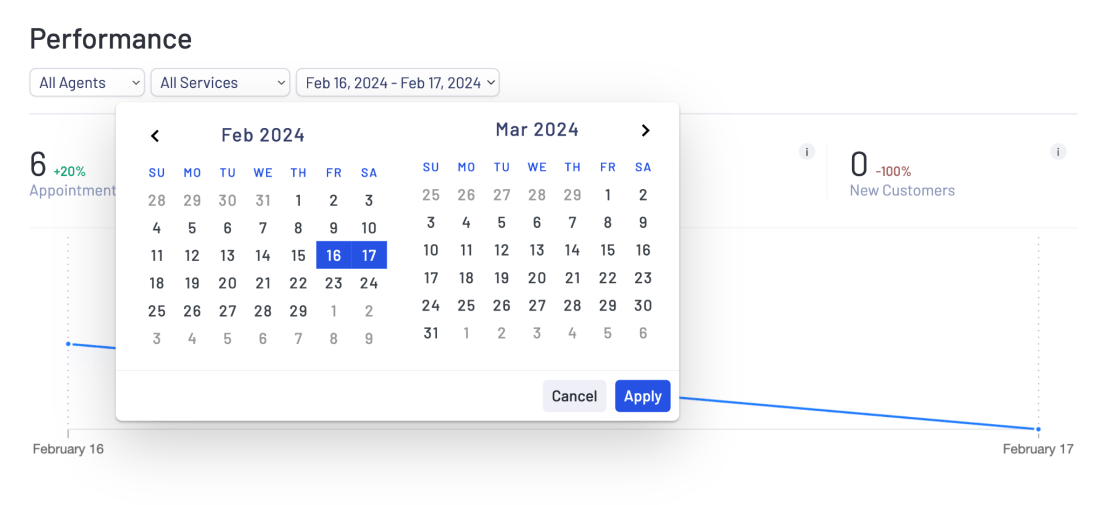
You can apply filters to refine the information. Choosing a date helps you select the desired period.
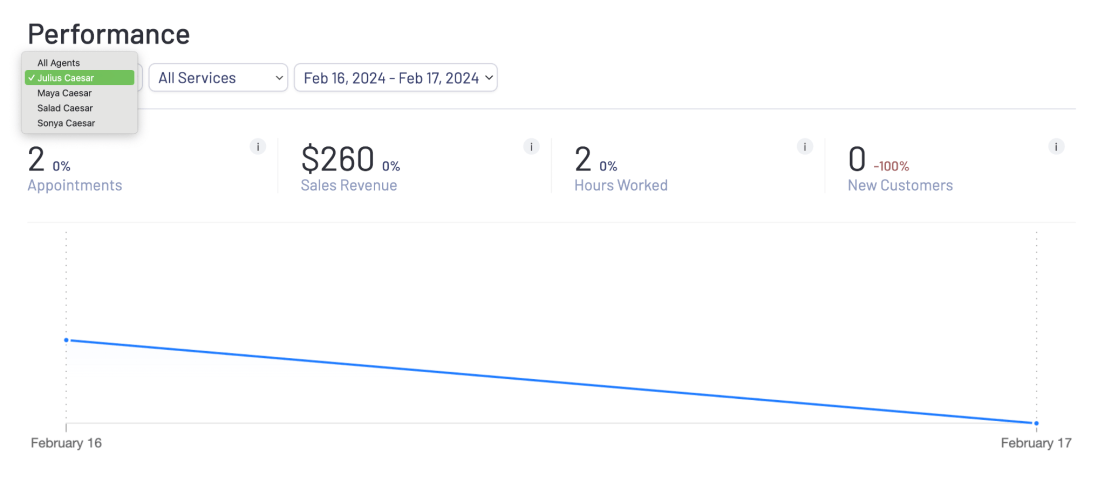
Use the agent filter to view the performance of a specific agent.
This allows you to track how much a particular agent has generated during the month, how many hours they’ve worked, and the ratio of new vs. returning customers.
You can use this data to monitor their efforts.
You can also use the service filter to assess the performance of your most popular service.
This is particularly useful for identifying areas for improvement or devising marketing strategies.
Upcoming
This widget provides a quick overview of your upcoming appointments for the week and month. Appointments are listed in chronological order.
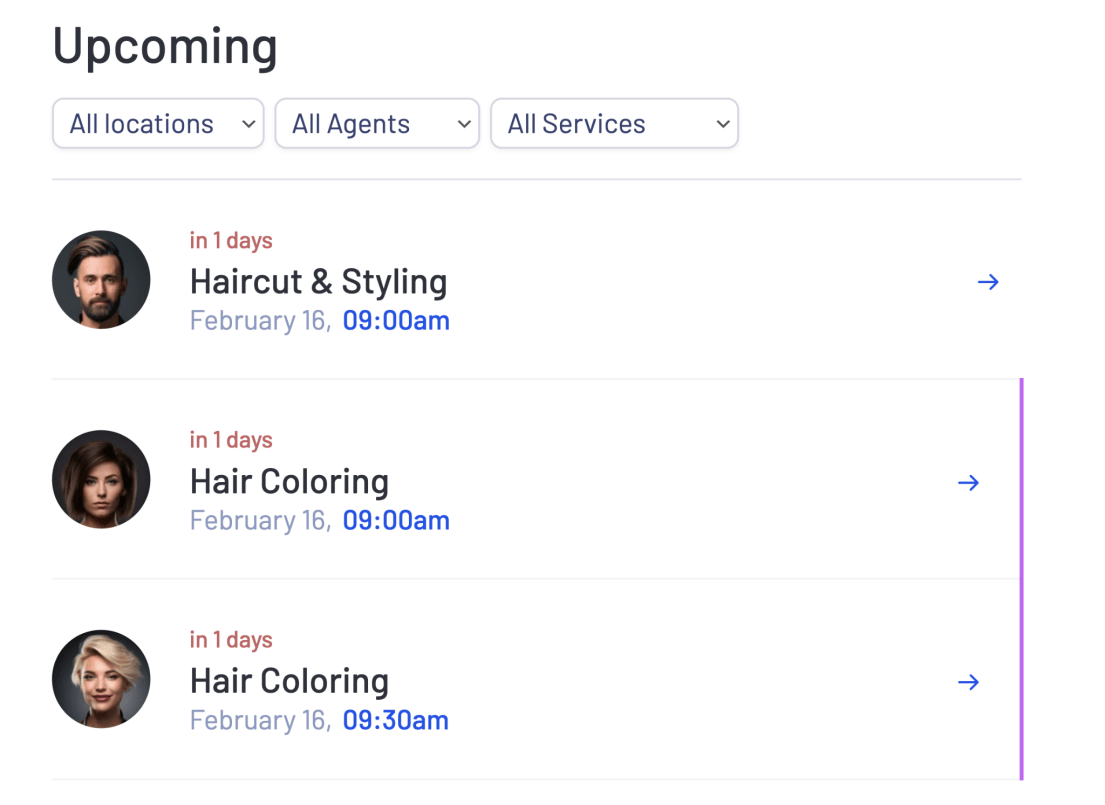
If you have multiple staff members, you can use the agent filter to see each worker’s upcoming appointments.
Similarly, the service filter helps you anticipate the frequency of specific services.
Clicking on an appointment reveals more details in a popup sidebar. You can update the appointment as needed.
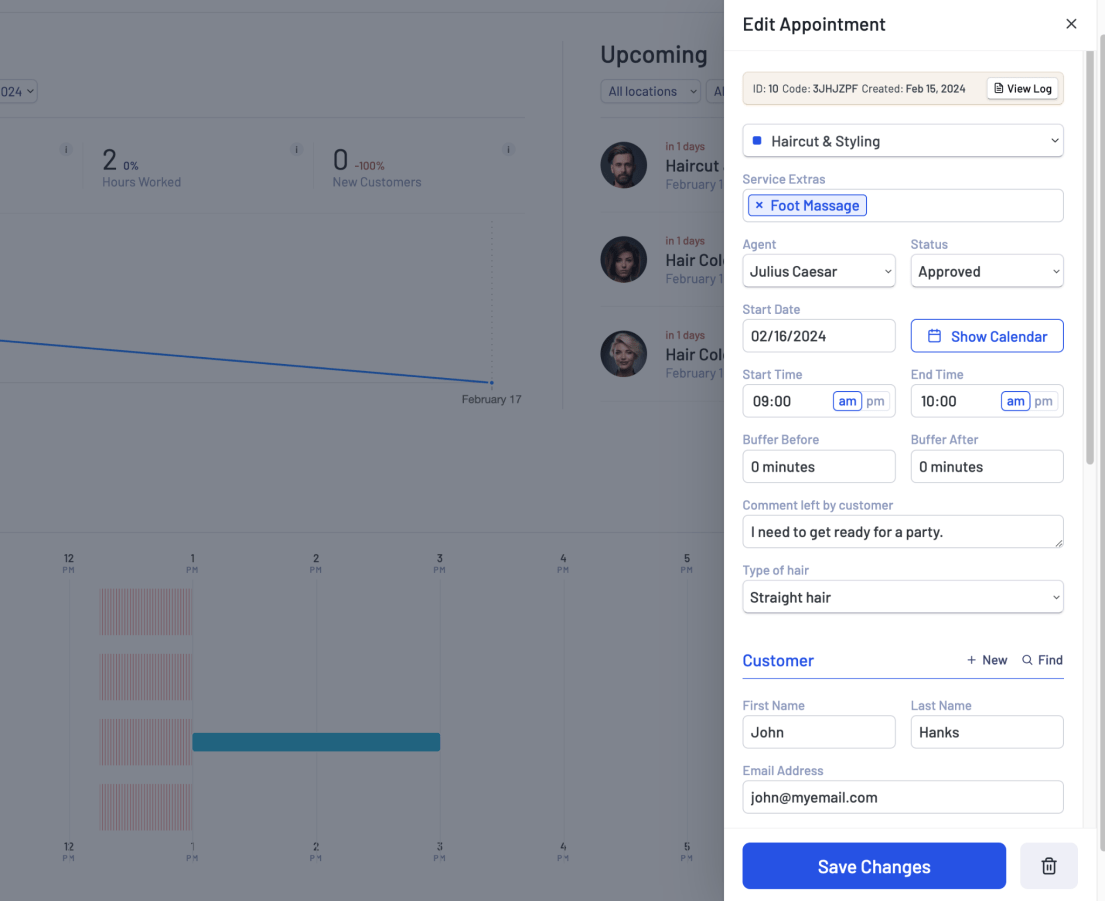
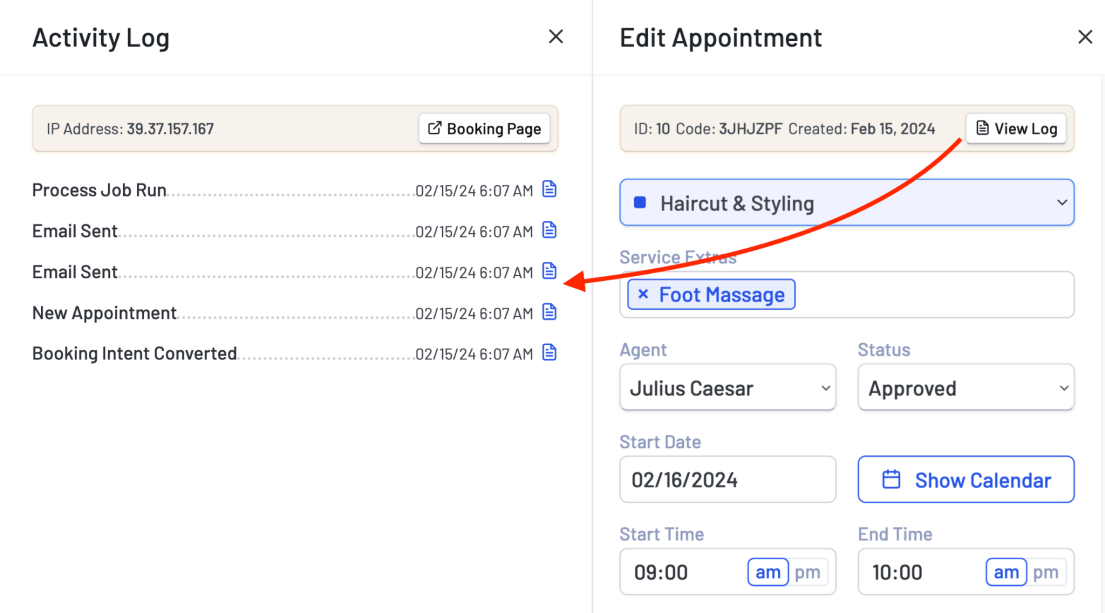
If you want to view the activity log for a particular appointment, click the View Log button to see all related events.
Day Preview
This widget displays daily appointments for all agents. You can refine your search by date, location, or service.
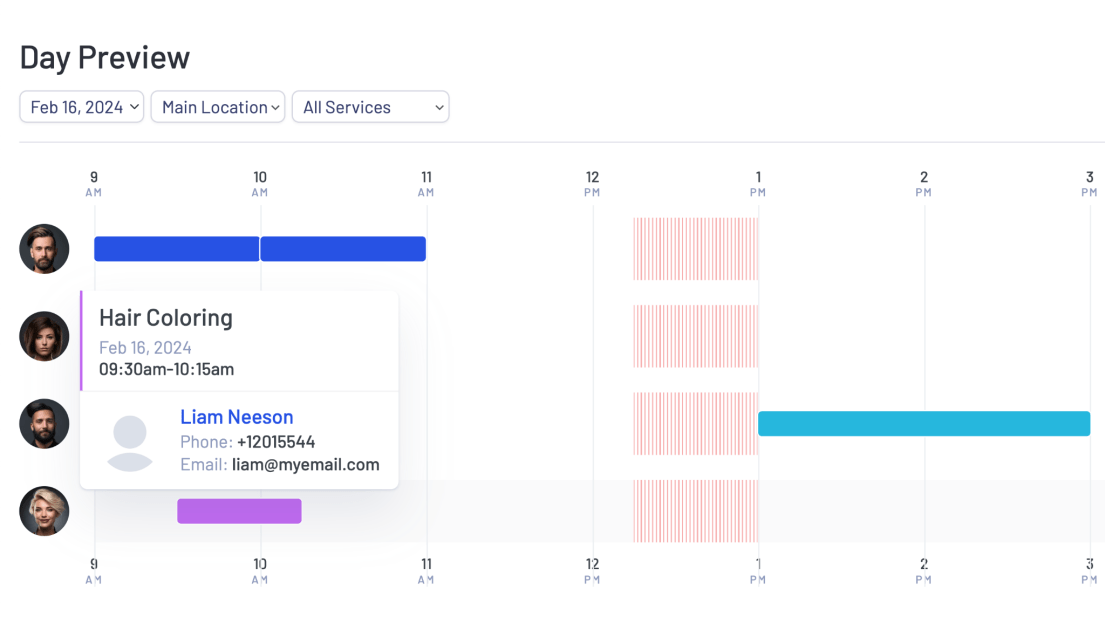
Hovering over a specific appointment slot reveals a tooltip with a summary, and clicking on it provides more details.
Chat Notifications
In the top-right corner, there are several buttons and icons. The first one is for chat notifications.

Whenever a customer sends a message through their dashboard, a notification appears. Each new message increases the count.
Next to chat notifications is the activity log button, which provides information on events triggered by LatePoint.
For instance, when someone books an appointment, LatePoint notifies both the administrator and customer via email. This helps ensure everything is running smoothly.
Similar to other sections, there are filters to refine the information.
The next button displays pending bookings.
And finally, there’s a large button labeled + New Booking that allows you to create a new booking directly from the dashboard.
That’s all you need to know to get started with LatePoint. It’s also enough to start accepting appointments for any business.
There’s a lot more to explore within LatePoint but we’ll leave that to you.
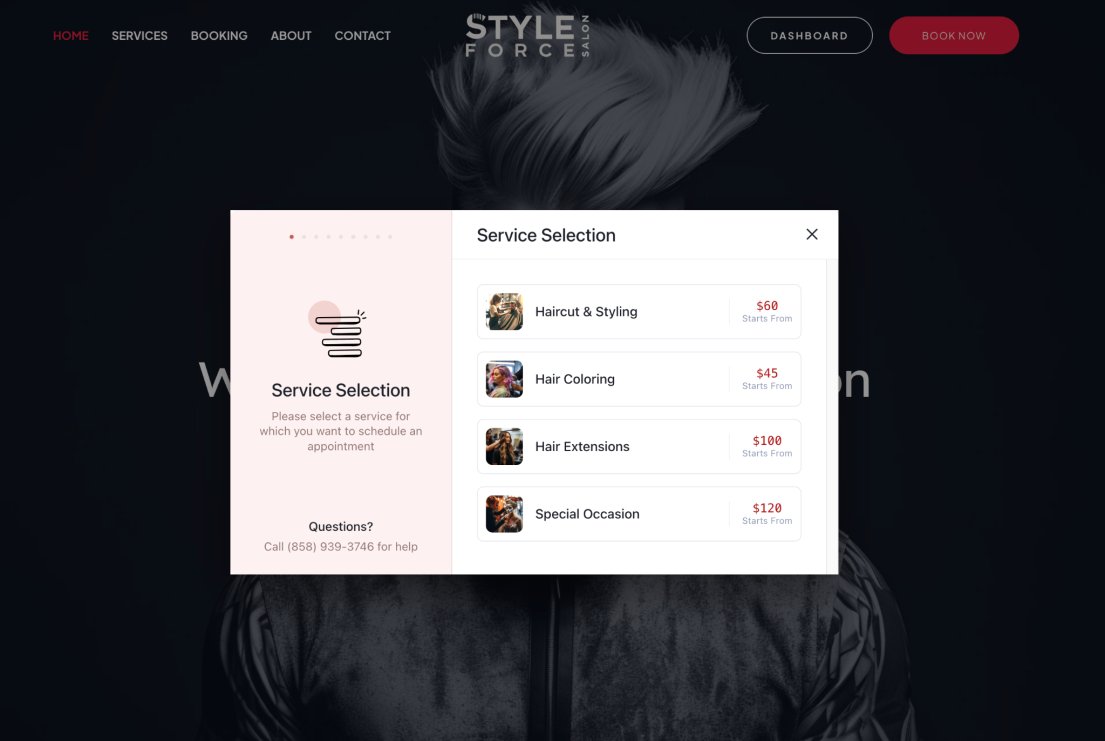
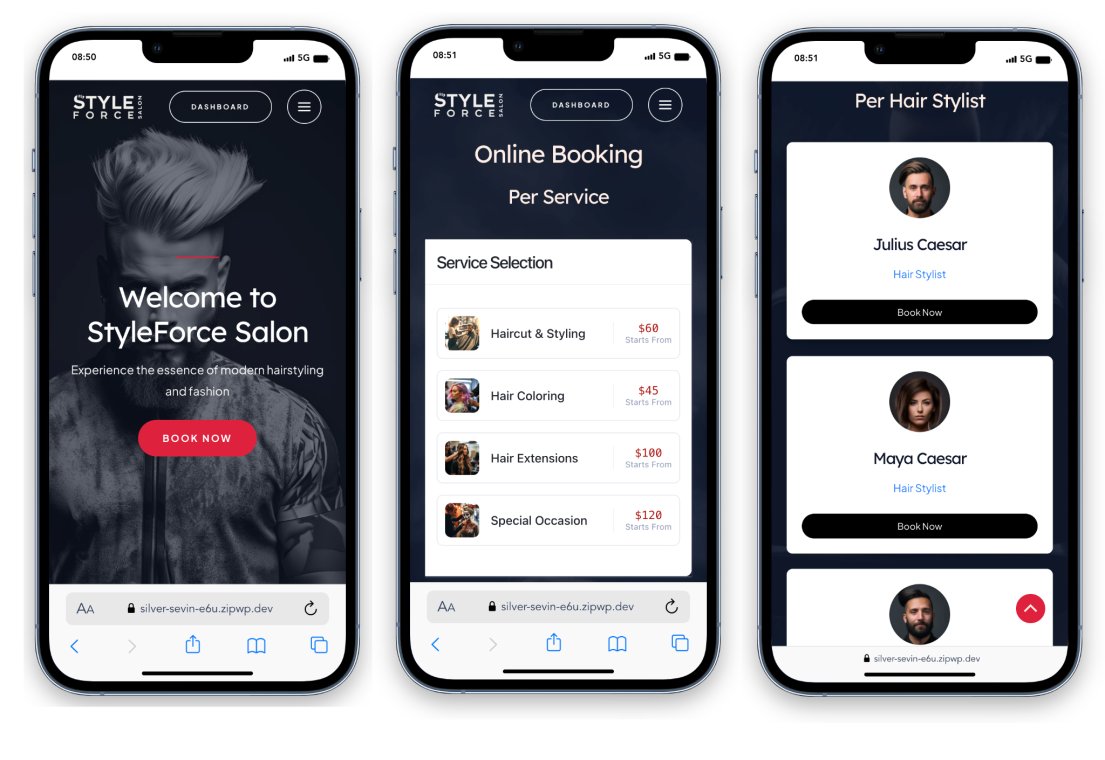
Now that we’ve tweaked our demo booking site and activated some key features, let’s take a look at how its various sections appear.
Home Page

Home page after pressing Book Now button
Home and booking pages on mobile devices
Conclusion
When you create a booking website with WordPress, you have limitless options.
The most critical decision is to choose the right tools for your booking setup.
After all, you want to give your customers one-click access to the booking system, built-in payment, coupons, appointment management, quick notifications, and more.
Above all, the entire process of making a booking website should be a breeze.
This tutorial uses the most reliable tools to do the job in 3 easy steps. The rest is now up to you!
What type of booking website are you planning to build? We’re eager to hear from you in the comments!
Disclosure: This blog may contain affiliate links. If you make a purchase through one of these links, we may receive a small commission. Read disclosure. Rest assured that we only recommend products that we have personally used and believe will add value to our readers. Thanks for your support!
